Configuring cisco asa and pix firewalls part4
•Transferir como DOCX, PDF•
1 gostou•466 visualizações

This document discusses configuring NAT rules on a Cisco ASA or PIX firewall using Firewall Builder. It describes creating a NAT rule to translate the source IP of inside traffic to the outside interface address. It also covers compiling the firewall configuration into device commands, inspecting the output, and using the installer to deploy the configuration to the firewall via SSH.

Recomendados
Mais conteúdo relacionado
Destaque
Destaque (19)
Semelhante a Configuring cisco asa and pix firewalls part4
Semelhante a Configuring cisco asa and pix firewalls part4 (20)
Mais de IT Tech
Mais de IT Tech (20)
Último
Último (20)
Configuring cisco asa and pix firewalls part4
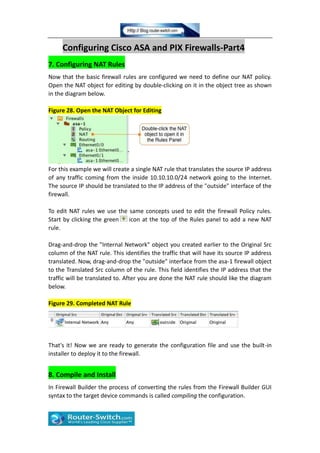
- 1. Configuring Cisco ASA and PIX Firewalls-Part4 7. Configuring NAT Rules Now that the basic firewall rules are configured we need to define our NAT policy. Open the NAT object for editing by double-clicking on it in the object tree as shown in the diagram below. Figure 28. Open the NAT Object for Editing For this example we will create a single NAT rule that translates the source IP address of any traffic coming from the inside 10.10.10.0/24 network going to the Internet. The source IP should be translated to the IP address of the "outside" interface of the firewall. To edit NAT rules we use the same concepts used to edit the firewall Policy rules. Start by clicking the green icon at the top of the Rules panel to add a new NAT rule. Drag-and-drop the "Internal Network" object you created earlier to the Original Src column of the NAT rule. This identifies the traffic that will have its source IP address translated. Now, drag-and-drop the "outside" interface from the asa-1 firewall object to the Translated Src column of the rule. This field identifies the IP address that the traffic will be translated to. After you are done the NAT rule should like the diagram below. Figure 29. Completed NAT Rule That's it! Now we are ready to generate the configuration file and use the built-in installer to deploy it to the firewall. 8. Compile and Install In Firewall Builder the process of converting the rules from the Firewall Builder GUI syntax to the target device commands is called compiling the configuration.
- 2. To compile, click on the Compile icon which looks like a hammer . If you haven’t saved your configuration file yet you will be asked to do so. After you save your file, a wizard will be displayed that lets you select which firewall(s) you want to compile. In this example we are going to compile the firewall called asa-1 configured with the rules above. If there aren’t any errors, you should see some messages scroll by in the main window and a message at the top left stating Success. To view the output of the compile, click on the button that says Inspect Generated Files. This will open the file that contains the commands in Cisco command format. Note that any line that starts with “!” is a comment. Figure 30. Example Compiler Output The output from the compiler is automatically saved in a file in the same directory as the data file that was used to create it. The generated files are named with the firewall name and a .fw extension. In our example the generated configuration file is called asa-1.fw. You can copy and copy and paste the commands from this file to your ASA or PIX firewall or you can use the built-in Firewall Builder installer. Installing Firewall Builder can install the generated configuration file for you using SSH and SCP. To use the installer we need to identify one of the router interfaces as the “Management Interface”. This tells Firewall Builder which IP address to connect to on the router.
- 3. Do this by double-clicking the firewall object to expand it, and then double-clicking on the interface name that you want to assign as the management interface. In this example this is interface Ethernet0/1, the interface connected to the internal network. Figure 31. Setting the Managment Interface Note Any time you change access lists on your router you face the risk of locking yourself out of the device. Please be careful to always inspect your access lists closely and make sure that you will be able to access the ASA / PIX after the access list is installed. To install your access lists on the firewall, click on the install icon . This will bring up a wizard where you will select the firewall to install. Click Next > to install the selected firewall. Figure 32. Setting Compile and Install Actions Firewall Builder will compile your rules, converting them to Cisco access list command line format. After the compile completes successfully click Next>. Enter the firewall's username, password and enable password. Figure 33. Install Dialog
- 4. After the access list configuration is installed you will see a message at the bottom of the main window and the status indicator in the upper left corner of the wizard will indicate if the installation was successful. Figure 34. Successful Install By default Firewall Builder uses SCP to copy the generated config file to the firewall. Once the file is copied to the firewall, Firewall Builder connects to it using SSH. It loads the transferred config file from memory using the "copy" command, merging the Firewall Builder generated command with the current running configuration. Firewall Builder requires SSH version 2 to be enabled on the firewall. More… Cisco Guide: Migration of Cisco PIX 500 Series to Cisco ASA 5500 Series Cisco PIX Firewall Basics