SlideShare uma empresa Scribd logo
1 de 44
Baixar para ler offline
HOW TO CREATE MIND MAP


Creating your first mind map


First step
   1. Go to www.mindomo.com
   2. Click button ‘LOG IN’


                   1

                   2
1. Insert username
   2. Insert password


After clicking launch, you'll be presented with Mindomo's easy to use interface.


Naming topics


   1. To name a topic double click the topic, or start typing on a selected topic. To finish,
       press the ENTER key.
   2. To insert new lines into the topic hold the SHIFT key then press the ENTER key.
Insert topics


   1. Create – use the PLUS button on the Map menu.
   2. More options – use the TOPIC button on the Map menu.
   3. Cut – Use the EDIT menu (EDIT CUT).
                              (EDIT-
   4. Delete – Use the EDIT menu (EDIT – DELETE).


Reposition
Drag-and-drop your topics to reposition them on the screen or move them to other topics.
Now that you've created your first map, learn how to Save and Share your mind map, or
Open one of the many mind maps created by other Mindomo users.


Opening mind maps


Click on "Open" in the File Menu. You will be directed to the Mindomo Map Management
Screen.


Mindomo map management screen
Click on the folder in which you have your mind map and double click on the mind map
name from the list.
   1. Mind Map folders
   2. Mind Map details
   3. Mind Map list


Working with topics


Topic types
There are three topic types: parent (central topic), main, and subtopics


Creating and Deleting topics
1. To create a new topic, use + Button on the Topic Menu.
  2. For more options, use the drop down menu.
  3. For quicker map creation, use the keyboard shortcut ENTER or use drag to insert
     from topics.
  4. To cut or delete topics, use the edit menu


Saving mind maps


  1. Save - In the Application Menu, we have an Autosave function, so you don’t have to
     click Save every time you want to backup your work.
  2. Make a copy - When you want to make a backup of a certain stage of the map, use
     Make a copy from the Application Menu. You will be asked for a name of the map
     and other details. If everything is ok, click Save.
  3. Save local - Save local from the Application Menu will give you the ability to transfer
     your map to your computer in just a few seconds.
Save screen


   1. Fill in the map name
   2. Add a description and specify the target folder


Naming topics


   1. To name a topic, double click on the topic, or start typing in a selected topic. To
      finish, press the ENTER key.
   2. To insert new lines into the topic hold the SHIFT key then press the ENTER key
Moving topics


To move a topic click and drag the topic or topic branch. A preview of the new position is
displayed as you move the topic around. To set the topic to the new position, release the
mouse button.


Sharing mind maps
1. Change the map publishing settings.
  2. Users list that currently are invited and their editing rights.
  3. Enter email address to share and choose editing rights.
  4. Add message to your invitation.
  5. Change the rights of the editors.
  6. Link for editing the map – It will be copied in your clipboard.
  7. Share and save.


Map Publishing


  1. Select the map access.
  2. Direct link to your mind map.
  3. Use direct links for your mind map.
  4. Add or remove map password.
Editors Rights


   1. Editors are allowed to add people and change the permissions.
   2. Only the owner can change the permissions.


Styling mind maps


Click the image above to see a mind map showcasing the formatting and appearance
options in Mindomo. You can change the look and style of your mind maps to help you
organize or even present your data.
Topic Appearance


For Topic Appearance, use the
   1. Topic Menu and also the
   2. Context Menus on topics.
Formatting Topic Text


You can format the topic text by using the Text Menu. Use Bold, Italic and Underline to
beautify your text.
   1.   To choose a font face use Font Family and select the font from the list.
   2.   To choose a font size use Size and select a number.
   3.   To choose a font color use Color.
   4.   To choose alignment use Alignment.
Changing Topic Appearance


  1.   Change the topic shape. Choose from a line, rectangle, rounded rectangle, oval,
       octagon, hexagon or a circle.
  2.   Change the topic background color
  3.   Change the topic line color
  4.   Change the line weight
  5.   Change the line type
Changing Boundaries
1. Select a shape for the boundary
  2. Remove Boundary
  3. Boundary Fill
  4. Boundary Border


Changing Relationship Appearance


  1. Insert - Insert a relationship.
  2. Delete - Select the relationship and delete it.
  3. Color - Choose a color for the selected connection.
  4. Weight - Change the thickness of the connection.
  5. Shape - Choose the shape for your connection.
  6. Pattern - Choose one of the line styles for the connection.
  7. Arrows - Select the direction.
Map styles


   1. Select a map theme - Map themes offer your mind maps a variety of styles with
      different shapes and colors that are applied to your central topic, main topics and
      subtopics, to branches and map background.
   2. Customize your current map theme - Start styling your map by choosing to edit and
      customize the look of the topics, subtopics, boundaries and relationships provided
      within the template. The changes you make can be saved and applied to your
      current map theme.
   3. Customize default theme - Change the appearance of your default theme for your
      new mind maps.
   4. Customize - apply default theme - By choosing to apply the default theme you are
      changing the look of your current map.
   5. Map background - Change the color of your map background.
Navigating in Mindomo
Zoom


  1. Use the 100% button at the bottom right of the screen to select a zoom level, or use
       the "–" and "+" buttons to change the zoom level.
  2. Another way is using the the mouse scroll, so you can adjust.
To use only the keyboard press the plus and minus keys while pressing the CTRL to
zoom in and out.


To pan with the mouse click and drag the mind map canvas.


To use the keyboard, hold down CTRL and press the arrow key for the direction of
your choice.
Left Toolbar
Notes


   1. Choose the font family
   2. Choose the font size
   3. Choose from Bold, Italic, Underline and Strikethrough effect on text
   4. Choose color of the text
   5. Choose the alignment
   6. Remove note


Hyperlink
You have various options to choose from when it comes to hyperlink
•   http:// - Type in a link
•   https:// - Type in a secure link
•   topic – Select a topic to link
•   map – Select a map to link
•   ftp:// - Use a ftp link
•   file/// - Use a document from your own computer
•   mailto: - Insert an email address that you want to link
•   callto: - Insert a phone number that you want to link. You also have the Open link in the
    same browser window.If you have recorded a mistake in the process or you want to
    delete a hyperlink, you can always use Remove.
Attachments


You have 2 options:
   1. Upload from Your computer
   2. Use a file that you already have on Mindomo
Images


   1. Use the Upload button to use images from your computer.
   2. After that you can choose the positioning inside the topic - LEFT, RIGHT, TOP and
       BOTTOM
   3. If you have an image URL, paste the link and click SET. You can use the same menu
       to REMOVE the picture from topic, RESET SIZE or REFRESH the link.
   4. Also, you can use our QUICK SEARCH for images. You can choose from:
     • Mindomo Library - where you can find various images for your maps

     • My Pictures - if you want to insert pictures from your own gallery
     • Google – use the Google Search to insert images
     • Wikipedia – use Wikipedia to insert images
     • Flickr - use Flick to insert images
After you search for the desired image, all you need to do is select it and click on SET.
Icons


You can use Mindomo icons as a visual aid in your map. The Remove button will allow you
to remove all icons from the selected topic.
Video and Audio


This menu will help you embed any kind of video or audio file.
   1. You can upload a file from your computer
   2. Record an audio note with your microphone
   3. First choose what kind of file you desire - video or audio, after that type in your link
       and click set.
   4. Also, you can use our QUICK SEARCH for video and audio. You can choose from:
       • Youtube - search and select files directly from Youtube
       • Video library - if you already have video files uploaded to Mindomo
       • Audio Library – if you already have audio files uploaded to Mindomo
Task Info


When you choose to use TASKS on your map, you have to take these details into
consideration
1. Priority - Choose a level of importance for the task
2. Completion – Choose the percentage of completion of the task
3. Time Span – Select the START and END date
4. Duration – an approximate number of hours, days, weeks or even months
5. Assigned to – Choose from your contacts list, or type in the name of the person
   responsible
6. Auto Calculate – Helps you calculate total time spend from tasks on your map
7. Settings menu – Helps you edit advanced settings on your tasks
8. Clear All – Clears all tasks on the selected topic
Comments


Comments is a feature that helps you and your collaborators discuss on each topic or
subtopic. You can even use Like or Dislike as a feedback mechanism.
Dashboard


   How to create a new map
1. To create a new map select the "New Map" button on the top left corner of your dashboard.


2. A pop-up box will appear where you should type in the title of your new mind map
3. Then click on "New" in order to create a new map.
4. You are ready to start working on your mind map.


   How to upload a document
1. To upload a file to Mindomo, choose the "Upload" button on the left side of your dashboard


2. Select the document you want to upload
How to create a subfolder


1. Select the "Folders" category from the left menu bar of your dashboard.
2. Then from the "+" sign, choose to "Create" a folder from the drop-down menu.


3. Name your subfolder in the pop-up box that appears on your screen.


4. You will be able to visualize the new subfolder you created right below your "Private maps"
How to edit a private map
Simply click on the title of your map which is listed in your dashboard.


How to view "Public Maps"
In order to view maps that are made public, select the "Public Maps" category from the left
menu bar.
How to access "My account"
   1. To access the information from your account, select "More" on the top right corner of
       your dashboard.
   2. Then access "My account" from the drop-down menu.


   Top Toolbar
   Undo and Redo
1. Undo – Go back to reverse the last modification
2. Redo – Go forward to recover the last modification


   Topic menu
   This menu provides you the ability to INSERT Topics change Background Shape and Color
   and also Line Color, Weight and Type.
INSERT
1. Subtopic
2. Floating Topic
3. Parent Topic
4. Topic Below
5. Topic Above


BACKGROUND
6.   Use the background menu to change the color and shape of the background LINE
7.   Use the line menu to change the color, weight and type of the line


Font Menu
This menu helps you format the text used in the mind map. It covers Bold/Italic/Underline,
along with Alignment, Font Family, Size, Color and also Clear Formatting.
1. Bold, Italic, Underline and Strikethrough - Use this to format your text.
2. Alignment - You can choose Left, Center and Right.
3. Font Family - Choose from various fonts.
4. Size - Change the size of your text.
5. Color - Change the color of your text.
6. Clear Formatting - Clear all your previous changes.
Map Themes
Beauty and structure come together in a wide variety of map themes.


1. Map Themes - By selecting any of the 24 predefined mind map themes, you are
   changing the appearance of your current mind map.
2. Customize - Change the appearance of your current map theme and default theme to
   match your taste. Apply the default theme to your current or new maps.
3. Map background – Change the color of your map background.
Layout
Layout will help you choose the best arrangement for your map. This will depend a lot on
the kind of map you want to create.


1. The layout is disabled because of the selected topic
2. The layout that you selected
3. Available layout for the current topic
4. Reset the subtopics positions
Relationship
   This feature will help you create a connection between two topics.


   1. Insert – Insert a relationship.
   2. Delete – Select the relationship and delete it.
   3. Color – Choose a color for the selected connection.
   4. Weight – Change the thickness of the connection.
   5. Shape – Choose the shape for your connection.
   6. Pattern – Choose one of the line styles for the connection.
   7. Arrows – Select the direction.


   Boundary
   Boundary will help you mark and determine the limits of an area on your map.


1. You have 4 styles that you can apply to the boundaries in your map.
2. Remove Boundary – Removes the selected boundary.
3. Fill – Choose the background color of your boundary area.
4. Border – Choose the border line color for the selected boundary.


   Application Menu


   File


   1. New – Create a new mind map
   2. Open - Open a mind map from your account
   3. Recent Maps – A list of previous opened maps
   4. Save (AutoSaved) – Your changes are saved automatically
   5. Make a copy - Create a copy (clone) of your mind map
   6. Save Local – Save the map on your computer
   7. Import from - Import mind maps with the following extensions
          • Mindomo file (.mom)
          • MindManager file (.mmap)
          • Freemind file (.mm)

          • Mindmeister file (.mind)
          • XMind file (.xmind)
          • Bubbl.us file (.xml)

          • Text file (.txt)
          • Opml file (.opml)
8.   Export - Use our export feature to use your mind map in other formats
       • Branch as Map
       • Document
       • PDF

       • MPX – Microsoft Project
       • XLS – Microsoft Excel
       • MMAP – MindManager File

       • MM – Freemind File
       • Opml File

9.   Map Properties - Edit map properties
10. Print - Print your mind map


Edit


     1. Undo - Revert the last change
     2. Redo - Invert the last change
     3. Cut - Cut out the selected text
     4. Copy - Copy selected text
     5. Copy Branch - Copy selected branch
     6. Paste - Paste selected text or branch
     7. Select All - Select the whole map
     8. Select Branch - Select the whole branch
     9. Delete - Delete selected
10. Delete Property - Choose to delete the following properties
  11. Find and Replace - Find keywords that you want to replace with the desired text


View


  1. Drill Down - This feature will help you show only what you need. Hiding any other
       information
  2. Drill Up - Reveals full map
  3. Full Screen - Takes you to full screen mode
  4. Collapse Map - Hides all nodes except Central Topic and Main Topics
  5. Levels - Set the level of nodes that you want to show
  6. Fit Map - Focus on the central topic
Tools


   1. Spelling - Check your spelling
   2. Numbering - This is a feature that will allow you to classify and organize topics
   3. Revision History - A detailed history of actions on your map or a certain topic
   4. Balance Map - Arrange distance and alignment between topics


Context Menu


Mini toolbar
Appears when editing text inside a note
1. F – Font type
  2. 18 - Font size
  3. B – Text formatting
  4. A – Text color


Topic menu


  1. Font type
  2. Font size
  3. Text alignment
  4. Text color
  5. Line format – choose from Straight Line, Arc, Rough, Curve, Elbow, Angle or No Line
  6. Apply Formatting to others
  7. B, I and T - Bold, Italic font and Strikethrough
  8. A - Text color
  9. Topic fill
  10. Topic shape
Mindomo Keyboard Shortcuts
    Most Mindomo functions are available through keyboard shortcuts. Please note that the
    shortcut functionality depends on your Web browser and operating system. The shortcuts
    are also available on Mac OS, but instead of Ctrl key use Cmd.
    For a shortcut to work, a topic must be highlighted with a blue box visible around
    it. To highlight a topic, click with the mouse on the mind map area or on a topic.
    Mouse functions
•   To pan the mind map with the mouse press the left mouse button in the map
    background and drag it
•   To rename a topic with the mouse double-click on the topic text
•   To rehang a topic drag it with the mouse to the new parent topic


•   To zoom a mind map with the mouse use the scroll wheel from your mouse


•   To select multiple topics hold down the Ctrl key and click on the topics you want to
    select


    Shortcuts for creating and deleting topics
•   Inserts a new subtopic of the selected topic
•   Removes the selected topic
•   Inserts a new topic after the selected topic, at the same level
•   Inserts a new topic before the selected topic, at the same level
•   Inserts a new parent topic. The new topic will create a new level
•   Renames the selected topic
•   Starts inserting a relationship
    Shortcuts for working with mind maps


•   Opens a Mindomo map from the server
    Shortcuts for text editing
•   Makes the selected text bold
•   Makes the selected text italic
•   Makes the selected text underlined
•   Increases font size of the selected text
•   Decreases font size of the selected text
    Expanding and collapsing topics


•   Collapses the selected topic (hides all subtopics)
•   Shows the first level of subtopics, and collapse the rest
•   Shows the first three levels of subtopics, and collapse the rest
•   Shows all subtopics
    Navigation
•   Selects the topic before the current topic, at the same level
•   Selects the topic after the current topic, at the same level
•   To the left of the central topic: selects the first subtopic; to the right of the central topic:
    selects the parent topic
•   To the left of the central topic: selects the parent topic; to the right of the central topic:
    selects the first subtopic
    Mind Map Panning


•   Moves the mind map downwards
•   Moves the mind map upwards
•   Moves the mind map to right
•   Moves the map to left
    Mind Map Zooming


•   Zoom in
•   Zoom out

Mais conteúdo relacionado

Destaque

Destaque (6)

Mindomo
MindomoMindomo
Mindomo
 
Presentation slide
Presentation slidePresentation slide
Presentation slide
 
MANUAL MINDOMO
MANUAL MINDOMOMANUAL MINDOMO
MANUAL MINDOMO
 
Tutorial mindomo
Tutorial mindomoTutorial mindomo
Tutorial mindomo
 
¿Que es mindomo?
¿Que es mindomo?¿Que es mindomo?
¿Que es mindomo?
 
Google Docs
Google DocsGoogle Docs
Google Docs
 

Semelhante a Mindomo

Grade 4 computer module 4th quarter even no. pages
Grade 4   computer module 4th quarter even no. pagesGrade 4   computer module 4th quarter even no. pages
Grade 4 computer module 4th quarter even no. pagesAndreacordero30
 
Grade 4 computer module 4th quarter even no. pages
Grade 4   computer module 4th quarter even no. pagesGrade 4   computer module 4th quarter even no. pages
Grade 4 computer module 4th quarter even no. pagesAndreaCordero34
 
TECHNOLOGY LIVLYHO ICT GRADE 9 QUARTER 3
TECHNOLOGY LIVLYHO ICT GRADE 9 QUARTER 3TECHNOLOGY LIVLYHO ICT GRADE 9 QUARTER 3
TECHNOLOGY LIVLYHO ICT GRADE 9 QUARTER 3kennethdecena54
 
Presentation software powerpoint 2013
Presentation software powerpoint 2013Presentation software powerpoint 2013
Presentation software powerpoint 2013imen Tekaya Bouaziz
 
Lesson 9 tac
Lesson 9 tacLesson 9 tac
Lesson 9 tacjovillarr
 
Micro soft word,excel notes
Micro soft word,excel notesMicro soft word,excel notes
Micro soft word,excel notesImran Waris
 
In 2015 E. c Doyogena Higa Model Grade 9th Student 2nd Semester ICT Note.pdf
In 2015 E. c Doyogena Higa Model Grade 9th Student 2nd Semester ICT Note.pdfIn 2015 E. c Doyogena Higa Model Grade 9th Student 2nd Semester ICT Note.pdf
In 2015 E. c Doyogena Higa Model Grade 9th Student 2nd Semester ICT Note.pdfalazargirma2
 
Digital portfolio 2 navigation, html, blog, logo
Digital portfolio 2  navigation, html, blog, logoDigital portfolio 2  navigation, html, blog, logo
Digital portfolio 2 navigation, html, blog, logoSung Woo Yoo
 
Microsoft power point 2010 publish
Microsoft power point 2010 publishMicrosoft power point 2010 publish
Microsoft power point 2010 publishRazif Rahman
 
Presentation application software
Presentation application softwarePresentation application software
Presentation application softwareChristhia Zapatos
 
Ppt exercise
Ppt exercisePpt exercise
Ppt exercisekaz naqvi
 
Microsoft PowerPoint Advance Features
Microsoft PowerPoint Advance FeaturesMicrosoft PowerPoint Advance Features
Microsoft PowerPoint Advance FeaturesAkashMeghwar2
 
Green Hectares Rural Tech Factsheet – Photoshop Elements
Green Hectares Rural Tech Factsheet – Photoshop ElementsGreen Hectares Rural Tech Factsheet – Photoshop Elements
Green Hectares Rural Tech Factsheet – Photoshop ElementsGreen Hectares
 

Semelhante a Mindomo (20)

Grade 4 computer module 4th quarter even no. pages
Grade 4   computer module 4th quarter even no. pagesGrade 4   computer module 4th quarter even no. pages
Grade 4 computer module 4th quarter even no. pages
 
Grade 4 computer module 4th quarter even no. pages
Grade 4   computer module 4th quarter even no. pagesGrade 4   computer module 4th quarter even no. pages
Grade 4 computer module 4th quarter even no. pages
 
TECHNOLOGY LIVLYHO ICT GRADE 9 QUARTER 3
TECHNOLOGY LIVLYHO ICT GRADE 9 QUARTER 3TECHNOLOGY LIVLYHO ICT GRADE 9 QUARTER 3
TECHNOLOGY LIVLYHO ICT GRADE 9 QUARTER 3
 
Presentation software powerpoint 2013
Presentation software powerpoint 2013Presentation software powerpoint 2013
Presentation software powerpoint 2013
 
Lesson 9 tac
Lesson 9 tacLesson 9 tac
Lesson 9 tac
 
Graphic Materials
Graphic MaterialsGraphic Materials
Graphic Materials
 
Micro soft word,excel notes
Micro soft word,excel notesMicro soft word,excel notes
Micro soft word,excel notes
 
In 2015 E. c Doyogena Higa Model Grade 9th Student 2nd Semester ICT Note.pdf
In 2015 E. c Doyogena Higa Model Grade 9th Student 2nd Semester ICT Note.pdfIn 2015 E. c Doyogena Higa Model Grade 9th Student 2nd Semester ICT Note.pdf
In 2015 E. c Doyogena Higa Model Grade 9th Student 2nd Semester ICT Note.pdf
 
Productivity tools
Productivity toolsProductivity tools
Productivity tools
 
GROUP 1.pptx
GROUP 1.pptxGROUP 1.pptx
GROUP 1.pptx
 
Digital portfolio 2 navigation, html, blog, logo
Digital portfolio 2  navigation, html, blog, logoDigital portfolio 2  navigation, html, blog, logo
Digital portfolio 2 navigation, html, blog, logo
 
Microsoft power point 2010 publish
Microsoft power point 2010 publishMicrosoft power point 2010 publish
Microsoft power point 2010 publish
 
Presentation application software
Presentation application softwarePresentation application software
Presentation application software
 
Adobe photoshop
Adobe photoshopAdobe photoshop
Adobe photoshop
 
creating prize
creating prizecreating prize
creating prize
 
Ppt exercise
Ppt exercisePpt exercise
Ppt exercise
 
Microsoft PowerPoint Advance Features
Microsoft PowerPoint Advance FeaturesMicrosoft PowerPoint Advance Features
Microsoft PowerPoint Advance Features
 
Guidelines for using power point
Guidelines for using power pointGuidelines for using power point
Guidelines for using power point
 
Adobe photoshop
Adobe photoshopAdobe photoshop
Adobe photoshop
 
Green Hectares Rural Tech Factsheet – Photoshop Elements
Green Hectares Rural Tech Factsheet – Photoshop ElementsGreen Hectares Rural Tech Factsheet – Photoshop Elements
Green Hectares Rural Tech Factsheet – Photoshop Elements
 

Mais de iezaku

Isu keluarga
Isu keluargaIsu keluarga
Isu keluargaiezaku
 
Presentation slide
Presentation slidePresentation slide
Presentation slideiezaku
 
Infografik slide 1
Infografik slide 1Infografik slide 1
Infografik slide 1iezaku
 
Rph lengkap
Rph lengkapRph lengkap
Rph lengkapiezaku
 
Dtt5212 teknologi dalam pendidikan (powerpoint individu asiah)
Dtt5212 teknologi dalam pendidikan (powerpoint individu asiah)Dtt5212 teknologi dalam pendidikan (powerpoint individu asiah)
Dtt5212 teknologi dalam pendidikan (powerpoint individu asiah)iezaku
 
5 slide
5 slide5 slide
5 slideiezaku
 
Infografik
InfografikInfografik
Infografikiezaku
 
Slide powerpoint (isu keselamatan pelajar)
Slide powerpoint (isu keselamatan pelajar)Slide powerpoint (isu keselamatan pelajar)
Slide powerpoint (isu keselamatan pelajar)iezaku
 
Infografik
InfografikInfografik
Infografikiezaku
 
Dtt5212 tekno (infografik aisah)
Dtt5212 tekno (infografik aisah)Dtt5212 tekno (infografik aisah)
Dtt5212 tekno (infografik aisah)iezaku
 
Guru efektif
Guru efektifGuru efektif
Guru efektifiezaku
 
Proses fotosintesis
Proses fotosintesisProses fotosintesis
Proses fotosintesisiezaku
 
Syarikat borneo utara british (sbub) mengeksploitasi
Syarikat borneo utara british (sbub) mengeksploitasiSyarikat borneo utara british (sbub) mengeksploitasi
Syarikat borneo utara british (sbub) mengeksploitasiiezaku
 
Penulisan ilmiah
Penulisan ilmiahPenulisan ilmiah
Penulisan ilmiahiezaku
 
Assignment 1
Assignment 1Assignment 1
Assignment 1iezaku
 

Mais de iezaku (17)

Isu keluarga
Isu keluargaIsu keluarga
Isu keluarga
 
Presentation slide
Presentation slidePresentation slide
Presentation slide
 
Infografik slide 1
Infografik slide 1Infografik slide 1
Infografik slide 1
 
Emosi
EmosiEmosi
Emosi
 
Emosi
EmosiEmosi
Emosi
 
Rph lengkap
Rph lengkapRph lengkap
Rph lengkap
 
Dtt5212 teknologi dalam pendidikan (powerpoint individu asiah)
Dtt5212 teknologi dalam pendidikan (powerpoint individu asiah)Dtt5212 teknologi dalam pendidikan (powerpoint individu asiah)
Dtt5212 teknologi dalam pendidikan (powerpoint individu asiah)
 
5 slide
5 slide5 slide
5 slide
 
Infografik
InfografikInfografik
Infografik
 
Slide powerpoint (isu keselamatan pelajar)
Slide powerpoint (isu keselamatan pelajar)Slide powerpoint (isu keselamatan pelajar)
Slide powerpoint (isu keselamatan pelajar)
 
Infografik
InfografikInfografik
Infografik
 
Dtt5212 tekno (infografik aisah)
Dtt5212 tekno (infografik aisah)Dtt5212 tekno (infografik aisah)
Dtt5212 tekno (infografik aisah)
 
Guru efektif
Guru efektifGuru efektif
Guru efektif
 
Proses fotosintesis
Proses fotosintesisProses fotosintesis
Proses fotosintesis
 
Syarikat borneo utara british (sbub) mengeksploitasi
Syarikat borneo utara british (sbub) mengeksploitasiSyarikat borneo utara british (sbub) mengeksploitasi
Syarikat borneo utara british (sbub) mengeksploitasi
 
Penulisan ilmiah
Penulisan ilmiahPenulisan ilmiah
Penulisan ilmiah
 
Assignment 1
Assignment 1Assignment 1
Assignment 1
 

Mindomo

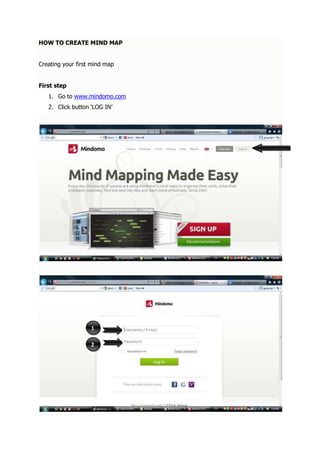
  • 1. HOW TO CREATE MIND MAP Creating your first mind map First step 1. Go to www.mindomo.com 2. Click button ‘LOG IN’ 1 2
  • 2. 1. Insert username 2. Insert password After clicking launch, you'll be presented with Mindomo's easy to use interface. Naming topics 1. To name a topic double click the topic, or start typing on a selected topic. To finish, press the ENTER key. 2. To insert new lines into the topic hold the SHIFT key then press the ENTER key.
  • 3. Insert topics 1. Create – use the PLUS button on the Map menu. 2. More options – use the TOPIC button on the Map menu. 3. Cut – Use the EDIT menu (EDIT CUT). (EDIT- 4. Delete – Use the EDIT menu (EDIT – DELETE). Reposition
  • 4. Drag-and-drop your topics to reposition them on the screen or move them to other topics. Now that you've created your first map, learn how to Save and Share your mind map, or Open one of the many mind maps created by other Mindomo users. Opening mind maps Click on "Open" in the File Menu. You will be directed to the Mindomo Map Management Screen. Mindomo map management screen
  • 5. Click on the folder in which you have your mind map and double click on the mind map name from the list. 1. Mind Map folders 2. Mind Map details 3. Mind Map list Working with topics Topic types There are three topic types: parent (central topic), main, and subtopics Creating and Deleting topics
  • 6. 1. To create a new topic, use + Button on the Topic Menu. 2. For more options, use the drop down menu. 3. For quicker map creation, use the keyboard shortcut ENTER or use drag to insert from topics. 4. To cut or delete topics, use the edit menu Saving mind maps 1. Save - In the Application Menu, we have an Autosave function, so you don’t have to click Save every time you want to backup your work. 2. Make a copy - When you want to make a backup of a certain stage of the map, use Make a copy from the Application Menu. You will be asked for a name of the map and other details. If everything is ok, click Save. 3. Save local - Save local from the Application Menu will give you the ability to transfer your map to your computer in just a few seconds.
  • 7. Save screen 1. Fill in the map name 2. Add a description and specify the target folder Naming topics 1. To name a topic, double click on the topic, or start typing in a selected topic. To finish, press the ENTER key. 2. To insert new lines into the topic hold the SHIFT key then press the ENTER key
  • 8. Moving topics To move a topic click and drag the topic or topic branch. A preview of the new position is displayed as you move the topic around. To set the topic to the new position, release the mouse button. Sharing mind maps
  • 9. 1. Change the map publishing settings. 2. Users list that currently are invited and their editing rights. 3. Enter email address to share and choose editing rights. 4. Add message to your invitation. 5. Change the rights of the editors. 6. Link for editing the map – It will be copied in your clipboard. 7. Share and save. Map Publishing 1. Select the map access. 2. Direct link to your mind map. 3. Use direct links for your mind map. 4. Add or remove map password.
  • 10. Editors Rights 1. Editors are allowed to add people and change the permissions. 2. Only the owner can change the permissions. Styling mind maps Click the image above to see a mind map showcasing the formatting and appearance options in Mindomo. You can change the look and style of your mind maps to help you organize or even present your data.
  • 11. Topic Appearance For Topic Appearance, use the 1. Topic Menu and also the 2. Context Menus on topics.
  • 12. Formatting Topic Text You can format the topic text by using the Text Menu. Use Bold, Italic and Underline to beautify your text. 1. To choose a font face use Font Family and select the font from the list. 2. To choose a font size use Size and select a number. 3. To choose a font color use Color. 4. To choose alignment use Alignment.
  • 13. Changing Topic Appearance 1. Change the topic shape. Choose from a line, rectangle, rounded rectangle, oval, octagon, hexagon or a circle. 2. Change the topic background color 3. Change the topic line color 4. Change the line weight 5. Change the line type Changing Boundaries
  • 14. 1. Select a shape for the boundary 2. Remove Boundary 3. Boundary Fill 4. Boundary Border Changing Relationship Appearance 1. Insert - Insert a relationship. 2. Delete - Select the relationship and delete it. 3. Color - Choose a color for the selected connection. 4. Weight - Change the thickness of the connection. 5. Shape - Choose the shape for your connection. 6. Pattern - Choose one of the line styles for the connection. 7. Arrows - Select the direction.
  • 15. Map styles 1. Select a map theme - Map themes offer your mind maps a variety of styles with different shapes and colors that are applied to your central topic, main topics and subtopics, to branches and map background. 2. Customize your current map theme - Start styling your map by choosing to edit and customize the look of the topics, subtopics, boundaries and relationships provided within the template. The changes you make can be saved and applied to your current map theme. 3. Customize default theme - Change the appearance of your default theme for your new mind maps. 4. Customize - apply default theme - By choosing to apply the default theme you are changing the look of your current map. 5. Map background - Change the color of your map background.
  • 16. Navigating in Mindomo Zoom 1. Use the 100% button at the bottom right of the screen to select a zoom level, or use the "–" and "+" buttons to change the zoom level. 2. Another way is using the the mouse scroll, so you can adjust.
  • 17. To use only the keyboard press the plus and minus keys while pressing the CTRL to zoom in and out. To pan with the mouse click and drag the mind map canvas. To use the keyboard, hold down CTRL and press the arrow key for the direction of your choice.
  • 18. Left Toolbar Notes 1. Choose the font family 2. Choose the font size 3. Choose from Bold, Italic, Underline and Strikethrough effect on text 4. Choose color of the text 5. Choose the alignment 6. Remove note Hyperlink
  • 19. You have various options to choose from when it comes to hyperlink • http:// - Type in a link • https:// - Type in a secure link • topic – Select a topic to link • map – Select a map to link • ftp:// - Use a ftp link • file/// - Use a document from your own computer • mailto: - Insert an email address that you want to link • callto: - Insert a phone number that you want to link. You also have the Open link in the same browser window.If you have recorded a mistake in the process or you want to delete a hyperlink, you can always use Remove.
  • 20. Attachments You have 2 options: 1. Upload from Your computer 2. Use a file that you already have on Mindomo
  • 21. Images 1. Use the Upload button to use images from your computer. 2. After that you can choose the positioning inside the topic - LEFT, RIGHT, TOP and BOTTOM 3. If you have an image URL, paste the link and click SET. You can use the same menu to REMOVE the picture from topic, RESET SIZE or REFRESH the link. 4. Also, you can use our QUICK SEARCH for images. You can choose from: • Mindomo Library - where you can find various images for your maps • My Pictures - if you want to insert pictures from your own gallery • Google – use the Google Search to insert images • Wikipedia – use Wikipedia to insert images • Flickr - use Flick to insert images After you search for the desired image, all you need to do is select it and click on SET.
  • 22. Icons You can use Mindomo icons as a visual aid in your map. The Remove button will allow you to remove all icons from the selected topic.
  • 23. Video and Audio This menu will help you embed any kind of video or audio file. 1. You can upload a file from your computer 2. Record an audio note with your microphone 3. First choose what kind of file you desire - video or audio, after that type in your link and click set. 4. Also, you can use our QUICK SEARCH for video and audio. You can choose from: • Youtube - search and select files directly from Youtube • Video library - if you already have video files uploaded to Mindomo • Audio Library – if you already have audio files uploaded to Mindomo
  • 24. Task Info When you choose to use TASKS on your map, you have to take these details into consideration 1. Priority - Choose a level of importance for the task 2. Completion – Choose the percentage of completion of the task 3. Time Span – Select the START and END date 4. Duration – an approximate number of hours, days, weeks or even months 5. Assigned to – Choose from your contacts list, or type in the name of the person responsible 6. Auto Calculate – Helps you calculate total time spend from tasks on your map 7. Settings menu – Helps you edit advanced settings on your tasks 8. Clear All – Clears all tasks on the selected topic
  • 25. Comments Comments is a feature that helps you and your collaborators discuss on each topic or subtopic. You can even use Like or Dislike as a feedback mechanism.
  • 26. Dashboard How to create a new map 1. To create a new map select the "New Map" button on the top left corner of your dashboard. 2. A pop-up box will appear where you should type in the title of your new mind map 3. Then click on "New" in order to create a new map.
  • 27. 4. You are ready to start working on your mind map. How to upload a document 1. To upload a file to Mindomo, choose the "Upload" button on the left side of your dashboard 2. Select the document you want to upload
  • 28. How to create a subfolder 1. Select the "Folders" category from the left menu bar of your dashboard. 2. Then from the "+" sign, choose to "Create" a folder from the drop-down menu. 3. Name your subfolder in the pop-up box that appears on your screen. 4. You will be able to visualize the new subfolder you created right below your "Private maps"
  • 29. How to edit a private map Simply click on the title of your map which is listed in your dashboard. How to view "Public Maps" In order to view maps that are made public, select the "Public Maps" category from the left menu bar.
  • 30. How to access "My account" 1. To access the information from your account, select "More" on the top right corner of your dashboard. 2. Then access "My account" from the drop-down menu. Top Toolbar Undo and Redo 1. Undo – Go back to reverse the last modification 2. Redo – Go forward to recover the last modification Topic menu This menu provides you the ability to INSERT Topics change Background Shape and Color and also Line Color, Weight and Type.
  • 31. INSERT 1. Subtopic 2. Floating Topic 3. Parent Topic 4. Topic Below 5. Topic Above BACKGROUND 6. Use the background menu to change the color and shape of the background LINE 7. Use the line menu to change the color, weight and type of the line Font Menu This menu helps you format the text used in the mind map. It covers Bold/Italic/Underline, along with Alignment, Font Family, Size, Color and also Clear Formatting.
  • 32. 1. Bold, Italic, Underline and Strikethrough - Use this to format your text. 2. Alignment - You can choose Left, Center and Right. 3. Font Family - Choose from various fonts. 4. Size - Change the size of your text. 5. Color - Change the color of your text. 6. Clear Formatting - Clear all your previous changes.
  • 33. Map Themes Beauty and structure come together in a wide variety of map themes. 1. Map Themes - By selecting any of the 24 predefined mind map themes, you are changing the appearance of your current mind map. 2. Customize - Change the appearance of your current map theme and default theme to match your taste. Apply the default theme to your current or new maps. 3. Map background – Change the color of your map background.
  • 34. Layout Layout will help you choose the best arrangement for your map. This will depend a lot on the kind of map you want to create. 1. The layout is disabled because of the selected topic 2. The layout that you selected 3. Available layout for the current topic 4. Reset the subtopics positions
  • 35. Relationship This feature will help you create a connection between two topics. 1. Insert – Insert a relationship. 2. Delete – Select the relationship and delete it. 3. Color – Choose a color for the selected connection. 4. Weight – Change the thickness of the connection. 5. Shape – Choose the shape for your connection. 6. Pattern – Choose one of the line styles for the connection. 7. Arrows – Select the direction. Boundary Boundary will help you mark and determine the limits of an area on your map. 1. You have 4 styles that you can apply to the boundaries in your map. 2. Remove Boundary – Removes the selected boundary.
  • 36. 3. Fill – Choose the background color of your boundary area. 4. Border – Choose the border line color for the selected boundary. Application Menu File 1. New – Create a new mind map 2. Open - Open a mind map from your account 3. Recent Maps – A list of previous opened maps 4. Save (AutoSaved) – Your changes are saved automatically 5. Make a copy - Create a copy (clone) of your mind map 6. Save Local – Save the map on your computer 7. Import from - Import mind maps with the following extensions • Mindomo file (.mom) • MindManager file (.mmap) • Freemind file (.mm) • Mindmeister file (.mind) • XMind file (.xmind) • Bubbl.us file (.xml) • Text file (.txt) • Opml file (.opml)
  • 37. 8. Export - Use our export feature to use your mind map in other formats • Branch as Map • Document • PDF • MPX – Microsoft Project • XLS – Microsoft Excel • MMAP – MindManager File • MM – Freemind File • Opml File 9. Map Properties - Edit map properties 10. Print - Print your mind map Edit 1. Undo - Revert the last change 2. Redo - Invert the last change 3. Cut - Cut out the selected text 4. Copy - Copy selected text 5. Copy Branch - Copy selected branch 6. Paste - Paste selected text or branch 7. Select All - Select the whole map 8. Select Branch - Select the whole branch 9. Delete - Delete selected
  • 38. 10. Delete Property - Choose to delete the following properties 11. Find and Replace - Find keywords that you want to replace with the desired text View 1. Drill Down - This feature will help you show only what you need. Hiding any other information 2. Drill Up - Reveals full map 3. Full Screen - Takes you to full screen mode 4. Collapse Map - Hides all nodes except Central Topic and Main Topics 5. Levels - Set the level of nodes that you want to show 6. Fit Map - Focus on the central topic
  • 39. Tools 1. Spelling - Check your spelling 2. Numbering - This is a feature that will allow you to classify and organize topics 3. Revision History - A detailed history of actions on your map or a certain topic 4. Balance Map - Arrange distance and alignment between topics Context Menu Mini toolbar Appears when editing text inside a note
  • 40. 1. F – Font type 2. 18 - Font size 3. B – Text formatting 4. A – Text color Topic menu 1. Font type 2. Font size 3. Text alignment 4. Text color 5. Line format – choose from Straight Line, Arc, Rough, Curve, Elbow, Angle or No Line 6. Apply Formatting to others 7. B, I and T - Bold, Italic font and Strikethrough 8. A - Text color 9. Topic fill 10. Topic shape
  • 41. Mindomo Keyboard Shortcuts Most Mindomo functions are available through keyboard shortcuts. Please note that the shortcut functionality depends on your Web browser and operating system. The shortcuts are also available on Mac OS, but instead of Ctrl key use Cmd. For a shortcut to work, a topic must be highlighted with a blue box visible around it. To highlight a topic, click with the mouse on the mind map area or on a topic. Mouse functions • To pan the mind map with the mouse press the left mouse button in the map background and drag it • To rename a topic with the mouse double-click on the topic text • To rehang a topic drag it with the mouse to the new parent topic • To zoom a mind map with the mouse use the scroll wheel from your mouse • To select multiple topics hold down the Ctrl key and click on the topics you want to select Shortcuts for creating and deleting topics
  • 42. Inserts a new subtopic of the selected topic • Removes the selected topic • Inserts a new topic after the selected topic, at the same level • Inserts a new topic before the selected topic, at the same level • Inserts a new parent topic. The new topic will create a new level • Renames the selected topic • Starts inserting a relationship Shortcuts for working with mind maps • Opens a Mindomo map from the server Shortcuts for text editing
  • 43. Makes the selected text bold • Makes the selected text italic • Makes the selected text underlined • Increases font size of the selected text • Decreases font size of the selected text Expanding and collapsing topics • Collapses the selected topic (hides all subtopics) • Shows the first level of subtopics, and collapse the rest • Shows the first level of subtopics, and collapse the rest • Shows the first three levels of subtopics, and collapse the rest • Shows all subtopics Navigation
  • 44. Selects the topic before the current topic, at the same level • Selects the topic after the current topic, at the same level • To the left of the central topic: selects the first subtopic; to the right of the central topic: selects the parent topic • To the left of the central topic: selects the parent topic; to the right of the central topic: selects the first subtopic Mind Map Panning • Moves the mind map downwards • Moves the mind map upwards • Moves the mind map to right • Moves the map to left Mind Map Zooming • Zoom in • Zoom out