SlideShare uma empresa Scribd logo
1 de 4
Baixar para ler offline
EE 281                                                                                     October 17, 2001
Embedded Systems Design Laboratory                                                              Handout #7
                                      HD44780 LCD Starter Guide

1. Introduction
   Advances in the features, miniaturization, and cost of LCD (Liquid Crystal Display) controller chips
have made LCDs usable not only in commercial products but also in hobbyist projects. By themselves,
Liquid Crystal Displays can be difficult to drive because they require multiplexing, AC drive waveforms,
and special voltages. LCD modules make this driving simpler by attaching hardware to the raw glass
LCD to assist in some or all of these rudimentary driving tasks.
    LCD modules can be split into two groups: those that have built-in controller and driver chips, and
those that have only driver chips. LCD displays that do not have controllers are typically used with
powerful hardware, such as a laptop computer, where a video controller is available to generate the
complex drive signals necessary to run the display. Most color and large (greater than 320x240)
monochrome displays are of this type.
   The category of display modules that have built-in controllers can be split again into character LCD
modules and graphic LCD modules. Character modules can display only text and perhaps some special
symbols, while graphic modules can display lines, circles, squares, and patterns in addition to text. Some
examples of graphic LCD controller chips are the Toshiba T6963, Seiko-Epson SED1330, and Hitachi
HD61202. Here, we will be primarily concerned with character LCD modules that have the Hitachi
HD44780 controller built-in.
    Nearly every pixel-based alphanumeric LCD module made today uses the Hitachi HD44780 LCD
controller chip, or a derivative such as the Seiko-Epson SED1278. This apparent standardization in
character LCDs has become extremely beneficial to design engineers and hobbyists. Dozens of
manufacturers produce literally hundreds of models of LCD modules using this controller chip. The
smallest of these displays is only one line of 8 characters; the largest is four lines of 40 characters each.
Other common sizes are 16x1, 20x1, 20x2, 20x4, 40x1, and 40x2 (characters x lines).
     Fortunately, all HD44780-based displays (of any size) use the same standard 14-wire interface.
Therefore, code and hardware made for one size/type display can be painlessly adapted to work for any
HD44780 compatible. Information about these displays can be easily obtained on the web by including
“HD44780” in your search keywords. Because of their widespread use, these displays can be purchased
surplus with typical prices of $3 for small displays to $20 for large ones.
2. Interfacing your LCD module
      The microcontroller/microprocessor interface to HD44780 LCD modules (hereafter generically
referred to as character LCD modules) is almost always 14 pins. Table 1 shows the basic pinout. You
may find that some displays have additional pins for backlighting or other purposes, but the first 14 pins
still serve as the interface.
    The first three pins provide power to the LCD module. Pin 1 is GND and should be grounded to the
power supply. Pin 2 is VCC and should be connected to +5V power. Pin 3 is the LCD Display Bias. By
adjusting the voltage or duty cycle of pin 3, the contrast of the display can be adjusted. Most character
LCDs can achieve good display contrast with a voltage between 5V and 0V on pin 3. Note that greater
contrast comes with lower voltage and you should never apply a VLCD higher than VCC. Some displays
which are specially made to work over a large temperature range may require a negative voltage to
achieve readable contrast.
Table 1: Character LCD Pinout

                                 Pin#   Name                                              In/Out/Pwr

                                 1      GND      Ground                                   Power

                                 2      VCC      LCD Controller Power (+3 to +5V)         Power

                                 3      VLCD     LCD Display Bias (+5 to -5V *see text)   Analog

                                 4      RS       Register Select: H: Data L: Command      Input

                                 5      R/W      H: Read L: Write                         Input

                                 6      E        Enable (Data strobe, active high)        Input

                                 7      DB0      Data LSB                                 I/O

                                 8      DB1      Data                                     I/O

                                 9      DB2      Data                                     I/O

                                 10     DB3      Data                                     I/O

                                 11     DB4      Data                                     I/O

                                 12     DB5      Data                                     I/O

                                 13     DB6      Data                                     I/O

                                 14     DB7      Data MSB                                 I/O

                                 15     A        LED Backlight Anode (optional)           Power

                                 16     K        LED Backlight Cathode (optional)         Power

    Pins 4,5, and 6 are the control lines for the LCD. These lines indicate what kind of transaction you
are proposing to do over the data lines DB0-7. The state of RS indicates whether you wish to transfer
commands or display data. The R/W line indicates whether you intend to read or write. Finally, the E
line tells the display when you are actually ready to perform the transaction. The control lines RS, R/W,
and E, along with the data lines DB0-7 are standard digital logic inputs or outputs. Remember than when
performing reads you must set the port connected to DB0-7 to be input.
3. Accessing your LCD module
    Character LCD modules are accessed through only two “registers”, the Command Register, and the
Data Register. When you perform a read or write with RS low, you are accessing the Command Register
and giving the module instructions. When you read or write with RS high, you are accessing the Data
Register and reading or writing characters/data from or to the display. Table 2 contains pseudo-code
examples of reads and writes to the two registers. The pseudo-code can be implemented on any
microcontroller and assumes that DBPORT is the port to which DB0-7 are connected. Since some
microcontrollers are very fast, delays may be required between the steps described in the pseudo-code.
See the concise datasheet on the course web page for more information.
Table 2: LCD access pseudo-code

   Reading from a register                             Writing to a register

       1.   set RS line high or low to designate the       1.   set RS line high or low to designate the
            register you wish to access                         register you wish to access
       2.   set R/W line high to indicate a read           2.   set R/W line low to indicate a write

       3.   set DBPORT to input                            3.   set DBPORT to output

       4.   set E line high to begin read cycle            4.   write data to DBPORT

       5.   pause to allow LCD to fetch the data           5.   set E line high to begin write cycle

       6.   read data from DBPORT                          6.   pause to allow LCD to accept the data

       7.   set E line low to finish read cycle            7.   set E line low to finish write cycle


4. Initiatizing and programming your LCD
     Character LCDs must be initialized after power-on and before writing data to the display. The
initialization must consist of at least a Function Set command, preferably followed by an Entry Mode
Set, Display Control, and a Clear Display. Issuing each of these commands after the Function Set
ensures that you know the state of your display. Instructions on how to issue and use these commands
can be found by looking at the concise datasheet, or at the HD44780 controller datasheet for more
information. Below is an example initialization sequence and “hello world” program assuming you’ve
programmed the C functions LcdCommandWrite(unsigned char command) to write commands
to the LCD, and LcdDataWrite(unsigned char data) to write data to the LCD:

// initiatize lcd
LcdCommandWrite(0x38);             //   function set:
                                   //     8-bit interface, 2 display lines, 5x7 font
LcdCommandWrite(0x06);             //   entry mode set:
                                   //     increment automatically, no display shift
LcdCommandWrite(0x0E);             //   display control:
                                   //     turn display on, cursor on, no blinking
LcdCommandWrite(0x01);             //   clear display, set cursor position to zero

// write “hello world” to the display
LcdDataWrite(“H”);
LcdDataWrite(“e”);
LcdDataWrite(“l”);
LcdDataWrite(“l”);
LcdDataWrite(“o”);
LcdDataWrite(“ ”);
LcdDataWrite(“W”);
LcdDataWrite(“o”);
LcdDataWrite(“r”);
LcdDataWrite(“l”);
LcdDataWrite(“d”);


5. LCD references on Web sites:
   http://www.doc.ic.ac.uk/~ih/doc/lcd/
   http://home.iae.nl/users/pouweha/lcd/lcd.shtml
6. LCD Character Map

Mais conteúdo relacionado

Mais procurados

Conexion cables
Conexion cablesConexion cables
Conexion cables1 2d
 
Microprocessor based system design
Microprocessor based system designMicroprocessor based system design
Microprocessor based system designTHANDAIAH PRABU
 
Datavideo SE-3000
Datavideo SE-3000Datavideo SE-3000
Datavideo SE-3000AV ProfShop
 
Nexys4ddr rm FPGA board Datasheet
Nexys4ddr rm  FPGA board DatasheetNexys4ddr rm  FPGA board Datasheet
Nexys4ddr rm FPGA board DatasheetOmkar Rane
 
Catálogo DDC con bus de datos y software para aeronáutica
Catálogo DDC con bus de datos y software para aeronáuticaCatálogo DDC con bus de datos y software para aeronáutica
Catálogo DDC con bus de datos y software para aeronáuticaMarketing Donalba
 
Bus de datos y Software de DDC
Bus de datos y Software de DDCBus de datos y Software de DDC
Bus de datos y Software de DDCMarketing Donalba
 
Design and Development of Artix-7 FPGAbased Educational Board
Design and Development of Artix-7 FPGAbased Educational BoardDesign and Development of Artix-7 FPGAbased Educational Board
Design and Development of Artix-7 FPGAbased Educational BoardIJERA Editor
 
Lmb162 abc manual-rev0.2
Lmb162 abc manual-rev0.2Lmb162 abc manual-rev0.2
Lmb162 abc manual-rev0.2aibad ahmed
 
Mg90 h102 ethernet master
Mg90 h102 ethernet masterMg90 h102 ethernet master
Mg90 h102 ethernet masterconfidencial
 
Microprocessor Instructions
Microprocessor InstructionsMicroprocessor Instructions
Microprocessor InstructionsChinmoy Ghorai
 

Mais procurados (20)

Conexion cables
Conexion cablesConexion cables
Conexion cables
 
Alp lcd
Alp lcdAlp lcd
Alp lcd
 
Pin out lpc2129
Pin out lpc2129Pin out lpc2129
Pin out lpc2129
 
Microprocessor based system design
Microprocessor based system designMicroprocessor based system design
Microprocessor based system design
 
Datavideo SE-3000
Datavideo SE-3000Datavideo SE-3000
Datavideo SE-3000
 
8051 io interface
8051 io interface8051 io interface
8051 io interface
 
Nexys4ddr rm FPGA board Datasheet
Nexys4ddr rm  FPGA board DatasheetNexys4ddr rm  FPGA board Datasheet
Nexys4ddr rm FPGA board Datasheet
 
576664
576664576664
576664
 
Catálogo DDC con bus de datos y software para aeronáutica
Catálogo DDC con bus de datos y software para aeronáuticaCatálogo DDC con bus de datos y software para aeronáutica
Catálogo DDC con bus de datos y software para aeronáutica
 
Bus de datos y Software de DDC
Bus de datos y Software de DDCBus de datos y Software de DDC
Bus de datos y Software de DDC
 
Xctu
XctuXctu
Xctu
 
Vga Pinout
Vga PinoutVga Pinout
Vga Pinout
 
Design and Development of Artix-7 FPGAbased Educational Board
Design and Development of Artix-7 FPGAbased Educational BoardDesign and Development of Artix-7 FPGAbased Educational Board
Design and Development of Artix-7 FPGAbased Educational Board
 
Lmb162 abc manual-rev0.2
Lmb162 abc manual-rev0.2Lmb162 abc manual-rev0.2
Lmb162 abc manual-rev0.2
 
Mg90 h102 ethernet master
Mg90 h102 ethernet masterMg90 h102 ethernet master
Mg90 h102 ethernet master
 
Folheto BCL 21 e 22
Folheto BCL 21 e 22Folheto BCL 21 e 22
Folheto BCL 21 e 22
 
74hc373 data sheet
74hc373 data sheet74hc373 data sheet
74hc373 data sheet
 
At24 c512b
At24 c512bAt24 c512b
At24 c512b
 
Microprocessor Instructions
Microprocessor InstructionsMicroprocessor Instructions
Microprocessor Instructions
 
8051 microcontroller
8051 microcontroller8051 microcontroller
8051 microcontroller
 

Semelhante a Lcd tutorial

Lcd interface with atmega32 avr best.ppt
Lcd interface with atmega32 avr best.pptLcd interface with atmega32 avr best.ppt
Lcd interface with atmega32 avr best.pptSoumyaGupta836456
 
MODULO TS-12864A-2
MODULO TS-12864A-2MODULO TS-12864A-2
MODULO TS-12864A-2ESPOL
 
Moving message display
Moving message displayMoving message display
Moving message displayviraj1989
 
Liquid crystal display
Liquid crystal displayLiquid crystal display
Liquid crystal displayVraj Patel
 
Micro Controller 8051 of Speedo Meter using KEIL Code
Micro Controller 8051 of Speedo Meter using KEIL CodeMicro Controller 8051 of Speedo Meter using KEIL Code
Micro Controller 8051 of Speedo Meter using KEIL CodeSunil Kumar R
 
Electronic code lock device
Electronic code lock deviceElectronic code lock device
Electronic code lock deviceAmitoj Kaur
 
Basics of peripheral devices and Working
Basics of peripheral devices and WorkingBasics of peripheral devices and Working
Basics of peripheral devices and WorkingDr.YNM
 
Calculator design with lcd using fpga
Calculator design with lcd using fpgaCalculator design with lcd using fpga
Calculator design with lcd using fpgaHossam Hassan
 

Semelhante a Lcd tutorial (20)

Lcd & keypad
Lcd & keypadLcd & keypad
Lcd & keypad
 
Lcd interface with atmega32 avr best.ppt
Lcd interface with atmega32 avr best.pptLcd interface with atmega32 avr best.ppt
Lcd interface with atmega32 avr best.ppt
 
MODULO TS-12864A-2
MODULO TS-12864A-2MODULO TS-12864A-2
MODULO TS-12864A-2
 
LCD Interacing with 8051
LCD Interacing with 8051LCD Interacing with 8051
LCD Interacing with 8051
 
Lcd interfacing
Lcd interfacingLcd interfacing
Lcd interfacing
 
Moving message display
Moving message displayMoving message display
Moving message display
 
131080111003 mci
131080111003 mci131080111003 mci
131080111003 mci
 
Liquid crystal display
Liquid crystal displayLiquid crystal display
Liquid crystal display
 
LCD WITH 8051.docx
LCD WITH 8051.docxLCD WITH 8051.docx
LCD WITH 8051.docx
 
LCD_Example.pptx
LCD_Example.pptxLCD_Example.pptx
LCD_Example.pptx
 
Micro Controller 8051 of Speedo Meter using KEIL Code
Micro Controller 8051 of Speedo Meter using KEIL CodeMicro Controller 8051 of Speedo Meter using KEIL Code
Micro Controller 8051 of Speedo Meter using KEIL Code
 
08_lcd.pdf
08_lcd.pdf08_lcd.pdf
08_lcd.pdf
 
Lcd
LcdLcd
Lcd
 
_LCD display-mbed.pdf
_LCD display-mbed.pdf_LCD display-mbed.pdf
_LCD display-mbed.pdf
 
Microcontroller part 4
Microcontroller part 4Microcontroller part 4
Microcontroller part 4
 
Electronic code lock device
Electronic code lock deviceElectronic code lock device
Electronic code lock device
 
Basics of peripheral devices and Working
Basics of peripheral devices and WorkingBasics of peripheral devices and Working
Basics of peripheral devices and Working
 
Arduino based applications part 2
Arduino based applications part 2Arduino based applications part 2
Arduino based applications part 2
 
Calculator design with lcd using fpga
Calculator design with lcd using fpgaCalculator design with lcd using fpga
Calculator design with lcd using fpga
 
Lecture mp 7(interface)
Lecture mp 7(interface)Lecture mp 7(interface)
Lecture mp 7(interface)
 

Lcd tutorial

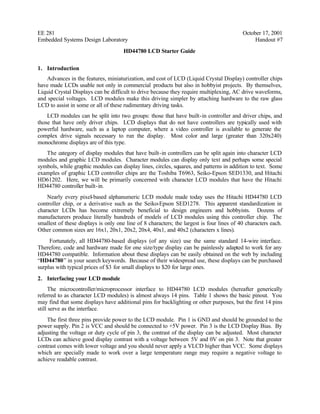
  • 1. EE 281 October 17, 2001 Embedded Systems Design Laboratory Handout #7 HD44780 LCD Starter Guide 1. Introduction Advances in the features, miniaturization, and cost of LCD (Liquid Crystal Display) controller chips have made LCDs usable not only in commercial products but also in hobbyist projects. By themselves, Liquid Crystal Displays can be difficult to drive because they require multiplexing, AC drive waveforms, and special voltages. LCD modules make this driving simpler by attaching hardware to the raw glass LCD to assist in some or all of these rudimentary driving tasks. LCD modules can be split into two groups: those that have built-in controller and driver chips, and those that have only driver chips. LCD displays that do not have controllers are typically used with powerful hardware, such as a laptop computer, where a video controller is available to generate the complex drive signals necessary to run the display. Most color and large (greater than 320x240) monochrome displays are of this type. The category of display modules that have built-in controllers can be split again into character LCD modules and graphic LCD modules. Character modules can display only text and perhaps some special symbols, while graphic modules can display lines, circles, squares, and patterns in addition to text. Some examples of graphic LCD controller chips are the Toshiba T6963, Seiko-Epson SED1330, and Hitachi HD61202. Here, we will be primarily concerned with character LCD modules that have the Hitachi HD44780 controller built-in. Nearly every pixel-based alphanumeric LCD module made today uses the Hitachi HD44780 LCD controller chip, or a derivative such as the Seiko-Epson SED1278. This apparent standardization in character LCDs has become extremely beneficial to design engineers and hobbyists. Dozens of manufacturers produce literally hundreds of models of LCD modules using this controller chip. The smallest of these displays is only one line of 8 characters; the largest is four lines of 40 characters each. Other common sizes are 16x1, 20x1, 20x2, 20x4, 40x1, and 40x2 (characters x lines). Fortunately, all HD44780-based displays (of any size) use the same standard 14-wire interface. Therefore, code and hardware made for one size/type display can be painlessly adapted to work for any HD44780 compatible. Information about these displays can be easily obtained on the web by including “HD44780” in your search keywords. Because of their widespread use, these displays can be purchased surplus with typical prices of $3 for small displays to $20 for large ones. 2. Interfacing your LCD module The microcontroller/microprocessor interface to HD44780 LCD modules (hereafter generically referred to as character LCD modules) is almost always 14 pins. Table 1 shows the basic pinout. You may find that some displays have additional pins for backlighting or other purposes, but the first 14 pins still serve as the interface. The first three pins provide power to the LCD module. Pin 1 is GND and should be grounded to the power supply. Pin 2 is VCC and should be connected to +5V power. Pin 3 is the LCD Display Bias. By adjusting the voltage or duty cycle of pin 3, the contrast of the display can be adjusted. Most character LCDs can achieve good display contrast with a voltage between 5V and 0V on pin 3. Note that greater contrast comes with lower voltage and you should never apply a VLCD higher than VCC. Some displays which are specially made to work over a large temperature range may require a negative voltage to achieve readable contrast.
  • 2. Table 1: Character LCD Pinout Pin# Name In/Out/Pwr 1 GND Ground Power 2 VCC LCD Controller Power (+3 to +5V) Power 3 VLCD LCD Display Bias (+5 to -5V *see text) Analog 4 RS Register Select: H: Data L: Command Input 5 R/W H: Read L: Write Input 6 E Enable (Data strobe, active high) Input 7 DB0 Data LSB I/O 8 DB1 Data I/O 9 DB2 Data I/O 10 DB3 Data I/O 11 DB4 Data I/O 12 DB5 Data I/O 13 DB6 Data I/O 14 DB7 Data MSB I/O 15 A LED Backlight Anode (optional) Power 16 K LED Backlight Cathode (optional) Power Pins 4,5, and 6 are the control lines for the LCD. These lines indicate what kind of transaction you are proposing to do over the data lines DB0-7. The state of RS indicates whether you wish to transfer commands or display data. The R/W line indicates whether you intend to read or write. Finally, the E line tells the display when you are actually ready to perform the transaction. The control lines RS, R/W, and E, along with the data lines DB0-7 are standard digital logic inputs or outputs. Remember than when performing reads you must set the port connected to DB0-7 to be input. 3. Accessing your LCD module Character LCD modules are accessed through only two “registers”, the Command Register, and the Data Register. When you perform a read or write with RS low, you are accessing the Command Register and giving the module instructions. When you read or write with RS high, you are accessing the Data Register and reading or writing characters/data from or to the display. Table 2 contains pseudo-code examples of reads and writes to the two registers. The pseudo-code can be implemented on any microcontroller and assumes that DBPORT is the port to which DB0-7 are connected. Since some microcontrollers are very fast, delays may be required between the steps described in the pseudo-code. See the concise datasheet on the course web page for more information.
  • 3. Table 2: LCD access pseudo-code Reading from a register Writing to a register 1. set RS line high or low to designate the 1. set RS line high or low to designate the register you wish to access register you wish to access 2. set R/W line high to indicate a read 2. set R/W line low to indicate a write 3. set DBPORT to input 3. set DBPORT to output 4. set E line high to begin read cycle 4. write data to DBPORT 5. pause to allow LCD to fetch the data 5. set E line high to begin write cycle 6. read data from DBPORT 6. pause to allow LCD to accept the data 7. set E line low to finish read cycle 7. set E line low to finish write cycle 4. Initiatizing and programming your LCD Character LCDs must be initialized after power-on and before writing data to the display. The initialization must consist of at least a Function Set command, preferably followed by an Entry Mode Set, Display Control, and a Clear Display. Issuing each of these commands after the Function Set ensures that you know the state of your display. Instructions on how to issue and use these commands can be found by looking at the concise datasheet, or at the HD44780 controller datasheet for more information. Below is an example initialization sequence and “hello world” program assuming you’ve programmed the C functions LcdCommandWrite(unsigned char command) to write commands to the LCD, and LcdDataWrite(unsigned char data) to write data to the LCD: // initiatize lcd LcdCommandWrite(0x38); // function set: // 8-bit interface, 2 display lines, 5x7 font LcdCommandWrite(0x06); // entry mode set: // increment automatically, no display shift LcdCommandWrite(0x0E); // display control: // turn display on, cursor on, no blinking LcdCommandWrite(0x01); // clear display, set cursor position to zero // write “hello world” to the display LcdDataWrite(“H”); LcdDataWrite(“e”); LcdDataWrite(“l”); LcdDataWrite(“l”); LcdDataWrite(“o”); LcdDataWrite(“ ”); LcdDataWrite(“W”); LcdDataWrite(“o”); LcdDataWrite(“r”); LcdDataWrite(“l”); LcdDataWrite(“d”); 5. LCD references on Web sites: http://www.doc.ic.ac.uk/~ih/doc/lcd/ http://home.iae.nl/users/pouweha/lcd/lcd.shtml