SlideShare uma empresa Scribd logo
1 de 5
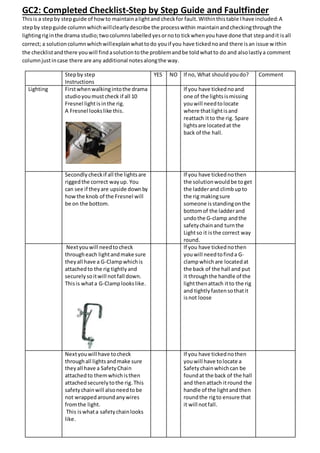
GC2: Completed Checklist-Step by Step Guide and Faultfinder
Thisis a stepby stepguide of howto maintainalightand checkfor fault.Withinthistable Ihave included:A
stepby stepguide columnwhichwillclearlydescribe the processwithin maintainandcheckingthroughthe
lightingriginthe drama studio;twocolumnslabelledyesornoto tickwhenyouhave done that stepandit isall
correct; a solutioncolumnwhichwillexplainwhattodo youif you have tickednoand there isan issue within
the checklistandthere youwill findasolutiontothe problemandbe toldwhatto do and alsolastlya comment
columnjustincase there are any additional notesalongthe way.
Stepby step
Instructions
YES NO If no, What shouldyoudo? Comment
Lighting Firstwhenwalkingintothe drama
studioyoumustcheck if all 10
Fresnel lightisinthe rig.
A Fresnel lookslike this.
If you have tickednoand
one of the lightsismissing
youwill needtolocate
where thatlightisand
reattach itto the rig. Spare
lightsare locatedat the
back of the hall.
Secondly checkif all the lightsare
riggedthe correct wayup. You
can see if theyare upside downby
howthe knob of the Fresnel will
be on the bottom.
If you have tickednothen
the solutionwouldbe toget
the ladderand climbupto
the rig makingsure
someone isstandingonthe
bottomof the ladderand
undothe G-clamp andthe
safetychainand turnthe
Lightso it isthe correct way
round.
Nextyouwill needtocheck
througheach lightandmake sure
theyall have a G-Clampwhichis
attachedto the rig tightlyand
securelysoitwill notfall down.
Thisis whata G-Clamplookslike.
If you have tickednothen
youwill needtofinda G-
clampwhichare locatedat
the back of the hall and put
it throughthe handle of the
lightthenattach itto the rig
and tightlyfastensothatit
isnot loose
Nextyouwill have tocheck
throughall lightsandmake sure
theyall have a SafetyChain
attachedto themwhichisthen
attachedsecurelytothe rig.This
safetychainwill alsoneedtobe
not wrappedaroundanywires
fromthe light.
This iswhata safetychainlooks
like.
If you have tickednothen
youwill have tolocate a
Safetychainwhichcan be
foundat the back of the hall
and thenattach itround the
handle of the lightandthen
roundthe rigto ensure that
it will notfall.
Nextyouhave to make sure that
all lightthat containany Barn
doors are placedand attached
correctlyso that theycan be used
properlyandwill notfall. The Barn
doorshave to be attachedby
havingall three clipssecuresand
not loose.Thisiswhatbarn doors
lookslike.
If you have tickednothen
youwill have toget the
ladderswhichare foundat
the back of the hall and re-
attach the barn doors by
clippingall three clipsin
securelysothatit isn’t
loose.
Nextyouhave to make sure that
all lightthat containanyGel
Framesare placedandattached
correctlyso that theycan be used
properlyandwill notfall.The Gel
Frameswill containagel that will
have to be cut to the rightsize
and shape dependingonthe light
and alsohave to be attachedby
havingall three clipssecuresand
not loose.ThisiswhatGel Frame
lookslike.
If you have tickednothen
youwill have toget the
ladderswhichare foundat
the back of the hall and re-
attach the Gel Framesby
clippingall three clipsin
securelysothatit isn’t
loose.
Nowyouwill have tocheck if all
of the light’slampholdersare
shut.Therefore the wiresand
cable and electricmagneticcircuit
will notbe loose andtherefore
will notcreate a hazard.
If this isa no then shutthe
lampholderandmake sure
it issecure so itwill not
openat un wantedtimes
again.
Lastlybefore goingovertothe
lightingdeskanddimmercheckif
all plugsfromthe lightsto the
socketare pushedinandnot
looselyopen.
If you have tickednoyou
needtoget a ladderthat are
locatedat the back of the
stage and pushthe plugs
intothe socketscorrectlyso
that itwill notcreate a
problemwithinthe circuit.
Nowyouneedto go overto the
dimmerdesksandstart patching
whichiswhen youmake sure the
plugscorrespondtothe lighting
numberforexample plug5links
to dimmer5.
Thisis a picture of the plugs
corresponding.
If theyare not
correspondingyouwill need
to change the dimmerto
the correct plugon the
board sothat theycorrect
match and therefore all the
lightsare correspondingto
the dimmerdesk.
Nextyouwill needtogoto the
back of the deskandcheck if the
DMX cable isinand connected
fromthe desktothe dimmer.This
iswhat a DMX cable lookslike.
If this isnot connector is
evenmissingyouwillneed
to go and locate a cable
whichwill be foundinthe
techniciansofficeina
labelledbox andreattachit
throughthe DMX cable
connectioninthe backof
the deskwiththe DMX cable
inputinthe back of the
dimmerbox.
Nextpluginthe 32 Ampplugfrom
the dimmertothe powersource
and turn onat the wall youwill
knowif youhave successful turn
the poweron because the
dimmerdeskwill lightup.
If this doesnotworksource
for technical helptosee if
the fuse inthe Amp iswired
wrongand if there is
internal problemwithinthe
plug.
The 32 Amppluglookslike this.
Nextyouwill needtoplug inthe
lightingdesktothe socketand
connectit to the powersource
thenat the back of the lighting
deskyouwill needtoswitchiton
by the powerbuttonwhichlooks
like this.Youwill knowif youare
successful switchingitonbecause
it will lightup.
If this doesnotworkthen
there will be something
wrongwiththe fuse inside
the plugof the lead
therefore youwill needto
gettechnical helpoff a
qualifiedpersontorewire
the plug.
Thenon the deskyouneedto turn
the grand masterswitchup to 10.
The grand masterfaderlookslike
this.
Thenturn fadersA and B onby
movingeachof themto the
number10. These faderslooklike
this.
Afterrunningthroughthischecklist,if still the lightare notworkingyouwill needtofinda
professionaltechnicianshelpforfurtherexaminationof the rig.Alsothe problemthatcouldoccur
wouldbe the hygienicandcleaningmaintenanceof eachlightindividuallytherefore afterevery
othermonththe lightsshouldbe properlycleanedandrecheckedtoreduce furtherdamage tothe
lights.
Thenmove the channelsonthe
fadersfrom1 to 6 upin turnto
turn on eachlight individual to
see if everythingisworking.These
fadersinthe six channelslooklike
this.
If the lightsdonot turnon you
nowhave to check througha
multiple of things.Firstlyyouhave
to checkif the fuse isnotworking
on the dimmers
If this isnot workingyouwill
needtofindtechnical help
to re wire the fuse tomake
sure it isworkingcorrectly
inthe plug.
Nextcheckif the lightisplugged
intoan extensionleadbefore
connectingtothe lightingdesk
and dimmersthenthe fuse may
be brokeninthe extensionlead
If so finda new extension
leadwhichislocatedinthe
technician’s office atthe
back of the hall ina labelled
box will needtoreplace the
currentone.Or finda
techniciantocheckthe fuse
or the wiringinthe plug.
If the lightwill stillnotturnon
thenthe last thingyouneedto
checkis the bulbto see if ithas
blown.
If it has thenyouneedto
locate a new bulbfromthe
technician’s office atthe
back of the hall.Youwill
needtoreplace thisbulb
whilstturningeverythingoff
as to secure yourhealthand
safetytonot be
electrocutedyoualsoneed
to handle the bulb withcare
and nottouch it withyour
handas to notburn yourself
and alsoreduce the bulbs
life.

Mais conteúdo relacionado

Mais de hannnnahgrant

Mais de hannnnahgrant (20)

Photographic evidence
Photographic evidencePhotographic evidence
Photographic evidence
 
Ammended checklist
Ammended checklistAmmended checklist
Ammended checklist
 
Drama inventory list
Drama inventory listDrama inventory list
Drama inventory list
 
List adjustments
List adjustmentsList adjustments
List adjustments
 
Step by step guide table first one
Step by step guide table first oneStep by step guide table first one
Step by step guide table first one
 
Carrying out maintenance
Carrying out maintenanceCarrying out maintenance
Carrying out maintenance
 
Step by step guide table first one
Step by step guide table first oneStep by step guide table first one
Step by step guide table first one
 
Checklist
ChecklistChecklist
Checklist
 
Lights powerpoint
Lights powerpointLights powerpoint
Lights powerpoint
 
Cue sheets
Cue sheetsCue sheets
Cue sheets
 
Cue sheets
Cue sheetsCue sheets
Cue sheets
 
Product eval ith
Product eval ithProduct eval ith
Product eval ith
 
The product ith
The product ithThe product ith
The product ith
 
Materials list ith
Materials list ithMaterials list ith
Materials list ith
 
Working with others ith
Working with others ithWorking with others ith
Working with others ith
 
Overall sketch idea
Overall sketch ideaOverall sketch idea
Overall sketch idea
 
Overall sketch idea
Overall sketch ideaOverall sketch idea
Overall sketch idea
 
Hsm eval
Hsm evalHsm eval
Hsm eval
 
The product
The productThe product
The product
 
Materials list
Materials listMaterials list
Materials list
 

Step by step guide table first one

  • 1. GC2: Completed Checklist-Step by Step Guide and Faultfinder Thisis a stepby stepguide of howto maintainalightand checkfor fault.Withinthistable Ihave included:A stepby stepguide columnwhichwillclearlydescribe the processwithin maintainandcheckingthroughthe lightingriginthe drama studio;twocolumnslabelledyesornoto tickwhenyouhave done that stepandit isall correct; a solutioncolumnwhichwillexplainwhattodo youif you have tickednoand there isan issue within the checklistandthere youwill findasolutiontothe problemandbe toldwhatto do and alsolastlya comment columnjustincase there are any additional notesalongthe way. Stepby step Instructions YES NO If no, What shouldyoudo? Comment Lighting Firstwhenwalkingintothe drama studioyoumustcheck if all 10 Fresnel lightisinthe rig. A Fresnel lookslike this. If you have tickednoand one of the lightsismissing youwill needtolocate where thatlightisand reattach itto the rig. Spare lightsare locatedat the back of the hall. Secondly checkif all the lightsare riggedthe correct wayup. You can see if theyare upside downby howthe knob of the Fresnel will be on the bottom. If you have tickednothen the solutionwouldbe toget the ladderand climbupto the rig makingsure someone isstandingonthe bottomof the ladderand undothe G-clamp andthe safetychainand turnthe Lightso it isthe correct way round. Nextyouwill needtocheck througheach lightandmake sure theyall have a G-Clampwhichis attachedto the rig tightlyand securelysoitwill notfall down. Thisis whata G-Clamplookslike. If you have tickednothen youwill needtofinda G- clampwhichare locatedat the back of the hall and put it throughthe handle of the lightthenattach itto the rig and tightlyfastensothatit isnot loose Nextyouwill have tocheck throughall lightsandmake sure theyall have a SafetyChain attachedto themwhichisthen attachedsecurelytothe rig.This safetychainwill alsoneedtobe not wrappedaroundanywires fromthe light. This iswhata safetychainlooks like. If you have tickednothen youwill have tolocate a Safetychainwhichcan be foundat the back of the hall and thenattach itround the handle of the lightandthen roundthe rigto ensure that it will notfall.
  • 2. Nextyouhave to make sure that all lightthat containany Barn doors are placedand attached correctlyso that theycan be used properlyandwill notfall. The Barn doorshave to be attachedby havingall three clipssecuresand not loose.Thisiswhatbarn doors lookslike. If you have tickednothen youwill have toget the ladderswhichare foundat the back of the hall and re- attach the barn doors by clippingall three clipsin securelysothatit isn’t loose. Nextyouhave to make sure that all lightthat containanyGel Framesare placedandattached correctlyso that theycan be used properlyandwill notfall.The Gel Frameswill containagel that will have to be cut to the rightsize and shape dependingonthe light and alsohave to be attachedby havingall three clipssecuresand not loose.ThisiswhatGel Frame lookslike. If you have tickednothen youwill have toget the ladderswhichare foundat the back of the hall and re- attach the Gel Framesby clippingall three clipsin securelysothatit isn’t loose. Nowyouwill have tocheck if all of the light’slampholdersare shut.Therefore the wiresand cable and electricmagneticcircuit will notbe loose andtherefore will notcreate a hazard. If this isa no then shutthe lampholderandmake sure it issecure so itwill not openat un wantedtimes again.
  • 3. Lastlybefore goingovertothe lightingdeskanddimmercheckif all plugsfromthe lightsto the socketare pushedinandnot looselyopen. If you have tickednoyou needtoget a ladderthat are locatedat the back of the stage and pushthe plugs intothe socketscorrectlyso that itwill notcreate a problemwithinthe circuit. Nowyouneedto go overto the dimmerdesksandstart patching whichiswhen youmake sure the plugscorrespondtothe lighting numberforexample plug5links to dimmer5. Thisis a picture of the plugs corresponding. If theyare not correspondingyouwill need to change the dimmerto the correct plugon the board sothat theycorrect match and therefore all the lightsare correspondingto the dimmerdesk. Nextyouwill needtogoto the back of the deskandcheck if the DMX cable isinand connected fromthe desktothe dimmer.This iswhat a DMX cable lookslike. If this isnot connector is evenmissingyouwillneed to go and locate a cable whichwill be foundinthe techniciansofficeina labelledbox andreattachit throughthe DMX cable connectioninthe backof the deskwiththe DMX cable inputinthe back of the dimmerbox. Nextpluginthe 32 Ampplugfrom the dimmertothe powersource and turn onat the wall youwill knowif youhave successful turn the poweron because the dimmerdeskwill lightup. If this doesnotworksource for technical helptosee if the fuse inthe Amp iswired wrongand if there is internal problemwithinthe plug.
  • 4. The 32 Amppluglookslike this. Nextyouwill needtoplug inthe lightingdesktothe socketand connectit to the powersource thenat the back of the lighting deskyouwill needtoswitchiton by the powerbuttonwhichlooks like this.Youwill knowif youare successful switchingitonbecause it will lightup. If this doesnotworkthen there will be something wrongwiththe fuse inside the plugof the lead therefore youwill needto gettechnical helpoff a qualifiedpersontorewire the plug. Thenon the deskyouneedto turn the grand masterswitchup to 10. The grand masterfaderlookslike this. Thenturn fadersA and B onby movingeachof themto the number10. These faderslooklike this.
  • 5. Afterrunningthroughthischecklist,if still the lightare notworkingyouwill needtofinda professionaltechnicianshelpforfurtherexaminationof the rig.Alsothe problemthatcouldoccur wouldbe the hygienicandcleaningmaintenanceof eachlightindividuallytherefore afterevery othermonththe lightsshouldbe properlycleanedandrecheckedtoreduce furtherdamage tothe lights. Thenmove the channelsonthe fadersfrom1 to 6 upin turnto turn on eachlight individual to see if everythingisworking.These fadersinthe six channelslooklike this. If the lightsdonot turnon you nowhave to check througha multiple of things.Firstlyyouhave to checkif the fuse isnotworking on the dimmers If this isnot workingyouwill needtofindtechnical help to re wire the fuse tomake sure it isworkingcorrectly inthe plug. Nextcheckif the lightisplugged intoan extensionleadbefore connectingtothe lightingdesk and dimmersthenthe fuse may be brokeninthe extensionlead If so finda new extension leadwhichislocatedinthe technician’s office atthe back of the hall ina labelled box will needtoreplace the currentone.Or finda techniciantocheckthe fuse or the wiringinthe plug. If the lightwill stillnotturnon thenthe last thingyouneedto checkis the bulbto see if ithas blown. If it has thenyouneedto locate a new bulbfromthe technician’s office atthe back of the hall.Youwill needtoreplace thisbulb whilstturningeverythingoff as to secure yourhealthand safetytonot be electrocutedyoualsoneed to handle the bulb withcare and nottouch it withyour handas to notburn yourself and alsoreduce the bulbs life.