SlideShare uma empresa Scribd logo
1 de 36
47

                               CHAPTER 6 – STORAGE DEVICES

THE HARD DRIVES
http://en.wikipedia.org/wiki/Hard_disk_drive
http://www.learning-about-computers.com/hard_disk_storage.php

A hard disk drive (often shortened as hard disk, hard drive, or HDD) is a
non-volatile storage device that stores digitally encoded data on rapidly
rotating rigid (i.e. hard) platters with magnetic surfaces. Strictly speaking,
"drive" refers to the mot orized mechanical aspect that is distinct from its
medium, such as a tape drive and its tape, or a floppy disk drive and its
floppy disk. Early HDDs had removable media; however, an HDD today is
typically a sealed unit (except for a filtered vent hole to equalize air
pressure) with fixed media.


TYPES OF HARD DRIVES
http://www.learning-about-computers.com/hard_disk_storage.php

Two main types are used by home PCs and laptops: IDE/EIDE and Serial ATA.

IDE (Integrated Drive Electronics)

The IDE interface standard has been around for a very long time. The term interface in this sense
means how the drive connects to the motherboard. As improvements were developed it later was
called EIDE for Enhanced IDE. And after even further developments it has also come to be
known as ATA (Advanced Technology Attachment). These drives connect to the motherboard via
a flat, 80-wire cable to an IDE connector. Two drives can be attached on one cable.


Every computer must have a hard disk drive (commonly called a hard drive, hard disk, or
abbreviated HDD). Your operating system is stored on the hard drive. Of course any other file
can be saved there too. It is the main location where people save data. Having adequate hard
disk storage for your needs is important. There are different types of hard drives, but first I explain
what I consider some of the main features.

Speed and Bus Interface

The speed of a hard drive is determined by how fast the connector can send data. Currently the
primary drive rates are 100 MB/s and 133 MB/s - 133 MB/s being the maximum. These hard
disks are commonly described by the abbreviation "ATA" followed by the speed of its connector
(ATA 100, ATA 133).


IDE drive connectors use a parallel bus, meaning multiple bits are transmitted simultaneously. To
distinguish between Serial ATA drives, IDE disks are also referred to as PATA (the "P" stands for
parallel).

To make it a little less confusing, here are some different names for IDE:
48


EIDE (Enhanced IDE)
ATA (Advanced Technology Attachment)
PATA (Parallel ATA)

Although there are still IDE drives around, Serial ATA is now the dominant standard.


The serial ATA or SATA computer bus, is a storage-interface for connecting host bus adapters
to mass storage devices such as hard disk drives and optical drives. The SATA host adapter is
integrated into almost all modern consumer laptop computers and desktop motherboards.

Serial ATA was designed to replace the older ATA (AT Attachment) standard (also known as
EIDE). It is able to use the same low level commands, but serial ATA host-adapters and devices
communicate via a high-speed serial cable over two pairs of conductors. In contrast, the parallel
ATA (the redesignation for the legacy ATA specifications) used 16 data conductors each
operating at a much lower speed.

SATA offers several compelling advantages over the older parallel ATA (PATA) interface:
reduced cable-bulk and cost (reduced from 80 wires to seven), faster and more efficient data
transfer, and hot swapping.

As of 2009, SATA has mostly replaced parallel ATA in all shipping consumer PCs. PATA remains
in industrial and embedded applications dependent on CompactFlash storage although the new
CFast storage standard will be based on SATA.


                                 SATA ports on a motherborad


HARD DRIVE MANUFACTURERS
http://compreviews.about.com/cs/manhard/

Fujitsu
Manufacturer of high performance SCSI drives mainly used in the server market.

Hitachi Global Storage
This is the web site for the newly created division of Hitachi after the purchase of the IBM storage
division. Information can be found here for both Hitachi's drive lines as well as the IBM line of
drives.
49

IBM
This is the legacy site for the IBM storage division which was recently sold to Hitachi.

Maxtor
Manufacturer of the popular DiamondMax line of PC hard drives and high performance SCSI
server drives.

Seagate
Manufacturer of a wide range of PC hard drives and high performance SCSI hard drives.

Western Digital
Maker of the popular Caviar line of PC hard drives.


HARD DRIVE IDENTIFICATION
http://www.ehow.com/how_2215628_identify-different-types-hard-drives.html

Superficially, IDE and SATA hard drives look the same. They're the same dimensions and
colored in the same manner. It's only if you read the jumble of letters and numbers on the label or
look at the pin setup on the back that you can tell which is which. Knowing which kind you have
and which kind you need can help prevent buying hardware that you can't use.

Step 1

Look for a bunch of pins among the connectors in the back. IDE drives have over 50 pins in the
back of the drive; SATA drives don't have many pins if they have any at all.

Step 2

Identify the board connection. On an IDE drive, the connection consists of many pins spread out
over about 2 inches. The cable that plugs into it is wide and ribbon-like. SATA drives have much
smaller connectors similar to that on a cell phone.

Step 3

Find the power connector. IDE drives have large connectors with 4 wide pins while SATA drives
have power connections similar to their board connection, only smaller.

Step 4

Check for jumpers. IDE drives have jumper settings that tell the computer which point on the
ribbon cable they get plugged into. SATA drives, since they're the only drive on their cable, don't
have jumpers.


IDENTIFYING DRIVE CAPACITY

Check the HDD for the drive capacity.

HARD DRIVE CONTROLLERS


The disk controller (or "hard disk controller") is the circuit which allows the CPU to communicate
with a hard disk, floppy disk or other kind of disk drive.

Early disk controllers were identified by their storage methods and data encoding. They were
typically implemented on a separate controller card. Modified frequency modulation (MFM)
controllers were the most common type in small computers, used for both floppy disk and hard
disk drives. Run length limited (RLL) controllers used data compression to increase storage
capacity by about 50%. Priam created a proprietary storage algorithm that could double the disk
storage. Shugart Associates Systems Interface (SASI) was a predecessor to SCSI.

Modern disk controllers are integrated into the disk drive. For example, disks called "SCSI disks"
have built-in SCSI controllers. In the past, before most SCSI controller functionality was
implemented in a single chip, separate SCSI controllers interfaced disks to the SCSI bus.
50

The most common types of interfaces provided nowadays by disk controllers are PATA (IDE) and
Serial ATA for home use. High-end disks use SCSI, Fibre Channel or Serial Attached SCSI.


IDE/SCSI CABLES


SCSI cables come in two flavors: internal and external. We carry both flat ribbon and rounded
internal cabling. All our 68 pin internal cables use Amphenol brand Ultra 320 (U320) LVD rated
cabling and are backwards compatible with slower speeds. Our external cables are similarly rated
and use high quality Hitachi brand cabling.


HARD DRIVE CONFIGURATION (MASTER/SLAVE LAYOUT)

Check out the HDD for the Master/Slave Layout.


HARD DRIVE INSTALLATION

Actual demonstration of hard drive installation.


UPGRADING TO LARGE HARD-DISKS


OPTIMIZING HARD DISK PERFORMANCE

The 10 ultimate tactics to improve and optimize hard disk IO performance are:

    1.    Defragment
    2.    Check for Disk Errors
    3.    Clean up Unnecessary Files and Optimize the Recycle Bin
    4.    Stop Hibernation
    5.    Compression/Encryption and Performance
    6.    Convert to NTFS
    7.    Disable 8.3 Filenames to reduce NTFS Overhead
    8.    Create More Space For the Master File Table
    9.    Disable Date and Time Stamp Updating
    10.   Enable DMA for IDE drives

Here come the first 5 basic tactics which are safe and easy for general PC users. Feel free
to apply them to your PC.

1. Defragment
Fragmentation is a normal occurrence within file systems. Windows XP attempts to store files in a
contiguous format. However, as files are changed and resaved, the file system has to move data
to different blocks of free space. The end result is that a typical file might have "pieces" scattered
over the disk. When you open the file, the disk must work harder to retrieve all of the pieces and
assemble                                             them.

The first regular and important task you need to do to optimize Windows XP disk performance is
defragmentation. Disk Defragmenter helps repair file fragmentation, which occurs over time in
any file system. Make sure you defragment the drive at least once a month to clean up clutter.

    1. Open My Computer. Right-click the disk that you want to defragment and click Properties.
       On the Tools tab, click the Defragment Now button.
    2. The Disk Defragmenter window appears. Click the Analyze button.
    3. An analysis of the drive is performed, and a message appears telling you whether or not
       you should defragment the drive.
    4. If the drive needs to be defragmented, click the Defragment button. The defragmentation
       process begins and may take some time, depending on how badly the drive is
       fragmented.
51

2. Check for Disk Errors

Checking for disk errors is also another useful tool provided by Windows XP. This tool is available
in the Tools tab of the hard disk properties sheet. It gives you simple check box options to check
for file system errors and recover bad sectors. This Error Checking tool needs complete access to
the disk for it to work. Applications must be closed and, in some cases, you need to reboot before
it starts to gain complete access to the disk. If you use your computer a lot, it is a good idea to run
this tool once a month to make sure your disk is in good working order.

3. Clean up Unnecessary Files and Optimize the Recycle Bin
You would be amazed that the number of temporary files, temporary Internet files, 'recent
documents' list in Windows start menu, download files and log files which Windows XP
generates. If you want the hard disk to work in the best possible way, you need to delete all of the
junk files from it. An overstuffed hard drive makes Windows XP work harder, so make sure you
have a system in place to keep old files and junk cleaned up and removed.

Also, make sure you optimize the Recycle Bin. The size of the recycle bin is a percentage of the
hard drive. If you have a 200GB hard drive then 12% of 200GB is 24GB. Who needs a 24GB
recycle bin? Follow the following steps to adjust the size of the recycle bin:

    1. Right click on the Recycle Bin and choose Properties
    2. On the Recycle Bin properties, move the Recycle Bin size slider from 10 percent to 3 or
       even 1 percent. Remember, this is still a decent amount of storage since you now have a
       larger disk to work with.
    3. Click OK

4. Stop Hibernation

Hibernation is a nice feature of Windows XP¡ªif you use it. One tip I usually share with others
to optimize Windows XP disk performance is to switch off hard disk Hibernation mode in Windows
XP. If you're not using this mode, then click Start > Control Panel > Power Options Properties.
Click    the   Hibernate     tab    and    clear    the  Enable     Hibernation    check     box.

5. Compression / Encryption and Performance

With NTFS, you can compress folders and encrypt folders and files to stop unauthorized access
of those files and folders. The compression feature works well, but compressed files take longer
to open and resave. Basically, avoid compressing drives if you want to squeeze as much speed
as possible from your system. You can decide to compress a drive or not by accessing the disk's
properties and clicking 'Compress drive to save disk space' check box on the General tab.

Encryption will also reduce performance in terms of opening files. After all, the encryption process
has to make sure that you are authorized to view the file. The general rule to follow here is to
encrypt files or folders that are necessary, but don't get in the habit of encrypting everything.
Encryption is a good safety measure and it has its place, but use it judiciously.

Here come the 5 advanced tactics. Before getting into the performance of the hard disk,
you should take very careful reading on the advanced tactics and make sure you are up to
do it yourself manually. This is especially true if disk management is relatively new to you.

6. Convert to NTFS
NTFS is the file system of choice on Windows XP. NTFS is overwhelmingly better than FAT /
FAT32 and enables you to use some management features of Windows XP that FAT / FAT32
does not support. So, you should certainly convert any FAT / FAT32 drives to NTFS. The only
exception to this rule is if you use a dual-boot system that also boots earlier versions of Windows
that   do     not     support     NTFS,     such     as   Windows      98     or    Windows     Me.

Keep the following two issues in mind when converting to NTFS:

    1. You can convert a FAT or FAT32 drive to NTFS while preserving your data. Conversion
       is a one-way process, however. Once you convert to NTFS, you cannot revert back to
       FAT without reformatting the disk.
    2. You cannot convert an NTFS drive to FAT or FAT32 without reformatting the drive. This
       means that all of your data on the hard disk will be destroyed during the formatting
       process. You will have to restore all of the data from backup.
52


To convert a FAT or FAT32 drive to NTFS:

    1. Click Start>Run. Type command and click OK.
    2. At the command prompt, you will use the Convert command to convert the FAT drive to
       NTFS. Keep in mind that the conversion process is completely safe and all of your data
       will remain as it is. The command and syntax is as follows:

        convert D: /FS:NTFS

        Press Enter.

    3. Conversion may take several minutes, depending on the size of the drive. When the
       process is complete, simply exit the command interface. If you converted the boot
       partition, you will be prompted to reboot the computer.


7. Disable 8.3 Filenames to reduce NTFS Overhead
As previously mentioned, NTFS is a powerful file system that provides many of the features you'll
enjoy with Windows XP, however, there is some overhead that can get in the way. For
compatibility with MS-DOS and old Windows 3.x systems, NTFS supports 8.3 filenames, which
means that files are named with eight characters, followed by a dot and a three-character
extension. There's nothing wrong with this, but the overhead is unnecessary if you are not
supporting older programs and systems (which you are probably not at this point). However, one
word of warning: some older programs depend on 8.3 filenames, so it is possible that if you turn
off the 8.3 filename feature, some programs may not work correctly. Although this is unlikely at
this point in time, it is still an issue you should keep in mind. Otherwise, lose the 8.3 filename
feature to reduce NTFS overhead by following these steps:

    1. Click Start>Run. Type regedit and click OK.
    2. In            the              Registry     Editor,         navigate           to
       HKEY_LOCAL_MACHINESYSTEM CurrentControlSetControlFilesystem.
    3. Locate the NtfsDisable8dot3NameCreation entry and change the value to 1. This will
       disable the creation of 8.3 filenames.
    4. Close the Registry Editor.


8. Create More Space For the Master File Table
NTFS uses a Master File Table to record data about files. You can add a Registry entry to ensure
that the table is large enough and has the space it needs. This will take up more space on the
hard disk, but it reduces overall NTFS overhead, which can help general performance.

Follow these steps:

    1. Click Start>Run. Type regedit and click OK.
    2. In the Registry Editor, navigate to
       HKEY_LOCAL_MACHINESYSTEM CurrentControlSetControlFileSystem.
    3. Create a REG_DWORD entry and name it NtfsMftZoneReservation.
    4. Set the value of the entry to 2.
    5. Close the Registry Editor.


9. Disable Date and Time Stamp Updating
NTFS updates the date and time stamp from the last time that it works through the directory. With
many directories, this process can slow your system down a bit, and disabling this date and time
stamping feature doesn't impact how you work with files on your system. You can easily disable
this dating and time stamping process by following these steps:

    1. Click Start>Run. Type 'regedit' and click OK.
    2. In the Registry Editor, navigate to
       HKEY_LOCAL_MACHINESYSTEM CurrentControlSetControlFileSystem.
    3. Locate the NtfsDisableLastAccessUpdate entry. (If you do not find it, create it in the entry
       as a REG_DWORD).
    4. Change the value of the entry to 1.
    5. Close the Registry Editor.
53


10. Enable DMA for IDE drives
Direct memory access (DMA) mode works best for IDE drives on Windows XP. If you have an
IDE drive, you will want to enable Direct Memory Access (DMA) mode. This is important for
smooth performance when you play videos and listen to music. Set it up by:

    1.   Going to My Computer > Properties.
    2.   Click the Hardware tab and select Device Manager.
    3.   Expand the IDE controllers and double-click the IDE primary drive.
    4.   Click the Advanced tab and ensure DMA mode is selected from the drop-down box.
    5.   Click OK; then restart your computer.
    6.

HARD DRIVE MAINTENANCE
http://www.macintoshos.com/troubleshooting/maintenance.html#general

There is very little you can do to physically maintain a hard drive. Selecting "Shut Down" from the
Special menu each time the machine is turned off allows the drive to park its heads over a safe
area of the platters, thus avoiding accidental contact during a severe jar. Always make sure all
SCSI devices are off before connecting or disconnecting a SCSI device. This can affect your hard
drive and logic board.

Programs such as Norton Utilities, FWB Hard Disk Toolkit PE, and Mac Tools Pro are great for
maintaining the data on your drive. Defragment the drive is a good exercise to perform once
every couple of months. If done too frequently, this can cause more damage than good. Norton's
Disk Doctor is a good one to run on a regular basis. Follow instructions in the manual about
creating a boot disk so that when Norton tells you there is a problem, you can fix it correctly.

Norton Utilities often creates unnecessary worry in many people. It has a way of finding
something wrong almost every time it is run. Most of what it finds is labeled as either "serious" or
"not serious." The not serious problems are usually the result of normal hard drive operation. The
serious problems are typically caught before they can cause any real problems.
Make sure your computer has proper ventilation. Especially with modern drives of 1 gigabyte or
more, much of the internal heat of a computer is created by these monstrous hard drives. It is not
uncommon for a drive to "burn up" and die because of over heating.

HARD DRIVES PROBLEMS TROUBLESHOOTING AND REPAIRING
http://www.techadvice.com/tech/H/HardDriveTS.htm

1. There is some type of electrical connection problem

Make sure the cable connections are correct. Check the 4-wire connector that carries power and
make sure it is properly plugged in. This connector has a taper on one end and cannot be put on
backwards.

When power is first applied to the computer, the hard drive light will momentarily come on which
is a good indication that the drive is getting power. Also the vibration of the spinning platter and
the slight hum will verify that the drive is plugged in.

Next check the data ribbon cable. This cable is a flat cable with a one edge colored red or blue to
indicate the location of pin 1. Some of these cables are also keyed by having a small tab in the
center of the connector's edge. On many hard drives pin 1 is the pin closest to the power supply
connection, but not always, so check the hard drive documentation or look on this site in Hard
Drives and locate your model.

You can find hard drive documentation on this site simply by using the index on top of each page
to find the manufacturer and then on the manufacturers page will be a listing which would have
links to each product and the technical support documents. Older drives are on different pages
then newer drives. Once you find the page where the manufacturer's products are listed, look at
the top of the page for a link that says "Older Models" and you will find them listed there.

If all the cables are connected properly, and power is applied, you should be able to hear and feel
the drive spinning. If the drive is not spinning, turn off the power and try using a different power
plug (maybe the one that the CD-ROM is connected). If the drive is not spinning then it is
probably bad. *see step 3
54

2. The hard drive controller has failed

A controller failure is usually indicated by an error at boot up. There is not much that can be done
except to replace the hard drive. See hard drive error codes

3. The hard drive has failed physically

There can be two indications for this condition.

        1) The drive is not spinning. To troubleshoot this condition you need to physically access
        the drive while the computer is on. With the cover off, look at the drive and find the side
        which has NO components. With your hand touch that side and try to feel the spinning of
        the hard drive platter. A typical hard drive has a small amount of vibration and a slight
        whine.

        2) The hard drive head has crashed onto the platter. This usually causes the drive to emit
        unusual sounds sometimes grinding and many times repeating on a regular basis. A
        normal hard drive has a smooth whine so its should be easy to identify the bad drive by
        just listening.

4. The hard drive has failed electronically

This will be indicated by an error message during the computer boot cycle. Not much can be
done in this condition other then replace the drive.

5. There is a problem with the recording on the hard drive (read or write)

There are two conditions that can cause this problem.

        1) The hard drive is unable to read a sector on the platter.

        This problem can be identified by running a program that is capable in performing a hard
        drive surface test. In Windows 95 you can use the scandisk which is found in the
        Start/Programs/Accessories/System Tools folder. Another way is to use a utility program
        like Norton Utilities to perform the surface scan.

        This problem can also be seen when you are formatting the hard drive and is indicated as
        "bad sectors" during the formatting. These bad sectors are normally recorded as such by
        the format program and the computer knows not to use them but more bad sectors can
        be created as the hard drive ages.

        2) One or more files have been damaged by some process.

        These type or problems are caused when the computer is unexpectedly rebooted after a
        lock-up or perhaps a power failure. They are easy to troubleshoot and repair. Simply run
        the scandisk program which is found in the Start/Programs/Accessories/System Tools
        folder and allow the computer to repair any errors found.

        After such a repair it is very possible that one of more files were corrupted and are now
        unusable. It is impossible to tell which files will be affected in advance but if you write
        down the bad file names shown during the scan disk operation you can try to find the
        application which loaded them and re-install that application.

6. The CMOS settings are not correctly set

Check the CMOS settings. These settings must match the required settings of the manufacturer.

a) older computers

On these computers you have to go into the CMOS/BIOS during boot and change the setting by
selecting a number from 1 to 48, by selecting a TYPE number of 1 or 2, or by selected the setting
"User defined" and manually entering the hard drive parameters of "head", "cylinders", "spt",
"WP", and "LZ". These settings can be found on your hard drive users manual, on the
55

manufacturer's web site, or on this site by looking for the company, then the hard drive's model
number.

After entering these parameters you will normally save them before exiting the BIOS program and
then reboot the computer.

b) newer computers

On these computers you can almost always find a selection that allows the computer to
"Automatically" find IDE style hard drives. There are two methods in use. First you can select
"Auto" from the main BIOS screen for the drive C: D: E: or F:. After rebooting the drive will be
automatically detected. Second, some Bios types have a selection called "Detect hard drive"
which allows you to initiate a detection process which looks for a drive, presents you with the
drive found and gives you the option of accepting or rejecting the detected drive. This process is
repeated for each of the available drive assignments C D E and F.

Again you must save the BIOS changes and reboot the computer.

Very critical also is the LBA setting which can cause the drive to operate but not be able to see all
the data. This comes into play with drives larger than 500 megabytes and is found by entering the
computer BIOS at boot up and looking in the area where the hard drive is configured.

"Wrong LBA setting" Symptoms:

            •   Computer comes on, but you get many read errors
            •   Windows comes up sometimes other times it hangs
            •   you can save short files but larger ones don't seem to save
            •   Scandisk is not able to fix the problems it finds

Solution:

The LBA setting in the BIOS is not correct. Most likely on drives that are more than 528MB, the
LBA setting is not enabled. Enter the BIOS and enable the LBA.

This can happen very easily when a drive is on a computer and works fine but then the
motherboard is changed. The old BIOS had LBA enabled but the new one might not. After the
drive is installed it seems to work but you get the symptoms described above.

7. There is a conflict with the IRQ settings

a) Normally the primary hard drive controller uses Interrupt Request Line (IRQ) number 14 which
allows the hard drive C and D to operate correctly.. The secondary hard drive controller uses IRQ
number 15 which allows the hard drives E and F to work properly.

What happens is some times a different device such as a sound card will use the IRQ 15 by
default or because the settings was changed by a user. This causes the computer to not see the
secondary hard drives immediately after the installation of this device using IRQ 15. The only way
to fix this problem is to change this device so that it uses a different IRQ setting.

b) Another problem can be introduced in Windows 95 by CD-ROM device drivers which are
loaded by the autoexec.bat and config.sys files at boot up. If windows 95 sees a conflict with
these drivers it will switch itself into the DOS compatibility mode. This can be seen by going to
Control Panel/System/Performance/File system.

A normal windows 95 installation uses 32 bit file access. When there is a conflict you will see that
the system is switched to the DOS compatibility mode. Sometimes this can be fixed by using the
procedure shown on this link.

8. There is a conflict with the jumper settings

All IDE hard drives must be properly setup using jumpers found on the hard drive. The users
guide for each drive has instruction for these settings. Each drive can either be a Master or a
Slave. Since there can be as many as two separate controllers on each computer the each
controller can have a Master and a Slave.
56

A typical computer with 4 IDE hard drives would setup the primary channel as Drives C (master)
and D (slave), and the secondary channel as Drive E (master) and Drive F (slave).

On 2 drive systems, the first drive should be setup as Master and the second as Slave and the
secondary channel is ignored.

On many motherboards you must go into the BIOS and actually either enable or disable the
secondary drive controller and save the changes. So if your computer came with 2 drives and
you've added two more, before the new drives are detected you will need to go into the BIOS and
enable the secondary IDE controller, save the changes and reboot.

9. The drive is unable to boot

To troubleshoot this condition boot the computer with a bootable DOS disk. After the computer
has booted with the disk try to access drive C: by issuing the standard directory command

DIR C: <enter>

If the C: drive is working and you can see the directory listing then you might be able to make the
drive bootable again by issuing the system command which transfers the system files from the
floppy drive to the hard drive as follows:

sys a: c: <enter>

The sys file has to be on the floppy disk. If it is not then find a disk that has the file or use another
computer to copy the file to the floppy disk. You can also copy the command.com file from the
floppy to the hard drive by typing...

copy a:command.com c:command.com <enter>

...the computer will ask you to verify the operation.

Note: A drive must also have the BOOT partition activated before it can boot properly. This is
done using FDISK.exe ( of course you must take precautions doing this since fdisk can make
your drive useless if mis-used).

To troubleshoot problems where the hard drive hangs at boot and the computer never responds,
turn off the computer and disconnect the hard drive from the ribbon cable that connects it to the
motherboard. When you turn the computer back on, you should at least get an error message
about the drive being bad, and perhaps go into the BIOS. Once in BIOS you can change the hard
drive type to AUTO and after shutting off the computer and reconnecting the hard drive, try again
to see if it now works.

10. Fdisk reports wrong size when using drives larger then 64GB

According to Microsoft KB article Q263044, "When you use Fdisk.exe to partition a hard disk that
is larger than 64 GB (64 gigabytes, or 68,719,476,736 bytes) in size, Fdisk does not report the
correct              size              of             the               hard               disk.

The size that Fdisk reports is the full size of the hard disk minus 64 GB. For example, if the
physical drive is 70.3 GB (75,484,122,112 bytes) in size, Fdisk reports the drive as being 6.3 GB
(6,764,579,840 bytes) in size."

Hard drive error codes

Typically a hard drive failure will be indicated by an error code while the computer is booting.

             •   1701 - hard drive failure. ...BIOS Post CodesThis BIOS error code is displayed
                 during the computer boot process when the hard drive has failed.

                 Also could be a cable connection problems as described above. IRQ conflicts
                 and bad jumper settings could cause this problem as well.

                 One more possibility is that the CMOS battery has died. This can be verified by
57

                 entering the BIOS during boot, then setting the hard drive settings and rebooting.
                 If the hard drive error goes away then the battery is dead.


THE FLOPPY DRIVES
http://en.wikipedia.org/wiki/Floppy_disk

A floppy disk is a data storage medium that is composed of a disk of thin, flexible ("floppy")
magnetic storage medium encased in a square or rectangular plastic shell.


TYPES OF DISKETTES
http://en.wikipedia.org/wiki/Floppy_disk

Floppy disks are read and written by a floppy disk
drive or FDD, the initials of which should not be
confused with "fixed disk drive", which is another term
for a (nonremovable) type of hard disk drive. Invented
by IBM, floppy disks in 8-inch (200 mm), 5¼-inch
(133.35 mm), and 3½-inch (90 mm) formats enjoyed
many years as a popular and ubiquitous form of data
storage and exchange, from the mid-1970s to the late 1990s. While floppy disk drives still have
some limited uses, especially with legacy industrial computer equipment,[2] they have now been
largely superseded by USB flash drives, external hard disk drives, CDs, DVDs, and memory
cards.


SETTING DRIVES AND CABLE ORIENTATION

Actual demonstration of the facilitator.


REPLACING A FLOPPY DRIVE

Actual demonstration of the facilitator.


FLOPPY DRIVE MAINTENANCE
http://www.macintoshos.com/troubleshooting/maintenance.html

The best maintenance for a floppy drive is to keep dust out of it. Even if there is visible dust inside
the drive now, it is best to just leave it and begin covering up the opening when not in use.
Attempts to clean dust out of a drive usually end up damaging the fragile components inside.
Keep the drive covered with either a complete system cover, or a simple piece of cloth just big
enough to drape over the opening.

There is nothing wrong with leaving a floppy disk completely inserted or partially inserted when
the machine is off. It is good for both drive and floppy to keep the disks covered or in cases so
they don't become dusty and transmit their dust to the inside of the drive.


FLOPPY DRIVE CLEANING PROCEDURES/DRIVE CARE
http://home.innernet.net/services/services-tips.asp
Symptoms:

"Error reading drive A:" is a good indication that you need to clean the heads in your floppy drive.

Cleaning Options:

Store bought floppy drive cleaning kit
Run Electronic Vacuum Cleaner across front of slot

To Use Store Bought Cleaners:

NOTE: FOLLOW the INSTRUCTIONS on the kit

Drop cleaning liquid onto the opening on the cleaner disk.
With a Macintosh: place the disk into the Drive, the disk will spin and give you a message stating
58

it is unreadable, use the "eject disk" option to get disk out.

With PC's: place the disk in Drive "A", then using File Manager, or the DOS prompt access the
"A" Drive, let it spin, abort, then eject disk.
NOTE: If the drive does not spin, it will not be cleaned.
59


                       CHAPTER 7 - OTHER DATA STORAGE DEVICES

CDROM DRIVE
http://www.basichardware.com/cd-rom_drive.html#Description

CD-ROM drives are necessary today for most programs. A single CD can store up to 650 MB of
data (newer CD-Rs allow for 700 MB of data, perhaps more with "overburn"). Fast CD-ROM
drives have been a big topic in the past, but all of today's CD-ROM drives are sufficiently fast. Of
course, it's nice to have the little bits of extra speed. However, when you consider CD-ROM
drives are generally used just to install a program or copy CDs, both of which are usually done
rarely on most users' computers, the extra speed isn't usually very important. The speed can
play a big role if you do a lot of CD burning at high speeds or some audio extraction from audio
CDs (i.e. converting CDs to MP3s).


DVD/DVD+R/RW DRIVE
http://www.basichardware.com/cd-rom_drive.html#Description

DVD-ROM drives can store up to 4 GB of data or about 6 times the size of a regular CD (not sure
on the exact size, but suffice to say it's a very large storage medium). DVDs look about the same
and are the same size as a CD-ROM. DVD drives can also read CD-ROM drives, so you don't
usually need a separate CD-ROM drive. DVD drives have become low enough inprice that there
isn't much point in purchasing a CD-ROM drive instead of a DVD-ROM drive. Some companies
even make CD burner drives that will also read DVDs (all in one). DVD's most practical use is
movies. The DVD format allows for much higher resolution digital recording that looks much
clearer than VCR recordings.

DVD recordable drives are available in a couple of different formats - DVD-R or DVD+R with a
RW version of each. These are slightly different discs and drives (although some drives support
writing to both formats). One is not much better than the other, so it really boils down to price of
the media (and also availability of the media).


CD-R/RW DRIVE
http://www.basichardware.com/cd-rom_drive.html#Description

CD-R/RW (which stands for Recordable / ReWritable) drives (aka burners, writers) allow a user to
create their own CDs of audio and/or data. These drives are great for backup purposes (backup
your computer's hard drive or backup your purchased CDs) and for creating your own audio CD
compilations (not to mention other things like home movies, multimedia presentations, etc.).


CD/DVD CONFIGURATION (MASTER/SLAVE LAYOUT)

Actual demonstration by the facilitator.


CD/DVD INSTALLATION AND UPGRADING

Actual demonstration by the facilitator.


TRANSFER SPEED X
http://www.allmemorycards.com/glossary/cd-rom-transfer-speed.htm

The CD-ROM industry is using a different measurement standard for rating data transfer speed.
Instead of using bits or bytes per second, they are indicating the transfer speed by the quantity of
X, which indicates the number of X transmitted in a given amount of time, in this case per second.
In reality bits and bytes are still in use since 1 X is equivalent to 0.15 MB/sec or 1.2288 Mbps.
The use of the X definition leaves out some confusion in comparison to the other terms.

Apart from the CD-ROM industry the X definition is used by the memory card industry for transfer
speed rating, but it is not as widely used as the MB/sec which is the most common used
definition. Some manufactures are indicating transfer speed only in MB/sec and some only in one
of them or just in X. Since transfer speeds are getting really fast the Mbps definition is not that
common used in the memory card industry, it makes more sense to use MB/sec.
60


Comparing different definitions with each other can be confusing. A comparable table over the
different transfer speed definitions and more information about transfer speed can be found at
data transfer speed and at buying guide.


CD/DVDROM MAINTENANCE/CLEANING PROCEDURES
http://home.innernet.net/services/services-tips.asp

Symptoms:

Disc skips or errors reading data from a disc are a good indication that you need to clean your
CD-ROM/DVD-ROM drive.

Cleaning Options:

Store bought CD-ROM/DVD-ROM drive cleaning kit

To Use Store Bought Cleaners:

NOTE: FOLLOW the INSTRUCTIONS on the kit

The CD-ROM/DVD-ROM contains a laser lens, which collects dust, and needs a special kind of
cleaner. Using a compact disc (CD/DVD) lens cleaner not only cleans the lens but other parts of
your drive as well.

NOTE: If the drive does not spin, it will not be cleaned


CDROM DRIVE PROBLEMS
http://www.jdresearch.com/tsd451.htm

1. There is no CD disc in the CD-ROM drive or it is the incorrect one.

2. The CD disc is dirty or defective.

3. The CD disc is in the drive upside down.

4. There is an audio CD disc in the drive when you are trying to access data files

5. There is a data CD disc in the drive when you are trying to play an audio or music CD disc.

6. The CD disc is an Apple or Macintosh CD and not an IBM compatible format.

7. The program that is trying to access the CD-ROM drive is corrupt.

8. The onboard IDE is not enabled in the System Setup or CMOS.

9. The data or audio cable is not connected, or damaged (check this on newly arrived systems).

10. Your CD-ROM drive is conflicting with newly installed hardware devices.

11. The jumper settings on the IDE CD-ROM drive are not set correctly.

12. You cannot access the CD-ROM from DOS because the MS-DOS real mode drivers are not
loaded.
61


REMOVABLE DRIVES
http://en.wikipedia.org/wiki/External_storage

External storage is any device that temporarily stores information for transporting from computer
to computer. These devices are not permanently fixed inside a computer.

Types of external storage devices include punched cards, cassette tapes, floppy disks, Zip disks,
CDs, DVDs, microforms, memory cards, memory spot chips, and memory sticks.


TROUBLESHOOTING EXTERNAL STORAGE DEVICE
http://www.smartcomputing.com/editorial/article.asp?
guid=&bJumpto=true&Isfrm=IN&article=articles/webonly/techsupport/ref1101/52r01/52r01.asp&Ar
ticleID=40459

The large storage capacity and portability of external hard drives and flash drives make external
storage an extremely convenient way to back up, transport, and swap files. Many of us now rely
solely on external storage to back up our internal hard drive or to transport multimedia libraries on
our key chain. However, when the external storage device you’ve come to depend on is operating
poorly or not at all, it can be frustrating and inconvenient—especially if the drive contains
important work documents or the entire contents of your hard drive. The following troubleshooting
tips can help you restore and improve your external storage drive’s swapping and storing
capabilities.

 Malfunction Junction

When troubleshooting an external hard drive or flash drive, it's wise to search the Internet for
known incompatibilities relevant to your device and to visit the manufacturer's Web site to make
certain you don't need any special software or drivers. To find the appropriate download, you
need to know the drive's name, model number, or serial number and its storage capacity.
Typically, external hard drives display this identification above the bar code on the bottom of the
drive, and flash drives include a name and model number in the accompanying packaging or
user’s guide.

Operating systems created after Windows 98 don’t require you to install any drivers to recognize
external storage drives. Therefore, you can trace the majority of detection problems to a
misconnection or incorrectly configured port. If you’re experiencing sluggish file transfer and drive
access, the problem is more likely because of inadequate USB or FireWire hardware within your
computer. While you can resolve both detection and slow drive problems, an external hard drive
that exhibits grinding noises or extremely hot running temperatures may be on its last legs and
you should remove data from the drive as soon as possible.

 The Computer Isn’t Detecting My External Drive

Problem: My external storage device isn’t listed in My Computer.

Solution: Partially connected USB or FireWire connectors (or devices that are inadvertently
unplugged) are a common cause of undetected drives. The plug may appear firmly seated, but
you should disconnect and reconnect the USB or FireWire connector to ensure the drive is
plugged in. If your external storage drive connects to a USB or FireWire hub, ensure the hub has
power and that its connector is plugged into the computer. Note that some external storage
devices work poorly or not at all when connected to a hub; try connecting the drive directly to a
port on the computer. If the drive still isn’t detected, test an external hard drive’s cable by
switching it with another USB or FireWire cable.

Problem: My external storage device is connected but not recognized by Windows.

Solution: If you use an external hard drive, ensure the AC power cord and any subsequently
connected power strip securely plugs into the power outlet and that both are switched on.
Eliminate the port as the source of the problem by connecting your flash drive or external hard
drive to another port. If the external storage isn’t recognized in another port, open Device Manger
to determine if your port or drive has a system conflict. Select the Start button, Settings, and then
click Control Panel. Double-click System, select the Hardware tab, and then click the Device
Manager button. Click the plus sign (+) next to Universal Serial Bus Controllers for a drive that
connects via USB and the plus sign next to IEEE 1394 Bus Host Controllers for a FireWire
connected drive.
62

A yellow exclamation point signifies the port has a driver conflict, and a red “X” indicates the port
has been disabled. Right-click and select Enable to reopen a disabled port. To resolve a port
conflict, right-click and choose Uninstall for each controller until all the USB or IEEE 1394
Controllers are removed. After you uninstall each controller, restart your computer and it will
reinstall the proper Bus Host Controllers. To check for an external storage conflict, select the Disk
Drives heading and find your external storage drive. If the drive has a conflict, you may need to
install its included software and proprietary driver for the computer to recognize the device. If the
drive still can’t be detected, uninstall the external drive and then reboot the computer to facilitate
its detection.

Problem: My flash drive works fine at home, but isn’t recognized on my work computer.

Solution: Many office networks use mapped network drives that override Windows’ drive lettering
system for removable devices. Through the Disk Management utility you can manually assign a
drive letter to your flash storage device. Right-click the My Computer icon, select Manage, and
then double-click Disk Management. Right-click your flash drive and choose Change Drive Letter
And Path. Select an unused drive letter from the drop-down list and click OK. You should now
see the flash drive listed under that drive letter in My Computer.

Problem: My computer runs Window 98 and it won’t recognize my external storage device.


Solution: To use any USB device on Win98, you need to update your installation of Windows 98
via the Windows Update Web site. Some USB devices have problems in Win98FE (First Edition)
and most work better in Win98SE (Second Edition). You’ll also need to install the Win98 driver
that came with your accompanying software. FireWire devices only work in Win98SE, and you’ll
need to download a FireWire update before you can detect your FireWire drive.

 I Can’t Read/Write Data To My External Storage Device

Problem: My external storage device shows up in My Computer, but I can’t access or write
to the drive.

Solution: The drive may be incorrectly formatted for Windows or have a corrupt partition.
Windows 2000 and XP feature a utility called Disk Management that analyzes your external drive
and assigns it an Online, Healthy, or Unreadable status. Open the utility by right-clicking the My
Computer icon and selecting Manage. Under the Storage heading, double-click Disk
Management to view your external storage drive’s status. If it has an Unreadable status, you
need to format the drive to remove the corrupt partition or incompatible Windows file format.
Before you do, attempt to transfer the drive’s data onto another computer because formatting
completely erases the files on the drive. To format, simply right-click the external hard drive and
click Format.

Problem: My external storage device works with Windows, but I can’t access it on
Macintosh operating systems.

Solution: You drive is most likely formatted in the NTFS (NT file system) file format. To use
external storage on both Windows and Macintosh operating systems, it must be in the FAT32
(32-bit file allocation table) format. You’ll need to reformat the drive and choose FAT32 when
prompted for a file format. To reformat the drive, right-click it in My Computer and click Format.

 My External Storage Works Slowly

Problem: My new external storage device is USB 2.0 compatible but my files don’t transfer
any faster than they did with the USB 1.1 external storage device.

Solution: At 480Mbps (megabits per second), USB 2.0 can transfer up to 40 times faster than
USB 1.1. But both your computer and any connected hub must have USB 2.0 hardware to
perform the higher-speed transfer. If you’re unsure of the computer’s USB capabilities, look under
the Universal Serial Bus Controllers in Device Manager. USB 2.0 is denoted by either Standard
Enhanced or USB 2.0 Enhanced. If your computer doesn’t support USB 2.0, you can install an
add-on card to take advantage of the greater transfer speed. Note that for Windows to support
USB 2.0, you must install Service Pack 2 for WinXP or Service Pack 4 for Win2000.

Problem: My FireWire external storage device transfers slowly.

Solution: FireWire 800 (also known as IEEE 1394b) can only transfer at 800Mbps when used
with a 9-pin to 9-pin FireWire cable. A 9-pin to 6-pin cable allows for backward compatibility
63

between older FireWire devices, but it only transfers data at 400Mbps.

A major benefit of FireWire devices is that you can connect them in a chain, meaning you can
connect your digital camcorder to your external hard drive and expect both to communicate with
your computer. However, the entire FireWire chain shares the same bandwidth, and if multiple
devices are active, you can significantly reduce your transfer speed. If you must daisy-chain
FireWire devices, connect the external hard drive to the computer and place the slower FireWire
devices at the end of the chain. In this fashion, your external drive’s data won’t have to pass
through the slower devices.

Problem: My external storage drive accesses data slowly when it’s full.

Solution: You can improve your external drive’s performance by running Windows’ Disk
Defragmenter utility to better organize the files on your drive. Select the Start menu, Programs,
Accessories, System Tools, and then click Disk Defragmenter. In the Disk Defragmenter window,
select your external drive and then click Analyze. Although Windows may indicate the drive
doesn’t need to be defragmented, doing so may still improve its performance. Check Disk (or
ScanDisk as it's known in older versions of Windows) is another helpful utility that locates errors
and bad sectors on your drive. Open My Computer and find the icon for your external storage
device. Right-click the icon, select Properties, and then click the Tools tab. Click the Check Now
button and select Automatically Fix File System Errors and Scan For And Attempt Recovery Of
Bad Sectors. During the repair, Check Disk may stop to give you the option to save
unrecoverable data. This data is an indecipherable jumble of characters that won’t provide any
usable files—don’t recover the data and let Check Disk continue the repair.

 External Drive Produces Errors

Problem: Windows reports my USB or FireWire flash drive is write-protected.

Solution: Some flash drives have a write-protect switch located on the side of the drive that locks
data from being written to it. Use a ballpoint pen or small object to unlock the drive’s write-
protection. It’s also possible to trigger write-protection by unplugging a drive in the process of
writing data. Although it’s typically fine to remove an idle flash drive, the Safely Remove
Hardware tool in the taskbar is designed to stop Windows from accessing the drive. You can click
this icon, even after the error has occurred, to remove the write-protection from the drive. If the
drive is still protected, you may need to connect the flash drive to another port and reboot your
computer to reset the flash drive’s settings.

Problem: Windows reports that my external storage is full even when it has more than
enough free space.

Solution: If your drive uses the FAT32 file format, Disk Is Full or Not Enough Space error
messages can occur when you transfer files larger than 4GB. Although FAT32 can’t work with
files over 4GB, the NTFS file format can. Win2000 and XP feature a converter tool that lets you
convert a drive from FAT32 to NTFS without removing any files from the drive. Before running the
converter tool, Windows advises you to back up the drive’s data because an error during the
conversion process could corrupt it. Click the Start menu, select Run, type cmd, and then click
OK. At the DOS prompt, type convert (drive letter): /fs:ntfs and press Enter. For example, if
your external drive’s letter is E, type convert E: /fs:ntfs to change it from FAT32 to NTFS. After
you enter the command line, you may be required to enter the drive’s volume name, which will be
listed in My Computer next to the external drive’s letter.

 Past Basic Troubleshooting

Most external hard drive and flash drive manufacturers maintain substantial online databases that
can help you resolve difficulties. If you experience a problem we didn’t have room to cover in this
article, see if your drive’s manufacturer covers the problem online.

Should you need to call the manufacturer’s tech support line, have your product identification
handy and outline any steps you’ve already taken to solve the problem. This information will not
only help expedite the troubleshooting process, but it will also provide the tech support agent a
better understanding of your problem.
64


                            CHAPTER 8 - I/O DEVICES & DISPLAYS

PC MONITOR
http://en.wikipedia.org/wiki/Computer_monitor

A monitor or display (sometimes called a visual display unit) is a piece of electrical equipment
which displays images generated by devices such as computers, without producing a permanent
record. The monitor comprises the display device, circuitry, and an enclosure. The display device
in modern monitors is typically a thin film transistor liquid crystal display (TFT-LCD), while older
monitors use a cathode ray tube (CRT).

KEYBOARDS
http://en.wikipedia.org/wiki/Keyboard_%28computing%29

In computing, a keyboard is an input device, partially modeled after the typewriter keyboard,
which uses an arrangement of buttons or keys, to act as mechanical levers or electronic switches.
A keyboard typically has characters engraved or printed on the keys and each press of a key
typically corresponds to a single written symbol. However, to produce some symbols requires
pressing and holding several keys simultaneously or in sequence. While most keyboard keys
produce letters, numbers or signs (characters), other keys or simultaneous key presses can
produce actions or computer commands.

In normal usage, the keyboard is used to type text and numbers into a word processor, text editor
or other program. In a modern computer, the interpretation of keypresses is generally left to the
software. A computer keyboard distinguishes each physical key from every other and reports all
keypresses to the controlling software. Keyboards are also used for computer gaming, either with
regular keyboards or by using keyboards with special gaming features, which can expedite
frequently used keystroke combinations. A keyboard is also used to give commands to the
operating system of a computer, such as Windows' Control-Alt-Delete combination, which brings
up a task window or shuts down the machine.


CONNECTING KEYBOARDS

Actual demonstration by the facilitator.

KEYBOARD MAINTENANCE/CLEANING PROCEDURE
http://home.innernet.net/services/services-tips.asp

Symptoms:

Sticky or jammed keys

Cleaning Options:

Electronic Vacuum Cleaner with a conducting grounded nozzle
Can of compressed air
Clean with solution and shop towel

Supplies needed:

Alcohol or Glass Cleaner or Anti-Static wipes
Canned Air
Shop Towel
Small Brush for Dusting
Foam Tipped Swabs
Key Cap Removal Tool
Electronic Vacuum Cleaner (grounded nozzle)

Procedures:

Any combination of this procedure can be used. It is not necessary to perform them all.

Turn off computer and disconnect keyboard.
Turn your keyboard upside down and gently tap the front edge, the one nearest to you as you
type, against the desk. You will be amazed at how much dust and dirt will fall out.
65


Use compressed air to blow the dust out of hard to get at places. Always keep the can level to
prevent discharging the propellant which can damage the surface of the keys.

For a complete cleaning, remove the key caps using the removal tool and then vacuum with an
Electronic Vacuum Cleaner. Replace the key caps insuring they snap back into place.
Use a small amount of alcohol or glass cleaner on a shop towel and clean each key.

CAUTION do not use designer paper towels, the dyes can be transferred to that nice tan finish
and can be very hard to remove.

Use a brush to remove loose dust and grime. Use Foam Tipped Swabs dipped in alcohol or glass
cleaner to clean heavier grime and between the keys.

Reconnect the keyboard.


JOYSTICKS
http://en.wikipedia.org/wiki/Joystick

A joystick is an input device consisting of a stick that pivots on a
base and reports its angle or direction to the device it is controlling.
Joysticks are often used to control video games, and usually have
one or more push-buttons whose state can also be read by the
computer. A popular variation of the joystick used on modern video
game consoles is the analog stick.

The joystick has been the principal flight control in the cockpit of
many aircraft, particularly military fast jets, where center stick or side-
stick location may b e employed (see also Center stick vs side-stick).

Joysticks are also used for controlling machines such as cranes,
trucks, underwater unmanned vehicles, wheelchairs, surveillance
cameras and zero turning radius lawn mowers. Miniature finger-
operated joysticks have been adopted as input devices for smaller
electronic equipment such as mobile phones.


WEB CAMS
http://en.wikipedia.org/wiki/Webcam

A webcam is a video capture device connected to a computer or
computer network, often using a USB port or, if connected to a
network, ethernet or Wi-Fi.

The most popular use is for video telephony, permitting a
computer to act as a videophone or video conferencing station.
This can be used in messenger programs such as Windows
Live Messenger, Skype and Yahoo messenger services. Other
popular uses, which include the recording of video files or even
still-images, are accessible via numerous software programs,
applications and devices.

Webcams are known for low manufacturing costs and flexibility,[1] making them the lowest cost
form of videotelephony.

The term "webcam" may also be used in its original sense of a video camera connected to Web
continuously for an indefinite time, rather than for a particular session, generally supplying a view
for anyone who visits its Web page. Some of these, for example those used as online traffic
cameras, are expensive, rugged professional video cameras.


CONNECTING A WEB CAM

Actual demonstration by the facilitator.
66


SPEAKERS
http://en.wikipedia.org/wiki/Computer_speaker

Computer speakers, or multimedia speakers, are speakers external to a computer, that disable
the lower fidelity built-in speaker. They often have a low-power internal amplifier. The standard
audio connection is a 3.5mm (1/8 inch) stereo jack plug often colour-coded lime green (following
the PC 99 standard) for computer sound cards. A plug and socket for a two-wire (signal and
ground) coaxial cable that is widely used to connect analog audio and video components. Also
called a "phono connector," rows of RCA sockets are found on the backs of stereo amplifier and
numerous A/V products. The prong is 1/8" thick by 5/16" long. A few use an RCA connector for
input. There are also USB speakers which are powered from the 5 volts at 200 milliamps
provided by the USB port, allowing about half a watt of output power.

Computer speakers range widely in quality and in price. The computer speakers typically
packaged with computer systems are small plastic boxes with mediocre sound quality. Some of
the slightly better computer speakers have equalization features such as bass and treble controls,
improving their sound quality somewhat.

The internal amplifiers require an external power source, known as a 'wall-wart'. More
sophisticated computer speakers may have a 'subwoofer' unit, to enhance bass output, and these
units usually include the power amplifiers both for the bass speaker, and the small 'satellite'
speakers.

Some computer displays have rather basic speakers built-in. Laptops come with integrated
speakers. Unfortunately the tight restriction on space inevitable in laptops means these speakers
unavoidably produce low-quality sound.

For some users, a lead connecting computer sound output to an existing stereo system is
practical. This normally yields much better results than small low-cost computer speakers.
Computer speakers can also serve as an economy amplifier for MP3 player use for those who
wish to not use headphones although some models of computer speakers have headphone jacks
of their own.

Features vary by manufacturer, but may include the following:

    •   An LED power indicator.
    •   A 3.5-mm (1/8-inch) headphone jack.
    •   Controls for volume, and sometimes bass and treble
    •   A remote volume control.

Major computer speaker companies

    •   Altec Lansing
    •   Bose Corporation
    •   Creative Labs
    •   Cyber Acoustics
    •   Dell
    •   Edifier
    •   General Electric
    •   Harman Kardon
    •   Hewlett-Packard
    •   JBL
    •   Klipsch
    •   Logitech


CONNECTING SPEAKERS

Actual demonstration by the facilitator.


PRINTERS

A device that prints text or illustrations on paper.
67

TYPES OF PRINTERS
http://www.webopedia.com/TERM/P/printer.html

There are many different types of printers. In terms of the technology utilized, printers fall into the
following categories:

  •   daisy-wheel: Similar to a ball-head typewriter, this type of printer has a plastic or metal
      wheel on which the shape of each character stands out in relief. A hammer presses the
      wheel against a ribbon, which in turn makes an ink stain in the shape of the character on
      the paper.Daisy-wheel printers produce letter-quality print but cannot print graphics.

  •   dot-matrix: Creates characters by striking pins against an ink ribbon. Each pin makes a
      dot, and combinations of dots form characters and illustrations.

  •   ink-jet: Sprays ink at a sheet of paper. Ink-jet printers produce high-quality text and
      graphics.

  •   laser: Uses the same technology as copy machines. Laser printers produce very high
      quality text and graphics.

  •   LCD & LED : Similar to a laser printer, but uses liquid crystals or light-emitting diodes
      rather than a laser to produce an image on the drum.

  •   line printer: Contains a chain of characters or pins that print an entire line at one time. Line
      printers are very fast, but produce low-quality print.

  •   thermal printer: An inexpensive printer that works by pushing heated pins against heat-
      sensitive paper. Thermal printers are widely used in calculators and fax machines.

Printers are also classified by the following characteristics:

  •   quality of type: The output produced by printers is said to be either letter quality (as good
      as a typewriter), near letter quality, or draft quality. Only daisy-wheel, ink-jet, and laser
      printers produce letter-quality type. Some dot-matrix printers claim letter-quality print, but if
      you look closely, you can see the difference.

  •   speed: Measured in characters per second (cps) or pages per minute (ppm), the speed of
      printers varies widely. Daisy-wheel printers tend to be the slowest, printing about 30 cps.
      Line printers are fastest (up to 3,000 lines per minute). Dot-matrix printers can print up to
      500 cps, and laser printers range from about 4 to 20 text pages per minute.

  •   impact or non-impact: Impact printers include all printers that work by striking an ink
      ribbon. Daisy-wheel, dot-matrix, and line printers are impact printers. Non-impact printers
      include laser printers and ink-jet printers. The important difference between impact and
      non-impact printers is that impact printers are much noisier.

  •   graphics: Some printers (daisy-wheel and line printers) can print only text. Other printers
      can print both text and graphics.

  •   fonts : Some printers, notably dot-matrix printers, are limited to one or a few fonts. In
      contrast, laser and ink-jet printers are capable of printing an almost unlimited variety of
      fonts. Daisy-wheel printers can also print different fonts, but you need to change the daisy
      wheel, making it difficult to mix fonts in the same document.


INSTALLING A PRINTER

Actual demonstration by the facilitator.


DIAGNOSING PRINTER PROBLEMS/ SOLVING COMMON PRINTER PROBLEMS
http://articles.techrepublic.com.com/5100-10878_11-5032833.html
68

It seems as though printer problems occur only at the most inconvenient time—like when you
have a deadline to meet and you’ve waited until the last minute to print the document.

The difficult thing about having a printer problem fixed down at your local computer store is that
you probably don’t know whether the problem lies with your computer, the cable, or the printer.
That means carrying in your computer, the cable, and the printer.

If you’d like to try troubleshooting printer problems on your own, you need a basic understanding
of what goes on during the print process. You don’t have to know every detail of the design of the
printer, the printer port, the printer driver, and the printer cable, but a little background information
may help you find and correct the problem.

From your computer to your printer

One of the most common sources of printing problems is the printer cable. Cable problems are
also the easiest to diagnose and correct.

If you examine the cable connecting the printer to your computer, chances are you’ll find a 36-pin
Centronics connector on the end attached to the printer and a 25-pin D-type connector attached
to the parallel port of your computer, which is called the printer port or LPT port.

The default printer port for most software is usually LPT1. If there are multiple parallel ports in
your machine, they will be designated LPT1, LPT2, and so on.

There have been several enhancements to the capabilities of the parallel port since the days of
the IBM XT machines. The original ports were unidirectional, which meant that they could send
data but couldn’t receive it. They could, however, receive status information from the printer.
These signals—such as paper out, busy, or error—control the flow of data to the printer.

Your printer has a data buffer that receives the data from the computer and supplies it to the
printer at a rate that the printer can accept. The signals from the printer to the parallel port turn on
and off this flow of data.

Each of the 25 conductors on your printer cable is important to the proper operation of your
printer. A bad cable can produce all sorts of strange printing problems.

You should consider several issues when examining a printer cable. Normal wear and tear can
damage one or more of the wires or pins in the connectors. (The Centronics connector seems to
be more vulnerable to damage than the D-type connector.) Look for obvious damage to the cable
and its connectors, although a bad cable will often show no signs of damage. Make sure that the
cable isn’t passing near a source of electrical interference. The longer the cable, the more
susceptible it will be to electrical interference.

If you have a late-model computer with a parallel port that supports ECP/EPP modes and you use
a modern, fast printer that can take advantage of it, be sure to connect them with a high-quality
IEEE 1284 compliant cable. The price will seem high for a printer cable, particularly when you
compare it with the lowest priced cables, but it’s worth the money.

The fastest way to troubleshoot a cable with no obvious defects is to substitute a known good
cable and see if the problem goes away. Or, you can place your questionable cable on a system
that is having no problems, to see if your problems follow the cable.

Printer driver problems

The printer driver that you installed when you set up your printer tells your parallel port how to
manage the data being sent to the printer. Different makes and models of printers require specific
software to effectively manage their particular features.

One of the most common printing problems is that an incorrect or defective printer driver is being
used. This can result in all sorts of strange gibberish on the printed page. If you selected the
wrong printer driver for the printer you are trying to use, you may need to purge the print jobs that
are hung up in the spooler as well as reset the printer to remove any bad data that remains in its
buffer.

Purge the print jobs first. You can do this in Windows 95/98 by clicking on Start, Settings,
Printers, and then clicking the icon for the appropriate printer. When the window for the printer
opens, click Printer in the upper-left corner and then click Purge Documents.
69

Now reset your printer to remove the last traces of the “poison” still in the printer’s buffer.

It’s also possible that you have the correct printer driver but that it isn’t configured properly for the
amount of RAM installed in your printer. If the driver is set for more RAM than the printer actually
has, an overflow can occur. This might go unnoticed for a long time. It may appear only when you
have a large print job or pages with lots of graphics.

Get the latest drivers

Sometimes there are known issues with a printer driver that crop up only under certain
circumstances. The best insurance is to go the Internet and download the latest printer drivers for
your operating system and printer.

Whenever you install a printer driver, make sure that all of the setting options are correct for your
individual printer. This not only includes the RAM settings, but also settings like the source tray
for the paper, the paper size and orientation, the timeout settings, and the print resolution.

Selecting the correct port type

Another possibility is that your parallel port settings are incorrect in your CMOS setup. This is
assuming that the parallel port is integrated on the motherboard. First, see if Windows is giving
any indication of a problem in Device Manager. To do this, click Start, Settings, Control Panel,
and then double-click on the System icon. Now select the Device Manager tab. If there is a
problem with the on-board parallel port settings, you will see a flag on the device, indicating a
discrepancy. Highlight the parallel port and click Properties to view the device status. Next, click
Resources to check out any resource conflicts.

It’s quite possible that when you last installed a component, you created a resource conflict that
didn’t appear until later when you tried to print. If a conflict is indicated, try changing the resources
that the offending device is using.

Testing the parallel port

Diagnostic software such as CheckIt or Norton Utilities can test the integrity of your port by using
a loop-back plug attached to your parallel port. This type of test can also be performed on your
serial ports. Be sure that you use a loop-back plug compatible with the testing software. This is
because manufacturers utilize different loop-back wiring schemes in their products.

The loop-back plug test may not find every parallel port problem, but if it does indicate a problem,
it’s probably accurate.

If you find a bad parallel port on a motherboard with integrated peripherals, you can disable the
port in the CMOS Setup and install an add-on parallel port if you have an unused ISA slot. But
check prices before you do this. You may be able to replace your motherboard with a new one for
very little more than the cost of a new parallel port card.

Check the CMOS

If you find no resource conflicts, try changing the port type in the CMOS. Run the CMOS Setup
program, open the Integrated Peripherals menu, and select the parallel port type settings. Press
[F1] to view the default setting. If the default setting isn’t specified, try changing the mode to the
default. You can also try setting to another value the memory address that the port is using. Start
with the default setting and then restart the computer and try printing again. Windows will
probably find what it considers new hardware and install the proper software during the start up
process. Note: This is the process I followed on my computer. However, since every CMOS is
different, your system may require you to change the port type in a different manner.
Documentation may accompany your computer or motherboard (if it was custom built).

Process of elimination

If you’ve checked the cable, the printer driver, the parallel port settings, the integrity of the parallel
port, and the possibility of resource conflicts, about the only thing left is the printer itself.

There are a lot of things that can go wrong with a printer. If you’ve eliminated all other possibilities
and have decided that the printer is the culprit, consult the manual that came with your printer for
user-serviceable items.

The new generation of inkjet printers has the capability of printing at a very high resolution. To
70

achieve this resolution, you must choose from a variety of high-quality papers available. If you’re
using standard quality inkjet paper, there is no benefit from choosing a very high resolution. The
print speed will be greatly influenced by the resolution you select.

Don’t try to use the paper designed for an ink jet printer in your laser printer. This paper is not
compatible with the high temperatures present in a laser printer. You can create a real mess
inside your laser printer by doing so. (Guess how I learned this.)

Another lesson I learned the hard way concerns letterhead paper and the envelopes that have a
preprinted return address. Be sure that the ink used on the letterhead and the envelopes is
approved for laser printers. Some of the more decorative inks will melt on the rollers of the printer
and then transfer to the remainder of the pages as they pass through the printer.

If your laser printer has begun to print pages with some of the areas of the page appearing lighter
than the rest, your toner cartridge may be a little low on toner. To get the maximum life from a
toner cartridge, make sure that the remaining toner is evenly distributed in the cartridge. Do this
by removing the cartridge from the printer and, while holding it in the same orientation that it rests
in when installed, gently rock it back and forth, tilting it about 45 degrees in each direction. The
object is to make toner available over the whole width of the drum. Be careful not to shake the
cartridge too vigorously as it takes very little spilled toner to make a big mess.

While you have the printer open and the cartridge removed, take the time to clean it out. Follow
the directions in the owner’s manual carefully so as to not damage anything.
Repairing printers
If it turns out that that a major component of your printer needs to be replaced, you may find that
the new part costs nearly as much as a new printer. If you use a repair service, ask for an
estimate of the repair costs before they proceed.


MOUSE
http://en.wikipedia.org/wiki/Mouse_%28computing%29

In computing, a mouse (plural mice, mouses, or mouse
devices.) is a pointing device that functions by detecting two-
dimensional motion relative to its supporting surface. Physically,
a mouse consists of an object held under one of the user's
hands, with one or more buttons. It sometimes features other
elements, such as "wheels", which allow the user to perform
various system-dependent operations, or extra buttons or fe
atures can add more control or dimensional input. The mouse's
motion typically translates into the motion of a cursor on a
display, which allows for fine control of a Graphical User
Interface.

The name mouse, originated at the Stanford Research Institute, derives from the resemblance of
early models (which had a cord attached to the rear part of the device, suggesting the idea of a
tail) to the common mouse.

The first marketed integrated mouse – shipped as a part of a computer and intended for personal
computer navigation – came with the Xerox 8010 Star Information System in 1981. However, the
mouse remained relatively obscure until the appearance of the Apple Macintosh; in 1984 PC
columnist John C. Dvorak ironically commented on the release of this new computer with a
mouse: “There is no evidence that people want to use these things.”

A mouse now comes with most computers and many other varieties can be bought separately.


MOUSE INTERFACES (PS2, SERIAL, USB AND WIRELESS)

Actual discussion by the facilitator.


MOUSE CLEANING PROCEDURES

Supplies needed:

Anti-static or Glass Cleaner
71

Shop Towel
Alcohol
Foam Tipped Swabs

Procedure:

Turn off the computer and unplug the mouse.
Use glass cleaner and shop towel to run over the cord and wipe down mouse. Turn the mouse
upside down and remove mouse ball plate. Remove ball and clean it with warm water. Let it dry.
Remove dust and grime in the mouse housing with a Foam Tipped Swabs dipped in alcohol. Pay
special attention to the ball rollers.

Reassemble and reconnect.


                   Chapter 9 - EXPANSION CARDS/PERIPHERAL DEVICES
                                  (actual demonstration)


EXPANSION SLOTS
http://www.webopedia.com/TERM/E/expansion_slot.html

An opening in a computer where a circuit board can be inserted to add new capabilities to the
computer. Nearly all personal computers except portables contain expansion slots for adding
more memory, graphics capabilities, and support for special devices. The boards inserted into the
expansion slots are called expansion boards, expansion cards , cards , add-ins , and add-ons.

Expansion slots for PCs come in two basic sizes: half- and full-size. Half-size slots are also called
8-bit slots because they can transfer 8 bits at a time. Full-size slots are sometimes called 16-bit
slots. In addition, modern PCs include PCI slots for expansion boards that connect directly to the
PCI bus.


PROPER INSERTION OF EXPANSION CARD

- Actual discussion of the facilitator


REPLACING AND REMOVING EXPANSION CARD

- Actual discussion of the facilitator


DISPLAY /VIDEO OR GRAPHICS CARD
http://www.answers.com/topic/video-card-1

A video card, video adapter, graphics-accelerator
card, display adapter or graphics card is an
expansion card whose function is to generate and
output images to a display. Many video cards offer
added functions, such as accelerated rendering of 3D
scenes and 2D graphics, video capture, TV-tuner
adapter, MPEG-2 and MPEG-4 decoding, FireWire,
light pen, TV output, or the ability to connect multiple
monitors (multi-monitor), while other modern high
performance cards are used for more graphically
demanding purposes such as PC games.

Video hardware can be integrated on the motherboard,
as it often happened with early computers; in this configuration it was sometimes referred to as a
video controller or graphics controller.


GRAPHICS ADAPTER INSTALLATION

- Actual discussion of the facilitator
72


ADDING AD REMOVING VIDEO CARD

- Actual discussion of the facilitator


COMMON PROBLEMS OF GRAPHICS ADAPTER
http://technology.ezineseeker.com/3-common-vga-drivers-problems-3-simple-troubleshooting-
solutions-143c2b1fab.html

There are quite a number of common problems that computer users encounter with their video
graphics array (VGA), and the most prevalent of these problems are often due to the VGA
drivers. This article will list the top 3 common VGA problems, and 3 simple troubleshooting
solutions to resolve them.

Problem one: Your monitor's power LED seems to flash, but there is no image displayed on
screen. This could possibly mean a couple of things, but before you do something stupid like
smacking the monitor hoping it will somehow jar it back to life, check to see if the connection to
the computer is ok.

Sometimes even when things are all connected there may still be problems. This would most
likely mean that there is something wrong with the digital/analogue connection, and you will have
to look into the problem. It could be the cable itself, or it could be the port. It could also mean that
you may need to have a converter, depending on how old or how new your monitor is. Not
everything is a problem with the driver though, and sometimes hardware also plays quite a part in
it; so you need to look at this problem from both angles.

The problem could also lie with your graphics card hardware and its drivers. One thing that you
need to have is the latest drivers for the graphics card. By doing so, you can figure out the
problem with ease, especially if you can eliminate drivers as being the sole cause of the
problems.

First things first, make sure that you are able to verify the graphics card compatibility with both
your system and the monitor. If there is still an issue with the display, then what you need to do is
to get the latest drivers. You can do so by simply going online and visit the manufacturer's
website and download the drivers from there. More often than not, this is enough to solve the
problem.

But if it still doesn't work, do not worry, most of the time, blank unresponsive screens would more
than often mean that you have installed a previous, outdated version of the drivers. What you can
do is also to use force ware drivers, which are universal drivers for graphics card that activates
the chip the same way your manufacturer has designed it. In fact, there is almost no difference
when it comes to both drivers, so you can use both.

One thing unique about the display environment of the PC is that there is another set of drivers
that come into play, which both facilitates and augments the capabilities of your graphics card
and this is called the Direct X technology. This is a technology released by Microsoft, and a lot of
the architecture built around the display driver is done so in reference to the versions of Direct X
available.

Therefore, it is also crucial for you to have an updated version of Direct X, whose drivers are
available on the company website and sometimes comes packaged with new games and new
graphics cards that are purchased.

With these 3 common problems and 3 common tips to use, you will be able to route around many
of the display driver problems that are plaguing people all over the world.


TV CARDS
http://en.wikipedia.org/wiki/TV_tuner_card

A TV tuner card is a computer component that allows
television signals to be received by a computer. Most TV
tuners also function as video capture cards, allowing them
to record television programs onto a hard disk. Variants of
TV Tuner cards are analog, digital, hybrid, combo tuner
and mobile.
73


ADDING AND REMOVING TV TUNER CARD

- Actual discussion of the facilitator


SOUND CARDS
http://en.wikipedia.org/wiki/Sound_card

A sound card (also known as an audio card) is
a computer expansion card that facilitates the
input and output of audio signals to and from a
computer under control of computer programs.
Typical uses of sound cards include providing
the audio component for multimedia applications
such as music composition, editing video or
audio,        presentation,    education,    and
entertainment (games). Many computers have
sound capabilities built in, while others require
additional expansion cards to provide for audio
capability.


ADDING AND REMOVING SOUND CARD

- Actual discussion of the facilitator


LAN CARDS
http://en.wikipedia.org/wiki/Network_interface_controller

A network interface card, network adapter,
network interface controller (NIC), or LAN
adapter is a computer hardware component
designed to allow computers to communicate
over a computer network. It is both an OSI
layer 1 (physical layer) and layer 2 (data link
layer) device, as it provides physical access to
a networking medium and provides a low-level
addressing system through the use of MAC
addresses. It allows users to connect to each
other either by using cables or wirelessly.

Although other network technologies exist,
Ethernet has achieved near-ubiquity since the
mid-1990s. Every Ethernet network card has a unique 48-bit serial number called a MAC
address, which is stored in ROM carried on the card. Every computer on an Ethernet network
must have a card with a unique MAC address. Normally it is safe to assume that no two network
cards will share the same address, because card vendors purchase blocks of addresses from the
Institute of Electrical and Electronics Engineers (IEEE) and assign a unique address to each card
at the time of manufacture.

Whereas network cards used to be expansion cards that plug into a computer bus, the low cost
and ubiquity of the Ethernet standard means that most newer computers have a network interface
built into the motherboard. These either have Ethernet capabilities integrated into the
motherboard chipset or implemented via a low cost dedicated Ethernet chip, connected through
the PCI (or the newer PCI express) bus. A separate network card is not required unless multiple
interfaces are needed or some other type of network is used. Newer motherboards may even
have dual network (Ethernet) interfaces built-in.

The card implements the electronic circuitry required to communicate using a specific physical
layer and data link layer standard such as Ethernet or token ring. This provides a base for a full
network protocol stack, allowing communication among small groups of computers on the same
LAN and large-scale network communications through routable protocols, such as IP.
74

There are four techniques used to transfer data, the NIC may use one or more of these
techniques.

    •   Polling is where the microprocessor examines the status of the peripheral under program
        control.
    •   Programmed I/O is where the microprocessor alerts the designated peripheral by
        applying its address to the system's address bus.
    •   Interrupt-driven I/O is where the peripheral alerts the microprocessor that it's ready to
        transfer data.
    •   DMA is where an intelligent peripheral assumes control of the system bus to access
        memory directly. This removes load from the CPU but requires a separate processor on
        the card.

A network card typically has a twisted pair, BNC, or AUI socket where the network cable is
connected, and a few LEDs to inform the user of whether the network is active, and whether or
not there is data being transmitted on it. Network cards are typically available in 10/100/1000
Mbit/s varieties. This means they can support a notional maximum transfer rate of 10, 100 or
1000 Megabits per second.

A network interface controller (NIC) is a hardware device that handles an interface to a
computer network and allows a network-capable device to access that network. The NIC has a
ROM chip that contains a unique number, the media access control (MAC) Address burned into
it. The MAC address identifies the device uniquely on the LAN. The NIC exists on both the
'Physical Layer' (Layer 1) and the 'Data Link Layer' (Layer 2) of the OSI model.

Sometimes the words 'controller' and 'card' are used interchangeably when talking about
networking because the most common NIC is the network interface card. Although 'card' is more
commonly used, it is less encompassing. The 'controller' may take the form of a network card that
is installed inside a computer, or it may refer to an embedded component as part of a computer
motherboard, a router, expansion card, printer interface or a USB device.

A MAC address is a 48-bit network hardware identifier that is burned into a ROM chip on the NIC
to identify that device on the network. The first 24-bit field is called the Organizationally Unique
Identifier (OUI) and is largely manufacturer-specific. Each OUI allows for 16,777,216 Unique NIC
Addresses. Smaller manufacturers that do not have a need for over 4096 unique NIC addresses
may opt to purchase an Individual Address Block (IAB) instead. An IAB consists of the 24-bit OUI
plus a 12-bit extension (taken from the 'potential' NIC portion of the MAC address.)


ADDING AND REMOVING LAN CARD

- Actual discussion of the facilitator


MODEM
http://www.webopedia.com/TERM/m/modem.html

Short for modulator-demodulator. A modem is a device or
program that enables a computer to transmit data over, for
example, telephone or cable lines. Computer information is
stored digitally, whereas information transmitted over
telephone lines is transmitted in the form of analog waves.
A modem converts between these two forms.

Fortunately, there is one standard interface for connecting
external modems to computers called RS-232.
Consequently, any external modem can be attached to
any computer that has an RS-232 port, which almost all personal computers have. There are also
modems that come as an expansion board that you can insert into a vacant expansion slot.
These are sometimes called onboard or internal modems.

While the modem interfaces are standardized, a number of different protocols for formatting data
to be transmitted over telephone lines exist. Some, like CCITT V.34, are official standards, while
others have been developed by private companies. Most modems have built-in support for the
more common protocols -- at slow data transmission speeds at least, most modems can
75

communicate with each other. At high transmission speeds, however, the protocols are less
standardized.

Aside from the transmission protocols that they support, the following characteristics distinguish
one modem from another:

        o bps : How fast the modem can transmit and receive data. At slow rates, modems are
        measured in terms of baud rates. The slowest rate is 300 baud (about 25 cps). At higher
        speeds, modems are measured in terms of bits per second (bps). The fastest modems
        run at 57,600 bps, although they can achieve even higher data transfer rates by
        compressing the data. Obviously, the faster the transmission rate, the faster you can
        send and receive data. Note, however, that you cannot receive data any faster than it is
        being sent. If, for example, the device sending data to your computer is sending it at
        2,400 bps, you must receive it at 2,400 bps. It does not always pay, therefore, to have a
        very fast modem. In addition, some telephone lines are unable to transmit data reliably at
        very high rates.
        v voice/data: Many modems support a switch to change between voice and data
        modes. In data mode, the modem acts like a regular modem. In voice mode, the modem
        acts like a regular telephone. Modems that support a voice/data switch have a built-in
        loudspeaker and microphone for voice communication.
        l auto-answer : An auto-answer modem enables your computer to receive calls in your
        absence. This is only necessary if you are offering some type of computer service that
        people can call in to use.
        p data compression : Some modems perform data compression, which enables them
        to send data at faster rates. However, the modem at the receiving end must be able to
        decompress the data using the same compression technique.
        d flash memory : Some modems come with flash memory rather than conventional
        ROM, which means that the communications protocols can be easily updated if
        necessary.
        n Fax capability: Most modern modems are fax modems, which means that they can
        send and receive faxes.

To get the most out of a modem, you should have a communications software package, a
program that simplifies the task of transferring data.


ADDING AND REMOVING INTERNAL MODEM

- Actual discussion of the facilitator


ADDING AND REMOVING EXTERNAL MODEM

- Actual discussion of the facilitator


SCANNER
http://en.wikipedia.org/wiki/Image_scanner

In computing, a scanner is a device that optically scans
images, printed text, handwriting, or an object, and
converts it to a digital image. Common examples found
in offices are variations of the desktop (or flatbed)
scanner where the document is placed on a glass
window for scanning. Hand-held scanners, where the
device is moved by hand, have evolved from text
scanning "wands" to 3D scanners used for industrial
design, reverse engineering, test and measurement,
orthotics, gaming and other applications. Mechanically
driven scanners that move the document are typically
used for large-format documents, where a flatbed design
would be impractical.

Modern scanners typically use a charge-coupled device
(CCD) or a Contact Image Sensor (CIS) as the image
sensor, whereas older drum scanners use a
photomultiplier tube as the image sensor. A rotary
76

scanner, used for high-speed document scanning, is another type of drum scanner, using a CCD
array instead of a photomultiplier. Other types of scanners are planetary scanners, which take
photographs of books and documents, and 3D scanners, for producing three-dimensional models
of objects.

Another category of scanner is digital camera scanners, which are based on the concept of
reprographic cameras. Due to increasing resolution and new features such as anti-shake, digital
cameras have become an attractive alternative to regular scanners. While still having
disadvantages compared to traditional scanners (such as distortion, reflections, shadows, low
contrast), digital cameras offer advantages such as speed, portability and gentle digitizing of thick
documents without damaging the book spine. New scanning technologies are combining 3D
scanners with digital cameras to create full-color, photo-realistic 3D models of objects.

In the biomedical research area, detection devices for DNA microarrays are called scanners as
well. These scanners are high-resolution systems (up to 1 µm/ pixel), similar to microscopes. The
detection is done via CCD or a photomultiplier tube (PMT).
77


                    CHAPTER 10 - PC PORTS (ACTUAL DEMONSTRATION)

SERIAL PORT
http://www.webopedia.com/TERM/S/serial_port.html

A port, or interface, that can be used for serial
communication, in which only 1 bit is transmitted at a
time.

Most serial ports on personal computers conform to the
RS-232C or RS-422 standards. A serial port is a
general-purpose interface that can be used for almost
any type of device, including modems, mice, and printers
(although most printers are connected to a parallel port).


ADDING AND REPLACING SERIAL PORTS

- Actual discussion of the facilitator


PARALLEL PORT
http://en.wikipedia.org/wiki/Parallel_port

A parallel port is a type of interface found on
computers (personal and otherwise) for
connecting various peripherals. In computing,
a parallel port is a parallel communication
physical interface. It is also known as a
printer port or Centronics port. The IEEE
1284 standard defines the bi-directional
version of the port.


ADDING PARALLEL PORT

- Actual discussion of the facilitator


USB PORT
http://compnetworking.about.com/od/usbnetworking/p/usb-port.htm

A USB port is a standard cable connection interface on
personal computers and consumer electronics. USB ports
allow stand-alone electronic devices to be connected via
cables to a computer (or to each other).

USB stands for Universal Serial Bus, an industry standard
for short-distance digital data communications. USB allows
data to be transferred between devices. USB ports can also
supply electric power across the cable to devices without
their own power source.

Both wired and wireless versions of the USB standard exist,
although only the wired version involves USB po rts and cables.

What Can You Plug Into a USB Port?:

Many types of consumer electronics support USB
interfaces. These types of equipment are most
commonly used for computer networking:

    •   USB network adapters
    •   USB broadband and cellular modems for
        Internet access
Hard Drives: Types, Manufacturers and Identification

Mais conteúdo relacionado

Mais procurados

CD/DVD Drive Error Cause Detection and Solution
CD/DVD Drive Error Cause Detection and SolutionCD/DVD Drive Error Cause Detection and Solution
CD/DVD Drive Error Cause Detection and SolutionSH Rajøn
 
3rd grading-reviewer-pc-assembly-and-networking
3rd grading-reviewer-pc-assembly-and-networking3rd grading-reviewer-pc-assembly-and-networking
3rd grading-reviewer-pc-assembly-and-networkingstarlanter
 
Building a Personal Computer: A detailed guide
Building a Personal Computer: A detailed guideBuilding a Personal Computer: A detailed guide
Building a Personal Computer: A detailed guideAnand Prithviraj
 
Open Ware Ramsan Dram Ssd
Open Ware Ramsan  Dram SsdOpen Ware Ramsan  Dram Ssd
Open Ware Ramsan Dram SsdSidnir Vieira
 
ServStation - CD/DVD Servers and Loaders
ServStation - CD/DVD Servers and LoadersServStation - CD/DVD Servers and Loaders
ServStation - CD/DVD Servers and LoadersPrime Array
 
Apresentacao Solid Access Corp Presentation Openware 5 20 10
Apresentacao Solid Access Corp Presentation Openware 5 20 10Apresentacao Solid Access Corp Presentation Openware 5 20 10
Apresentacao Solid Access Corp Presentation Openware 5 20 10Sidnir Vieira
 
Unit3 ppt3 hard drive
Unit3 ppt3 hard driveUnit3 ppt3 hard drive
Unit3 ppt3 hard driveFarhanMalik93
 
ProServer - Direct network attached CD / DVD Server and Loader
ProServer - Direct network attached CD / DVD Server and LoaderProServer - Direct network attached CD / DVD Server and Loader
ProServer - Direct network attached CD / DVD Server and LoaderPrime Array
 
Guide to Build A High-Performance Custom Gaming PC
Guide to Build A High-Performance Custom Gaming PCGuide to Build A High-Performance Custom Gaming PC
Guide to Build A High-Performance Custom Gaming PCMemory4 less
 
Performing Disk Management Tasks
Performing Disk Management TasksPerforming Disk Management Tasks
Performing Disk Management TasksAmir Villas
 
101 1.1 hardware settings v2
101 1.1 hardware settings v2101 1.1 hardware settings v2
101 1.1 hardware settings v2Acácio Oliveira
 
How To Build A Computer
How To Build A ComputerHow To Build A Computer
How To Build A Computeriamsoccer17
 

Mais procurados (20)

Hw notes- aim Technologies
Hw notes- aim TechnologiesHw notes- aim Technologies
Hw notes- aim Technologies
 
CD/DVD Drive Error Cause Detection and Solution
CD/DVD Drive Error Cause Detection and SolutionCD/DVD Drive Error Cause Detection and Solution
CD/DVD Drive Error Cause Detection and Solution
 
3rd grading-reviewer-pc-assembly-and-networking
3rd grading-reviewer-pc-assembly-and-networking3rd grading-reviewer-pc-assembly-and-networking
3rd grading-reviewer-pc-assembly-and-networking
 
Hard Disk Data Acquisition
Hard Disk Data AcquisitionHard Disk Data Acquisition
Hard Disk Data Acquisition
 
Chapter07
Chapter07Chapter07
Chapter07
 
Building a Personal Computer: A detailed guide
Building a Personal Computer: A detailed guideBuilding a Personal Computer: A detailed guide
Building a Personal Computer: A detailed guide
 
Open Ware Ramsan Dram Ssd
Open Ware Ramsan  Dram SsdOpen Ware Ramsan  Dram Ssd
Open Ware Ramsan Dram Ssd
 
Dell precision 380
Dell precision 380Dell precision 380
Dell precision 380
 
ServStation - CD/DVD Servers and Loaders
ServStation - CD/DVD Servers and LoadersServStation - CD/DVD Servers and Loaders
ServStation - CD/DVD Servers and Loaders
 
Vostro 220
Vostro 220Vostro 220
Vostro 220
 
Apresentacao Solid Access Corp Presentation Openware 5 20 10
Apresentacao Solid Access Corp Presentation Openware 5 20 10Apresentacao Solid Access Corp Presentation Openware 5 20 10
Apresentacao Solid Access Corp Presentation Openware 5 20 10
 
Unit3 ppt3 hard drive
Unit3 ppt3 hard driveUnit3 ppt3 hard drive
Unit3 ppt3 hard drive
 
Raid technology
Raid technologyRaid technology
Raid technology
 
ProServer - Direct network attached CD / DVD Server and Loader
ProServer - Direct network attached CD / DVD Server and LoaderProServer - Direct network attached CD / DVD Server and Loader
ProServer - Direct network attached CD / DVD Server and Loader
 
Guide to Build A High-Performance Custom Gaming PC
Guide to Build A High-Performance Custom Gaming PCGuide to Build A High-Performance Custom Gaming PC
Guide to Build A High-Performance Custom Gaming PC
 
Performing Disk Management Tasks
Performing Disk Management TasksPerforming Disk Management Tasks
Performing Disk Management Tasks
 
101 1.1 hardware settings v2
101 1.1 hardware settings v2101 1.1 hardware settings v2
101 1.1 hardware settings v2
 
How to build a computer
How to build a computerHow to build a computer
How to build a computer
 
How To Build A Computer
How To Build A ComputerHow To Build A Computer
How To Build A Computer
 
Hbcd
HbcdHbcd
Hbcd
 

Semelhante a Hard Drives: Types, Manufacturers and Identification

Technical & Non-Technical Information
Technical & Non-Technical InformationTechnical & Non-Technical Information
Technical & Non-Technical InformationBalBadwal
 
Parts of system unit
Parts of system unitParts of system unit
Parts of system unitkapitanbasa
 
Hard disk drives
Hard disk drivesHard disk drives
Hard disk drivesBits
 
Chapter 9: SCSI Drives and File Systems
Chapter 9: SCSI Drives and File SystemsChapter 9: SCSI Drives and File Systems
Chapter 9: SCSI Drives and File Systemsaskme
 
Internal components - luke nutter
Internal components - luke nutterInternal components - luke nutter
Internal components - luke nutterluke_nutter
 
Technical presentation
Technical presentationTechnical presentation
Technical presentationconnorhowe131
 
Asif Jamal disk (it)
Asif Jamal disk (it)Asif Jamal disk (it)
Asif Jamal disk (it)Asif Jamal
 
Project in computer education ((Team Flash Drive)
Project in computer education ((Team Flash Drive)Project in computer education ((Team Flash Drive)
Project in computer education ((Team Flash Drive)gremiorodolfo24
 
Project in computer education ((Team Flash Drive)
Project in computer education ((Team Flash Drive)Project in computer education ((Team Flash Drive)
Project in computer education ((Team Flash Drive)gremiorodolfo24
 
Project in computer education (jr)
Project in computer education (jr)Project in computer education (jr)
Project in computer education (jr)Sherwin Company
 
Project in computer education (Team Flash Drive)
Project in computer education (Team Flash Drive)Project in computer education (Team Flash Drive)
Project in computer education (Team Flash Drive)gremiorodolfo24
 
Project in computer education (Team Flash Drive)
Project in computer education (Team Flash Drive)Project in computer education (Team Flash Drive)
Project in computer education (Team Flash Drive)Sherwin Company
 
Project in computer education (jr)
Project in computer education (jr)Project in computer education (jr)
Project in computer education (jr)Sherwin Company
 
PERFORM CALCULATION AND MENSURATION.pptx
PERFORM CALCULATION AND MENSURATION.pptxPERFORM CALCULATION AND MENSURATION.pptx
PERFORM CALCULATION AND MENSURATION.pptxEchelleOgatis
 
Parts of System Unit (2).ppt aaaaaaa dd gg g h h h h...
Parts of System Unit (2).ppt   aaaaaaa         dd         gg  g       h h h h...Parts of System Unit (2).ppt   aaaaaaa         dd         gg  g       h h h h...
Parts of System Unit (2).ppt aaaaaaa dd gg g h h h h...AnalizaCastillejosSa
 

Semelhante a Hard Drives: Types, Manufacturers and Identification (20)

1.1 storage device
1.1  storage device1.1  storage device
1.1 storage device
 
Hard disk PPT
Hard disk PPTHard disk PPT
Hard disk PPT
 
Technical & Non-Technical Information
Technical & Non-Technical InformationTechnical & Non-Technical Information
Technical & Non-Technical Information
 
Parts of system unit
Parts of system unitParts of system unit
Parts of system unit
 
Hard Disk Componets
Hard Disk ComponetsHard Disk Componets
Hard Disk Componets
 
Hard disk drives
Hard disk drivesHard disk drives
Hard disk drives
 
Chapter 9: SCSI Drives and File Systems
Chapter 9: SCSI Drives and File SystemsChapter 9: SCSI Drives and File Systems
Chapter 9: SCSI Drives and File Systems
 
Internal components - luke nutter
Internal components - luke nutterInternal components - luke nutter
Internal components - luke nutter
 
Technical presentation
Technical presentationTechnical presentation
Technical presentation
 
Asif Jamal disk (it)
Asif Jamal disk (it)Asif Jamal disk (it)
Asif Jamal disk (it)
 
Harddisk
HarddiskHarddisk
Harddisk
 
Project in computer education ((Team Flash Drive)
Project in computer education ((Team Flash Drive)Project in computer education ((Team Flash Drive)
Project in computer education ((Team Flash Drive)
 
Project in computer education ((Team Flash Drive)
Project in computer education ((Team Flash Drive)Project in computer education ((Team Flash Drive)
Project in computer education ((Team Flash Drive)
 
Project in computer education (jr)
Project in computer education (jr)Project in computer education (jr)
Project in computer education (jr)
 
Project in computer education (Team Flash Drive)
Project in computer education (Team Flash Drive)Project in computer education (Team Flash Drive)
Project in computer education (Team Flash Drive)
 
Project in computer education (Team Flash Drive)
Project in computer education (Team Flash Drive)Project in computer education (Team Flash Drive)
Project in computer education (Team Flash Drive)
 
Project in computer education (jr)
Project in computer education (jr)Project in computer education (jr)
Project in computer education (jr)
 
HARD DISK DRIVE ppt
HARD DISK DRIVE pptHARD DISK DRIVE ppt
HARD DISK DRIVE ppt
 
PERFORM CALCULATION AND MENSURATION.pptx
PERFORM CALCULATION AND MENSURATION.pptxPERFORM CALCULATION AND MENSURATION.pptx
PERFORM CALCULATION AND MENSURATION.pptx
 
Parts of System Unit (2).ppt aaaaaaa dd gg g h h h h...
Parts of System Unit (2).ppt   aaaaaaa         dd         gg  g       h h h h...Parts of System Unit (2).ppt   aaaaaaa         dd         gg  g       h h h h...
Parts of System Unit (2).ppt aaaaaaa dd gg g h h h h...
 

Mais de Laguna State Polytechnic University

Formal Logic - Lesson 4 - Tautology, Contradiction and Contingency
Formal Logic - Lesson 4 - Tautology, Contradiction and ContingencyFormal Logic - Lesson 4 - Tautology, Contradiction and Contingency
Formal Logic - Lesson 4 - Tautology, Contradiction and ContingencyLaguna State Polytechnic University
 
Exploring the Difference Between Information Technology and Information System
Exploring the Difference Between Information Technology and Information SystemExploring the Difference Between Information Technology and Information System
Exploring the Difference Between Information Technology and Information SystemLaguna State Polytechnic University
 

Mais de Laguna State Polytechnic University (20)

Number Theory - Lesson 1 - Introduction to Number Theory
Number Theory - Lesson 1 - Introduction to Number TheoryNumber Theory - Lesson 1 - Introduction to Number Theory
Number Theory - Lesson 1 - Introduction to Number Theory
 
Formal Logic - Lesson 8 - Predicates and Quantifiers
Formal Logic - Lesson 8 - Predicates and QuantifiersFormal Logic - Lesson 8 - Predicates and Quantifiers
Formal Logic - Lesson 8 - Predicates and Quantifiers
 
Machine Learning Algorithms (Part 1)
Machine Learning Algorithms (Part 1)Machine Learning Algorithms (Part 1)
Machine Learning Algorithms (Part 1)
 
Artificial Intelligence Algorithms
Artificial Intelligence AlgorithmsArtificial Intelligence Algorithms
Artificial Intelligence Algorithms
 
Formal Logic - Lesson 7 - Rules of Inference
Formal Logic - Lesson 7 - Rules of InferenceFormal Logic - Lesson 7 - Rules of Inference
Formal Logic - Lesson 7 - Rules of Inference
 
Formal Logic - Lesson 6 - Switching Circuits
Formal Logic - Lesson 6 - Switching CircuitsFormal Logic - Lesson 6 - Switching Circuits
Formal Logic - Lesson 6 - Switching Circuits
 
Formal Logic - Lesson 5 - Logical Equivalence
Formal Logic - Lesson 5 - Logical EquivalenceFormal Logic - Lesson 5 - Logical Equivalence
Formal Logic - Lesson 5 - Logical Equivalence
 
Formal Logic - Lesson 4 - Tautology, Contradiction and Contingency
Formal Logic - Lesson 4 - Tautology, Contradiction and ContingencyFormal Logic - Lesson 4 - Tautology, Contradiction and Contingency
Formal Logic - Lesson 4 - Tautology, Contradiction and Contingency
 
Formal Logic - Lesson 3 - Truth Tables
Formal Logic - Lesson 3 - Truth TablesFormal Logic - Lesson 3 - Truth Tables
Formal Logic - Lesson 3 - Truth Tables
 
Formal Logic - Lesson 2 - Logical Connectives
Formal Logic - Lesson 2 - Logical ConnectivesFormal Logic - Lesson 2 - Logical Connectives
Formal Logic - Lesson 2 - Logical Connectives
 
Formal Logic - Lesson 1 - Introduction to Logic
Formal Logic - Lesson 1 - Introduction to LogicFormal Logic - Lesson 1 - Introduction to Logic
Formal Logic - Lesson 1 - Introduction to Logic
 
Ethical Issues and Relevant Laws on Computing
Ethical Issues and Relevant Laws on ComputingEthical Issues and Relevant Laws on Computing
Ethical Issues and Relevant Laws on Computing
 
Number Systems Basic Concepts
Number Systems Basic ConceptsNumber Systems Basic Concepts
Number Systems Basic Concepts
 
Number Systems Basic Concepts
Number Systems Basic ConceptsNumber Systems Basic Concepts
Number Systems Basic Concepts
 
Exploring the Difference Between Information Technology and Information System
Exploring the Difference Between Information Technology and Information SystemExploring the Difference Between Information Technology and Information System
Exploring the Difference Between Information Technology and Information System
 
Introduction to Data Science
Introduction to Data ScienceIntroduction to Data Science
Introduction to Data Science
 
Introduction to Computers
Introduction to ComputersIntroduction to Computers
Introduction to Computers
 
Introduction to Computing Logic Formulation
Introduction to Computing Logic FormulationIntroduction to Computing Logic Formulation
Introduction to Computing Logic Formulation
 
Oasis of Sparkling and Refreshing Truisms
Oasis of Sparkling and Refreshing TruismsOasis of Sparkling and Refreshing Truisms
Oasis of Sparkling and Refreshing Truisms
 
My Teacher Got IT v2.0 - Software Installation Track
My Teacher Got IT v2.0 - Software Installation TrackMy Teacher Got IT v2.0 - Software Installation Track
My Teacher Got IT v2.0 - Software Installation Track
 

Último

From Family Reminiscence to Scholarly Archive .
From Family Reminiscence to Scholarly Archive .From Family Reminiscence to Scholarly Archive .
From Family Reminiscence to Scholarly Archive .Alan Dix
 
The State of Passkeys with FIDO Alliance.pptx
The State of Passkeys with FIDO Alliance.pptxThe State of Passkeys with FIDO Alliance.pptx
The State of Passkeys with FIDO Alliance.pptxLoriGlavin3
 
TrustArc Webinar - How to Build Consumer Trust Through Data Privacy
TrustArc Webinar - How to Build Consumer Trust Through Data PrivacyTrustArc Webinar - How to Build Consumer Trust Through Data Privacy
TrustArc Webinar - How to Build Consumer Trust Through Data PrivacyTrustArc
 
Ensuring Technical Readiness For Copilot in Microsoft 365
Ensuring Technical Readiness For Copilot in Microsoft 365Ensuring Technical Readiness For Copilot in Microsoft 365
Ensuring Technical Readiness For Copilot in Microsoft 3652toLead Limited
 
Unraveling Multimodality with Large Language Models.pdf
Unraveling Multimodality with Large Language Models.pdfUnraveling Multimodality with Large Language Models.pdf
Unraveling Multimodality with Large Language Models.pdfAlex Barbosa Coqueiro
 
DSPy a system for AI to Write Prompts and Do Fine Tuning
DSPy a system for AI to Write Prompts and Do Fine TuningDSPy a system for AI to Write Prompts and Do Fine Tuning
DSPy a system for AI to Write Prompts and Do Fine TuningLars Bell
 
unit 4 immunoblotting technique complete.pptx
unit 4 immunoblotting technique complete.pptxunit 4 immunoblotting technique complete.pptx
unit 4 immunoblotting technique complete.pptxBkGupta21
 
Merck Moving Beyond Passwords: FIDO Paris Seminar.pptx
Merck Moving Beyond Passwords: FIDO Paris Seminar.pptxMerck Moving Beyond Passwords: FIDO Paris Seminar.pptx
Merck Moving Beyond Passwords: FIDO Paris Seminar.pptxLoriGlavin3
 
The Role of FIDO in a Cyber Secure Netherlands: FIDO Paris Seminar.pptx
The Role of FIDO in a Cyber Secure Netherlands: FIDO Paris Seminar.pptxThe Role of FIDO in a Cyber Secure Netherlands: FIDO Paris Seminar.pptx
The Role of FIDO in a Cyber Secure Netherlands: FIDO Paris Seminar.pptxLoriGlavin3
 
The Fit for Passkeys for Employee and Consumer Sign-ins: FIDO Paris Seminar.pptx
The Fit for Passkeys for Employee and Consumer Sign-ins: FIDO Paris Seminar.pptxThe Fit for Passkeys for Employee and Consumer Sign-ins: FIDO Paris Seminar.pptx
The Fit for Passkeys for Employee and Consumer Sign-ins: FIDO Paris Seminar.pptxLoriGlavin3
 
What's New in Teams Calling, Meetings and Devices March 2024
What's New in Teams Calling, Meetings and Devices March 2024What's New in Teams Calling, Meetings and Devices March 2024
What's New in Teams Calling, Meetings and Devices March 2024Stephanie Beckett
 
Transcript: New from BookNet Canada for 2024: Loan Stars - Tech Forum 2024
Transcript: New from BookNet Canada for 2024: Loan Stars - Tech Forum 2024Transcript: New from BookNet Canada for 2024: Loan Stars - Tech Forum 2024
Transcript: New from BookNet Canada for 2024: Loan Stars - Tech Forum 2024BookNet Canada
 
DevEX - reference for building teams, processes, and platforms
DevEX - reference for building teams, processes, and platformsDevEX - reference for building teams, processes, and platforms
DevEX - reference for building teams, processes, and platformsSergiu Bodiu
 
"ML in Production",Oleksandr Bagan
"ML in Production",Oleksandr Bagan"ML in Production",Oleksandr Bagan
"ML in Production",Oleksandr BaganFwdays
 
Transcript: New from BookNet Canada for 2024: BNC CataList - Tech Forum 2024
Transcript: New from BookNet Canada for 2024: BNC CataList - Tech Forum 2024Transcript: New from BookNet Canada for 2024: BNC CataList - Tech Forum 2024
Transcript: New from BookNet Canada for 2024: BNC CataList - Tech Forum 2024BookNet Canada
 
Use of FIDO in the Payments and Identity Landscape: FIDO Paris Seminar.pptx
Use of FIDO in the Payments and Identity Landscape: FIDO Paris Seminar.pptxUse of FIDO in the Payments and Identity Landscape: FIDO Paris Seminar.pptx
Use of FIDO in the Payments and Identity Landscape: FIDO Paris Seminar.pptxLoriGlavin3
 
Gen AI in Business - Global Trends Report 2024.pdf
Gen AI in Business - Global Trends Report 2024.pdfGen AI in Business - Global Trends Report 2024.pdf
Gen AI in Business - Global Trends Report 2024.pdfAddepto
 
Passkey Providers and Enabling Portability: FIDO Paris Seminar.pptx
Passkey Providers and Enabling Portability: FIDO Paris Seminar.pptxPasskey Providers and Enabling Portability: FIDO Paris Seminar.pptx
Passkey Providers and Enabling Portability: FIDO Paris Seminar.pptxLoriGlavin3
 
How to write a Business Continuity Plan
How to write a Business Continuity PlanHow to write a Business Continuity Plan
How to write a Business Continuity PlanDatabarracks
 
Tampa BSides - Chef's Tour of Microsoft Security Adoption Framework (SAF)
Tampa BSides - Chef's Tour of Microsoft Security Adoption Framework (SAF)Tampa BSides - Chef's Tour of Microsoft Security Adoption Framework (SAF)
Tampa BSides - Chef's Tour of Microsoft Security Adoption Framework (SAF)Mark Simos
 

Último (20)

From Family Reminiscence to Scholarly Archive .
From Family Reminiscence to Scholarly Archive .From Family Reminiscence to Scholarly Archive .
From Family Reminiscence to Scholarly Archive .
 
The State of Passkeys with FIDO Alliance.pptx
The State of Passkeys with FIDO Alliance.pptxThe State of Passkeys with FIDO Alliance.pptx
The State of Passkeys with FIDO Alliance.pptx
 
TrustArc Webinar - How to Build Consumer Trust Through Data Privacy
TrustArc Webinar - How to Build Consumer Trust Through Data PrivacyTrustArc Webinar - How to Build Consumer Trust Through Data Privacy
TrustArc Webinar - How to Build Consumer Trust Through Data Privacy
 
Ensuring Technical Readiness For Copilot in Microsoft 365
Ensuring Technical Readiness For Copilot in Microsoft 365Ensuring Technical Readiness For Copilot in Microsoft 365
Ensuring Technical Readiness For Copilot in Microsoft 365
 
Unraveling Multimodality with Large Language Models.pdf
Unraveling Multimodality with Large Language Models.pdfUnraveling Multimodality with Large Language Models.pdf
Unraveling Multimodality with Large Language Models.pdf
 
DSPy a system for AI to Write Prompts and Do Fine Tuning
DSPy a system for AI to Write Prompts and Do Fine TuningDSPy a system for AI to Write Prompts and Do Fine Tuning
DSPy a system for AI to Write Prompts and Do Fine Tuning
 
unit 4 immunoblotting technique complete.pptx
unit 4 immunoblotting technique complete.pptxunit 4 immunoblotting technique complete.pptx
unit 4 immunoblotting technique complete.pptx
 
Merck Moving Beyond Passwords: FIDO Paris Seminar.pptx
Merck Moving Beyond Passwords: FIDO Paris Seminar.pptxMerck Moving Beyond Passwords: FIDO Paris Seminar.pptx
Merck Moving Beyond Passwords: FIDO Paris Seminar.pptx
 
The Role of FIDO in a Cyber Secure Netherlands: FIDO Paris Seminar.pptx
The Role of FIDO in a Cyber Secure Netherlands: FIDO Paris Seminar.pptxThe Role of FIDO in a Cyber Secure Netherlands: FIDO Paris Seminar.pptx
The Role of FIDO in a Cyber Secure Netherlands: FIDO Paris Seminar.pptx
 
The Fit for Passkeys for Employee and Consumer Sign-ins: FIDO Paris Seminar.pptx
The Fit for Passkeys for Employee and Consumer Sign-ins: FIDO Paris Seminar.pptxThe Fit for Passkeys for Employee and Consumer Sign-ins: FIDO Paris Seminar.pptx
The Fit for Passkeys for Employee and Consumer Sign-ins: FIDO Paris Seminar.pptx
 
What's New in Teams Calling, Meetings and Devices March 2024
What's New in Teams Calling, Meetings and Devices March 2024What's New in Teams Calling, Meetings and Devices March 2024
What's New in Teams Calling, Meetings and Devices March 2024
 
Transcript: New from BookNet Canada for 2024: Loan Stars - Tech Forum 2024
Transcript: New from BookNet Canada for 2024: Loan Stars - Tech Forum 2024Transcript: New from BookNet Canada for 2024: Loan Stars - Tech Forum 2024
Transcript: New from BookNet Canada for 2024: Loan Stars - Tech Forum 2024
 
DevEX - reference for building teams, processes, and platforms
DevEX - reference for building teams, processes, and platformsDevEX - reference for building teams, processes, and platforms
DevEX - reference for building teams, processes, and platforms
 
"ML in Production",Oleksandr Bagan
"ML in Production",Oleksandr Bagan"ML in Production",Oleksandr Bagan
"ML in Production",Oleksandr Bagan
 
Transcript: New from BookNet Canada for 2024: BNC CataList - Tech Forum 2024
Transcript: New from BookNet Canada for 2024: BNC CataList - Tech Forum 2024Transcript: New from BookNet Canada for 2024: BNC CataList - Tech Forum 2024
Transcript: New from BookNet Canada for 2024: BNC CataList - Tech Forum 2024
 
Use of FIDO in the Payments and Identity Landscape: FIDO Paris Seminar.pptx
Use of FIDO in the Payments and Identity Landscape: FIDO Paris Seminar.pptxUse of FIDO in the Payments and Identity Landscape: FIDO Paris Seminar.pptx
Use of FIDO in the Payments and Identity Landscape: FIDO Paris Seminar.pptx
 
Gen AI in Business - Global Trends Report 2024.pdf
Gen AI in Business - Global Trends Report 2024.pdfGen AI in Business - Global Trends Report 2024.pdf
Gen AI in Business - Global Trends Report 2024.pdf
 
Passkey Providers and Enabling Portability: FIDO Paris Seminar.pptx
Passkey Providers and Enabling Portability: FIDO Paris Seminar.pptxPasskey Providers and Enabling Portability: FIDO Paris Seminar.pptx
Passkey Providers and Enabling Portability: FIDO Paris Seminar.pptx
 
How to write a Business Continuity Plan
How to write a Business Continuity PlanHow to write a Business Continuity Plan
How to write a Business Continuity Plan
 
Tampa BSides - Chef's Tour of Microsoft Security Adoption Framework (SAF)
Tampa BSides - Chef's Tour of Microsoft Security Adoption Framework (SAF)Tampa BSides - Chef's Tour of Microsoft Security Adoption Framework (SAF)
Tampa BSides - Chef's Tour of Microsoft Security Adoption Framework (SAF)
 

Hard Drives: Types, Manufacturers and Identification

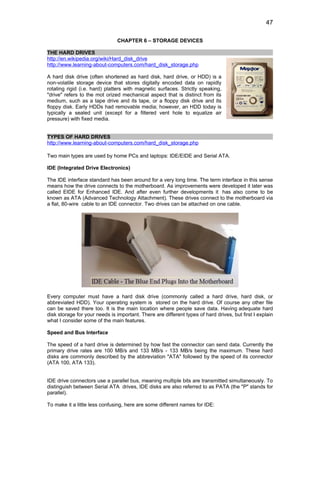
  • 1. 47 CHAPTER 6 – STORAGE DEVICES THE HARD DRIVES http://en.wikipedia.org/wiki/Hard_disk_drive http://www.learning-about-computers.com/hard_disk_storage.php A hard disk drive (often shortened as hard disk, hard drive, or HDD) is a non-volatile storage device that stores digitally encoded data on rapidly rotating rigid (i.e. hard) platters with magnetic surfaces. Strictly speaking, "drive" refers to the mot orized mechanical aspect that is distinct from its medium, such as a tape drive and its tape, or a floppy disk drive and its floppy disk. Early HDDs had removable media; however, an HDD today is typically a sealed unit (except for a filtered vent hole to equalize air pressure) with fixed media. TYPES OF HARD DRIVES http://www.learning-about-computers.com/hard_disk_storage.php Two main types are used by home PCs and laptops: IDE/EIDE and Serial ATA. IDE (Integrated Drive Electronics) The IDE interface standard has been around for a very long time. The term interface in this sense means how the drive connects to the motherboard. As improvements were developed it later was called EIDE for Enhanced IDE. And after even further developments it has also come to be known as ATA (Advanced Technology Attachment). These drives connect to the motherboard via a flat, 80-wire cable to an IDE connector. Two drives can be attached on one cable. Every computer must have a hard disk drive (commonly called a hard drive, hard disk, or abbreviated HDD). Your operating system is stored on the hard drive. Of course any other file can be saved there too. It is the main location where people save data. Having adequate hard disk storage for your needs is important. There are different types of hard drives, but first I explain what I consider some of the main features. Speed and Bus Interface The speed of a hard drive is determined by how fast the connector can send data. Currently the primary drive rates are 100 MB/s and 133 MB/s - 133 MB/s being the maximum. These hard disks are commonly described by the abbreviation "ATA" followed by the speed of its connector (ATA 100, ATA 133). IDE drive connectors use a parallel bus, meaning multiple bits are transmitted simultaneously. To distinguish between Serial ATA drives, IDE disks are also referred to as PATA (the "P" stands for parallel). To make it a little less confusing, here are some different names for IDE:
  • 2. 48 EIDE (Enhanced IDE) ATA (Advanced Technology Attachment) PATA (Parallel ATA) Although there are still IDE drives around, Serial ATA is now the dominant standard. The serial ATA or SATA computer bus, is a storage-interface for connecting host bus adapters to mass storage devices such as hard disk drives and optical drives. The SATA host adapter is integrated into almost all modern consumer laptop computers and desktop motherboards. Serial ATA was designed to replace the older ATA (AT Attachment) standard (also known as EIDE). It is able to use the same low level commands, but serial ATA host-adapters and devices communicate via a high-speed serial cable over two pairs of conductors. In contrast, the parallel ATA (the redesignation for the legacy ATA specifications) used 16 data conductors each operating at a much lower speed. SATA offers several compelling advantages over the older parallel ATA (PATA) interface: reduced cable-bulk and cost (reduced from 80 wires to seven), faster and more efficient data transfer, and hot swapping. As of 2009, SATA has mostly replaced parallel ATA in all shipping consumer PCs. PATA remains in industrial and embedded applications dependent on CompactFlash storage although the new CFast storage standard will be based on SATA. SATA ports on a motherborad HARD DRIVE MANUFACTURERS http://compreviews.about.com/cs/manhard/ Fujitsu Manufacturer of high performance SCSI drives mainly used in the server market. Hitachi Global Storage This is the web site for the newly created division of Hitachi after the purchase of the IBM storage division. Information can be found here for both Hitachi's drive lines as well as the IBM line of drives.
  • 3. 49 IBM This is the legacy site for the IBM storage division which was recently sold to Hitachi. Maxtor Manufacturer of the popular DiamondMax line of PC hard drives and high performance SCSI server drives. Seagate Manufacturer of a wide range of PC hard drives and high performance SCSI hard drives. Western Digital Maker of the popular Caviar line of PC hard drives. HARD DRIVE IDENTIFICATION http://www.ehow.com/how_2215628_identify-different-types-hard-drives.html Superficially, IDE and SATA hard drives look the same. They're the same dimensions and colored in the same manner. It's only if you read the jumble of letters and numbers on the label or look at the pin setup on the back that you can tell which is which. Knowing which kind you have and which kind you need can help prevent buying hardware that you can't use. Step 1 Look for a bunch of pins among the connectors in the back. IDE drives have over 50 pins in the back of the drive; SATA drives don't have many pins if they have any at all. Step 2 Identify the board connection. On an IDE drive, the connection consists of many pins spread out over about 2 inches. The cable that plugs into it is wide and ribbon-like. SATA drives have much smaller connectors similar to that on a cell phone. Step 3 Find the power connector. IDE drives have large connectors with 4 wide pins while SATA drives have power connections similar to their board connection, only smaller. Step 4 Check for jumpers. IDE drives have jumper settings that tell the computer which point on the ribbon cable they get plugged into. SATA drives, since they're the only drive on their cable, don't have jumpers. IDENTIFYING DRIVE CAPACITY Check the HDD for the drive capacity. HARD DRIVE CONTROLLERS The disk controller (or "hard disk controller") is the circuit which allows the CPU to communicate with a hard disk, floppy disk or other kind of disk drive. Early disk controllers were identified by their storage methods and data encoding. They were typically implemented on a separate controller card. Modified frequency modulation (MFM) controllers were the most common type in small computers, used for both floppy disk and hard disk drives. Run length limited (RLL) controllers used data compression to increase storage capacity by about 50%. Priam created a proprietary storage algorithm that could double the disk storage. Shugart Associates Systems Interface (SASI) was a predecessor to SCSI. Modern disk controllers are integrated into the disk drive. For example, disks called "SCSI disks" have built-in SCSI controllers. In the past, before most SCSI controller functionality was implemented in a single chip, separate SCSI controllers interfaced disks to the SCSI bus.
  • 4. 50 The most common types of interfaces provided nowadays by disk controllers are PATA (IDE) and Serial ATA for home use. High-end disks use SCSI, Fibre Channel or Serial Attached SCSI. IDE/SCSI CABLES SCSI cables come in two flavors: internal and external. We carry both flat ribbon and rounded internal cabling. All our 68 pin internal cables use Amphenol brand Ultra 320 (U320) LVD rated cabling and are backwards compatible with slower speeds. Our external cables are similarly rated and use high quality Hitachi brand cabling. HARD DRIVE CONFIGURATION (MASTER/SLAVE LAYOUT) Check out the HDD for the Master/Slave Layout. HARD DRIVE INSTALLATION Actual demonstration of hard drive installation. UPGRADING TO LARGE HARD-DISKS OPTIMIZING HARD DISK PERFORMANCE The 10 ultimate tactics to improve and optimize hard disk IO performance are: 1. Defragment 2. Check for Disk Errors 3. Clean up Unnecessary Files and Optimize the Recycle Bin 4. Stop Hibernation 5. Compression/Encryption and Performance 6. Convert to NTFS 7. Disable 8.3 Filenames to reduce NTFS Overhead 8. Create More Space For the Master File Table 9. Disable Date and Time Stamp Updating 10. Enable DMA for IDE drives Here come the first 5 basic tactics which are safe and easy for general PC users. Feel free to apply them to your PC. 1. Defragment Fragmentation is a normal occurrence within file systems. Windows XP attempts to store files in a contiguous format. However, as files are changed and resaved, the file system has to move data to different blocks of free space. The end result is that a typical file might have "pieces" scattered over the disk. When you open the file, the disk must work harder to retrieve all of the pieces and assemble them. The first regular and important task you need to do to optimize Windows XP disk performance is defragmentation. Disk Defragmenter helps repair file fragmentation, which occurs over time in any file system. Make sure you defragment the drive at least once a month to clean up clutter. 1. Open My Computer. Right-click the disk that you want to defragment and click Properties. On the Tools tab, click the Defragment Now button. 2. The Disk Defragmenter window appears. Click the Analyze button. 3. An analysis of the drive is performed, and a message appears telling you whether or not you should defragment the drive. 4. If the drive needs to be defragmented, click the Defragment button. The defragmentation process begins and may take some time, depending on how badly the drive is fragmented.
  • 5. 51 2. Check for Disk Errors Checking for disk errors is also another useful tool provided by Windows XP. This tool is available in the Tools tab of the hard disk properties sheet. It gives you simple check box options to check for file system errors and recover bad sectors. This Error Checking tool needs complete access to the disk for it to work. Applications must be closed and, in some cases, you need to reboot before it starts to gain complete access to the disk. If you use your computer a lot, it is a good idea to run this tool once a month to make sure your disk is in good working order. 3. Clean up Unnecessary Files and Optimize the Recycle Bin You would be amazed that the number of temporary files, temporary Internet files, 'recent documents' list in Windows start menu, download files and log files which Windows XP generates. If you want the hard disk to work in the best possible way, you need to delete all of the junk files from it. An overstuffed hard drive makes Windows XP work harder, so make sure you have a system in place to keep old files and junk cleaned up and removed. Also, make sure you optimize the Recycle Bin. The size of the recycle bin is a percentage of the hard drive. If you have a 200GB hard drive then 12% of 200GB is 24GB. Who needs a 24GB recycle bin? Follow the following steps to adjust the size of the recycle bin: 1. Right click on the Recycle Bin and choose Properties 2. On the Recycle Bin properties, move the Recycle Bin size slider from 10 percent to 3 or even 1 percent. Remember, this is still a decent amount of storage since you now have a larger disk to work with. 3. Click OK 4. Stop Hibernation Hibernation is a nice feature of Windows XP¡ªif you use it. One tip I usually share with others to optimize Windows XP disk performance is to switch off hard disk Hibernation mode in Windows XP. If you're not using this mode, then click Start > Control Panel > Power Options Properties. Click the Hibernate tab and clear the Enable Hibernation check box. 5. Compression / Encryption and Performance With NTFS, you can compress folders and encrypt folders and files to stop unauthorized access of those files and folders. The compression feature works well, but compressed files take longer to open and resave. Basically, avoid compressing drives if you want to squeeze as much speed as possible from your system. You can decide to compress a drive or not by accessing the disk's properties and clicking 'Compress drive to save disk space' check box on the General tab. Encryption will also reduce performance in terms of opening files. After all, the encryption process has to make sure that you are authorized to view the file. The general rule to follow here is to encrypt files or folders that are necessary, but don't get in the habit of encrypting everything. Encryption is a good safety measure and it has its place, but use it judiciously. Here come the 5 advanced tactics. Before getting into the performance of the hard disk, you should take very careful reading on the advanced tactics and make sure you are up to do it yourself manually. This is especially true if disk management is relatively new to you. 6. Convert to NTFS NTFS is the file system of choice on Windows XP. NTFS is overwhelmingly better than FAT / FAT32 and enables you to use some management features of Windows XP that FAT / FAT32 does not support. So, you should certainly convert any FAT / FAT32 drives to NTFS. The only exception to this rule is if you use a dual-boot system that also boots earlier versions of Windows that do not support NTFS, such as Windows 98 or Windows Me. Keep the following two issues in mind when converting to NTFS: 1. You can convert a FAT or FAT32 drive to NTFS while preserving your data. Conversion is a one-way process, however. Once you convert to NTFS, you cannot revert back to FAT without reformatting the disk. 2. You cannot convert an NTFS drive to FAT or FAT32 without reformatting the drive. This means that all of your data on the hard disk will be destroyed during the formatting process. You will have to restore all of the data from backup.
  • 6. 52 To convert a FAT or FAT32 drive to NTFS: 1. Click Start>Run. Type command and click OK. 2. At the command prompt, you will use the Convert command to convert the FAT drive to NTFS. Keep in mind that the conversion process is completely safe and all of your data will remain as it is. The command and syntax is as follows: convert D: /FS:NTFS Press Enter. 3. Conversion may take several minutes, depending on the size of the drive. When the process is complete, simply exit the command interface. If you converted the boot partition, you will be prompted to reboot the computer. 7. Disable 8.3 Filenames to reduce NTFS Overhead As previously mentioned, NTFS is a powerful file system that provides many of the features you'll enjoy with Windows XP, however, there is some overhead that can get in the way. For compatibility with MS-DOS and old Windows 3.x systems, NTFS supports 8.3 filenames, which means that files are named with eight characters, followed by a dot and a three-character extension. There's nothing wrong with this, but the overhead is unnecessary if you are not supporting older programs and systems (which you are probably not at this point). However, one word of warning: some older programs depend on 8.3 filenames, so it is possible that if you turn off the 8.3 filename feature, some programs may not work correctly. Although this is unlikely at this point in time, it is still an issue you should keep in mind. Otherwise, lose the 8.3 filename feature to reduce NTFS overhead by following these steps: 1. Click Start>Run. Type regedit and click OK. 2. In the Registry Editor, navigate to HKEY_LOCAL_MACHINESYSTEM CurrentControlSetControlFilesystem. 3. Locate the NtfsDisable8dot3NameCreation entry and change the value to 1. This will disable the creation of 8.3 filenames. 4. Close the Registry Editor. 8. Create More Space For the Master File Table NTFS uses a Master File Table to record data about files. You can add a Registry entry to ensure that the table is large enough and has the space it needs. This will take up more space on the hard disk, but it reduces overall NTFS overhead, which can help general performance. Follow these steps: 1. Click Start>Run. Type regedit and click OK. 2. In the Registry Editor, navigate to HKEY_LOCAL_MACHINESYSTEM CurrentControlSetControlFileSystem. 3. Create a REG_DWORD entry and name it NtfsMftZoneReservation. 4. Set the value of the entry to 2. 5. Close the Registry Editor. 9. Disable Date and Time Stamp Updating NTFS updates the date and time stamp from the last time that it works through the directory. With many directories, this process can slow your system down a bit, and disabling this date and time stamping feature doesn't impact how you work with files on your system. You can easily disable this dating and time stamping process by following these steps: 1. Click Start>Run. Type 'regedit' and click OK. 2. In the Registry Editor, navigate to HKEY_LOCAL_MACHINESYSTEM CurrentControlSetControlFileSystem. 3. Locate the NtfsDisableLastAccessUpdate entry. (If you do not find it, create it in the entry as a REG_DWORD). 4. Change the value of the entry to 1. 5. Close the Registry Editor.
  • 7. 53 10. Enable DMA for IDE drives Direct memory access (DMA) mode works best for IDE drives on Windows XP. If you have an IDE drive, you will want to enable Direct Memory Access (DMA) mode. This is important for smooth performance when you play videos and listen to music. Set it up by: 1. Going to My Computer > Properties. 2. Click the Hardware tab and select Device Manager. 3. Expand the IDE controllers and double-click the IDE primary drive. 4. Click the Advanced tab and ensure DMA mode is selected from the drop-down box. 5. Click OK; then restart your computer. 6. HARD DRIVE MAINTENANCE http://www.macintoshos.com/troubleshooting/maintenance.html#general There is very little you can do to physically maintain a hard drive. Selecting "Shut Down" from the Special menu each time the machine is turned off allows the drive to park its heads over a safe area of the platters, thus avoiding accidental contact during a severe jar. Always make sure all SCSI devices are off before connecting or disconnecting a SCSI device. This can affect your hard drive and logic board. Programs such as Norton Utilities, FWB Hard Disk Toolkit PE, and Mac Tools Pro are great for maintaining the data on your drive. Defragment the drive is a good exercise to perform once every couple of months. If done too frequently, this can cause more damage than good. Norton's Disk Doctor is a good one to run on a regular basis. Follow instructions in the manual about creating a boot disk so that when Norton tells you there is a problem, you can fix it correctly. Norton Utilities often creates unnecessary worry in many people. It has a way of finding something wrong almost every time it is run. Most of what it finds is labeled as either "serious" or "not serious." The not serious problems are usually the result of normal hard drive operation. The serious problems are typically caught before they can cause any real problems. Make sure your computer has proper ventilation. Especially with modern drives of 1 gigabyte or more, much of the internal heat of a computer is created by these monstrous hard drives. It is not uncommon for a drive to "burn up" and die because of over heating. HARD DRIVES PROBLEMS TROUBLESHOOTING AND REPAIRING http://www.techadvice.com/tech/H/HardDriveTS.htm 1. There is some type of electrical connection problem Make sure the cable connections are correct. Check the 4-wire connector that carries power and make sure it is properly plugged in. This connector has a taper on one end and cannot be put on backwards. When power is first applied to the computer, the hard drive light will momentarily come on which is a good indication that the drive is getting power. Also the vibration of the spinning platter and the slight hum will verify that the drive is plugged in. Next check the data ribbon cable. This cable is a flat cable with a one edge colored red or blue to indicate the location of pin 1. Some of these cables are also keyed by having a small tab in the center of the connector's edge. On many hard drives pin 1 is the pin closest to the power supply connection, but not always, so check the hard drive documentation or look on this site in Hard Drives and locate your model. You can find hard drive documentation on this site simply by using the index on top of each page to find the manufacturer and then on the manufacturers page will be a listing which would have links to each product and the technical support documents. Older drives are on different pages then newer drives. Once you find the page where the manufacturer's products are listed, look at the top of the page for a link that says "Older Models" and you will find them listed there. If all the cables are connected properly, and power is applied, you should be able to hear and feel the drive spinning. If the drive is not spinning, turn off the power and try using a different power plug (maybe the one that the CD-ROM is connected). If the drive is not spinning then it is probably bad. *see step 3
  • 8. 54 2. The hard drive controller has failed A controller failure is usually indicated by an error at boot up. There is not much that can be done except to replace the hard drive. See hard drive error codes 3. The hard drive has failed physically There can be two indications for this condition. 1) The drive is not spinning. To troubleshoot this condition you need to physically access the drive while the computer is on. With the cover off, look at the drive and find the side which has NO components. With your hand touch that side and try to feel the spinning of the hard drive platter. A typical hard drive has a small amount of vibration and a slight whine. 2) The hard drive head has crashed onto the platter. This usually causes the drive to emit unusual sounds sometimes grinding and many times repeating on a regular basis. A normal hard drive has a smooth whine so its should be easy to identify the bad drive by just listening. 4. The hard drive has failed electronically This will be indicated by an error message during the computer boot cycle. Not much can be done in this condition other then replace the drive. 5. There is a problem with the recording on the hard drive (read or write) There are two conditions that can cause this problem. 1) The hard drive is unable to read a sector on the platter. This problem can be identified by running a program that is capable in performing a hard drive surface test. In Windows 95 you can use the scandisk which is found in the Start/Programs/Accessories/System Tools folder. Another way is to use a utility program like Norton Utilities to perform the surface scan. This problem can also be seen when you are formatting the hard drive and is indicated as "bad sectors" during the formatting. These bad sectors are normally recorded as such by the format program and the computer knows not to use them but more bad sectors can be created as the hard drive ages. 2) One or more files have been damaged by some process. These type or problems are caused when the computer is unexpectedly rebooted after a lock-up or perhaps a power failure. They are easy to troubleshoot and repair. Simply run the scandisk program which is found in the Start/Programs/Accessories/System Tools folder and allow the computer to repair any errors found. After such a repair it is very possible that one of more files were corrupted and are now unusable. It is impossible to tell which files will be affected in advance but if you write down the bad file names shown during the scan disk operation you can try to find the application which loaded them and re-install that application. 6. The CMOS settings are not correctly set Check the CMOS settings. These settings must match the required settings of the manufacturer. a) older computers On these computers you have to go into the CMOS/BIOS during boot and change the setting by selecting a number from 1 to 48, by selecting a TYPE number of 1 or 2, or by selected the setting "User defined" and manually entering the hard drive parameters of "head", "cylinders", "spt", "WP", and "LZ". These settings can be found on your hard drive users manual, on the
  • 9. 55 manufacturer's web site, or on this site by looking for the company, then the hard drive's model number. After entering these parameters you will normally save them before exiting the BIOS program and then reboot the computer. b) newer computers On these computers you can almost always find a selection that allows the computer to "Automatically" find IDE style hard drives. There are two methods in use. First you can select "Auto" from the main BIOS screen for the drive C: D: E: or F:. After rebooting the drive will be automatically detected. Second, some Bios types have a selection called "Detect hard drive" which allows you to initiate a detection process which looks for a drive, presents you with the drive found and gives you the option of accepting or rejecting the detected drive. This process is repeated for each of the available drive assignments C D E and F. Again you must save the BIOS changes and reboot the computer. Very critical also is the LBA setting which can cause the drive to operate but not be able to see all the data. This comes into play with drives larger than 500 megabytes and is found by entering the computer BIOS at boot up and looking in the area where the hard drive is configured. "Wrong LBA setting" Symptoms: • Computer comes on, but you get many read errors • Windows comes up sometimes other times it hangs • you can save short files but larger ones don't seem to save • Scandisk is not able to fix the problems it finds Solution: The LBA setting in the BIOS is not correct. Most likely on drives that are more than 528MB, the LBA setting is not enabled. Enter the BIOS and enable the LBA. This can happen very easily when a drive is on a computer and works fine but then the motherboard is changed. The old BIOS had LBA enabled but the new one might not. After the drive is installed it seems to work but you get the symptoms described above. 7. There is a conflict with the IRQ settings a) Normally the primary hard drive controller uses Interrupt Request Line (IRQ) number 14 which allows the hard drive C and D to operate correctly.. The secondary hard drive controller uses IRQ number 15 which allows the hard drives E and F to work properly. What happens is some times a different device such as a sound card will use the IRQ 15 by default or because the settings was changed by a user. This causes the computer to not see the secondary hard drives immediately after the installation of this device using IRQ 15. The only way to fix this problem is to change this device so that it uses a different IRQ setting. b) Another problem can be introduced in Windows 95 by CD-ROM device drivers which are loaded by the autoexec.bat and config.sys files at boot up. If windows 95 sees a conflict with these drivers it will switch itself into the DOS compatibility mode. This can be seen by going to Control Panel/System/Performance/File system. A normal windows 95 installation uses 32 bit file access. When there is a conflict you will see that the system is switched to the DOS compatibility mode. Sometimes this can be fixed by using the procedure shown on this link. 8. There is a conflict with the jumper settings All IDE hard drives must be properly setup using jumpers found on the hard drive. The users guide for each drive has instruction for these settings. Each drive can either be a Master or a Slave. Since there can be as many as two separate controllers on each computer the each controller can have a Master and a Slave.
  • 10. 56 A typical computer with 4 IDE hard drives would setup the primary channel as Drives C (master) and D (slave), and the secondary channel as Drive E (master) and Drive F (slave). On 2 drive systems, the first drive should be setup as Master and the second as Slave and the secondary channel is ignored. On many motherboards you must go into the BIOS and actually either enable or disable the secondary drive controller and save the changes. So if your computer came with 2 drives and you've added two more, before the new drives are detected you will need to go into the BIOS and enable the secondary IDE controller, save the changes and reboot. 9. The drive is unable to boot To troubleshoot this condition boot the computer with a bootable DOS disk. After the computer has booted with the disk try to access drive C: by issuing the standard directory command DIR C: <enter> If the C: drive is working and you can see the directory listing then you might be able to make the drive bootable again by issuing the system command which transfers the system files from the floppy drive to the hard drive as follows: sys a: c: <enter> The sys file has to be on the floppy disk. If it is not then find a disk that has the file or use another computer to copy the file to the floppy disk. You can also copy the command.com file from the floppy to the hard drive by typing... copy a:command.com c:command.com <enter> ...the computer will ask you to verify the operation. Note: A drive must also have the BOOT partition activated before it can boot properly. This is done using FDISK.exe ( of course you must take precautions doing this since fdisk can make your drive useless if mis-used). To troubleshoot problems where the hard drive hangs at boot and the computer never responds, turn off the computer and disconnect the hard drive from the ribbon cable that connects it to the motherboard. When you turn the computer back on, you should at least get an error message about the drive being bad, and perhaps go into the BIOS. Once in BIOS you can change the hard drive type to AUTO and after shutting off the computer and reconnecting the hard drive, try again to see if it now works. 10. Fdisk reports wrong size when using drives larger then 64GB According to Microsoft KB article Q263044, "When you use Fdisk.exe to partition a hard disk that is larger than 64 GB (64 gigabytes, or 68,719,476,736 bytes) in size, Fdisk does not report the correct size of the hard disk. The size that Fdisk reports is the full size of the hard disk minus 64 GB. For example, if the physical drive is 70.3 GB (75,484,122,112 bytes) in size, Fdisk reports the drive as being 6.3 GB (6,764,579,840 bytes) in size." Hard drive error codes Typically a hard drive failure will be indicated by an error code while the computer is booting. • 1701 - hard drive failure. ...BIOS Post CodesThis BIOS error code is displayed during the computer boot process when the hard drive has failed. Also could be a cable connection problems as described above. IRQ conflicts and bad jumper settings could cause this problem as well. One more possibility is that the CMOS battery has died. This can be verified by
  • 11. 57 entering the BIOS during boot, then setting the hard drive settings and rebooting. If the hard drive error goes away then the battery is dead. THE FLOPPY DRIVES http://en.wikipedia.org/wiki/Floppy_disk A floppy disk is a data storage medium that is composed of a disk of thin, flexible ("floppy") magnetic storage medium encased in a square or rectangular plastic shell. TYPES OF DISKETTES http://en.wikipedia.org/wiki/Floppy_disk Floppy disks are read and written by a floppy disk drive or FDD, the initials of which should not be confused with "fixed disk drive", which is another term for a (nonremovable) type of hard disk drive. Invented by IBM, floppy disks in 8-inch (200 mm), 5¼-inch (133.35 mm), and 3½-inch (90 mm) formats enjoyed many years as a popular and ubiquitous form of data storage and exchange, from the mid-1970s to the late 1990s. While floppy disk drives still have some limited uses, especially with legacy industrial computer equipment,[2] they have now been largely superseded by USB flash drives, external hard disk drives, CDs, DVDs, and memory cards. SETTING DRIVES AND CABLE ORIENTATION Actual demonstration of the facilitator. REPLACING A FLOPPY DRIVE Actual demonstration of the facilitator. FLOPPY DRIVE MAINTENANCE http://www.macintoshos.com/troubleshooting/maintenance.html The best maintenance for a floppy drive is to keep dust out of it. Even if there is visible dust inside the drive now, it is best to just leave it and begin covering up the opening when not in use. Attempts to clean dust out of a drive usually end up damaging the fragile components inside. Keep the drive covered with either a complete system cover, or a simple piece of cloth just big enough to drape over the opening. There is nothing wrong with leaving a floppy disk completely inserted or partially inserted when the machine is off. It is good for both drive and floppy to keep the disks covered or in cases so they don't become dusty and transmit their dust to the inside of the drive. FLOPPY DRIVE CLEANING PROCEDURES/DRIVE CARE http://home.innernet.net/services/services-tips.asp Symptoms: "Error reading drive A:" is a good indication that you need to clean the heads in your floppy drive. Cleaning Options: Store bought floppy drive cleaning kit Run Electronic Vacuum Cleaner across front of slot To Use Store Bought Cleaners: NOTE: FOLLOW the INSTRUCTIONS on the kit Drop cleaning liquid onto the opening on the cleaner disk. With a Macintosh: place the disk into the Drive, the disk will spin and give you a message stating
  • 12. 58 it is unreadable, use the "eject disk" option to get disk out. With PC's: place the disk in Drive "A", then using File Manager, or the DOS prompt access the "A" Drive, let it spin, abort, then eject disk. NOTE: If the drive does not spin, it will not be cleaned.
  • 13. 59 CHAPTER 7 - OTHER DATA STORAGE DEVICES CDROM DRIVE http://www.basichardware.com/cd-rom_drive.html#Description CD-ROM drives are necessary today for most programs. A single CD can store up to 650 MB of data (newer CD-Rs allow for 700 MB of data, perhaps more with "overburn"). Fast CD-ROM drives have been a big topic in the past, but all of today's CD-ROM drives are sufficiently fast. Of course, it's nice to have the little bits of extra speed. However, when you consider CD-ROM drives are generally used just to install a program or copy CDs, both of which are usually done rarely on most users' computers, the extra speed isn't usually very important. The speed can play a big role if you do a lot of CD burning at high speeds or some audio extraction from audio CDs (i.e. converting CDs to MP3s). DVD/DVD+R/RW DRIVE http://www.basichardware.com/cd-rom_drive.html#Description DVD-ROM drives can store up to 4 GB of data or about 6 times the size of a regular CD (not sure on the exact size, but suffice to say it's a very large storage medium). DVDs look about the same and are the same size as a CD-ROM. DVD drives can also read CD-ROM drives, so you don't usually need a separate CD-ROM drive. DVD drives have become low enough inprice that there isn't much point in purchasing a CD-ROM drive instead of a DVD-ROM drive. Some companies even make CD burner drives that will also read DVDs (all in one). DVD's most practical use is movies. The DVD format allows for much higher resolution digital recording that looks much clearer than VCR recordings. DVD recordable drives are available in a couple of different formats - DVD-R or DVD+R with a RW version of each. These are slightly different discs and drives (although some drives support writing to both formats). One is not much better than the other, so it really boils down to price of the media (and also availability of the media). CD-R/RW DRIVE http://www.basichardware.com/cd-rom_drive.html#Description CD-R/RW (which stands for Recordable / ReWritable) drives (aka burners, writers) allow a user to create their own CDs of audio and/or data. These drives are great for backup purposes (backup your computer's hard drive or backup your purchased CDs) and for creating your own audio CD compilations (not to mention other things like home movies, multimedia presentations, etc.). CD/DVD CONFIGURATION (MASTER/SLAVE LAYOUT) Actual demonstration by the facilitator. CD/DVD INSTALLATION AND UPGRADING Actual demonstration by the facilitator. TRANSFER SPEED X http://www.allmemorycards.com/glossary/cd-rom-transfer-speed.htm The CD-ROM industry is using a different measurement standard for rating data transfer speed. Instead of using bits or bytes per second, they are indicating the transfer speed by the quantity of X, which indicates the number of X transmitted in a given amount of time, in this case per second. In reality bits and bytes are still in use since 1 X is equivalent to 0.15 MB/sec or 1.2288 Mbps. The use of the X definition leaves out some confusion in comparison to the other terms. Apart from the CD-ROM industry the X definition is used by the memory card industry for transfer speed rating, but it is not as widely used as the MB/sec which is the most common used definition. Some manufactures are indicating transfer speed only in MB/sec and some only in one of them or just in X. Since transfer speeds are getting really fast the Mbps definition is not that common used in the memory card industry, it makes more sense to use MB/sec.
  • 14. 60 Comparing different definitions with each other can be confusing. A comparable table over the different transfer speed definitions and more information about transfer speed can be found at data transfer speed and at buying guide. CD/DVDROM MAINTENANCE/CLEANING PROCEDURES http://home.innernet.net/services/services-tips.asp Symptoms: Disc skips or errors reading data from a disc are a good indication that you need to clean your CD-ROM/DVD-ROM drive. Cleaning Options: Store bought CD-ROM/DVD-ROM drive cleaning kit To Use Store Bought Cleaners: NOTE: FOLLOW the INSTRUCTIONS on the kit The CD-ROM/DVD-ROM contains a laser lens, which collects dust, and needs a special kind of cleaner. Using a compact disc (CD/DVD) lens cleaner not only cleans the lens but other parts of your drive as well. NOTE: If the drive does not spin, it will not be cleaned CDROM DRIVE PROBLEMS http://www.jdresearch.com/tsd451.htm 1. There is no CD disc in the CD-ROM drive or it is the incorrect one. 2. The CD disc is dirty or defective. 3. The CD disc is in the drive upside down. 4. There is an audio CD disc in the drive when you are trying to access data files 5. There is a data CD disc in the drive when you are trying to play an audio or music CD disc. 6. The CD disc is an Apple or Macintosh CD and not an IBM compatible format. 7. The program that is trying to access the CD-ROM drive is corrupt. 8. The onboard IDE is not enabled in the System Setup or CMOS. 9. The data or audio cable is not connected, or damaged (check this on newly arrived systems). 10. Your CD-ROM drive is conflicting with newly installed hardware devices. 11. The jumper settings on the IDE CD-ROM drive are not set correctly. 12. You cannot access the CD-ROM from DOS because the MS-DOS real mode drivers are not loaded.
  • 15. 61 REMOVABLE DRIVES http://en.wikipedia.org/wiki/External_storage External storage is any device that temporarily stores information for transporting from computer to computer. These devices are not permanently fixed inside a computer. Types of external storage devices include punched cards, cassette tapes, floppy disks, Zip disks, CDs, DVDs, microforms, memory cards, memory spot chips, and memory sticks. TROUBLESHOOTING EXTERNAL STORAGE DEVICE http://www.smartcomputing.com/editorial/article.asp? guid=&bJumpto=true&Isfrm=IN&article=articles/webonly/techsupport/ref1101/52r01/52r01.asp&Ar ticleID=40459 The large storage capacity and portability of external hard drives and flash drives make external storage an extremely convenient way to back up, transport, and swap files. Many of us now rely solely on external storage to back up our internal hard drive or to transport multimedia libraries on our key chain. However, when the external storage device you’ve come to depend on is operating poorly or not at all, it can be frustrating and inconvenient—especially if the drive contains important work documents or the entire contents of your hard drive. The following troubleshooting tips can help you restore and improve your external storage drive’s swapping and storing capabilities. Malfunction Junction When troubleshooting an external hard drive or flash drive, it's wise to search the Internet for known incompatibilities relevant to your device and to visit the manufacturer's Web site to make certain you don't need any special software or drivers. To find the appropriate download, you need to know the drive's name, model number, or serial number and its storage capacity. Typically, external hard drives display this identification above the bar code on the bottom of the drive, and flash drives include a name and model number in the accompanying packaging or user’s guide. Operating systems created after Windows 98 don’t require you to install any drivers to recognize external storage drives. Therefore, you can trace the majority of detection problems to a misconnection or incorrectly configured port. If you’re experiencing sluggish file transfer and drive access, the problem is more likely because of inadequate USB or FireWire hardware within your computer. While you can resolve both detection and slow drive problems, an external hard drive that exhibits grinding noises or extremely hot running temperatures may be on its last legs and you should remove data from the drive as soon as possible. The Computer Isn’t Detecting My External Drive Problem: My external storage device isn’t listed in My Computer. Solution: Partially connected USB or FireWire connectors (or devices that are inadvertently unplugged) are a common cause of undetected drives. The plug may appear firmly seated, but you should disconnect and reconnect the USB or FireWire connector to ensure the drive is plugged in. If your external storage drive connects to a USB or FireWire hub, ensure the hub has power and that its connector is plugged into the computer. Note that some external storage devices work poorly or not at all when connected to a hub; try connecting the drive directly to a port on the computer. If the drive still isn’t detected, test an external hard drive’s cable by switching it with another USB or FireWire cable. Problem: My external storage device is connected but not recognized by Windows. Solution: If you use an external hard drive, ensure the AC power cord and any subsequently connected power strip securely plugs into the power outlet and that both are switched on. Eliminate the port as the source of the problem by connecting your flash drive or external hard drive to another port. If the external storage isn’t recognized in another port, open Device Manger to determine if your port or drive has a system conflict. Select the Start button, Settings, and then click Control Panel. Double-click System, select the Hardware tab, and then click the Device Manager button. Click the plus sign (+) next to Universal Serial Bus Controllers for a drive that connects via USB and the plus sign next to IEEE 1394 Bus Host Controllers for a FireWire connected drive.
  • 16. 62 A yellow exclamation point signifies the port has a driver conflict, and a red “X” indicates the port has been disabled. Right-click and select Enable to reopen a disabled port. To resolve a port conflict, right-click and choose Uninstall for each controller until all the USB or IEEE 1394 Controllers are removed. After you uninstall each controller, restart your computer and it will reinstall the proper Bus Host Controllers. To check for an external storage conflict, select the Disk Drives heading and find your external storage drive. If the drive has a conflict, you may need to install its included software and proprietary driver for the computer to recognize the device. If the drive still can’t be detected, uninstall the external drive and then reboot the computer to facilitate its detection. Problem: My flash drive works fine at home, but isn’t recognized on my work computer. Solution: Many office networks use mapped network drives that override Windows’ drive lettering system for removable devices. Through the Disk Management utility you can manually assign a drive letter to your flash storage device. Right-click the My Computer icon, select Manage, and then double-click Disk Management. Right-click your flash drive and choose Change Drive Letter And Path. Select an unused drive letter from the drop-down list and click OK. You should now see the flash drive listed under that drive letter in My Computer. Problem: My computer runs Window 98 and it won’t recognize my external storage device. Solution: To use any USB device on Win98, you need to update your installation of Windows 98 via the Windows Update Web site. Some USB devices have problems in Win98FE (First Edition) and most work better in Win98SE (Second Edition). You’ll also need to install the Win98 driver that came with your accompanying software. FireWire devices only work in Win98SE, and you’ll need to download a FireWire update before you can detect your FireWire drive. I Can’t Read/Write Data To My External Storage Device Problem: My external storage device shows up in My Computer, but I can’t access or write to the drive. Solution: The drive may be incorrectly formatted for Windows or have a corrupt partition. Windows 2000 and XP feature a utility called Disk Management that analyzes your external drive and assigns it an Online, Healthy, or Unreadable status. Open the utility by right-clicking the My Computer icon and selecting Manage. Under the Storage heading, double-click Disk Management to view your external storage drive’s status. If it has an Unreadable status, you need to format the drive to remove the corrupt partition or incompatible Windows file format. Before you do, attempt to transfer the drive’s data onto another computer because formatting completely erases the files on the drive. To format, simply right-click the external hard drive and click Format. Problem: My external storage device works with Windows, but I can’t access it on Macintosh operating systems. Solution: You drive is most likely formatted in the NTFS (NT file system) file format. To use external storage on both Windows and Macintosh operating systems, it must be in the FAT32 (32-bit file allocation table) format. You’ll need to reformat the drive and choose FAT32 when prompted for a file format. To reformat the drive, right-click it in My Computer and click Format. My External Storage Works Slowly Problem: My new external storage device is USB 2.0 compatible but my files don’t transfer any faster than they did with the USB 1.1 external storage device. Solution: At 480Mbps (megabits per second), USB 2.0 can transfer up to 40 times faster than USB 1.1. But both your computer and any connected hub must have USB 2.0 hardware to perform the higher-speed transfer. If you’re unsure of the computer’s USB capabilities, look under the Universal Serial Bus Controllers in Device Manager. USB 2.0 is denoted by either Standard Enhanced or USB 2.0 Enhanced. If your computer doesn’t support USB 2.0, you can install an add-on card to take advantage of the greater transfer speed. Note that for Windows to support USB 2.0, you must install Service Pack 2 for WinXP or Service Pack 4 for Win2000. Problem: My FireWire external storage device transfers slowly. Solution: FireWire 800 (also known as IEEE 1394b) can only transfer at 800Mbps when used with a 9-pin to 9-pin FireWire cable. A 9-pin to 6-pin cable allows for backward compatibility
  • 17. 63 between older FireWire devices, but it only transfers data at 400Mbps. A major benefit of FireWire devices is that you can connect them in a chain, meaning you can connect your digital camcorder to your external hard drive and expect both to communicate with your computer. However, the entire FireWire chain shares the same bandwidth, and if multiple devices are active, you can significantly reduce your transfer speed. If you must daisy-chain FireWire devices, connect the external hard drive to the computer and place the slower FireWire devices at the end of the chain. In this fashion, your external drive’s data won’t have to pass through the slower devices. Problem: My external storage drive accesses data slowly when it’s full. Solution: You can improve your external drive’s performance by running Windows’ Disk Defragmenter utility to better organize the files on your drive. Select the Start menu, Programs, Accessories, System Tools, and then click Disk Defragmenter. In the Disk Defragmenter window, select your external drive and then click Analyze. Although Windows may indicate the drive doesn’t need to be defragmented, doing so may still improve its performance. Check Disk (or ScanDisk as it's known in older versions of Windows) is another helpful utility that locates errors and bad sectors on your drive. Open My Computer and find the icon for your external storage device. Right-click the icon, select Properties, and then click the Tools tab. Click the Check Now button and select Automatically Fix File System Errors and Scan For And Attempt Recovery Of Bad Sectors. During the repair, Check Disk may stop to give you the option to save unrecoverable data. This data is an indecipherable jumble of characters that won’t provide any usable files—don’t recover the data and let Check Disk continue the repair. External Drive Produces Errors Problem: Windows reports my USB or FireWire flash drive is write-protected. Solution: Some flash drives have a write-protect switch located on the side of the drive that locks data from being written to it. Use a ballpoint pen or small object to unlock the drive’s write- protection. It’s also possible to trigger write-protection by unplugging a drive in the process of writing data. Although it’s typically fine to remove an idle flash drive, the Safely Remove Hardware tool in the taskbar is designed to stop Windows from accessing the drive. You can click this icon, even after the error has occurred, to remove the write-protection from the drive. If the drive is still protected, you may need to connect the flash drive to another port and reboot your computer to reset the flash drive’s settings. Problem: Windows reports that my external storage is full even when it has more than enough free space. Solution: If your drive uses the FAT32 file format, Disk Is Full or Not Enough Space error messages can occur when you transfer files larger than 4GB. Although FAT32 can’t work with files over 4GB, the NTFS file format can. Win2000 and XP feature a converter tool that lets you convert a drive from FAT32 to NTFS without removing any files from the drive. Before running the converter tool, Windows advises you to back up the drive’s data because an error during the conversion process could corrupt it. Click the Start menu, select Run, type cmd, and then click OK. At the DOS prompt, type convert (drive letter): /fs:ntfs and press Enter. For example, if your external drive’s letter is E, type convert E: /fs:ntfs to change it from FAT32 to NTFS. After you enter the command line, you may be required to enter the drive’s volume name, which will be listed in My Computer next to the external drive’s letter. Past Basic Troubleshooting Most external hard drive and flash drive manufacturers maintain substantial online databases that can help you resolve difficulties. If you experience a problem we didn’t have room to cover in this article, see if your drive’s manufacturer covers the problem online. Should you need to call the manufacturer’s tech support line, have your product identification handy and outline any steps you’ve already taken to solve the problem. This information will not only help expedite the troubleshooting process, but it will also provide the tech support agent a better understanding of your problem.
  • 18. 64 CHAPTER 8 - I/O DEVICES & DISPLAYS PC MONITOR http://en.wikipedia.org/wiki/Computer_monitor A monitor or display (sometimes called a visual display unit) is a piece of electrical equipment which displays images generated by devices such as computers, without producing a permanent record. The monitor comprises the display device, circuitry, and an enclosure. The display device in modern monitors is typically a thin film transistor liquid crystal display (TFT-LCD), while older monitors use a cathode ray tube (CRT). KEYBOARDS http://en.wikipedia.org/wiki/Keyboard_%28computing%29 In computing, a keyboard is an input device, partially modeled after the typewriter keyboard, which uses an arrangement of buttons or keys, to act as mechanical levers or electronic switches. A keyboard typically has characters engraved or printed on the keys and each press of a key typically corresponds to a single written symbol. However, to produce some symbols requires pressing and holding several keys simultaneously or in sequence. While most keyboard keys produce letters, numbers or signs (characters), other keys or simultaneous key presses can produce actions or computer commands. In normal usage, the keyboard is used to type text and numbers into a word processor, text editor or other program. In a modern computer, the interpretation of keypresses is generally left to the software. A computer keyboard distinguishes each physical key from every other and reports all keypresses to the controlling software. Keyboards are also used for computer gaming, either with regular keyboards or by using keyboards with special gaming features, which can expedite frequently used keystroke combinations. A keyboard is also used to give commands to the operating system of a computer, such as Windows' Control-Alt-Delete combination, which brings up a task window or shuts down the machine. CONNECTING KEYBOARDS Actual demonstration by the facilitator. KEYBOARD MAINTENANCE/CLEANING PROCEDURE http://home.innernet.net/services/services-tips.asp Symptoms: Sticky or jammed keys Cleaning Options: Electronic Vacuum Cleaner with a conducting grounded nozzle Can of compressed air Clean with solution and shop towel Supplies needed: Alcohol or Glass Cleaner or Anti-Static wipes Canned Air Shop Towel Small Brush for Dusting Foam Tipped Swabs Key Cap Removal Tool Electronic Vacuum Cleaner (grounded nozzle) Procedures: Any combination of this procedure can be used. It is not necessary to perform them all. Turn off computer and disconnect keyboard. Turn your keyboard upside down and gently tap the front edge, the one nearest to you as you type, against the desk. You will be amazed at how much dust and dirt will fall out.
  • 19. 65 Use compressed air to blow the dust out of hard to get at places. Always keep the can level to prevent discharging the propellant which can damage the surface of the keys. For a complete cleaning, remove the key caps using the removal tool and then vacuum with an Electronic Vacuum Cleaner. Replace the key caps insuring they snap back into place. Use a small amount of alcohol or glass cleaner on a shop towel and clean each key. CAUTION do not use designer paper towels, the dyes can be transferred to that nice tan finish and can be very hard to remove. Use a brush to remove loose dust and grime. Use Foam Tipped Swabs dipped in alcohol or glass cleaner to clean heavier grime and between the keys. Reconnect the keyboard. JOYSTICKS http://en.wikipedia.org/wiki/Joystick A joystick is an input device consisting of a stick that pivots on a base and reports its angle or direction to the device it is controlling. Joysticks are often used to control video games, and usually have one or more push-buttons whose state can also be read by the computer. A popular variation of the joystick used on modern video game consoles is the analog stick. The joystick has been the principal flight control in the cockpit of many aircraft, particularly military fast jets, where center stick or side- stick location may b e employed (see also Center stick vs side-stick). Joysticks are also used for controlling machines such as cranes, trucks, underwater unmanned vehicles, wheelchairs, surveillance cameras and zero turning radius lawn mowers. Miniature finger- operated joysticks have been adopted as input devices for smaller electronic equipment such as mobile phones. WEB CAMS http://en.wikipedia.org/wiki/Webcam A webcam is a video capture device connected to a computer or computer network, often using a USB port or, if connected to a network, ethernet or Wi-Fi. The most popular use is for video telephony, permitting a computer to act as a videophone or video conferencing station. This can be used in messenger programs such as Windows Live Messenger, Skype and Yahoo messenger services. Other popular uses, which include the recording of video files or even still-images, are accessible via numerous software programs, applications and devices. Webcams are known for low manufacturing costs and flexibility,[1] making them the lowest cost form of videotelephony. The term "webcam" may also be used in its original sense of a video camera connected to Web continuously for an indefinite time, rather than for a particular session, generally supplying a view for anyone who visits its Web page. Some of these, for example those used as online traffic cameras, are expensive, rugged professional video cameras. CONNECTING A WEB CAM Actual demonstration by the facilitator.
  • 20. 66 SPEAKERS http://en.wikipedia.org/wiki/Computer_speaker Computer speakers, or multimedia speakers, are speakers external to a computer, that disable the lower fidelity built-in speaker. They often have a low-power internal amplifier. The standard audio connection is a 3.5mm (1/8 inch) stereo jack plug often colour-coded lime green (following the PC 99 standard) for computer sound cards. A plug and socket for a two-wire (signal and ground) coaxial cable that is widely used to connect analog audio and video components. Also called a "phono connector," rows of RCA sockets are found on the backs of stereo amplifier and numerous A/V products. The prong is 1/8" thick by 5/16" long. A few use an RCA connector for input. There are also USB speakers which are powered from the 5 volts at 200 milliamps provided by the USB port, allowing about half a watt of output power. Computer speakers range widely in quality and in price. The computer speakers typically packaged with computer systems are small plastic boxes with mediocre sound quality. Some of the slightly better computer speakers have equalization features such as bass and treble controls, improving their sound quality somewhat. The internal amplifiers require an external power source, known as a 'wall-wart'. More sophisticated computer speakers may have a 'subwoofer' unit, to enhance bass output, and these units usually include the power amplifiers both for the bass speaker, and the small 'satellite' speakers. Some computer displays have rather basic speakers built-in. Laptops come with integrated speakers. Unfortunately the tight restriction on space inevitable in laptops means these speakers unavoidably produce low-quality sound. For some users, a lead connecting computer sound output to an existing stereo system is practical. This normally yields much better results than small low-cost computer speakers. Computer speakers can also serve as an economy amplifier for MP3 player use for those who wish to not use headphones although some models of computer speakers have headphone jacks of their own. Features vary by manufacturer, but may include the following: • An LED power indicator. • A 3.5-mm (1/8-inch) headphone jack. • Controls for volume, and sometimes bass and treble • A remote volume control. Major computer speaker companies • Altec Lansing • Bose Corporation • Creative Labs • Cyber Acoustics • Dell • Edifier • General Electric • Harman Kardon • Hewlett-Packard • JBL • Klipsch • Logitech CONNECTING SPEAKERS Actual demonstration by the facilitator. PRINTERS A device that prints text or illustrations on paper.
  • 21. 67 TYPES OF PRINTERS http://www.webopedia.com/TERM/P/printer.html There are many different types of printers. In terms of the technology utilized, printers fall into the following categories: • daisy-wheel: Similar to a ball-head typewriter, this type of printer has a plastic or metal wheel on which the shape of each character stands out in relief. A hammer presses the wheel against a ribbon, which in turn makes an ink stain in the shape of the character on the paper.Daisy-wheel printers produce letter-quality print but cannot print graphics. • dot-matrix: Creates characters by striking pins against an ink ribbon. Each pin makes a dot, and combinations of dots form characters and illustrations. • ink-jet: Sprays ink at a sheet of paper. Ink-jet printers produce high-quality text and graphics. • laser: Uses the same technology as copy machines. Laser printers produce very high quality text and graphics. • LCD & LED : Similar to a laser printer, but uses liquid crystals or light-emitting diodes rather than a laser to produce an image on the drum. • line printer: Contains a chain of characters or pins that print an entire line at one time. Line printers are very fast, but produce low-quality print. • thermal printer: An inexpensive printer that works by pushing heated pins against heat- sensitive paper. Thermal printers are widely used in calculators and fax machines. Printers are also classified by the following characteristics: • quality of type: The output produced by printers is said to be either letter quality (as good as a typewriter), near letter quality, or draft quality. Only daisy-wheel, ink-jet, and laser printers produce letter-quality type. Some dot-matrix printers claim letter-quality print, but if you look closely, you can see the difference. • speed: Measured in characters per second (cps) or pages per minute (ppm), the speed of printers varies widely. Daisy-wheel printers tend to be the slowest, printing about 30 cps. Line printers are fastest (up to 3,000 lines per minute). Dot-matrix printers can print up to 500 cps, and laser printers range from about 4 to 20 text pages per minute. • impact or non-impact: Impact printers include all printers that work by striking an ink ribbon. Daisy-wheel, dot-matrix, and line printers are impact printers. Non-impact printers include laser printers and ink-jet printers. The important difference between impact and non-impact printers is that impact printers are much noisier. • graphics: Some printers (daisy-wheel and line printers) can print only text. Other printers can print both text and graphics. • fonts : Some printers, notably dot-matrix printers, are limited to one or a few fonts. In contrast, laser and ink-jet printers are capable of printing an almost unlimited variety of fonts. Daisy-wheel printers can also print different fonts, but you need to change the daisy wheel, making it difficult to mix fonts in the same document. INSTALLING A PRINTER Actual demonstration by the facilitator. DIAGNOSING PRINTER PROBLEMS/ SOLVING COMMON PRINTER PROBLEMS http://articles.techrepublic.com.com/5100-10878_11-5032833.html
  • 22. 68 It seems as though printer problems occur only at the most inconvenient time—like when you have a deadline to meet and you’ve waited until the last minute to print the document. The difficult thing about having a printer problem fixed down at your local computer store is that you probably don’t know whether the problem lies with your computer, the cable, or the printer. That means carrying in your computer, the cable, and the printer. If you’d like to try troubleshooting printer problems on your own, you need a basic understanding of what goes on during the print process. You don’t have to know every detail of the design of the printer, the printer port, the printer driver, and the printer cable, but a little background information may help you find and correct the problem. From your computer to your printer One of the most common sources of printing problems is the printer cable. Cable problems are also the easiest to diagnose and correct. If you examine the cable connecting the printer to your computer, chances are you’ll find a 36-pin Centronics connector on the end attached to the printer and a 25-pin D-type connector attached to the parallel port of your computer, which is called the printer port or LPT port. The default printer port for most software is usually LPT1. If there are multiple parallel ports in your machine, they will be designated LPT1, LPT2, and so on. There have been several enhancements to the capabilities of the parallel port since the days of the IBM XT machines. The original ports were unidirectional, which meant that they could send data but couldn’t receive it. They could, however, receive status information from the printer. These signals—such as paper out, busy, or error—control the flow of data to the printer. Your printer has a data buffer that receives the data from the computer and supplies it to the printer at a rate that the printer can accept. The signals from the printer to the parallel port turn on and off this flow of data. Each of the 25 conductors on your printer cable is important to the proper operation of your printer. A bad cable can produce all sorts of strange printing problems. You should consider several issues when examining a printer cable. Normal wear and tear can damage one or more of the wires or pins in the connectors. (The Centronics connector seems to be more vulnerable to damage than the D-type connector.) Look for obvious damage to the cable and its connectors, although a bad cable will often show no signs of damage. Make sure that the cable isn’t passing near a source of electrical interference. The longer the cable, the more susceptible it will be to electrical interference. If you have a late-model computer with a parallel port that supports ECP/EPP modes and you use a modern, fast printer that can take advantage of it, be sure to connect them with a high-quality IEEE 1284 compliant cable. The price will seem high for a printer cable, particularly when you compare it with the lowest priced cables, but it’s worth the money. The fastest way to troubleshoot a cable with no obvious defects is to substitute a known good cable and see if the problem goes away. Or, you can place your questionable cable on a system that is having no problems, to see if your problems follow the cable. Printer driver problems The printer driver that you installed when you set up your printer tells your parallel port how to manage the data being sent to the printer. Different makes and models of printers require specific software to effectively manage their particular features. One of the most common printing problems is that an incorrect or defective printer driver is being used. This can result in all sorts of strange gibberish on the printed page. If you selected the wrong printer driver for the printer you are trying to use, you may need to purge the print jobs that are hung up in the spooler as well as reset the printer to remove any bad data that remains in its buffer. Purge the print jobs first. You can do this in Windows 95/98 by clicking on Start, Settings, Printers, and then clicking the icon for the appropriate printer. When the window for the printer opens, click Printer in the upper-left corner and then click Purge Documents.
  • 23. 69 Now reset your printer to remove the last traces of the “poison” still in the printer’s buffer. It’s also possible that you have the correct printer driver but that it isn’t configured properly for the amount of RAM installed in your printer. If the driver is set for more RAM than the printer actually has, an overflow can occur. This might go unnoticed for a long time. It may appear only when you have a large print job or pages with lots of graphics. Get the latest drivers Sometimes there are known issues with a printer driver that crop up only under certain circumstances. The best insurance is to go the Internet and download the latest printer drivers for your operating system and printer. Whenever you install a printer driver, make sure that all of the setting options are correct for your individual printer. This not only includes the RAM settings, but also settings like the source tray for the paper, the paper size and orientation, the timeout settings, and the print resolution. Selecting the correct port type Another possibility is that your parallel port settings are incorrect in your CMOS setup. This is assuming that the parallel port is integrated on the motherboard. First, see if Windows is giving any indication of a problem in Device Manager. To do this, click Start, Settings, Control Panel, and then double-click on the System icon. Now select the Device Manager tab. If there is a problem with the on-board parallel port settings, you will see a flag on the device, indicating a discrepancy. Highlight the parallel port and click Properties to view the device status. Next, click Resources to check out any resource conflicts. It’s quite possible that when you last installed a component, you created a resource conflict that didn’t appear until later when you tried to print. If a conflict is indicated, try changing the resources that the offending device is using. Testing the parallel port Diagnostic software such as CheckIt or Norton Utilities can test the integrity of your port by using a loop-back plug attached to your parallel port. This type of test can also be performed on your serial ports. Be sure that you use a loop-back plug compatible with the testing software. This is because manufacturers utilize different loop-back wiring schemes in their products. The loop-back plug test may not find every parallel port problem, but if it does indicate a problem, it’s probably accurate. If you find a bad parallel port on a motherboard with integrated peripherals, you can disable the port in the CMOS Setup and install an add-on parallel port if you have an unused ISA slot. But check prices before you do this. You may be able to replace your motherboard with a new one for very little more than the cost of a new parallel port card. Check the CMOS If you find no resource conflicts, try changing the port type in the CMOS. Run the CMOS Setup program, open the Integrated Peripherals menu, and select the parallel port type settings. Press [F1] to view the default setting. If the default setting isn’t specified, try changing the mode to the default. You can also try setting to another value the memory address that the port is using. Start with the default setting and then restart the computer and try printing again. Windows will probably find what it considers new hardware and install the proper software during the start up process. Note: This is the process I followed on my computer. However, since every CMOS is different, your system may require you to change the port type in a different manner. Documentation may accompany your computer or motherboard (if it was custom built). Process of elimination If you’ve checked the cable, the printer driver, the parallel port settings, the integrity of the parallel port, and the possibility of resource conflicts, about the only thing left is the printer itself. There are a lot of things that can go wrong with a printer. If you’ve eliminated all other possibilities and have decided that the printer is the culprit, consult the manual that came with your printer for user-serviceable items. The new generation of inkjet printers has the capability of printing at a very high resolution. To
  • 24. 70 achieve this resolution, you must choose from a variety of high-quality papers available. If you’re using standard quality inkjet paper, there is no benefit from choosing a very high resolution. The print speed will be greatly influenced by the resolution you select. Don’t try to use the paper designed for an ink jet printer in your laser printer. This paper is not compatible with the high temperatures present in a laser printer. You can create a real mess inside your laser printer by doing so. (Guess how I learned this.) Another lesson I learned the hard way concerns letterhead paper and the envelopes that have a preprinted return address. Be sure that the ink used on the letterhead and the envelopes is approved for laser printers. Some of the more decorative inks will melt on the rollers of the printer and then transfer to the remainder of the pages as they pass through the printer. If your laser printer has begun to print pages with some of the areas of the page appearing lighter than the rest, your toner cartridge may be a little low on toner. To get the maximum life from a toner cartridge, make sure that the remaining toner is evenly distributed in the cartridge. Do this by removing the cartridge from the printer and, while holding it in the same orientation that it rests in when installed, gently rock it back and forth, tilting it about 45 degrees in each direction. The object is to make toner available over the whole width of the drum. Be careful not to shake the cartridge too vigorously as it takes very little spilled toner to make a big mess. While you have the printer open and the cartridge removed, take the time to clean it out. Follow the directions in the owner’s manual carefully so as to not damage anything. Repairing printers If it turns out that that a major component of your printer needs to be replaced, you may find that the new part costs nearly as much as a new printer. If you use a repair service, ask for an estimate of the repair costs before they proceed. MOUSE http://en.wikipedia.org/wiki/Mouse_%28computing%29 In computing, a mouse (plural mice, mouses, or mouse devices.) is a pointing device that functions by detecting two- dimensional motion relative to its supporting surface. Physically, a mouse consists of an object held under one of the user's hands, with one or more buttons. It sometimes features other elements, such as "wheels", which allow the user to perform various system-dependent operations, or extra buttons or fe atures can add more control or dimensional input. The mouse's motion typically translates into the motion of a cursor on a display, which allows for fine control of a Graphical User Interface. The name mouse, originated at the Stanford Research Institute, derives from the resemblance of early models (which had a cord attached to the rear part of the device, suggesting the idea of a tail) to the common mouse. The first marketed integrated mouse – shipped as a part of a computer and intended for personal computer navigation – came with the Xerox 8010 Star Information System in 1981. However, the mouse remained relatively obscure until the appearance of the Apple Macintosh; in 1984 PC columnist John C. Dvorak ironically commented on the release of this new computer with a mouse: “There is no evidence that people want to use these things.” A mouse now comes with most computers and many other varieties can be bought separately. MOUSE INTERFACES (PS2, SERIAL, USB AND WIRELESS) Actual discussion by the facilitator. MOUSE CLEANING PROCEDURES Supplies needed: Anti-static or Glass Cleaner
  • 25. 71 Shop Towel Alcohol Foam Tipped Swabs Procedure: Turn off the computer and unplug the mouse. Use glass cleaner and shop towel to run over the cord and wipe down mouse. Turn the mouse upside down and remove mouse ball plate. Remove ball and clean it with warm water. Let it dry. Remove dust and grime in the mouse housing with a Foam Tipped Swabs dipped in alcohol. Pay special attention to the ball rollers. Reassemble and reconnect. Chapter 9 - EXPANSION CARDS/PERIPHERAL DEVICES (actual demonstration) EXPANSION SLOTS http://www.webopedia.com/TERM/E/expansion_slot.html An opening in a computer where a circuit board can be inserted to add new capabilities to the computer. Nearly all personal computers except portables contain expansion slots for adding more memory, graphics capabilities, and support for special devices. The boards inserted into the expansion slots are called expansion boards, expansion cards , cards , add-ins , and add-ons. Expansion slots for PCs come in two basic sizes: half- and full-size. Half-size slots are also called 8-bit slots because they can transfer 8 bits at a time. Full-size slots are sometimes called 16-bit slots. In addition, modern PCs include PCI slots for expansion boards that connect directly to the PCI bus. PROPER INSERTION OF EXPANSION CARD - Actual discussion of the facilitator REPLACING AND REMOVING EXPANSION CARD - Actual discussion of the facilitator DISPLAY /VIDEO OR GRAPHICS CARD http://www.answers.com/topic/video-card-1 A video card, video adapter, graphics-accelerator card, display adapter or graphics card is an expansion card whose function is to generate and output images to a display. Many video cards offer added functions, such as accelerated rendering of 3D scenes and 2D graphics, video capture, TV-tuner adapter, MPEG-2 and MPEG-4 decoding, FireWire, light pen, TV output, or the ability to connect multiple monitors (multi-monitor), while other modern high performance cards are used for more graphically demanding purposes such as PC games. Video hardware can be integrated on the motherboard, as it often happened with early computers; in this configuration it was sometimes referred to as a video controller or graphics controller. GRAPHICS ADAPTER INSTALLATION - Actual discussion of the facilitator
  • 26. 72 ADDING AD REMOVING VIDEO CARD - Actual discussion of the facilitator COMMON PROBLEMS OF GRAPHICS ADAPTER http://technology.ezineseeker.com/3-common-vga-drivers-problems-3-simple-troubleshooting- solutions-143c2b1fab.html There are quite a number of common problems that computer users encounter with their video graphics array (VGA), and the most prevalent of these problems are often due to the VGA drivers. This article will list the top 3 common VGA problems, and 3 simple troubleshooting solutions to resolve them. Problem one: Your monitor's power LED seems to flash, but there is no image displayed on screen. This could possibly mean a couple of things, but before you do something stupid like smacking the monitor hoping it will somehow jar it back to life, check to see if the connection to the computer is ok. Sometimes even when things are all connected there may still be problems. This would most likely mean that there is something wrong with the digital/analogue connection, and you will have to look into the problem. It could be the cable itself, or it could be the port. It could also mean that you may need to have a converter, depending on how old or how new your monitor is. Not everything is a problem with the driver though, and sometimes hardware also plays quite a part in it; so you need to look at this problem from both angles. The problem could also lie with your graphics card hardware and its drivers. One thing that you need to have is the latest drivers for the graphics card. By doing so, you can figure out the problem with ease, especially if you can eliminate drivers as being the sole cause of the problems. First things first, make sure that you are able to verify the graphics card compatibility with both your system and the monitor. If there is still an issue with the display, then what you need to do is to get the latest drivers. You can do so by simply going online and visit the manufacturer's website and download the drivers from there. More often than not, this is enough to solve the problem. But if it still doesn't work, do not worry, most of the time, blank unresponsive screens would more than often mean that you have installed a previous, outdated version of the drivers. What you can do is also to use force ware drivers, which are universal drivers for graphics card that activates the chip the same way your manufacturer has designed it. In fact, there is almost no difference when it comes to both drivers, so you can use both. One thing unique about the display environment of the PC is that there is another set of drivers that come into play, which both facilitates and augments the capabilities of your graphics card and this is called the Direct X technology. This is a technology released by Microsoft, and a lot of the architecture built around the display driver is done so in reference to the versions of Direct X available. Therefore, it is also crucial for you to have an updated version of Direct X, whose drivers are available on the company website and sometimes comes packaged with new games and new graphics cards that are purchased. With these 3 common problems and 3 common tips to use, you will be able to route around many of the display driver problems that are plaguing people all over the world. TV CARDS http://en.wikipedia.org/wiki/TV_tuner_card A TV tuner card is a computer component that allows television signals to be received by a computer. Most TV tuners also function as video capture cards, allowing them to record television programs onto a hard disk. Variants of TV Tuner cards are analog, digital, hybrid, combo tuner and mobile.
  • 27. 73 ADDING AND REMOVING TV TUNER CARD - Actual discussion of the facilitator SOUND CARDS http://en.wikipedia.org/wiki/Sound_card A sound card (also known as an audio card) is a computer expansion card that facilitates the input and output of audio signals to and from a computer under control of computer programs. Typical uses of sound cards include providing the audio component for multimedia applications such as music composition, editing video or audio, presentation, education, and entertainment (games). Many computers have sound capabilities built in, while others require additional expansion cards to provide for audio capability. ADDING AND REMOVING SOUND CARD - Actual discussion of the facilitator LAN CARDS http://en.wikipedia.org/wiki/Network_interface_controller A network interface card, network adapter, network interface controller (NIC), or LAN adapter is a computer hardware component designed to allow computers to communicate over a computer network. It is both an OSI layer 1 (physical layer) and layer 2 (data link layer) device, as it provides physical access to a networking medium and provides a low-level addressing system through the use of MAC addresses. It allows users to connect to each other either by using cables or wirelessly. Although other network technologies exist, Ethernet has achieved near-ubiquity since the mid-1990s. Every Ethernet network card has a unique 48-bit serial number called a MAC address, which is stored in ROM carried on the card. Every computer on an Ethernet network must have a card with a unique MAC address. Normally it is safe to assume that no two network cards will share the same address, because card vendors purchase blocks of addresses from the Institute of Electrical and Electronics Engineers (IEEE) and assign a unique address to each card at the time of manufacture. Whereas network cards used to be expansion cards that plug into a computer bus, the low cost and ubiquity of the Ethernet standard means that most newer computers have a network interface built into the motherboard. These either have Ethernet capabilities integrated into the motherboard chipset or implemented via a low cost dedicated Ethernet chip, connected through the PCI (or the newer PCI express) bus. A separate network card is not required unless multiple interfaces are needed or some other type of network is used. Newer motherboards may even have dual network (Ethernet) interfaces built-in. The card implements the electronic circuitry required to communicate using a specific physical layer and data link layer standard such as Ethernet or token ring. This provides a base for a full network protocol stack, allowing communication among small groups of computers on the same LAN and large-scale network communications through routable protocols, such as IP.
  • 28. 74 There are four techniques used to transfer data, the NIC may use one or more of these techniques. • Polling is where the microprocessor examines the status of the peripheral under program control. • Programmed I/O is where the microprocessor alerts the designated peripheral by applying its address to the system's address bus. • Interrupt-driven I/O is where the peripheral alerts the microprocessor that it's ready to transfer data. • DMA is where an intelligent peripheral assumes control of the system bus to access memory directly. This removes load from the CPU but requires a separate processor on the card. A network card typically has a twisted pair, BNC, or AUI socket where the network cable is connected, and a few LEDs to inform the user of whether the network is active, and whether or not there is data being transmitted on it. Network cards are typically available in 10/100/1000 Mbit/s varieties. This means they can support a notional maximum transfer rate of 10, 100 or 1000 Megabits per second. A network interface controller (NIC) is a hardware device that handles an interface to a computer network and allows a network-capable device to access that network. The NIC has a ROM chip that contains a unique number, the media access control (MAC) Address burned into it. The MAC address identifies the device uniquely on the LAN. The NIC exists on both the 'Physical Layer' (Layer 1) and the 'Data Link Layer' (Layer 2) of the OSI model. Sometimes the words 'controller' and 'card' are used interchangeably when talking about networking because the most common NIC is the network interface card. Although 'card' is more commonly used, it is less encompassing. The 'controller' may take the form of a network card that is installed inside a computer, or it may refer to an embedded component as part of a computer motherboard, a router, expansion card, printer interface or a USB device. A MAC address is a 48-bit network hardware identifier that is burned into a ROM chip on the NIC to identify that device on the network. The first 24-bit field is called the Organizationally Unique Identifier (OUI) and is largely manufacturer-specific. Each OUI allows for 16,777,216 Unique NIC Addresses. Smaller manufacturers that do not have a need for over 4096 unique NIC addresses may opt to purchase an Individual Address Block (IAB) instead. An IAB consists of the 24-bit OUI plus a 12-bit extension (taken from the 'potential' NIC portion of the MAC address.) ADDING AND REMOVING LAN CARD - Actual discussion of the facilitator MODEM http://www.webopedia.com/TERM/m/modem.html Short for modulator-demodulator. A modem is a device or program that enables a computer to transmit data over, for example, telephone or cable lines. Computer information is stored digitally, whereas information transmitted over telephone lines is transmitted in the form of analog waves. A modem converts between these two forms. Fortunately, there is one standard interface for connecting external modems to computers called RS-232. Consequently, any external modem can be attached to any computer that has an RS-232 port, which almost all personal computers have. There are also modems that come as an expansion board that you can insert into a vacant expansion slot. These are sometimes called onboard or internal modems. While the modem interfaces are standardized, a number of different protocols for formatting data to be transmitted over telephone lines exist. Some, like CCITT V.34, are official standards, while others have been developed by private companies. Most modems have built-in support for the more common protocols -- at slow data transmission speeds at least, most modems can
  • 29. 75 communicate with each other. At high transmission speeds, however, the protocols are less standardized. Aside from the transmission protocols that they support, the following characteristics distinguish one modem from another: o bps : How fast the modem can transmit and receive data. At slow rates, modems are measured in terms of baud rates. The slowest rate is 300 baud (about 25 cps). At higher speeds, modems are measured in terms of bits per second (bps). The fastest modems run at 57,600 bps, although they can achieve even higher data transfer rates by compressing the data. Obviously, the faster the transmission rate, the faster you can send and receive data. Note, however, that you cannot receive data any faster than it is being sent. If, for example, the device sending data to your computer is sending it at 2,400 bps, you must receive it at 2,400 bps. It does not always pay, therefore, to have a very fast modem. In addition, some telephone lines are unable to transmit data reliably at very high rates. v voice/data: Many modems support a switch to change between voice and data modes. In data mode, the modem acts like a regular modem. In voice mode, the modem acts like a regular telephone. Modems that support a voice/data switch have a built-in loudspeaker and microphone for voice communication. l auto-answer : An auto-answer modem enables your computer to receive calls in your absence. This is only necessary if you are offering some type of computer service that people can call in to use. p data compression : Some modems perform data compression, which enables them to send data at faster rates. However, the modem at the receiving end must be able to decompress the data using the same compression technique. d flash memory : Some modems come with flash memory rather than conventional ROM, which means that the communications protocols can be easily updated if necessary. n Fax capability: Most modern modems are fax modems, which means that they can send and receive faxes. To get the most out of a modem, you should have a communications software package, a program that simplifies the task of transferring data. ADDING AND REMOVING INTERNAL MODEM - Actual discussion of the facilitator ADDING AND REMOVING EXTERNAL MODEM - Actual discussion of the facilitator SCANNER http://en.wikipedia.org/wiki/Image_scanner In computing, a scanner is a device that optically scans images, printed text, handwriting, or an object, and converts it to a digital image. Common examples found in offices are variations of the desktop (or flatbed) scanner where the document is placed on a glass window for scanning. Hand-held scanners, where the device is moved by hand, have evolved from text scanning "wands" to 3D scanners used for industrial design, reverse engineering, test and measurement, orthotics, gaming and other applications. Mechanically driven scanners that move the document are typically used for large-format documents, where a flatbed design would be impractical. Modern scanners typically use a charge-coupled device (CCD) or a Contact Image Sensor (CIS) as the image sensor, whereas older drum scanners use a photomultiplier tube as the image sensor. A rotary
  • 30. 76 scanner, used for high-speed document scanning, is another type of drum scanner, using a CCD array instead of a photomultiplier. Other types of scanners are planetary scanners, which take photographs of books and documents, and 3D scanners, for producing three-dimensional models of objects. Another category of scanner is digital camera scanners, which are based on the concept of reprographic cameras. Due to increasing resolution and new features such as anti-shake, digital cameras have become an attractive alternative to regular scanners. While still having disadvantages compared to traditional scanners (such as distortion, reflections, shadows, low contrast), digital cameras offer advantages such as speed, portability and gentle digitizing of thick documents without damaging the book spine. New scanning technologies are combining 3D scanners with digital cameras to create full-color, photo-realistic 3D models of objects. In the biomedical research area, detection devices for DNA microarrays are called scanners as well. These scanners are high-resolution systems (up to 1 µm/ pixel), similar to microscopes. The detection is done via CCD or a photomultiplier tube (PMT).
  • 31. 77 CHAPTER 10 - PC PORTS (ACTUAL DEMONSTRATION) SERIAL PORT http://www.webopedia.com/TERM/S/serial_port.html A port, or interface, that can be used for serial communication, in which only 1 bit is transmitted at a time. Most serial ports on personal computers conform to the RS-232C or RS-422 standards. A serial port is a general-purpose interface that can be used for almost any type of device, including modems, mice, and printers (although most printers are connected to a parallel port). ADDING AND REPLACING SERIAL PORTS - Actual discussion of the facilitator PARALLEL PORT http://en.wikipedia.org/wiki/Parallel_port A parallel port is a type of interface found on computers (personal and otherwise) for connecting various peripherals. In computing, a parallel port is a parallel communication physical interface. It is also known as a printer port or Centronics port. The IEEE 1284 standard defines the bi-directional version of the port. ADDING PARALLEL PORT - Actual discussion of the facilitator USB PORT http://compnetworking.about.com/od/usbnetworking/p/usb-port.htm A USB port is a standard cable connection interface on personal computers and consumer electronics. USB ports allow stand-alone electronic devices to be connected via cables to a computer (or to each other). USB stands for Universal Serial Bus, an industry standard for short-distance digital data communications. USB allows data to be transferred between devices. USB ports can also supply electric power across the cable to devices without their own power source. Both wired and wireless versions of the USB standard exist, although only the wired version involves USB po rts and cables. What Can You Plug Into a USB Port?: Many types of consumer electronics support USB interfaces. These types of equipment are most commonly used for computer networking: • USB network adapters • USB broadband and cellular modems for Internet access