SlideShare uma empresa Scribd logo
1 de 6
Copy or move lists by using list templates
     Applies to: Microsoft SharePoint Foundation 2010 , SharePoint Server 2010


     You might need to copy or move a SharePoint list and its data from one site to another for any number of
     reasons. For example, you can copy a list without the data to another site to use it as the basis of a new
     list on that site, or you can move several lists including their data from one site to another because you
     have changed to a new workgroup. The essential prerequisite task for copying and moving a list is to
     create a list template, which contains the list definition and optionally its data, in the list template gallery
     for the site. You can then copy or move a list between a site’s subsites and between different sites by
     using this list template.

              IMPORTANT        Copying lists by using list templates requires site management permission.


     Create a list template


      WARNING        This step does not save any security settings that may have been applied to the list. Save
     this list template to a secure place so that it cannot be restored by someone who should not have access
     to this content.
1.   Navigate to the site containing the list for which you want to create a list template.

2.   In the ribbon, click the List tab, and then in the Settings section, click List Settings.

3.   In the Permissions and Management column, click Save list as template.
     The Save as Template page appears.

4.   In the File Name box, type the file name to use for the template file.


      NOTE       Do not add a file extension to the file name. The .stp file extension is automatically added for
     you.
5.   In the Template name box, type the title that you want to appear in the list template gallery for this
     template.

6.   In the Template Description box, type a description for the template.

7.   Do one of the following:


             To copy just the list definition, clear the Include Content check box.
             To copy the list definition and all the data in the list, select the Include Content check box.

8.   Click OK.

     The new list template appears in the list template gallery.
NOTE     By default, you can create a list template that contains up to 10 megabytes (MB) of content.
      However, an administrator can increase this size limit. For example to increase the limit to 20 MB, use the
      following command in the Stsadm tool for command-line administration:stsadm -o setproperty -pn max-
      template-document-size -pv 20000000


      Edit the list template properties

     1.    Navigate to the site containing the list for which you want to edit the list template.

     2.    On the Site Actions                  menu, click Site Settings.


            NOTE    On a site for which the Site Actions menu is customized, point toSite Settings, and then click
           the settings that you want to view.
     3.    In the Galleries section, click List templates.

          NOTE     This option appears only to users who have the Manage Lists permission. Site owners have this
      permission by default.
      The List Template Gallery page appears.

     4.    Select the list template.

     5.    In the ribbon, click the Documents tab, and then in the Manage section, click Edit Properties.

     6.    Edit the Name, (Required), Title, or Description information that you want to change, and then
           click Save.


      Copy or move a list within a site

      Do the following steps to copy or move a list within a subsite, or from one subsite to another subsite
      within the same SharePoint site.

      STEP 1: CREATE A LIST TEMPLATE


      STEP 2: CREATE A NEW LIST BASED ON THE LIST TEMPLATE.
      To copy a list, you create a new list based on the list template you created in “Step 1: Create a list
      template”.

1.    Navigate to the site where you want to create the list.

2.    Click Site Actions                  , click View All Site Content, and then click Create      .


          NOTE     A SharePoint site can be significantly modified in appearance and navigation. If you cannot
      locate an option, such as a command, button, or link, contact your administrator.
3.    Under Lists, select the list template created in “Step 1: Create a list template”.


      ©2009 Microsoft Corporation.
4.    Type the Name for the list. Name is required.
      The name appears at the top of the list in most views, becomes part of the Web address for the list page,
      and appears in site navigation to help users to find the list. You can change the name of a list, but the
      Web address will remain the same.

5.    Type the Description for the list. Description is optional.
      The description appears below the name in most views. Some types of lists can receive content by e-mail.
      If you plan to enable the list to receive content by e-mail, you can add the e-mail address of the list to its
      description, so that people can easily find the e-mail address. You can change the description for a list.

6.    To add a link to this list on the Quick Launch, verify that Yes is selected in the Navigation section.

7.    If there is an E-mail section, your administrator has enabled lists on your site to receive content by e-mail.
      To enable people to add content to this list by sending e-mail, click Yes under Enable this list to receive
      e-mail. Then, in the Email address box, type the first part of the address that you want people to use for
      the list. This option is not available for all types of list.

8.    Click Create.


      STEP 3: DELETE THE ORIGINAL LIST (OPTIONAL)
      To move a list, you delete the original list that the list template was based on.

1.    Navigate to the site containing the original list for which the list template was based on, and that you
      want to delete.

2.    Click the name of the list on the Quick Launch, or click Site Actions, click View All Site Content, and then
      under the appropriate List section, click the name of the list.


       NOTE     A SharePoint site can be significantly modified in appearance and navigation. If you cannot
      locate an option, such as a command, button, or link, contact your administrator.
3.    In the ribbon, click the List tab and then in the Settings group, click List Settings.

4.    On the list settings page, click Delete this list, and then click OK.

      For more information on creating and deleting a list, see the See Also section.


      Copy or move a list between sites

      Do the following steps to copy or move a list between a source site and a destination site.

      STEP 1: CREATE A LIST TEMPLATE


      STEP 2: DOWNLOAD THE LIST TEMPLATE AS A FILE (.STP) FROM THE LIST GALLERY OF THE SOURCE SITE
       NOTE     The following steps require that you have Write permissions to the folder or share on which you
       are downloading the list template file.
     1. Navigate to the source site that contains the list you want to copy or move.


      ©2009 Microsoft Corporation.
2.    On the Site Actions menu                  , click Site Settings.

     NOTE    On a site for which the Site Actions menu is customized, point to Site Settings, and then click
  the settings that you want to view.
3. In the Galleries column, click List templates.

     NOTE    This option appears only to users who have the Manage Lists permission. Site owners have this
  permission by default.
4. The List Template Gallery page appears.

5.    Select the list template that you want to download.

6.    In the ribbon, click the Documents tab, and then in the Copies section, click Download.

7.    In the File Download dialog box, click Save.

8.    In the Save As dialog box, specify the path and file name for the file that you are downloading, and
      then click Save.

9.    In the Download complete dialog box, click Close. Alternatively, you can click Open Folder to
      immediately see the file you just created in the folder that you specified.


 STEP 3: UPLOAD THE LIST TEMPLATE FILE (.STP) TO THE LIST TEMPLATE GALLERY OF THE DESTINATION
 SITE
1.    Navigate to the destination site to which you want to copy or move the list.

2.    On the Site Actions menu                  , click Site Settings.

     NOTE    On a site for which the Site Actions menu is customized, point to Site Settings, and then click
  the settings that you want to view.
3. In the Galleries column, click List templates.

     NOTE    This option appears only to users who have the Manage Lists permission. Site owners have this
 permission by default.
 The List Template Gallery page appears.
4.    In the ribbon, click the New tab, and then in the New section, click the arrow next to Upload, and
      click Upload Document.

5.    The Upload Template: List Template Gallery page appears.

6.    Either type the path and file name (including the file extension) of the list template that you want to
      upload, or click Browse to select the file.

7.    Choose whether to overwrite the existing files. By default, the Overwrite existing file check box is
      selected.


 ©2009 Microsoft Corporation.
NOTE      If the Overwrite existing file check box is selected, a list template that is already stored in
           the list gallery and that has the same name as the file you are uploading will be overwritten. If you
           attempt to upload a list template that already exists in the content database and this check box is not
           selected, an error message will be displayed.
     8.    Click Save.


      STEP 4: CREATE A NEW LIST BASED ON THE LIST TEMPLATE.
      To copy a list, you create a new list based on the list template you created in “Step 1: Create a list
      template”.

      Navigate to the site where you want to create the list.

1.    Click Site Actions                   , click View All Site Content, and then click Create       .


          NOTE     A SharePoint site can be significantly modified in appearance and navigation. If you cannot
      locate an option, such as a command, button, or link, contact your administrator.
2.    Under Lists, select the list template created in “Step 1: Create a list template”.

3.    Type the Name for the list. Name is required.
      The name appears at the top of the list in most views, becomes part of the Web address for the list page,
      and appears in site navigation to help users to find the list. You can change the name of a list, but the
      Web address will remain the same.

4.    Type the Description for the list. Description is optional.
      The description appears below the name in most views. Some types of lists can receive content by e-mail.
      If you plan to enable the list to receive content by e-mail, you can add the e-mail address of the list to its
      description, so that people can easily find the e-mail address. You can change the description for a list.

5.    To add a link to this list on the Quick Launch, verify that Yes is selected in the Navigation section.

6.    If there is an E-mail section, your administrator has enabled lists on your site to receive content by e-mail.
      To enable people to add content to this list by sending e-mail, click Yes under Enable this list to receive
      e-mail. Then, in the Email address box, type the first part of the address that you want people to use for
      the list. This option is not available for all types of list.

7.    Click Create.


      STEP 5: DELETE THE ORIGINAL LIST (OPTIONAL)
      To move a list, you delete the original list that the list template was based on.

           1.    Navigate to the site containing the original list for which the list template was based on, and that
                 you want to delete.


      ©2009 Microsoft Corporation.
2.   Click the name of the list on the Quick Launch, or click Site Actions, click View All Site
          Content, and then under the appropriate List section, click the name of the list.


           NOTE     A SharePoint site can be significantly modified in appearance and navigation. If you
          cannot locate an option, such as a command, button, or link, contact your administrator.
     3.   In the ribbon, click the List tab and then in the Settings group, click List Settings.

     4.   On the list settings page, click Delete this list, and then click OK.

     5.   For more information on creating and deleting a list, see the See Also section.


 Delete a list template

1.   Navigate to the site containing the list template that you want to delete.

2.   On the Site Actions menu                    , click Site Settings.


      NOTE     On a site for which the Site Actions menu is customized, point to Site Settings, and then
     click the settings that you want to view.
3.   In the Galleries column, click List templates.


      NOTE     This option appears only to users who have the Manage Lists permission. Site owners have this
     permission by default.
4.   The List Template Gallery page appears.

5.   In the Edit column, click Edit Document Properties for the list template that you want to delete.

6.   Click Delete Item, and then click OK to confirm.


 ©2009 Microsoft Corporation.

Mais conteúdo relacionado

Mais procurados (8)

Guide to Mendeley Reference Management
Guide to Mendeley Reference ManagementGuide to Mendeley Reference Management
Guide to Mendeley Reference Management
 
Zotero
ZoteroZotero
Zotero
 
Developing LiveBinders as a Teaching Resource Tool
Developing LiveBinders as a Teaching Resource ToolDeveloping LiveBinders as a Teaching Resource Tool
Developing LiveBinders as a Teaching Resource Tool
 
Getting started guide
Getting started guideGetting started guide
Getting started guide
 
Mendeley
Mendeley Mendeley
Mendeley
 
Endnote
EndnoteEndnote
Endnote
 
Guide to endnote 2021
Guide to endnote 2021Guide to endnote 2021
Guide to endnote 2021
 
Guide to endnote 2021
Guide to endnote 2021Guide to endnote 2021
Guide to endnote 2021
 

Destaque

Roy Resume
Roy ResumeRoy Resume
Roy Resume
Roy John
 
Ave Point Corporate Overview
Ave Point Corporate OverviewAve Point Corporate Overview
Ave Point Corporate Overview
kimaujla
 
WeiCraftTaxationResume (1)
WeiCraftTaxationResume (1)WeiCraftTaxationResume (1)
WeiCraftTaxationResume (1)
wei craft
 

Destaque (12)

Microsoft India - Evaluation Guide for SharePoint Server 2010 Whitepaper
Microsoft India - Evaluation Guide for SharePoint Server 2010 WhitepaperMicrosoft India - Evaluation Guide for SharePoint Server 2010 Whitepaper
Microsoft India - Evaluation Guide for SharePoint Server 2010 Whitepaper
 
Roy Resume
Roy ResumeRoy Resume
Roy Resume
 
Ave Point Corporate Overview
Ave Point Corporate OverviewAve Point Corporate Overview
Ave Point Corporate Overview
 
Thinakaran
ThinakaranThinakaran
Thinakaran
 
Share Point Administrator Course Content
Share Point Administrator Course ContentShare Point Administrator Course Content
Share Point Administrator Course Content
 
SharePoint 2010 Administrator Course Content
SharePoint 2010 Administrator Course ContentSharePoint 2010 Administrator Course Content
SharePoint 2010 Administrator Course Content
 
WeiCraftTaxationResume (1)
WeiCraftTaxationResume (1)WeiCraftTaxationResume (1)
WeiCraftTaxationResume (1)
 
Selvi_resume
Selvi_resumeSelvi_resume
Selvi_resume
 
Chris O'Brien - Modern SharePoint sites and the SharePoint Framework - reference
Chris O'Brien - Modern SharePoint sites and the SharePoint Framework - referenceChris O'Brien - Modern SharePoint sites and the SharePoint Framework - reference
Chris O'Brien - Modern SharePoint sites and the SharePoint Framework - reference
 
Chris O'Brien - Introduction to the SharePoint Framework for developers
Chris O'Brien - Introduction to the SharePoint Framework for developersChris O'Brien - Introduction to the SharePoint Framework for developers
Chris O'Brien - Introduction to the SharePoint Framework for developers
 
Abhishek_Kumar31001
Abhishek_Kumar31001Abhishek_Kumar31001
Abhishek_Kumar31001
 
Ma5612 configuration guide(v800 r308c00 04)
Ma5612 configuration guide(v800 r308c00 04)Ma5612 configuration guide(v800 r308c00 04)
Ma5612 configuration guide(v800 r308c00 04)
 

Semelhante a Copy or Move Lists by Using List Templates - EPC Group - SharePoint 2010

Worklowsinsharepoint
WorklowsinsharepointWorklowsinsharepoint
Worklowsinsharepoint
LiquidHub
 
Create a blog in sp2010 epc
Create a blog in sp2010  epcCreate a blog in sp2010  epc
Create a blog in sp2010 epc
EPC Group
 
Source httpsites.google.comsupport University of Nevad.docx
Source httpsites.google.comsupport University of Nevad.docxSource httpsites.google.comsupport University of Nevad.docx
Source httpsites.google.comsupport University of Nevad.docx
rosemariebrayshaw
 

Semelhante a Copy or Move Lists by Using List Templates - EPC Group - SharePoint 2010 (20)

Implement Records Management in - SharePoint 2010 - EPC Group
Implement Records Management in - SharePoint 2010 - EPC GroupImplement Records Management in - SharePoint 2010 - EPC Group
Implement Records Management in - SharePoint 2010 - EPC Group
 
Worklowsinsharepoint
WorklowsinsharepointWorklowsinsharepoint
Worklowsinsharepoint
 
Create a blog in sp2010 epc
Create a blog in sp2010  epcCreate a blog in sp2010  epc
Create a blog in sp2010 epc
 
Post to a blog in sp 2010 epc
Post to a blog in sp 2010   epcPost to a blog in sp 2010   epc
Post to a blog in sp 2010 epc
 
Phpmyadmin administer mysql
Phpmyadmin administer mysqlPhpmyadmin administer mysql
Phpmyadmin administer mysql
 
Database.pptx
Database.pptxDatabase.pptx
Database.pptx
 
Add or Delete Files in a Library - SharePoint 2010 - EPC Group
Add or Delete Files in a Library - SharePoint 2010 - EPC GroupAdd or Delete Files in a Library - SharePoint 2010 - EPC Group
Add or Delete Files in a Library - SharePoint 2010 - EPC Group
 
Guide to Using DrumUp for Content Discovery, Curation and Social Media Manage...
Guide to Using DrumUp for Content Discovery, Curation and Social Media Manage...Guide to Using DrumUp for Content Discovery, Curation and Social Media Manage...
Guide to Using DrumUp for Content Discovery, Curation and Social Media Manage...
 
Source httpsites.google.comsupport University of Nevad.docx
Source httpsites.google.comsupport University of Nevad.docxSource httpsites.google.comsupport University of Nevad.docx
Source httpsites.google.comsupport University of Nevad.docx
 
TemplateTutorial
TemplateTutorialTemplateTutorial
TemplateTutorial
 
TemplateTutorial
TemplateTutorialTemplateTutorial
TemplateTutorial
 
Share point training_guide[1]
Share point training_guide[1]Share point training_guide[1]
Share point training_guide[1]
 
SharePoint 2010 Team Site Overview
SharePoint 2010 Team Site OverviewSharePoint 2010 Team Site Overview
SharePoint 2010 Team Site Overview
 
Getting Started with SharePoint Status Indicators - EPC Group
Getting Started with SharePoint Status Indicators - EPC GroupGetting Started with SharePoint Status Indicators - EPC Group
Getting Started with SharePoint Status Indicators - EPC Group
 
SharePoint Lists and Libraries Configuration
SharePoint Lists and Libraries ConfigurationSharePoint Lists and Libraries Configuration
SharePoint Lists and Libraries Configuration
 
SharePoint Lists and Document Libraries Configuration and Learning
SharePoint Lists and Document Libraries Configuration and LearningSharePoint Lists and Document Libraries Configuration and Learning
SharePoint Lists and Document Libraries Configuration and Learning
 
SharePoint Lists and Libraries Configuration
SharePoint Lists and Libraries ConfigurationSharePoint Lists and Libraries Configuration
SharePoint Lists and Libraries Configuration
 
SharePoint Lists and Libraries Configuration
SharePoint Lists and Libraries ConfigurationSharePoint Lists and Libraries Configuration
SharePoint Lists and Libraries Configuration
 
SharePoint Lists and Libraries
SharePoint Lists and LibrariesSharePoint Lists and Libraries
SharePoint Lists and Libraries
 
Presentation 03
Presentation 03Presentation 03
Presentation 03
 

Mais de EPC Group

Windows Server 2012 Deep-Dive - EPC Group
Windows Server 2012 Deep-Dive - EPC GroupWindows Server 2012 Deep-Dive - EPC Group
Windows Server 2012 Deep-Dive - EPC Group
EPC Group
 
Understanding Windows Azure’s Active Directory (AD) and PowerShell Tools
Understanding Windows Azure’s Active Directory (AD) and PowerShell ToolsUnderstanding Windows Azure’s Active Directory (AD) and PowerShell Tools
Understanding Windows Azure’s Active Directory (AD) and PowerShell Tools
EPC Group
 
PowerShell with SharePoint 2013 and Office 365 - EPC Group
PowerShell with SharePoint 2013 and Office 365 - EPC GroupPowerShell with SharePoint 2013 and Office 365 - EPC Group
PowerShell with SharePoint 2013 and Office 365 - EPC Group
EPC Group
 

Mais de EPC Group (20)

Power BI vs Tableau - An Overview from EPC Group.pptx
Power BI vs Tableau - An Overview from EPC Group.pptxPower BI vs Tableau - An Overview from EPC Group.pptx
Power BI vs Tableau - An Overview from EPC Group.pptx
 
EPC Group Intune Practice and Capabilities Overview
EPC Group Intune Practice and Capabilities OverviewEPC Group Intune Practice and Capabilities Overview
EPC Group Intune Practice and Capabilities Overview
 
Pop the Hood on Microsoft Teams - EPC Group
Pop the Hood on Microsoft Teams - EPC GroupPop the Hood on Microsoft Teams - EPC Group
Pop the Hood on Microsoft Teams - EPC Group
 
Windows Server 2012 Deep-Dive - EPC Group
Windows Server 2012 Deep-Dive - EPC GroupWindows Server 2012 Deep-Dive - EPC Group
Windows Server 2012 Deep-Dive - EPC Group
 
Understanding Windows Azure’s Active Directory (AD) and PowerShell Tools
Understanding Windows Azure’s Active Directory (AD) and PowerShell ToolsUnderstanding Windows Azure’s Active Directory (AD) and PowerShell Tools
Understanding Windows Azure’s Active Directory (AD) and PowerShell Tools
 
PowerShell with SharePoint 2013 and Office 365 - EPC Group
PowerShell with SharePoint 2013 and Office 365 - EPC GroupPowerShell with SharePoint 2013 and Office 365 - EPC Group
PowerShell with SharePoint 2013 and Office 365 - EPC Group
 
Understanding Office 365’s Identity Solutions: Deep Dive - EPC Group
Understanding Office 365’s Identity Solutions: Deep Dive - EPC GroupUnderstanding Office 365’s Identity Solutions: Deep Dive - EPC Group
Understanding Office 365’s Identity Solutions: Deep Dive - EPC Group
 
System Center 2012 SP1 - Overview - EPC Group
System Center 2012 SP1 - Overview - EPC GroupSystem Center 2012 SP1 - Overview - EPC Group
System Center 2012 SP1 - Overview - EPC Group
 
Windows Azure Pack Enabling Virtual Machines - IaaS & Virtual Machine Role - ...
Windows Azure Pack Enabling Virtual Machines - IaaS & Virtual Machine Role - ...Windows Azure Pack Enabling Virtual Machines - IaaS & Virtual Machine Role - ...
Windows Azure Pack Enabling Virtual Machines - IaaS & Virtual Machine Role - ...
 
Lync 2013 - Audio - Quick Reference - 2 Page Reference - EPC Group
Lync 2013 - Audio - Quick Reference - 2 Page Reference - EPC GroupLync 2013 - Audio - Quick Reference - 2 Page Reference - EPC Group
Lync 2013 - Audio - Quick Reference - 2 Page Reference - EPC Group
 
Lync 2013 - Sharing and Collaboration - Quick Reference 2 Pager
Lync 2013 - Sharing and Collaboration - Quick Reference 2 PagerLync 2013 - Sharing and Collaboration - Quick Reference 2 Pager
Lync 2013 - Sharing and Collaboration - Quick Reference 2 Pager
 
Windows Server 2012 Deep-Dive - EPC Group
Windows Server 2012 Deep-Dive - EPC GroupWindows Server 2012 Deep-Dive - EPC Group
Windows Server 2012 Deep-Dive - EPC Group
 
Hyper-V’s Virtualization Enhancements - EPC Group
Hyper-V’s Virtualization Enhancements - EPC GroupHyper-V’s Virtualization Enhancements - EPC Group
Hyper-V’s Virtualization Enhancements - EPC Group
 
High Level Overview of Windows Azure - EPC Group
High Level Overview of Windows Azure - EPC GroupHigh Level Overview of Windows Azure - EPC Group
High Level Overview of Windows Azure - EPC Group
 
SharePoint 2013 and Office 365 External Sharing
SharePoint 2013 and Office 365 External SharingSharePoint 2013 and Office 365 External Sharing
SharePoint 2013 and Office 365 External Sharing
 
BizTalk Server 2010 - Invoking Restful Services - EPC Group
BizTalk Server 2010 - Invoking Restful Services - EPC GroupBizTalk Server 2010 - Invoking Restful Services - EPC Group
BizTalk Server 2010 - Invoking Restful Services - EPC Group
 
BizTalk Sever 2010 - Basic Principles of Maps - EPC Group
BizTalk Sever 2010 - Basic Principles of Maps - EPC GroupBizTalk Sever 2010 - Basic Principles of Maps - EPC Group
BizTalk Sever 2010 - Basic Principles of Maps - EPC Group
 
EPC Group and Continental Airlines ECM Case Study - SharePoint 2007 Global Study
EPC Group and Continental Airlines ECM Case Study - SharePoint 2007 Global StudyEPC Group and Continental Airlines ECM Case Study - SharePoint 2007 Global Study
EPC Group and Continental Airlines ECM Case Study - SharePoint 2007 Global Study
 
Driving End User Adoption in SharePoint 2013 & 2010 - EPC Group
Driving End User Adoption in SharePoint 2013 & 2010 - EPC GroupDriving End User Adoption in SharePoint 2013 & 2010 - EPC Group
Driving End User Adoption in SharePoint 2013 & 2010 - EPC Group
 
Join EPC Group's Monthly Newsletter
Join EPC Group's Monthly NewsletterJoin EPC Group's Monthly Newsletter
Join EPC Group's Monthly Newsletter
 

Último

Why Teams call analytics are critical to your entire business
Why Teams call analytics are critical to your entire businessWhy Teams call analytics are critical to your entire business
Why Teams call analytics are critical to your entire business
panagenda
 
Architecting Cloud Native Applications
Architecting Cloud Native ApplicationsArchitecting Cloud Native Applications
Architecting Cloud Native Applications
WSO2
 

Último (20)

A Beginners Guide to Building a RAG App Using Open Source Milvus
A Beginners Guide to Building a RAG App Using Open Source MilvusA Beginners Guide to Building a RAG App Using Open Source Milvus
A Beginners Guide to Building a RAG App Using Open Source Milvus
 
Why Teams call analytics are critical to your entire business
Why Teams call analytics are critical to your entire businessWhy Teams call analytics are critical to your entire business
Why Teams call analytics are critical to your entire business
 
Strategize a Smooth Tenant-to-tenant Migration and Copilot Takeoff
Strategize a Smooth Tenant-to-tenant Migration and Copilot TakeoffStrategize a Smooth Tenant-to-tenant Migration and Copilot Takeoff
Strategize a Smooth Tenant-to-tenant Migration and Copilot Takeoff
 
Exploring the Future Potential of AI-Enabled Smartphone Processors
Exploring the Future Potential of AI-Enabled Smartphone ProcessorsExploring the Future Potential of AI-Enabled Smartphone Processors
Exploring the Future Potential of AI-Enabled Smartphone Processors
 
EMPOWERMENT TECHNOLOGY GRADE 11 QUARTER 2 REVIEWER
EMPOWERMENT TECHNOLOGY GRADE 11 QUARTER 2 REVIEWEREMPOWERMENT TECHNOLOGY GRADE 11 QUARTER 2 REVIEWER
EMPOWERMENT TECHNOLOGY GRADE 11 QUARTER 2 REVIEWER
 
Apidays New York 2024 - The value of a flexible API Management solution for O...
Apidays New York 2024 - The value of a flexible API Management solution for O...Apidays New York 2024 - The value of a flexible API Management solution for O...
Apidays New York 2024 - The value of a flexible API Management solution for O...
 
Architecting Cloud Native Applications
Architecting Cloud Native ApplicationsArchitecting Cloud Native Applications
Architecting Cloud Native Applications
 
Real Time Object Detection Using Open CV
Real Time Object Detection Using Open CVReal Time Object Detection Using Open CV
Real Time Object Detection Using Open CV
 
AXA XL - Insurer Innovation Award Americas 2024
AXA XL - Insurer Innovation Award Americas 2024AXA XL - Insurer Innovation Award Americas 2024
AXA XL - Insurer Innovation Award Americas 2024
 
ProductAnonymous-April2024-WinProductDiscovery-MelissaKlemke
ProductAnonymous-April2024-WinProductDiscovery-MelissaKlemkeProductAnonymous-April2024-WinProductDiscovery-MelissaKlemke
ProductAnonymous-April2024-WinProductDiscovery-MelissaKlemke
 
TrustArc Webinar - Unlock the Power of AI-Driven Data Discovery
TrustArc Webinar - Unlock the Power of AI-Driven Data DiscoveryTrustArc Webinar - Unlock the Power of AI-Driven Data Discovery
TrustArc Webinar - Unlock the Power of AI-Driven Data Discovery
 
MS Copilot expands with MS Graph connectors
MS Copilot expands with MS Graph connectorsMS Copilot expands with MS Graph connectors
MS Copilot expands with MS Graph connectors
 
Apidays New York 2024 - Scaling API-first by Ian Reasor and Radu Cotescu, Adobe
Apidays New York 2024 - Scaling API-first by Ian Reasor and Radu Cotescu, AdobeApidays New York 2024 - Scaling API-first by Ian Reasor and Radu Cotescu, Adobe
Apidays New York 2024 - Scaling API-first by Ian Reasor and Radu Cotescu, Adobe
 
Navi Mumbai Call Girls 🥰 8617370543 Service Offer VIP Hot Model
Navi Mumbai Call Girls 🥰 8617370543 Service Offer VIP Hot ModelNavi Mumbai Call Girls 🥰 8617370543 Service Offer VIP Hot Model
Navi Mumbai Call Girls 🥰 8617370543 Service Offer VIP Hot Model
 
DBX First Quarter 2024 Investor Presentation
DBX First Quarter 2024 Investor PresentationDBX First Quarter 2024 Investor Presentation
DBX First Quarter 2024 Investor Presentation
 
Corporate and higher education May webinar.pptx
Corporate and higher education May webinar.pptxCorporate and higher education May webinar.pptx
Corporate and higher education May webinar.pptx
 
Ransomware_Q4_2023. The report. [EN].pdf
Ransomware_Q4_2023. The report. [EN].pdfRansomware_Q4_2023. The report. [EN].pdf
Ransomware_Q4_2023. The report. [EN].pdf
 
Emergent Methods: Multi-lingual narrative tracking in the news - real-time ex...
Emergent Methods: Multi-lingual narrative tracking in the news - real-time ex...Emergent Methods: Multi-lingual narrative tracking in the news - real-time ex...
Emergent Methods: Multi-lingual narrative tracking in the news - real-time ex...
 
Apidays New York 2024 - The Good, the Bad and the Governed by David O'Neill, ...
Apidays New York 2024 - The Good, the Bad and the Governed by David O'Neill, ...Apidays New York 2024 - The Good, the Bad and the Governed by David O'Neill, ...
Apidays New York 2024 - The Good, the Bad and the Governed by David O'Neill, ...
 
Powerful Google developer tools for immediate impact! (2023-24 C)
Powerful Google developer tools for immediate impact! (2023-24 C)Powerful Google developer tools for immediate impact! (2023-24 C)
Powerful Google developer tools for immediate impact! (2023-24 C)
 

Copy or Move Lists by Using List Templates - EPC Group - SharePoint 2010

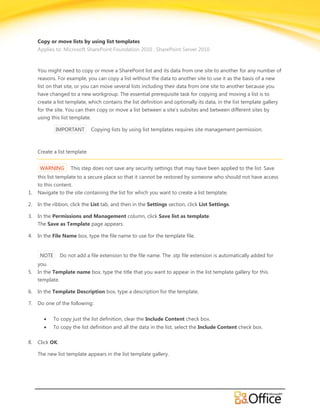
  • 1. Copy or move lists by using list templates Applies to: Microsoft SharePoint Foundation 2010 , SharePoint Server 2010 You might need to copy or move a SharePoint list and its data from one site to another for any number of reasons. For example, you can copy a list without the data to another site to use it as the basis of a new list on that site, or you can move several lists including their data from one site to another because you have changed to a new workgroup. The essential prerequisite task for copying and moving a list is to create a list template, which contains the list definition and optionally its data, in the list template gallery for the site. You can then copy or move a list between a site’s subsites and between different sites by using this list template. IMPORTANT Copying lists by using list templates requires site management permission. Create a list template WARNING This step does not save any security settings that may have been applied to the list. Save this list template to a secure place so that it cannot be restored by someone who should not have access to this content. 1. Navigate to the site containing the list for which you want to create a list template. 2. In the ribbon, click the List tab, and then in the Settings section, click List Settings. 3. In the Permissions and Management column, click Save list as template. The Save as Template page appears. 4. In the File Name box, type the file name to use for the template file. NOTE Do not add a file extension to the file name. The .stp file extension is automatically added for you. 5. In the Template name box, type the title that you want to appear in the list template gallery for this template. 6. In the Template Description box, type a description for the template. 7. Do one of the following: To copy just the list definition, clear the Include Content check box. To copy the list definition and all the data in the list, select the Include Content check box. 8. Click OK. The new list template appears in the list template gallery.
  • 2. NOTE By default, you can create a list template that contains up to 10 megabytes (MB) of content. However, an administrator can increase this size limit. For example to increase the limit to 20 MB, use the following command in the Stsadm tool for command-line administration:stsadm -o setproperty -pn max- template-document-size -pv 20000000 Edit the list template properties 1. Navigate to the site containing the list for which you want to edit the list template. 2. On the Site Actions menu, click Site Settings. NOTE On a site for which the Site Actions menu is customized, point toSite Settings, and then click the settings that you want to view. 3. In the Galleries section, click List templates. NOTE This option appears only to users who have the Manage Lists permission. Site owners have this permission by default. The List Template Gallery page appears. 4. Select the list template. 5. In the ribbon, click the Documents tab, and then in the Manage section, click Edit Properties. 6. Edit the Name, (Required), Title, or Description information that you want to change, and then click Save. Copy or move a list within a site Do the following steps to copy or move a list within a subsite, or from one subsite to another subsite within the same SharePoint site. STEP 1: CREATE A LIST TEMPLATE STEP 2: CREATE A NEW LIST BASED ON THE LIST TEMPLATE. To copy a list, you create a new list based on the list template you created in “Step 1: Create a list template”. 1. Navigate to the site where you want to create the list. 2. Click Site Actions , click View All Site Content, and then click Create . NOTE A SharePoint site can be significantly modified in appearance and navigation. If you cannot locate an option, such as a command, button, or link, contact your administrator. 3. Under Lists, select the list template created in “Step 1: Create a list template”. ©2009 Microsoft Corporation.
  • 3. 4. Type the Name for the list. Name is required. The name appears at the top of the list in most views, becomes part of the Web address for the list page, and appears in site navigation to help users to find the list. You can change the name of a list, but the Web address will remain the same. 5. Type the Description for the list. Description is optional. The description appears below the name in most views. Some types of lists can receive content by e-mail. If you plan to enable the list to receive content by e-mail, you can add the e-mail address of the list to its description, so that people can easily find the e-mail address. You can change the description for a list. 6. To add a link to this list on the Quick Launch, verify that Yes is selected in the Navigation section. 7. If there is an E-mail section, your administrator has enabled lists on your site to receive content by e-mail. To enable people to add content to this list by sending e-mail, click Yes under Enable this list to receive e-mail. Then, in the Email address box, type the first part of the address that you want people to use for the list. This option is not available for all types of list. 8. Click Create. STEP 3: DELETE THE ORIGINAL LIST (OPTIONAL) To move a list, you delete the original list that the list template was based on. 1. Navigate to the site containing the original list for which the list template was based on, and that you want to delete. 2. Click the name of the list on the Quick Launch, or click Site Actions, click View All Site Content, and then under the appropriate List section, click the name of the list. NOTE A SharePoint site can be significantly modified in appearance and navigation. If you cannot locate an option, such as a command, button, or link, contact your administrator. 3. In the ribbon, click the List tab and then in the Settings group, click List Settings. 4. On the list settings page, click Delete this list, and then click OK. For more information on creating and deleting a list, see the See Also section. Copy or move a list between sites Do the following steps to copy or move a list between a source site and a destination site. STEP 1: CREATE A LIST TEMPLATE STEP 2: DOWNLOAD THE LIST TEMPLATE AS A FILE (.STP) FROM THE LIST GALLERY OF THE SOURCE SITE NOTE The following steps require that you have Write permissions to the folder or share on which you are downloading the list template file. 1. Navigate to the source site that contains the list you want to copy or move. ©2009 Microsoft Corporation.
  • 4. 2. On the Site Actions menu , click Site Settings. NOTE On a site for which the Site Actions menu is customized, point to Site Settings, and then click the settings that you want to view. 3. In the Galleries column, click List templates. NOTE This option appears only to users who have the Manage Lists permission. Site owners have this permission by default. 4. The List Template Gallery page appears. 5. Select the list template that you want to download. 6. In the ribbon, click the Documents tab, and then in the Copies section, click Download. 7. In the File Download dialog box, click Save. 8. In the Save As dialog box, specify the path and file name for the file that you are downloading, and then click Save. 9. In the Download complete dialog box, click Close. Alternatively, you can click Open Folder to immediately see the file you just created in the folder that you specified. STEP 3: UPLOAD THE LIST TEMPLATE FILE (.STP) TO THE LIST TEMPLATE GALLERY OF THE DESTINATION SITE 1. Navigate to the destination site to which you want to copy or move the list. 2. On the Site Actions menu , click Site Settings. NOTE On a site for which the Site Actions menu is customized, point to Site Settings, and then click the settings that you want to view. 3. In the Galleries column, click List templates. NOTE This option appears only to users who have the Manage Lists permission. Site owners have this permission by default. The List Template Gallery page appears. 4. In the ribbon, click the New tab, and then in the New section, click the arrow next to Upload, and click Upload Document. 5. The Upload Template: List Template Gallery page appears. 6. Either type the path and file name (including the file extension) of the list template that you want to upload, or click Browse to select the file. 7. Choose whether to overwrite the existing files. By default, the Overwrite existing file check box is selected. ©2009 Microsoft Corporation.
  • 5. NOTE If the Overwrite existing file check box is selected, a list template that is already stored in the list gallery and that has the same name as the file you are uploading will be overwritten. If you attempt to upload a list template that already exists in the content database and this check box is not selected, an error message will be displayed. 8. Click Save. STEP 4: CREATE A NEW LIST BASED ON THE LIST TEMPLATE. To copy a list, you create a new list based on the list template you created in “Step 1: Create a list template”. Navigate to the site where you want to create the list. 1. Click Site Actions , click View All Site Content, and then click Create . NOTE A SharePoint site can be significantly modified in appearance and navigation. If you cannot locate an option, such as a command, button, or link, contact your administrator. 2. Under Lists, select the list template created in “Step 1: Create a list template”. 3. Type the Name for the list. Name is required. The name appears at the top of the list in most views, becomes part of the Web address for the list page, and appears in site navigation to help users to find the list. You can change the name of a list, but the Web address will remain the same. 4. Type the Description for the list. Description is optional. The description appears below the name in most views. Some types of lists can receive content by e-mail. If you plan to enable the list to receive content by e-mail, you can add the e-mail address of the list to its description, so that people can easily find the e-mail address. You can change the description for a list. 5. To add a link to this list on the Quick Launch, verify that Yes is selected in the Navigation section. 6. If there is an E-mail section, your administrator has enabled lists on your site to receive content by e-mail. To enable people to add content to this list by sending e-mail, click Yes under Enable this list to receive e-mail. Then, in the Email address box, type the first part of the address that you want people to use for the list. This option is not available for all types of list. 7. Click Create. STEP 5: DELETE THE ORIGINAL LIST (OPTIONAL) To move a list, you delete the original list that the list template was based on. 1. Navigate to the site containing the original list for which the list template was based on, and that you want to delete. ©2009 Microsoft Corporation.
  • 6. 2. Click the name of the list on the Quick Launch, or click Site Actions, click View All Site Content, and then under the appropriate List section, click the name of the list. NOTE A SharePoint site can be significantly modified in appearance and navigation. If you cannot locate an option, such as a command, button, or link, contact your administrator. 3. In the ribbon, click the List tab and then in the Settings group, click List Settings. 4. On the list settings page, click Delete this list, and then click OK. 5. For more information on creating and deleting a list, see the See Also section. Delete a list template 1. Navigate to the site containing the list template that you want to delete. 2. On the Site Actions menu , click Site Settings. NOTE On a site for which the Site Actions menu is customized, point to Site Settings, and then click the settings that you want to view. 3. In the Galleries column, click List templates. NOTE This option appears only to users who have the Manage Lists permission. Site owners have this permission by default. 4. The List Template Gallery page appears. 5. In the Edit column, click Edit Document Properties for the list template that you want to delete. 6. Click Delete Item, and then click OK to confirm. ©2009 Microsoft Corporation.