SlideShare uma empresa Scribd logo
1 de 6
1
Images and Files Information
Uploading images or files
1. Click the "Upload files" link in the upper right corner of your workspace page.
2. On the files page, click the "Upload files" button.


3. Select the file you'd like to upload. If you'd like to upload multiple files, please hold down the CTRL key (to
   add a file to the list of selected files) or the SHIFT key (to select a range of files) when choosing files from
                                                          your computer. NOTE: To ensure a smooth uploading
                                                          experience, please avoid uploading files with extremely
                                                          long file names. If you're having an issue uploading a file
                                                          with a long name, please try renaming the file and
                                                          attempting to upload the file again. Also, you may only
                                                          upload up to ten files at a time with this uploader.


4. Click the "Open" or "Select" button to upload
   the files to your workspace.


   5. A window will then pop-up to show you the progress of
      your files to be uploaded. Cancelling queued uploads is
      easy, just click on the "Cancel Uploads" button.


       Your successfully uploaded files will appear in your
       workspace's list of files.
2
Images and Files Information
Adding images or files to workspace pages
    1. Go into "Edit Mode" on any page by clicking the edit tab.
    2. Click "Images and Files" tab under the "Insert Links" "Page Tool" on the right-side of your screen;


    3. Click the Upload Files link to find the file on your computer;
    4. When you locate the file, select it, then click “upload”. After uploading, the file will appear in your file
       list.
    5. Click on the text of the file name to insert it into your workspace.


Note: If you want to see a list of your files and pictures without going into "Edit" mode, click the “Upload/view
files” link while viewing the workspace. From here you may also rename and delete files or pictures from
there. However, only Editors and Admins can remove files. If you don't see the option to delete in the Pages
& Files manager, then you probably don't have permission on the workspace to delete files.


TIP: Have a lot of images and files and don't like scrolling through a huge list to find the one you want? Use
your browser's "Search" function (CTRL+F) to find the image or file in a flash!

Image files are usually in these types of extensions: .jpg, .jpeg, .gif, .png, .bmp, .tiff

Documents are usually in: .doc, .docx, .pdf, .xls, .xlt, .ppt, .pptx, .dot, .dotx
3
Images and Files Information
Resizing Images
Using your mouse
To set the size quickly using your mouse:

   1. When in editing mode, click the picture you want to resize in order to select it.
   2. Click and hold on the
      lower right corner of
      the picture and drag
      to make the picture
      bigger or smaller.
      The new image size
      will be displayed in
      pixels in a Width x
      Height format.
   3. When you've
      achieved the desired
      size, release the
      mouse button to
      complete the resizing process.


Using precise sizes
To precisely set the size of an image you can also edit the Image
Properties:

   1. Select the image you want to resize by clicking on it.
   2. Right-click (or Command+click on the Mac), on the
      selected image and select image properties


   3. In the Width or height field, you can manually enter in                                             precise
      pixel sizes. By default the height and width are in locked proportion, signalled by the lock icon, so that
      any change you make to one, will make a proportional adjustment to the other. This is the best way to
      keep the image's height and width in proportion. To unlock them, just click the lock icon. Then, you
      can set both width and height to whatever value needed.
4
Images and Files Information
Image file sizes
Changing the image size on the workspace does NOT change the actual               file size of the
image, so if it is extremely large, it will take just as long to load as it did   before. If you
need to resize a file to make it load faster (and preserve image                  quality), you
will need to resize it on your own computer, then upload the smaller              file. One
useful program for this purpose is Irfanview , which is a lightweight             image editing
program for Windows. Any other image editing program is also                      suitable.

How to resize pictures online (web-based)…

http://www.picresize.com


Batch Resize
    1. To resize a set of pictures you can use the
       “Automater” apps.
5
Images and Files Information
   2. There are two apps. One resizes to 50% and the other to 25%.


   3. You can run one of these apps (double-click) and choose all the pictures at once (dragging).


   4. They will save into the “Pictures” folder. To access this folder, go to the hard drive icon and it should be
       on the left panel.

How to resize images using iPhoto on Macintosh ...
http://www.aaps.k12.mi.us/aaps.sm/resizing_an_image_using_iphoto


How to resize images using Irfanview on a PC.


http://www.somewhere-in-time.net/tutorial/irfanview/


 Deleting Images and Files
6
Images and Files Information
Important: Deleting pages and files is an irreversible action, and once a page or file has been deleted it cannot
be recovered. The backups we make of your workspace are in the event of catastrophic system failure, and
cannot be used to retrieve specific pages and files on your workspace. In order to minimize the risk of
deletion, you may want to put your users' permission level to "Writer." Writers can edit pages and add files,
but cannot delete.

Please delete carefully, and at your own risk.

Method 1

   1. Click the Pages & Files link in the upper right corner of your workspace.


   2. Find the page or file you want to delete in the list.
      Check the box next to the file you wish to delete.
      You can check more than one page or file if you
      want to delete more than one page or file at a
                                      time.


                                   3. Click the Delete button. You'll also have to click a dialogue box to make
                                       sure you want to delete the page or file. The confirm dialog will tell
                                       you how many pages you're about to delete. Click the "OK" button in
                                       the confirm
       dialog box to delete the page or file.


   4. Please note that all links to the deleted page
      will be broken. You can find which pages link
      to the deleted page by doing a Search for
      "src:<page name>" (with spaces in the page name replaced with +s), and then remove the links from
      each page.

Mais conteúdo relacionado

Mais procurados

Mais procurados (6)

Getting Started
Getting StartedGetting Started
Getting Started
 
Step-by-Step - Free Tools for Photos
Step-by-Step - Free Tools for PhotosStep-by-Step - Free Tools for Photos
Step-by-Step - Free Tools for Photos
 
Cloud drives
Cloud drivesCloud drives
Cloud drives
 
Getting Started
Getting StartedGetting Started
Getting Started
 
Getting Started
Getting StartedGetting Started
Getting Started
 
Getting Started
Getting StartedGetting Started
Getting Started
 

Semelhante a Uploading and Managing Images

ITFT - Window explorer
ITFT - Window explorerITFT - Window explorer
ITFT - Window explorerBlossom Sood
 
Windows 8.1 Guide
Windows 8.1 GuideWindows 8.1 Guide
Windows 8.1 GuideCorcelll
 
Chapter 2 start
Chapter 2   startChapter 2   start
Chapter 2 startIra Raji
 
Camp TEACH Troubleshooting Tips
Camp TEACH Troubleshooting TipsCamp TEACH Troubleshooting Tips
Camp TEACH Troubleshooting TipsDonia Teagle
 
Power Point Lesson 05
Power Point  Lesson 05Power Point  Lesson 05
Power Point Lesson 05Nasir Jumani
 
1.5 File Management Presentation.pptx
1.5 File Management Presentation.pptx1.5 File Management Presentation.pptx
1.5 File Management Presentation.pptxARYAN552812
 
E portfolio guide how to upload and manage files
E portfolio guide  how to upload and manage filesE portfolio guide  how to upload and manage files
E portfolio guide how to upload and manage filesIris Hershenson
 
Decatur File Clean Up Guide
Decatur File Clean Up GuideDecatur File Clean Up Guide
Decatur File Clean Up Guidestevenslena
 
Technology Troubleshooting
Technology TroubleshootingTechnology Troubleshooting
Technology TroubleshootingDonia Teagle
 
Find Duplicate Files in Office 365 SharePoint
Find Duplicate Files in Office 365 SharePointFind Duplicate Files in Office 365 SharePoint
Find Duplicate Files in Office 365 SharePointZohaibAhmed114
 

Semelhante a Uploading and Managing Images (20)

ITFT - Window explorer
ITFT - Window explorerITFT - Window explorer
ITFT - Window explorer
 
Windows 8.1 Guide
Windows 8.1 GuideWindows 8.1 Guide
Windows 8.1 Guide
 
Unit 2 introduction to windows 7
Unit 2    introduction to windows 7Unit 2    introduction to windows 7
Unit 2 introduction to windows 7
 
Xn View Usage Guide
Xn View Usage GuideXn View Usage Guide
Xn View Usage Guide
 
Chapter 2 Start
Chapter 2   StartChapter 2   Start
Chapter 2 Start
 
Windows FAQs
Windows FAQsWindows FAQs
Windows FAQs
 
Chapter 2 start
Chapter 2   startChapter 2   start
Chapter 2 start
 
Camp TEACH Troubleshooting Tips
Camp TEACH Troubleshooting TipsCamp TEACH Troubleshooting Tips
Camp TEACH Troubleshooting Tips
 
Power Point Lesson 05
Power Point  Lesson 05Power Point  Lesson 05
Power Point Lesson 05
 
Main handout
Main handoutMain handout
Main handout
 
Main handout
Main handoutMain handout
Main handout
 
1.5 File Management Presentation.pptx
1.5 File Management Presentation.pptx1.5 File Management Presentation.pptx
1.5 File Management Presentation.pptx
 
E portfolio guide how to upload and manage files
E portfolio guide  how to upload and manage filesE portfolio guide  how to upload and manage files
E portfolio guide how to upload and manage files
 
Decatur File Clean Up Guide
Decatur File Clean Up GuideDecatur File Clean Up Guide
Decatur File Clean Up Guide
 
Technology Troubleshooting
Technology TroubleshootingTechnology Troubleshooting
Technology Troubleshooting
 
Find Duplicate Files in Office 365 SharePoint
Find Duplicate Files in Office 365 SharePointFind Duplicate Files in Office 365 SharePoint
Find Duplicate Files in Office 365 SharePoint
 
Joomdoc
JoomdocJoomdoc
Joomdoc
 
Document librarydisplayppt
Document librarydisplaypptDocument librarydisplayppt
Document librarydisplayppt
 
Getting Started
Getting StartedGetting Started
Getting Started
 
Getting Started
Getting StartedGetting Started
Getting Started
 

Último

4.16.24 21st Century Movements for Black Lives.pptx
4.16.24 21st Century Movements for Black Lives.pptx4.16.24 21st Century Movements for Black Lives.pptx
4.16.24 21st Century Movements for Black Lives.pptxmary850239
 
Karra SKD Conference Presentation Revised.pptx
Karra SKD Conference Presentation Revised.pptxKarra SKD Conference Presentation Revised.pptx
Karra SKD Conference Presentation Revised.pptxAshokKarra1
 
ECONOMIC CONTEXT - PAPER 1 Q3: NEWSPAPERS.pptx
ECONOMIC CONTEXT - PAPER 1 Q3: NEWSPAPERS.pptxECONOMIC CONTEXT - PAPER 1 Q3: NEWSPAPERS.pptx
ECONOMIC CONTEXT - PAPER 1 Q3: NEWSPAPERS.pptxiammrhaywood
 
ANG SEKTOR NG agrikultura.pptx QUARTER 4
ANG SEKTOR NG agrikultura.pptx QUARTER 4ANG SEKTOR NG agrikultura.pptx QUARTER 4
ANG SEKTOR NG agrikultura.pptx QUARTER 4MiaBumagat1
 
Virtual-Orientation-on-the-Administration-of-NATG12-NATG6-and-ELLNA.pdf
Virtual-Orientation-on-the-Administration-of-NATG12-NATG6-and-ELLNA.pdfVirtual-Orientation-on-the-Administration-of-NATG12-NATG6-and-ELLNA.pdf
Virtual-Orientation-on-the-Administration-of-NATG12-NATG6-and-ELLNA.pdfErwinPantujan2
 
Inclusivity Essentials_ Creating Accessible Websites for Nonprofits .pdf
Inclusivity Essentials_ Creating Accessible Websites for Nonprofits .pdfInclusivity Essentials_ Creating Accessible Websites for Nonprofits .pdf
Inclusivity Essentials_ Creating Accessible Websites for Nonprofits .pdfTechSoup
 
Influencing policy (training slides from Fast Track Impact)
Influencing policy (training slides from Fast Track Impact)Influencing policy (training slides from Fast Track Impact)
Influencing policy (training slides from Fast Track Impact)Mark Reed
 
GRADE 4 - SUMMATIVE TEST QUARTER 4 ALL SUBJECTS
GRADE 4 - SUMMATIVE TEST QUARTER 4 ALL SUBJECTSGRADE 4 - SUMMATIVE TEST QUARTER 4 ALL SUBJECTS
GRADE 4 - SUMMATIVE TEST QUARTER 4 ALL SUBJECTSJoshuaGantuangco2
 
Music 9 - 4th quarter - Vocal Music of the Romantic Period.pptx
Music 9 - 4th quarter - Vocal Music of the Romantic Period.pptxMusic 9 - 4th quarter - Vocal Music of the Romantic Period.pptx
Music 9 - 4th quarter - Vocal Music of the Romantic Period.pptxleah joy valeriano
 
Barangay Council for the Protection of Children (BCPC) Orientation.pptx
Barangay Council for the Protection of Children (BCPC) Orientation.pptxBarangay Council for the Protection of Children (BCPC) Orientation.pptx
Barangay Council for the Protection of Children (BCPC) Orientation.pptxCarlos105
 
What is Model Inheritance in Odoo 17 ERP
What is Model Inheritance in Odoo 17 ERPWhat is Model Inheritance in Odoo 17 ERP
What is Model Inheritance in Odoo 17 ERPCeline George
 
ENGLISH 7_Q4_LESSON 2_ Employing a Variety of Strategies for Effective Interp...
ENGLISH 7_Q4_LESSON 2_ Employing a Variety of Strategies for Effective Interp...ENGLISH 7_Q4_LESSON 2_ Employing a Variety of Strategies for Effective Interp...
ENGLISH 7_Q4_LESSON 2_ Employing a Variety of Strategies for Effective Interp...JhezDiaz1
 
Activity 2-unit 2-update 2024. English translation
Activity 2-unit 2-update 2024. English translationActivity 2-unit 2-update 2024. English translation
Activity 2-unit 2-update 2024. English translationRosabel UA
 
Field Attribute Index Feature in Odoo 17
Field Attribute Index Feature in Odoo 17Field Attribute Index Feature in Odoo 17
Field Attribute Index Feature in Odoo 17Celine George
 
Difference Between Search & Browse Methods in Odoo 17
Difference Between Search & Browse Methods in Odoo 17Difference Between Search & Browse Methods in Odoo 17
Difference Between Search & Browse Methods in Odoo 17Celine George
 
Incoming and Outgoing Shipments in 3 STEPS Using Odoo 17
Incoming and Outgoing Shipments in 3 STEPS Using Odoo 17Incoming and Outgoing Shipments in 3 STEPS Using Odoo 17
Incoming and Outgoing Shipments in 3 STEPS Using Odoo 17Celine George
 
INTRODUCTION TO CATHOLIC CHRISTOLOGY.pptx
INTRODUCTION TO CATHOLIC CHRISTOLOGY.pptxINTRODUCTION TO CATHOLIC CHRISTOLOGY.pptx
INTRODUCTION TO CATHOLIC CHRISTOLOGY.pptxHumphrey A Beña
 

Último (20)

4.16.24 21st Century Movements for Black Lives.pptx
4.16.24 21st Century Movements for Black Lives.pptx4.16.24 21st Century Movements for Black Lives.pptx
4.16.24 21st Century Movements for Black Lives.pptx
 
Karra SKD Conference Presentation Revised.pptx
Karra SKD Conference Presentation Revised.pptxKarra SKD Conference Presentation Revised.pptx
Karra SKD Conference Presentation Revised.pptx
 
ECONOMIC CONTEXT - PAPER 1 Q3: NEWSPAPERS.pptx
ECONOMIC CONTEXT - PAPER 1 Q3: NEWSPAPERS.pptxECONOMIC CONTEXT - PAPER 1 Q3: NEWSPAPERS.pptx
ECONOMIC CONTEXT - PAPER 1 Q3: NEWSPAPERS.pptx
 
ANG SEKTOR NG agrikultura.pptx QUARTER 4
ANG SEKTOR NG agrikultura.pptx QUARTER 4ANG SEKTOR NG agrikultura.pptx QUARTER 4
ANG SEKTOR NG agrikultura.pptx QUARTER 4
 
Virtual-Orientation-on-the-Administration-of-NATG12-NATG6-and-ELLNA.pdf
Virtual-Orientation-on-the-Administration-of-NATG12-NATG6-and-ELLNA.pdfVirtual-Orientation-on-the-Administration-of-NATG12-NATG6-and-ELLNA.pdf
Virtual-Orientation-on-the-Administration-of-NATG12-NATG6-and-ELLNA.pdf
 
Inclusivity Essentials_ Creating Accessible Websites for Nonprofits .pdf
Inclusivity Essentials_ Creating Accessible Websites for Nonprofits .pdfInclusivity Essentials_ Creating Accessible Websites for Nonprofits .pdf
Inclusivity Essentials_ Creating Accessible Websites for Nonprofits .pdf
 
Influencing policy (training slides from Fast Track Impact)
Influencing policy (training slides from Fast Track Impact)Influencing policy (training slides from Fast Track Impact)
Influencing policy (training slides from Fast Track Impact)
 
GRADE 4 - SUMMATIVE TEST QUARTER 4 ALL SUBJECTS
GRADE 4 - SUMMATIVE TEST QUARTER 4 ALL SUBJECTSGRADE 4 - SUMMATIVE TEST QUARTER 4 ALL SUBJECTS
GRADE 4 - SUMMATIVE TEST QUARTER 4 ALL SUBJECTS
 
Music 9 - 4th quarter - Vocal Music of the Romantic Period.pptx
Music 9 - 4th quarter - Vocal Music of the Romantic Period.pptxMusic 9 - 4th quarter - Vocal Music of the Romantic Period.pptx
Music 9 - 4th quarter - Vocal Music of the Romantic Period.pptx
 
Barangay Council for the Protection of Children (BCPC) Orientation.pptx
Barangay Council for the Protection of Children (BCPC) Orientation.pptxBarangay Council for the Protection of Children (BCPC) Orientation.pptx
Barangay Council for the Protection of Children (BCPC) Orientation.pptx
 
YOUVE GOT EMAIL_FINALS_EL_DORADO_2024.pptx
YOUVE GOT EMAIL_FINALS_EL_DORADO_2024.pptxYOUVE GOT EMAIL_FINALS_EL_DORADO_2024.pptx
YOUVE GOT EMAIL_FINALS_EL_DORADO_2024.pptx
 
What is Model Inheritance in Odoo 17 ERP
What is Model Inheritance in Odoo 17 ERPWhat is Model Inheritance in Odoo 17 ERP
What is Model Inheritance in Odoo 17 ERP
 
ENGLISH 7_Q4_LESSON 2_ Employing a Variety of Strategies for Effective Interp...
ENGLISH 7_Q4_LESSON 2_ Employing a Variety of Strategies for Effective Interp...ENGLISH 7_Q4_LESSON 2_ Employing a Variety of Strategies for Effective Interp...
ENGLISH 7_Q4_LESSON 2_ Employing a Variety of Strategies for Effective Interp...
 
Activity 2-unit 2-update 2024. English translation
Activity 2-unit 2-update 2024. English translationActivity 2-unit 2-update 2024. English translation
Activity 2-unit 2-update 2024. English translation
 
LEFT_ON_C'N_ PRELIMS_EL_DORADO_2024.pptx
LEFT_ON_C'N_ PRELIMS_EL_DORADO_2024.pptxLEFT_ON_C'N_ PRELIMS_EL_DORADO_2024.pptx
LEFT_ON_C'N_ PRELIMS_EL_DORADO_2024.pptx
 
Field Attribute Index Feature in Odoo 17
Field Attribute Index Feature in Odoo 17Field Attribute Index Feature in Odoo 17
Field Attribute Index Feature in Odoo 17
 
FINALS_OF_LEFT_ON_C'N_EL_DORADO_2024.pptx
FINALS_OF_LEFT_ON_C'N_EL_DORADO_2024.pptxFINALS_OF_LEFT_ON_C'N_EL_DORADO_2024.pptx
FINALS_OF_LEFT_ON_C'N_EL_DORADO_2024.pptx
 
Difference Between Search & Browse Methods in Odoo 17
Difference Between Search & Browse Methods in Odoo 17Difference Between Search & Browse Methods in Odoo 17
Difference Between Search & Browse Methods in Odoo 17
 
Incoming and Outgoing Shipments in 3 STEPS Using Odoo 17
Incoming and Outgoing Shipments in 3 STEPS Using Odoo 17Incoming and Outgoing Shipments in 3 STEPS Using Odoo 17
Incoming and Outgoing Shipments in 3 STEPS Using Odoo 17
 
INTRODUCTION TO CATHOLIC CHRISTOLOGY.pptx
INTRODUCTION TO CATHOLIC CHRISTOLOGY.pptxINTRODUCTION TO CATHOLIC CHRISTOLOGY.pptx
INTRODUCTION TO CATHOLIC CHRISTOLOGY.pptx
 

Uploading and Managing Images

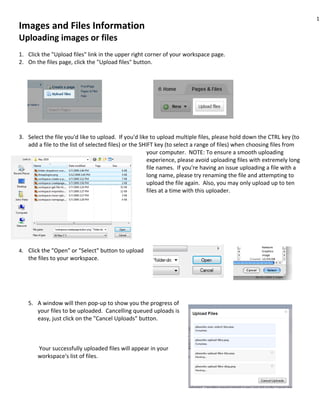
  • 1. 1 Images and Files Information Uploading images or files 1. Click the "Upload files" link in the upper right corner of your workspace page. 2. On the files page, click the "Upload files" button. 3. Select the file you'd like to upload. If you'd like to upload multiple files, please hold down the CTRL key (to add a file to the list of selected files) or the SHIFT key (to select a range of files) when choosing files from your computer. NOTE: To ensure a smooth uploading experience, please avoid uploading files with extremely long file names. If you're having an issue uploading a file with a long name, please try renaming the file and attempting to upload the file again. Also, you may only upload up to ten files at a time with this uploader. 4. Click the "Open" or "Select" button to upload the files to your workspace. 5. A window will then pop-up to show you the progress of your files to be uploaded. Cancelling queued uploads is easy, just click on the "Cancel Uploads" button. Your successfully uploaded files will appear in your workspace's list of files.
  • 2. 2 Images and Files Information Adding images or files to workspace pages 1. Go into "Edit Mode" on any page by clicking the edit tab. 2. Click "Images and Files" tab under the "Insert Links" "Page Tool" on the right-side of your screen; 3. Click the Upload Files link to find the file on your computer; 4. When you locate the file, select it, then click “upload”. After uploading, the file will appear in your file list. 5. Click on the text of the file name to insert it into your workspace. Note: If you want to see a list of your files and pictures without going into "Edit" mode, click the “Upload/view files” link while viewing the workspace. From here you may also rename and delete files or pictures from there. However, only Editors and Admins can remove files. If you don't see the option to delete in the Pages & Files manager, then you probably don't have permission on the workspace to delete files. TIP: Have a lot of images and files and don't like scrolling through a huge list to find the one you want? Use your browser's "Search" function (CTRL+F) to find the image or file in a flash! Image files are usually in these types of extensions: .jpg, .jpeg, .gif, .png, .bmp, .tiff Documents are usually in: .doc, .docx, .pdf, .xls, .xlt, .ppt, .pptx, .dot, .dotx
  • 3. 3 Images and Files Information Resizing Images Using your mouse To set the size quickly using your mouse: 1. When in editing mode, click the picture you want to resize in order to select it. 2. Click and hold on the lower right corner of the picture and drag to make the picture bigger or smaller. The new image size will be displayed in pixels in a Width x Height format. 3. When you've achieved the desired size, release the mouse button to complete the resizing process. Using precise sizes To precisely set the size of an image you can also edit the Image Properties: 1. Select the image you want to resize by clicking on it. 2. Right-click (or Command+click on the Mac), on the selected image and select image properties 3. In the Width or height field, you can manually enter in precise pixel sizes. By default the height and width are in locked proportion, signalled by the lock icon, so that any change you make to one, will make a proportional adjustment to the other. This is the best way to keep the image's height and width in proportion. To unlock them, just click the lock icon. Then, you can set both width and height to whatever value needed.
  • 4. 4 Images and Files Information Image file sizes Changing the image size on the workspace does NOT change the actual file size of the image, so if it is extremely large, it will take just as long to load as it did before. If you need to resize a file to make it load faster (and preserve image quality), you will need to resize it on your own computer, then upload the smaller file. One useful program for this purpose is Irfanview , which is a lightweight image editing program for Windows. Any other image editing program is also suitable. How to resize pictures online (web-based)… http://www.picresize.com Batch Resize 1. To resize a set of pictures you can use the “Automater” apps.
  • 5. 5 Images and Files Information 2. There are two apps. One resizes to 50% and the other to 25%. 3. You can run one of these apps (double-click) and choose all the pictures at once (dragging). 4. They will save into the “Pictures” folder. To access this folder, go to the hard drive icon and it should be on the left panel. How to resize images using iPhoto on Macintosh ... http://www.aaps.k12.mi.us/aaps.sm/resizing_an_image_using_iphoto How to resize images using Irfanview on a PC. http://www.somewhere-in-time.net/tutorial/irfanview/ Deleting Images and Files
  • 6. 6 Images and Files Information Important: Deleting pages and files is an irreversible action, and once a page or file has been deleted it cannot be recovered. The backups we make of your workspace are in the event of catastrophic system failure, and cannot be used to retrieve specific pages and files on your workspace. In order to minimize the risk of deletion, you may want to put your users' permission level to "Writer." Writers can edit pages and add files, but cannot delete. Please delete carefully, and at your own risk. Method 1 1. Click the Pages & Files link in the upper right corner of your workspace. 2. Find the page or file you want to delete in the list. Check the box next to the file you wish to delete. You can check more than one page or file if you want to delete more than one page or file at a time. 3. Click the Delete button. You'll also have to click a dialogue box to make sure you want to delete the page or file. The confirm dialog will tell you how many pages you're about to delete. Click the "OK" button in the confirm dialog box to delete the page or file. 4. Please note that all links to the deleted page will be broken. You can find which pages link to the deleted page by doing a Search for "src:<page name>" (with spaces in the page name replaced with +s), and then remove the links from each page.