
Recomendados
Mais conteúdo relacionado
Semelhante a Insulstone Mortar Less Stone Veneer
Semelhante a Insulstone Mortar Less Stone Veneer (20)
Último
Último (9)
Insulstone Mortar Less Stone Veneer
- 3. InsulStone ™ Added Value Design Solutions: Cost Competitive Insulation Value (2 ¼” foam = R-11) Damp Wall/Mold Prevention (Built-in Rain-screen) Earthquake Resistance (shingle-like) Hurricane (High Winds) Flame Spread & Smoke Generation – “0”
- 5. The InsulStone™ System Wainscot Cap Corner/End Flats Corner/End Only 4 – Parts (Lego-like) Starter
- 6. 1” Crown By 2” Leg Staple
- 8. Stand-offs provide a10 MM rain-screen drainage and ventilation zone between the panel and the wall.
- 9. Fastener locations are clearly Fascia stand- offs reduce problems marked for the installer! from: •Hydraulic freeze/thaw effect •Effervescence
- 10. Hot-melt silicone adhesive (Holds windows in skyscrapers) Adhesive method developed in co-operation with Dow Corning 50 year Limited Warranty Adhesion and Structural Uniform Load Test rated at 127 lbs/SF transverse loading.
- 12. Each panel is individually fastened to the wall (Panel weight: 8-10 lbs/ft²) Support ledger not required Structural Uniform Load Test Rated at 127 lbs/SF (ASTM E330) Individually fastened panels flex with the wall
- 13. Dual Rain-screen Drainage Fastener 1” Crown X 2” Leg Galv. Staple Drainage Drainage Plane #2 Plane #1 Sheathing OSB/Plywood 7/16” min. Manufactured Stone, or Stud Brick Sheetrock Starter Section Fastener Starter Section
- 15. 2012 Outcome of 2012 IECC Residential Chapter Final Action Hearings Analysis of ICF International Based on estimates from the measures that were approved by the ICC’s Government Membership, the threshold of 30% energy savings of the 2012 IECC beyond the 2006 IECC was met or surpassed. Significant adopted changes to the IECC include: 1. A better thermal envelope – i.e., window, door, insulation – in all Climate Zones. In 2006, the number of climate zones in the IECC was reduced to eight in an effort to shorten the IECC, make it easier to use and employ a common map for both commercial and residential codes. The simplified map (shown for the continental US) replaced many pages of maps and commercial envelope tables and allowed IECC users to easily determine the requirements that apply anywhere in the US. Note: Hawaii, Guam, Puerto Rico and the Virgin Islands are in Climate Zone 1; Alaska is in Climate Zones 7/8). Final changes to insulation & fenestration component requirements are listed below (improvements over 2009 IECC are shaded in green): Ceiling R-value Wood Frame R-value Basement R-value Crawl Space R-value 2009 2012 2009 2012 2009 2012 2009 2012 IECC IECC IECC IECC IECC IECC IECC IECC Climate Zone 30 30 13 13 0 0 0 0 1 30 38 13 13 0 0 0 0 2 3 30 38 13 20 or 13+5** 5/13*** 5/13 5/13 5/13 38 49 13 20 or 13+5 10/13 10/13 10/13 10/13 4 exc. Marine 38 49 20 or 13+5 20 or 13+5 10/13 15/19 10/13 15/19 4 Marine & 5 6 49 49 20 or 13+5 20+5 or 13+10 15/19 15/19 10/13 15/19 7&8 49 49 21 20+5 or 13+10 15/19 15/19 10/13 15/19 * Floor and Slab insulations levels remain unchanged. ** Commonly available insulation in 2x6 cavity (R20) or in 2x4 cavity with sheathing (R13+x) *** R5 continuous insulation or R13 for framed cavity insulation
- 23. “Installation” InsulStone Insulated Wall Cladding ™ ICC - EG315 “Masonry Veneer Systems with Foam Plastic Backing” InsulStone ™ Simplifying Construction!
- 26. 1” crown by 2” staples are the most common and fastest way to install InsulStone™ over sheathing.(see InsulStone installation guide for details) ™ Washer head screws can be used to attach directly to studs (16” centers) or to CMU or concrete. (see InsulStone installation guide for details). ™
- 27. Determine the location of the starter and select 2 points with a laser level at each side of the section of wall, mark and snap a line for the starter.
- 29. Step #1: Install the corners first and fill the field to the last panel. (randomly locate the splices) Step #2: Cut the 2 panels as illustrated to fit remaining space. Use the left over piece for the splice in the next row. Step #3: Apply adhesive to the foam only. Step #4: Press the sections together as illustrated on right. (Note: 2 colors of stone are used for illustration purposes only)
- 30. Electrical Boxes and Hose Bibs are flat stones designed for cover plate or light fixture installation. The stone is mounted on foam the same thickness as the stone. Use deck screws to attach this accessory, then cut surrounding stones to fit to the plate. Use adhesive to seal the cut edges to the accessory plate.
- 41. InsulStone ™ Commercial Grade Insulated Sand Stone Panels 11 ½” x 22 ½” InsulStone™ is sand and red colored
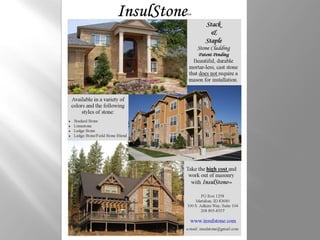
- 43. High-Density Concrete Fascia Harder than Mfg. Stone – 5,000 + PSI Mortar-less “Stack & Staple” Natural Sand finish or internally colored finishes R-11 Nominal Insulation Value Built-in Rain-screen 8-10 lbs. square foot