
Recomendados
Recomendados
Mais conteúdo relacionado
Mais de dlpruk
Mais de dlpruk (20)
Último
Último (14)
Mansfield U3A CMS Site Editing Notes Pt3: Adding Photographs and Links
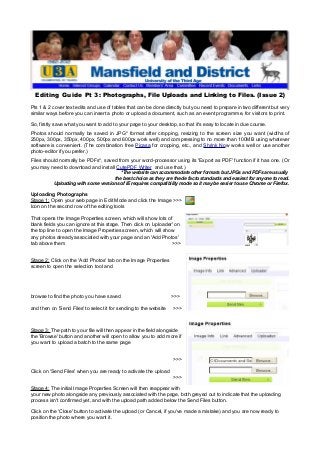
- 1. Editing Guide Pt 3: Photographs, File Uploads and Linking to Files. (Issue 2) Pts 1 & 2 cover text edits and use of tables that can be done directly but you need to prepare in two different but very similar ways before you can insert a photo or upload a document, such as an event programme, for visitors to print. So, firstly save what you want to add to your page to your desktop, so that it's easy to locate in due course. Photos should normally be saved in JPG* format after cropping, resizing to the screen size you want (widths of 250px, 300px, 350px, 400px, 500px and 600px work well) and compressing to no more than 100MB using whatever software is convenient. (The combination free Picasa for cropping, etc., and Shrink Now works well or use another photo-editor if you prefer.) Files should normally be PDFs*, saved from your word-processor using its 'Export as PDF' function if it has one. (Or you may need to download and install CutePDF Writer and use that.) *The website can accommodate other formats but JPGs and PDFs are usually the best choice as they are the de facto standards and easiest for anyone to read. Uploading with some versions of IE requires compatibility mode so it may be easier to use Chrome or Firefox. Uploading Photographs Stage 1: Open your web page in Edit Mode and click the Image >>> Icon on the second row of the editing tools That opens the Image Properties screen, which will show lots of blank fields you can ignore at this stage. Then click on 'uploader' on the top line to open the Image Properties screen, which will show any photos already associated with your page and an 'Add Photos' tab above them >>> Stage 2: Click on the 'Add Photos' tab on the Image Properties screen to open the selection tool and browse to find the photo you have saved >>> and then on 'Send Files' to select it for sending to the website >>> Stage 3: The path to your file will then appear in the field alongside the 'Browse' button and another will open to allow you to add more if you want to upload a batch to the same page >>> Click on 'Send Files' when you are ready to activate the upload >>> Stage 4: The initial Image Properties Screen will then reappear with your new photo alongside any previously associated with the page, both greyed out to indicate that the uploading process isn't confirmed yet, and with the upload path added below the Send Files button. Click on the 'Close' button to activate the upload (or Cancel, if you've made a mistake) and you are now ready to position the photo where you want it.
- 2. Stage 5: Position your cursor at the start of the line in which you want your photo to appear and return to Stage 1 above. You should now see a thumbnail of your new photo in the uploader panel; click on that and it will appear on your page. Stage 6: Adjust the size of the photo and alignment you want, by typing appropriate values into the width and height fields. (NB the proportions will remain set by default so click on the padlock icon if you want to set them individually - as in this example where an exactly square version of the uploaded photo was wanted >>> 'Border' allows your photo to be framed at various widths; 'HSpace' inserts whatever pixel width you choose to both left and right of the photo; 'VSpace' applies pixels above and below >>> The alignment drop-downs give the options to align to the left or right of the page; <not set> defaults to the cursor >>> Click on 'OK' to finish. __________________________________________________________________________ Uploading Files Stage 1: As with photos you may want to include on your page, you must associate any documents you have prepared with the page before you can show it via a link. So start by logging into the Manage Site area of the editor for your page thus >>> Click on 'Files' next to your page name >>> Stage 2: The uploader then opens, showing a list of any files you have already associated with the page and a 'Select a file to be uploaded' field that will allow you to pick whatever you want from everything available on your computer if you browse to it. (You must delete any old files you want to replace by clicking on the box next to the file name and then on 'Delete Selected Files.') Preparation will be complete when you click on the 'Upload File' button >>> Stage 3: Return to the 'Manage Site' section of the editor and click on your page name to open it in editor mode. Highlight the word or phrase that you want readers to click to read your file and then on this link icon on the toolbar >>> Stage 4: That will open the link dialogue screen thus >>> into which you can 'Select an uploaded file' if you've just uploaded one, 'Select a page' if you want to direct readers to another page on our site or paste-in the URL address of a page on another one. Click on 'OK' to finish and the highlighted word or phrase will have become a hyperlink that will open the link target when clicked. >>> ___________________________________________________________________________________________ Hope that's help; just ask if it isn't clear! David Ling (01623 822994/mansfieldu3a@aol.com)