Google drive and enquiries by Tracey Totty, Middlesborough College
•
0 gostou•705 visualizações


Recomendados
Mais conteúdo relacionado
Mais procurados
Mais procurados (20)
Destaque
Destaque (6)
Semelhante a Google drive and enquiries by Tracey Totty, Middlesborough College
Semelhante a Google drive and enquiries by Tracey Totty, Middlesborough College (20)
Mais de CILIP ARLG
Mais de CILIP ARLG (20)
Último
Último (20)
Google drive and enquiries by Tracey Totty, Middlesborough College
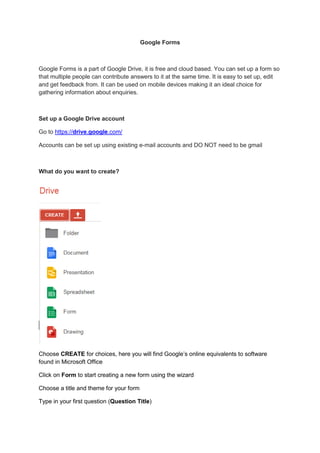
- 1. Google Forms Google Forms is a part of Google Drive, it is free and cloud based. You can set up a form so that multiple people can contribute answers to it at the same time. It is easy to set up, edit and get feedback from. It can be used on mobile devices making it an ideal choice for gathering information about enquiries. Set up a Google Drive account Go to https://drive.google.com/ Accounts can be set up using existing e-mail accounts and DO NOT need to be gmail What do you want to create? Choose CREATE for choices, here you will find Google’s online equivalents to software found in Microsoft Office Click on Form to start creating a new form using the wizard Choose a title and theme for your form Type in your first question (Question Title)
- 2. Add Help text if you wish Choose your Question Type (these are explored in the next section) Type in possible answers (unless text based answer) Click Done. Your first question is complete. Click Add item to write your next question. This will default to the same question type as the previous question; use either the Edit button on the right to bring up the Question Type option Or instead of clicking on Add item to create the next question, choose the drop down next to it to display the question type options Question Types How you want your question answered will determine which style of question you choose. The options are: Text is a short text answer Paragraph text is for a longer text answer Multiple choice – although there are multiple responses to choose from on this question type, the respondent can only give one answer. Checkboxes – if respondents are allowed to give more than one answer, use this Choose from a list – the same as Multiple choice only in a drop down list format
- 3. Scale – a 5 option rank, you choose whether you want 1 at the top of the scale or the bottom by giving a value to 1 and 5 Grid – respondents select a point on a grid Date – respondents select a date Time – respondents select a time Set required fields Tick required question box Set up multiple pages on a form To direct the respondents to a specific page, you need to: Set up sections on the form by using the Page Break option from either the Add item drop down or the Insert menu Direct the answer to a specific page using the Go to page based on answer option. Choose which page the answer needs to go to using the drop down menu next to your answer
- 4. You also need to tell the form what to do after the next question is answered e.g. After Page 2, Submit form Please note: This option is only available on the Multiple choice and Choose from a list question types Responses Once you have finished setting the form up, click on Choose a response destination, it will automatically default to New spreadsheet and give the title of your form. By doing this you create a spreadsheet that can be manipulated to analyse the information more closely than the form will give you. In order to retain the original data and as a matter of good practice, I suggest that the form responses are copied and pasted into another spreadsheet before you analyse them closely.
- 5. Once this has been done the Choose response destination will change to say View responses Sharing the form with other administrators Choose the Send form button Add collaborators In the Invite people box add the e-mail of people you want to share administration with Click Done / Send (the Done changes to Send when you Invite People)
- 6. Publish the URL so the form can be populated Although there are different ways to do this, I find the easiest to view live form and then copy and paste the URL into an e-mail. Send the e-mail to your staff and ask them to set it up as a Favourite, so they have quick and easy access on the Internet. I have set up shortcuts on the tablets we have, so that they are on our home page. Where to find the feedback You can View responses to see the spreadsheet of responses or if you want a snapshot choose Responses, Summary of Responses If you are in the spreadsheet use Form, Show summary of responses to get a snapshot of the responses
- 7. As the responses can be published and printed, they can be used either as they are, if you need information quickly, or copied into reports to help demonstrate impact. The raw data can be copied into Excel to allow for filtering, manipulating, further analysis etc. Reviewing and altering forms This can be done by clicking into your form Hover over the question you want to change until the option icons appear Click on the edit icon
- 8. Make your changes and click Done Archiving responses This is something that cannot be done easily . There are ways to do it involving coding (see Google Drive’s Help section). Alternatively copy and paste your responses into an Excel spreadsheet, save that and then delete the responses from the Google Drive spreadsheet.