1. Lenses
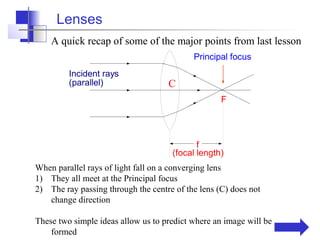
A quick recap of some of the major points from last lesson
Principal focus
Incident rays
(parallel) C
F
f
(focal length)
When parallel rays of light fall on a converging lens
1) They all meet at the Principal focus
2) The ray passing through the centre of the lens (C) does not
change direction
These two simple ideas allow us to predict where an image will be
formed
2. Lenses Ray Diagrams for convex lenses
Rule 1: Parallel rays of light are refracted through the
principal focus F
Central axis of lens
2F F F 2F
In Ray Diagrams and only in Ray Diagrams we don’t
draw the rays bending on entering and leaving then lens.
We draw on change of direction when the ray reaches
the central axis of the lens.
3. Lenses Ray Diagrams for convex lenses
Rule 2: Rays of light passing through the centre of the lens
travel straight on
Central axis
The centre of the lens
2F F F 2F
It is best to draw ray diagrams on graph paper.
Ray diagrams can be drawn to scale with 1cm on the graph
paper representing a much larger distance.
4. Lenses Ray Diagrams for convex lenses
Lets get drawing
You will need
1. A 30 cm ruler
2. A sharp pencil
3. A4 graph paper
Draw a line along the centre of the graph paper
A4 Graph paper
5. Lenses
You are going to draw a ray diagram to show the
position and size of the image of an object 4cm tall
that is placed 30 cm from a lens which has a focal
length of 10cm.
First you need to write down all the relevant information
Click on reveal when you have done so.
Reveal
6. Lenses
You are going to draw a ray diagram to show the
position and size of the image of an object 10cm tall
that is placed 30 cm from a lens which has a focal
length of 10cm.
First you need to write down all the relevant information
Click on reveal when you have done so.
Focal length of lens = 10cm
Object height = 10cm
Object to lens distance = 30cm
This is the information we need to draw the ray diagram.
Our scale will let 2 cm on the graph paper represent 5cm.
7. Lenses
Draw in the central axis of the lens
And mark on either side of the lens the postion of F and
2F
Central axis
Graph paper
2F F F 2F
4cm 4cm 4cm 4cm
on graph paper
represents 10 cm
8. Lenses
Now draw in our object to scale.
30cm from the lens is represented by 12cm on our scale
10cm height is represented by 4cm on the graph paper
Object Central axis Graph paper
4cm
2F F F 2F
12cm
on graph paper
represents 30 cm
9. Lenses
Now follow rule 1.
Draw in the path of a parallel ray from the top of the
object
Object Central axis Graph paper
2F F F 2F
The parallel ray must pass
through F on leaving the lens
10. Lenses
Now draw in a ray from the top of the object that passes
through the centre of the lens
Remember this doesn’t change direction.
Graph paper
Object Central axis
2F F F 2F
11. Lenses
The image will form where the two rays meet.
The size of the object and its distance from the lens can
be measured on the graph paper.
Object Central axis Graph paper
The image
2F F F 2F
The image is inverted
(upside down) and
diminshed
12. Lenses
On the graph paper measure from the centre of the lens to the
image. Remembering the scale we used predict what the real
distance would be.
Write it down
Now measure the height of the object and calculate the
magnification
Magnification = height of image
height of object
Write this down.
Your teacher will have set up this experiment for you.
Measure the actual lens to image distance and the magnification.
How close were your predictions?
13. Lenses
If you have time you can draw some more diagrams.
Try them with the object 20cm, 15cm and 5cm away from
the lens.
Now test your predictions by setting out the experiment as
demonstrated by your teacher.
Remember all distances are measured to or from the lens.
Some real examples of ray tracing
14. Lenses
Object further than 2F away from lens
Image is real, inverted and diminished
Uses: in a camera
in your eye – yes the image on your retina is upside down but your
brain corrects for this!!
15. Lenses
Object placed at exactly 2F
Image is real, inverted but the same
size as the object
16. Lenses
Object placed between F and 2F from the lens
Image is real, inverted and larger
than the object (magnified)
Uses: projectors in cinemas and in the classroom
17. Lenses
The object is placed between the lens and F.
The image is virtual (can not be put on a screen, forms on the same
side of the lens as the object), it is upright and magnified.
Uses: Magnifying glass