The document summarizes the process of creating a website in Flash. It describes setting up the stage size and frames per second. It then discusses creating the background design by layering rectangles and adding text. Buttons and navigation were created using symbols. Pages were set up by adding keyframes every 20 frames and labeling them. Testing involved previewing scenes and checking bandwidth usage. Hidden buttons were added to a map to link to individual state pages. Scrollable text boxes and a booking form with different field types were also created.
Diary for unit 65 assignment 2 creating the website
1. Diary for Unit 65 Assignment 2 creating the website
I started creating website in flash based on the storyboards I created. I set the size of the stage to
800x600 pixels and the frames per second (fps) to 12.00. This is so when the website is put online it
will load quicker and run smoother on older
computers. I then started to create my website.
Firstly I chose the colours I was going to use
from the colour pallete and
added them to the color
swatch. This is so I have easy
access to the specific colours
I had chosen and wouldn’t
have to re-locate them
everytime I wanted to use
them. I then selected
the rectangle tool and
the colour I wanted to create the background for my website. I then layered them
on top of each other to create my design. In order to do this I had to select the open
drawing tool from the toolbar. This allows the shape to be placed over each over
without deleting part of the shape. When I had finished placing the rectangles in
position to create the background, I used the text tool to type in the name of the
website in the header. I then chose the colour I wanted it to be from the colour swatch,
the font and size.
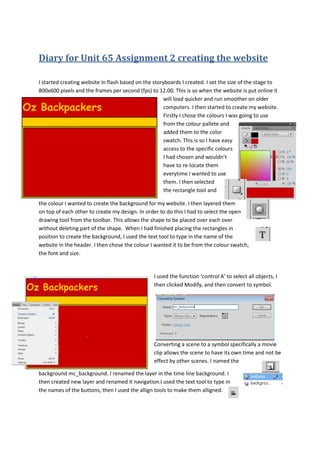
I used the function ‘control A’ to select all objects, I
then clicked Modify, and then convert to symbol.
Converting a scene to a symbol specifically a movie
clip allows the scene to have its own time and not be
effect by other scenes. I named the
background mc_background. I renamed the layer in the time line background. I
then created new layer and renamed it navigation.I used the text tool to type in
the names of the buttons, then I used the allign tools to make them alligned.
2. I then right clicked on the text and selected convert to symbol, and changed
the type to button and I
renamed it btn_home, I did
this for the rest of the buttons
but with the respective
names.I then double clicked
the button I
wanted, clicked on the ‘over’ frame and rightclicked then
insert Keyframe.I then click again on the same button to
bring up the side menu. I clicked the add filter tool, and
chose adjust colour and add glow and I reversed the
colour to create a rolloverbutton.
I then added a logo and changed the heading.
Every page on my website needs 20 frames so at 220 I added two blank frames,
one in background, and one in navigation layers. I then added key frames at
every 20 frames and named them accordingly to the
pages on the website for example home, booking, etc.
I then added the layer called frame labels. In this this layer I made the pages by
addingnames to keyframes. Above this layer I added the layer actions in which I
added blank keyframes on the 19th of the 20 frames corresponding to each
keyframe in the labels layer; on this in each I had the ‘stop’ action to end the
page and allow a new one to start.
3. Firstly I created a new scene and renamed it Splash screen.
On the stage I drew a rectangle to fill the stage and filled it in
with the red fill colour I chose to use in my colour scheme. I
then used the text tool to type ‘loading’ and I used the
yellow font colour I had also chosen from my colour scheme.
I then the converted the text into a movie clip. I then double
clicked the movie clip to see its own timeline, to which I
added three key frames at frames 5, 10, and 15. At the end
of each key frame I clicked on the text to alter it by adding a
period to the end of it. I added three in total. This was
so as the splash screen plays the user of the website
will see it loading.
I then did ‘control, enter’ to preview the splash screen and I opened the
bandwidth profiler. This is so I can see how much the website pages
will take to load. I then opened the ‘actions’ on the first frame and
typed in the code: stop(); myInterval = setInterval(preload,100);
function preload() { if (_root.getBytesLoaded() >=
_root.getBytesTotal()) { gotoAndStop("Scene 1",1); clearInterval(myInterval); this is the code
for the splash screen to repeat itself over and over again until the bandwidth has
reached a certain capacity.
I uploaded to my library in flash all the images I intend to use as hidden buttons on my website, the
hidden buttons will be in the map on the home page which will link the individual states to pages
that correspond to the selected state and will have information on the corresponding page about
the state.
4. I clicked on the map of Australia to get its own timeline and right clicked on
the map and clicked edit. I then
clicked ‘modify, Bitmap, Trace
Bitmap…’ I then clicked OK. I
changed the colour to the colour
scheme yellow but later changed it
to red, and returned to the maps timeline. I then started to create the
hidden buttons, similarly to the map the states I did, ‘modify, Bitmap, Trace
Bitmap…’ I then clicked OK to the default options. But I then converted the
image into a button; I then double clicked the button to get
its own timeline. I then dragged the keyframe to the ‘over’
panel, this is so the selected state is invisible until the
website user hovers/clicks on it. I then renamed the layer 1
as ‘map’ and created a new layer above the map called ‘text’. I changed the state colour to yellow
and the text to red. I then clicked on the state and in the ‘properties
tab’ I clicked on; colour effect style and selected brightness and
reduced the brightness to -10. This is so the state would stand out
against the background.
I drew a rectangle shape and colour filled it with the yellow from my
colour scheme. I converted the shape to a movie clip and double clicked
it to get its own timeline. I then added a keyframe at the 20th frame. I
moved the shape in the first frame off the stage and moved the shape
where I wanted it to be in the 20th frame I selected all the frames I then
created a classic tween to create movement. I used this as my
background for the map.
I started to create scrollable text boxes.I changed the settings to say
Dynamic text, and multi line. I then went to ‘window’ then
‘componets’ and chose the UIScrollbar and attached it to the side of
the textbox. This then creates a scrollable textbox which
I tested with ‘ctrl enter’.
5. I then started to create the booking form by populating it with a form to fill.
Firstly I created a movieclip, and used it to type in the form questions like Title, First
name etc. I then used the tools to create the different boxes to type in. I firstly
created the text input box, which I changed the amount of characters that can be
typed in the box to correspond with question it
is associated with.
I then created the combo box, which is where you you can
select an choice from various other options, I did this for the
title question and card type.
Finally I created the last question form which was the Date field box, this is where
you can select a date form the pop up calender and the selected date will be put in
the text box.