Beginners Guide to TikTok for Search - Rachel Pearson - We are Tilt __ Bright...
How to make key frame animation with automatic function
1. How to make Key-Frame Animation with Automatic Function
1. The Aurora 3D Animation has key-frame animation, it’s a flexible animation create function.
In this guide, we can learn how make a key-frame animation with or without automatic
function. Look the bellow picture, if we want use auto key-frame, just click the “auto
keyframe” button under the time line.
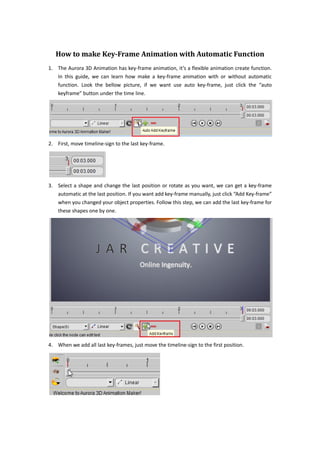
2. First, move timeline-sign to the last key-frame.
3. Select a shape and change the last position or rotate as you want, we can get a key-frame
automatic at the last position. If you want add key-frame manually, just click “Add Key-frame”
when you changed your object properties. Follow this step, we can add the last key-frame for
these shapes one by one.
4. When we add all last key-frames, just move the timeline-sign to the first position.
2. 5. Then, move the shape to your start position. In this guide, we move the depth of the shape
position out the screen.
6. When we can’t move the shape with manipulator, we can switch to the “Shape” tab, and
change Z value for the position.
7. We can move these shapes one by one, and the first key-frame will auto add on the start,
because we turn on the “Auto add key-frame” function.
8. Now, we can click the “Play” button, and preview this animation.
3. 9. If you want make more like real for the animation, we can select some animation effect for
every shapes or texts.
Aurora3D Software: www.aurora3dsoftware.com www.presentation-3d.com
Email: support@presentation-3d.com