SlideShare uma empresa Scribd logo
1 de 12
Baixar para ler offline
NX Plotting Basic Setup Guide - TeamWiki                                                                    Page 1 of 12


NX Plotting Basic Setup Guide
From TeamWiki

Contents
    „   1 NX Plotting Basic Setup Guide (NX3 onwards)
           „ 1.1 For Multiple Seats of Unigraphics
           „ 1.2 To Plot Drawing Line Widths Correctly(in NX3 and NX4)
           „ 1.3 Useful Tips


NX Plotting Basic Setup Guide (NX3 onwards)
The steps for configuring NX plotting are described below:

1. Ensure that you have the printer/plotter set up in Windows and that Windows can print to it. It does not matter if
this is connected to a share on a server or set up locally.

2. Create a directory where you want to keep your plotter settings. This could be on a server if you have multiple
clients that all want to see the same settings.

e.g. c:nxplotters

3. Start NX

4. Click File > Utilities > Printer Administration (If this option is not available change your active role to
Advanced with full menus)

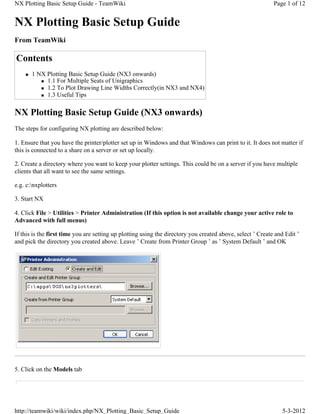
If this is the first time you are setting up plotting using the directory you created above, select ’ Create and Edit ’
and pick the directory you created above. Leave ’ Create from Printer Group ’ as ’ System Default ’ and OK


5. Click on the Models tab


http://teamwiki/wiki/index.php/NX_Plotting_Basic_Setup_Guide                                                   5-3-2012
NX Plotting Basic Setup Guide - TeamWiki                                 Page 2 of 12


Find the closest match to your plotter in the list and select it.

Click ’ Save As ’ to create your own copy of the model with a new name


http://teamwiki/wiki/index.php/NX_Plotting_Basic_Setup_Guide                5-3-2012
NX Plotting Basic Setup Guide - TeamWiki                                                               Page 3 of 12


6. Find the newly created plotter model in the list, highlight it and click on Properties.

In the properties dialog , the paper sizes available can be modified if required. Important …Also the Class should
be noted.

By default it might read Raster/RTL


http://teamwiki/wiki/index.php/NX_Plotting_Basic_Setup_Guide                                              5-3-2012
NX Plotting Basic Setup Guide - TeamWiki                                                                Page 4 of 12


This is not always the best option for performance, often changing this to HPGL, HPGL2 or Postscript will
improved the time to generate a plot considerably.

Click ok when finished modifications


7. Click on the ’ printers ’ tab and click ’ Add ’

Give your printer a new name, and pick the model you just created form the list (it will be at the bottom)


http://teamwiki/wiki/index.php/NX_Plotting_Basic_Setup_Guide                                                 5-3-2012
NX Plotting Basic Setup Guide - TeamWiki                                                            Page 5 of 12


Ensure ’ NT/Queue ’ is ticked and pick your windows printer from the list, then OK

NOTE! – If you do not have the plotter defined as a local printer it can still be accessed using the unc path.
E.g. lhrsrv02UK_UK_helpdesk . To do this select the option "Device" (NOT LPR/Queue!) and enter the
path in the lower box.


8. Highlight the new printer in the list and click ’ System Profile ’


http://teamwiki/wiki/index.php/NX_Plotting_Basic_Setup_Guide                                           5-3-2012
NX Plotting Basic Setup Guide - TeamWiki                       Page 6 of 12


http://teamwiki/wiki/index.php/NX_Plotting_Basic_Setup_Guide      5-3-2012
NX Plotting Basic Setup Guide - TeamWiki                                                                    Page 7 of 12


Edit the settings as appropriate for your printer - specifically Paper Size and plot scaling (for printers rather than
plotters), then OK, and OK once more

9. Exit from NX, File > Exit

10. Edit the ugii_env.dat file that your setup of NX is using, set the variable UGII_SDI_SERVER_CFG_DIR to
point to the plotting directory that you set up in Step 2.

Remember to remove the # from the start of the line.

e.g.


# This variable specifies a single printer group directory that is


# shared by all users. If you prefer to use multiple printer group


# directories, then specify the directories in a printer group list


# file instead. Before setting this variable, review printer group


# concepts presented in NX Help documentation.


#

UGII_SDI_SERVER_CFG_DIR=c:nxplotters

11. Restart NX, open a part or drawing. The select File > Plot


http://teamwiki/wiki/index.php/NX_Plotting_Basic_Setup_Guide                                                    5-3-2012
NX Plotting Basic Setup Guide - TeamWiki                       Page 8 of 12


http://teamwiki/wiki/index.php/NX_Plotting_Basic_Setup_Guide      5-3-2012
NX Plotting Basic Setup Guide - TeamWiki                                                            Page 9 of 12


Change any settings as necessary, for more advanced options you can select the "Advanced Plot" button which will
bring up the following dialog.


http://teamwiki/wiki/index.php/NX_Plotting_Basic_Setup_Guide                                           5-3-2012
NX Plotting Basic Setup Guide - TeamWiki                       Page 10 of 12


http://teamwiki/wiki/index.php/NX_Plotting_Basic_Setup_Guide       5-3-2012
NX Plotting Basic Setup Guide - TeamWiki                                                         Page 11 of 12


The CGM Viewer button will show you a preview of the display that is to be plotted.

For Multiple Seats of Unigraphics

Once configured correctly, to roll out to multiple seats of NX, ensure that UGII_SDI_SERVER_CFG_DIR is set
correctly for each client, and that the Windows printer(s) are set up the same on each client.

To Plot Drawing Line Widths Correctly(in NX3 and NX4)

After Selecting File > Plot , enable the Use Drawing Sheet Widths toggle. If this does not work change the
Option under widths to Custom 3 Widths and define widths as required

In NX3 and NX4:


In NX5:


http://teamwiki/wiki/index.php/NX_Plotting_Basic_Setup_Guide                                         5-3-2012
NX Plotting Basic Setup Guide - TeamWiki                                                            Page 12 of 12


Useful Tips

If you frequently get the message: "image exceeds printable area" when in reality you plot is an acceptable size.
This message can be suppressed by setting the environment variable "UGII_SDI_IGNORE_SIZE_WARNING=1"

Retrieved from "http://teamwiki/wiki/index.php/NX_Plotting_Basic_Setup_Guide"

Category: NX tips and tricks

   „   This page was last modified 10:36, 27 May 2008.


http://teamwiki/wiki/index.php/NX_Plotting_Basic_Setup_Guide                                             5-3-2012

Mais conteúdo relacionado

Semelhante a Teamwiki nx plotting setup

Install nagios
Install nagiosInstall nagios
Install nagioshassandb
 
Xgboost readthedocs-io-en-release 1.3.3
Xgboost readthedocs-io-en-release 1.3.3Xgboost readthedocs-io-en-release 1.3.3
Xgboost readthedocs-io-en-release 1.3.3Angie Ihirwe
 
dassault-systemes-catia-application-scalability-guide
dassault-systemes-catia-application-scalability-guidedassault-systemes-catia-application-scalability-guide
dassault-systemes-catia-application-scalability-guideJason Kyungho Lee
 
LAS16-TR03: Upstreaming 201
LAS16-TR03: Upstreaming 201LAS16-TR03: Upstreaming 201
LAS16-TR03: Upstreaming 201Linaro
 
N vision
N visionN vision
N visionsri44
 
01 release document_8.7.1
01 release document_8.7.101 release document_8.7.1
01 release document_8.7.1struds
 
Final opensource record 2019
Final opensource record 2019Final opensource record 2019
Final opensource record 2019Karthik Sekhar
 
SPHARM-PDM_Tutorial_July2015
SPHARM-PDM_Tutorial_July2015SPHARM-PDM_Tutorial_July2015
SPHARM-PDM_Tutorial_July2015Jonathan Perdomo
 
INOVA GIS Platform - TeleCAD-GIS & IGS (2018)
INOVA GIS Platform - TeleCAD-GIS & IGS (2018)INOVA GIS Platform - TeleCAD-GIS & IGS (2018)
INOVA GIS Platform - TeleCAD-GIS & IGS (2018)Maksim Sestic
 
Computer application
Computer applicationComputer application
Computer applicationSudamRaut2
 
(A1)_RWS_Customization_WORKSAMPLE
(A1)_RWS_Customization_WORKSAMPLE(A1)_RWS_Customization_WORKSAMPLE
(A1)_RWS_Customization_WORKSAMPLEAngel Marckwordt
 

Semelhante a Teamwiki nx plotting setup (20)

Install nagios
Install nagiosInstall nagios
Install nagios
 
Xgboost readthedocs-io-en-release 1.3.3
Xgboost readthedocs-io-en-release 1.3.3Xgboost readthedocs-io-en-release 1.3.3
Xgboost readthedocs-io-en-release 1.3.3
 
dassault-systemes-catia-application-scalability-guide
dassault-systemes-catia-application-scalability-guidedassault-systemes-catia-application-scalability-guide
dassault-systemes-catia-application-scalability-guide
 
Workbench de Mannarino
Workbench de MannarinoWorkbench de Mannarino
Workbench de Mannarino
 
All in one
All in oneAll in one
All in one
 
Work flow
Work flowWork flow
Work flow
 
LAS16-TR03: Upstreaming 201
LAS16-TR03: Upstreaming 201LAS16-TR03: Upstreaming 201
LAS16-TR03: Upstreaming 201
 
N vision
N visionN vision
N vision
 
Get the Sheet out of here! Plan production for jobs due yesterday
Get the Sheet out of here! Plan production for jobs due yesterdayGet the Sheet out of here! Plan production for jobs due yesterday
Get the Sheet out of here! Plan production for jobs due yesterday
 
01 release document_8.7.1
01 release document_8.7.101 release document_8.7.1
01 release document_8.7.1
 
Final opensource record 2019
Final opensource record 2019Final opensource record 2019
Final opensource record 2019
 
SPHARM-PDM_Tutorial_July2015
SPHARM-PDM_Tutorial_July2015SPHARM-PDM_Tutorial_July2015
SPHARM-PDM_Tutorial_July2015
 
Saving File As Plot File
Saving File As Plot FileSaving File As Plot File
Saving File As Plot File
 
Manual do SSCT
Manual do SSCTManual do SSCT
Manual do SSCT
 
Tutorial
TutorialTutorial
Tutorial
 
Tutorial
TutorialTutorial
Tutorial
 
INOVA GIS Platform - TeleCAD-GIS & IGS (2018)
INOVA GIS Platform - TeleCAD-GIS & IGS (2018)INOVA GIS Platform - TeleCAD-GIS & IGS (2018)
INOVA GIS Platform - TeleCAD-GIS & IGS (2018)
 
Lab 1 Essay
Lab 1 EssayLab 1 Essay
Lab 1 Essay
 
Computer application
Computer applicationComputer application
Computer application
 
(A1)_RWS_Customization_WORKSAMPLE
(A1)_RWS_Customization_WORKSAMPLE(A1)_RWS_Customization_WORKSAMPLE
(A1)_RWS_Customization_WORKSAMPLE
 

Último

Sanyam Choudhary Chemistry practical.pdf
Sanyam Choudhary Chemistry practical.pdfSanyam Choudhary Chemistry practical.pdf
Sanyam Choudhary Chemistry practical.pdfsanyamsingh5019
 
URLs and Routing in the Odoo 17 Website App
URLs and Routing in the Odoo 17 Website AppURLs and Routing in the Odoo 17 Website App
URLs and Routing in the Odoo 17 Website AppCeline George
 
Concept of Vouching. B.Com(Hons) /B.Compdf
Concept of Vouching. B.Com(Hons) /B.CompdfConcept of Vouching. B.Com(Hons) /B.Compdf
Concept of Vouching. B.Com(Hons) /B.CompdfUmakantAnnand
 
_Math 4-Q4 Week 5.pptx Steps in Collecting Data
_Math 4-Q4 Week 5.pptx Steps in Collecting Data_Math 4-Q4 Week 5.pptx Steps in Collecting Data
_Math 4-Q4 Week 5.pptx Steps in Collecting DataJhengPantaleon
 
Hybridoma Technology ( Production , Purification , and Application )
Hybridoma Technology  ( Production , Purification , and Application  ) Hybridoma Technology  ( Production , Purification , and Application  )
Hybridoma Technology ( Production , Purification , and Application ) Sakshi Ghasle
 
Micromeritics - Fundamental and Derived Properties of Powders
Micromeritics - Fundamental and Derived Properties of PowdersMicromeritics - Fundamental and Derived Properties of Powders
Micromeritics - Fundamental and Derived Properties of PowdersChitralekhaTherkar
 
Accessible design: Minimum effort, maximum impact
Accessible design: Minimum effort, maximum impactAccessible design: Minimum effort, maximum impact
Accessible design: Minimum effort, maximum impactdawncurless
 
Industrial Policy - 1948, 1956, 1973, 1977, 1980, 1991
Industrial Policy - 1948, 1956, 1973, 1977, 1980, 1991Industrial Policy - 1948, 1956, 1973, 1977, 1980, 1991
Industrial Policy - 1948, 1956, 1973, 1977, 1980, 1991RKavithamani
 
Arihant handbook biology for class 11 .pdf
Arihant handbook biology for class 11 .pdfArihant handbook biology for class 11 .pdf
Arihant handbook biology for class 11 .pdfchloefrazer622
 
Science 7 - LAND and SEA BREEZE and its Characteristics
Science 7 - LAND and SEA BREEZE and its CharacteristicsScience 7 - LAND and SEA BREEZE and its Characteristics
Science 7 - LAND and SEA BREEZE and its CharacteristicsKarinaGenton
 
BASLIQ CURRENT LOOKBOOK LOOKBOOK(1) (1).pdf
BASLIQ CURRENT LOOKBOOK  LOOKBOOK(1) (1).pdfBASLIQ CURRENT LOOKBOOK  LOOKBOOK(1) (1).pdf
BASLIQ CURRENT LOOKBOOK LOOKBOOK(1) (1).pdfSoniaTolstoy
 
Mastering the Unannounced Regulatory Inspection
Mastering the Unannounced Regulatory InspectionMastering the Unannounced Regulatory Inspection
Mastering the Unannounced Regulatory InspectionSafetyChain Software
 
Introduction to AI in Higher Education_draft.pptx
Introduction to AI in Higher Education_draft.pptxIntroduction to AI in Higher Education_draft.pptx
Introduction to AI in Higher Education_draft.pptxpboyjonauth
 
APM Welcome, APM North West Network Conference, Synergies Across Sectors
APM Welcome, APM North West Network Conference, Synergies Across SectorsAPM Welcome, APM North West Network Conference, Synergies Across Sectors
APM Welcome, APM North West Network Conference, Synergies Across SectorsAssociation for Project Management
 
Software Engineering Methodologies (overview)
Software Engineering Methodologies (overview)Software Engineering Methodologies (overview)
Software Engineering Methodologies (overview)eniolaolutunde
 
MENTAL STATUS EXAMINATION format.docx
MENTAL     STATUS EXAMINATION format.docxMENTAL     STATUS EXAMINATION format.docx
MENTAL STATUS EXAMINATION format.docxPoojaSen20
 
Kisan Call Centre - To harness potential of ICT in Agriculture by answer farm...
Kisan Call Centre - To harness potential of ICT in Agriculture by answer farm...Kisan Call Centre - To harness potential of ICT in Agriculture by answer farm...
Kisan Call Centre - To harness potential of ICT in Agriculture by answer farm...Krashi Coaching
 
Crayon Activity Handout For the Crayon A
Crayon Activity Handout For the Crayon ACrayon Activity Handout For the Crayon A
Crayon Activity Handout For the Crayon AUnboundStockton
 

Último (20)

Sanyam Choudhary Chemistry practical.pdf
Sanyam Choudhary Chemistry practical.pdfSanyam Choudhary Chemistry practical.pdf
Sanyam Choudhary Chemistry practical.pdf
 
URLs and Routing in the Odoo 17 Website App
URLs and Routing in the Odoo 17 Website AppURLs and Routing in the Odoo 17 Website App
URLs and Routing in the Odoo 17 Website App
 
Concept of Vouching. B.Com(Hons) /B.Compdf
Concept of Vouching. B.Com(Hons) /B.CompdfConcept of Vouching. B.Com(Hons) /B.Compdf
Concept of Vouching. B.Com(Hons) /B.Compdf
 
_Math 4-Q4 Week 5.pptx Steps in Collecting Data
_Math 4-Q4 Week 5.pptx Steps in Collecting Data_Math 4-Q4 Week 5.pptx Steps in Collecting Data
_Math 4-Q4 Week 5.pptx Steps in Collecting Data
 
Hybridoma Technology ( Production , Purification , and Application )
Hybridoma Technology  ( Production , Purification , and Application  ) Hybridoma Technology  ( Production , Purification , and Application  )
Hybridoma Technology ( Production , Purification , and Application )
 
Micromeritics - Fundamental and Derived Properties of Powders
Micromeritics - Fundamental and Derived Properties of PowdersMicromeritics - Fundamental and Derived Properties of Powders
Micromeritics - Fundamental and Derived Properties of Powders
 
Accessible design: Minimum effort, maximum impact
Accessible design: Minimum effort, maximum impactAccessible design: Minimum effort, maximum impact
Accessible design: Minimum effort, maximum impact
 
Industrial Policy - 1948, 1956, 1973, 1977, 1980, 1991
Industrial Policy - 1948, 1956, 1973, 1977, 1980, 1991Industrial Policy - 1948, 1956, 1973, 1977, 1980, 1991
Industrial Policy - 1948, 1956, 1973, 1977, 1980, 1991
 
Arihant handbook biology for class 11 .pdf
Arihant handbook biology for class 11 .pdfArihant handbook biology for class 11 .pdf
Arihant handbook biology for class 11 .pdf
 
Science 7 - LAND and SEA BREEZE and its Characteristics
Science 7 - LAND and SEA BREEZE and its CharacteristicsScience 7 - LAND and SEA BREEZE and its Characteristics
Science 7 - LAND and SEA BREEZE and its Characteristics
 
Staff of Color (SOC) Retention Efforts DDSD
Staff of Color (SOC) Retention Efforts DDSDStaff of Color (SOC) Retention Efforts DDSD
Staff of Color (SOC) Retention Efforts DDSD
 
BASLIQ CURRENT LOOKBOOK LOOKBOOK(1) (1).pdf
BASLIQ CURRENT LOOKBOOK  LOOKBOOK(1) (1).pdfBASLIQ CURRENT LOOKBOOK  LOOKBOOK(1) (1).pdf
BASLIQ CURRENT LOOKBOOK LOOKBOOK(1) (1).pdf
 
TataKelola dan KamSiber Kecerdasan Buatan v022.pdf
TataKelola dan KamSiber Kecerdasan Buatan v022.pdfTataKelola dan KamSiber Kecerdasan Buatan v022.pdf
TataKelola dan KamSiber Kecerdasan Buatan v022.pdf
 
Mastering the Unannounced Regulatory Inspection
Mastering the Unannounced Regulatory InspectionMastering the Unannounced Regulatory Inspection
Mastering the Unannounced Regulatory Inspection
 
Introduction to AI in Higher Education_draft.pptx
Introduction to AI in Higher Education_draft.pptxIntroduction to AI in Higher Education_draft.pptx
Introduction to AI in Higher Education_draft.pptx
 
APM Welcome, APM North West Network Conference, Synergies Across Sectors
APM Welcome, APM North West Network Conference, Synergies Across SectorsAPM Welcome, APM North West Network Conference, Synergies Across Sectors
APM Welcome, APM North West Network Conference, Synergies Across Sectors
 
Software Engineering Methodologies (overview)
Software Engineering Methodologies (overview)Software Engineering Methodologies (overview)
Software Engineering Methodologies (overview)
 
MENTAL STATUS EXAMINATION format.docx
MENTAL     STATUS EXAMINATION format.docxMENTAL     STATUS EXAMINATION format.docx
MENTAL STATUS EXAMINATION format.docx
 
Kisan Call Centre - To harness potential of ICT in Agriculture by answer farm...
Kisan Call Centre - To harness potential of ICT in Agriculture by answer farm...Kisan Call Centre - To harness potential of ICT in Agriculture by answer farm...
Kisan Call Centre - To harness potential of ICT in Agriculture by answer farm...
 
Crayon Activity Handout For the Crayon A
Crayon Activity Handout For the Crayon ACrayon Activity Handout For the Crayon A
Crayon Activity Handout For the Crayon A
 

Teamwiki nx plotting setup

  • 1. NX Plotting Basic Setup Guide - TeamWiki Page 1 of 12 NX Plotting Basic Setup Guide From TeamWiki Contents „ 1 NX Plotting Basic Setup Guide (NX3 onwards) „ 1.1 For Multiple Seats of Unigraphics „ 1.2 To Plot Drawing Line Widths Correctly(in NX3 and NX4) „ 1.3 Useful Tips NX Plotting Basic Setup Guide (NX3 onwards) The steps for configuring NX plotting are described below: 1. Ensure that you have the printer/plotter set up in Windows and that Windows can print to it. It does not matter if this is connected to a share on a server or set up locally. 2. Create a directory where you want to keep your plotter settings. This could be on a server if you have multiple clients that all want to see the same settings. e.g. c:nxplotters 3. Start NX 4. Click File > Utilities > Printer Administration (If this option is not available change your active role to Advanced with full menus) If this is the first time you are setting up plotting using the directory you created above, select ’ Create and Edit ’ and pick the directory you created above. Leave ’ Create from Printer Group ’ as ’ System Default ’ and OK 5. Click on the Models tab http://teamwiki/wiki/index.php/NX_Plotting_Basic_Setup_Guide 5-3-2012
  • 2. NX Plotting Basic Setup Guide - TeamWiki Page 2 of 12 Find the closest match to your plotter in the list and select it. Click ’ Save As ’ to create your own copy of the model with a new name http://teamwiki/wiki/index.php/NX_Plotting_Basic_Setup_Guide 5-3-2012
  • 3. NX Plotting Basic Setup Guide - TeamWiki Page 3 of 12 6. Find the newly created plotter model in the list, highlight it and click on Properties. In the properties dialog , the paper sizes available can be modified if required. Important …Also the Class should be noted. By default it might read Raster/RTL http://teamwiki/wiki/index.php/NX_Plotting_Basic_Setup_Guide 5-3-2012
  • 4. NX Plotting Basic Setup Guide - TeamWiki Page 4 of 12 This is not always the best option for performance, often changing this to HPGL, HPGL2 or Postscript will improved the time to generate a plot considerably. Click ok when finished modifications 7. Click on the ’ printers ’ tab and click ’ Add ’ Give your printer a new name, and pick the model you just created form the list (it will be at the bottom) http://teamwiki/wiki/index.php/NX_Plotting_Basic_Setup_Guide 5-3-2012
  • 5. NX Plotting Basic Setup Guide - TeamWiki Page 5 of 12 Ensure ’ NT/Queue ’ is ticked and pick your windows printer from the list, then OK NOTE! – If you do not have the plotter defined as a local printer it can still be accessed using the unc path. E.g. lhrsrv02UK_UK_helpdesk . To do this select the option "Device" (NOT LPR/Queue!) and enter the path in the lower box. 8. Highlight the new printer in the list and click ’ System Profile ’ http://teamwiki/wiki/index.php/NX_Plotting_Basic_Setup_Guide 5-3-2012
  • 6. NX Plotting Basic Setup Guide - TeamWiki Page 6 of 12 http://teamwiki/wiki/index.php/NX_Plotting_Basic_Setup_Guide 5-3-2012
  • 7. NX Plotting Basic Setup Guide - TeamWiki Page 7 of 12 Edit the settings as appropriate for your printer - specifically Paper Size and plot scaling (for printers rather than plotters), then OK, and OK once more 9. Exit from NX, File > Exit 10. Edit the ugii_env.dat file that your setup of NX is using, set the variable UGII_SDI_SERVER_CFG_DIR to point to the plotting directory that you set up in Step 2. Remember to remove the # from the start of the line. e.g. # This variable specifies a single printer group directory that is # shared by all users. If you prefer to use multiple printer group # directories, then specify the directories in a printer group list # file instead. Before setting this variable, review printer group # concepts presented in NX Help documentation. # UGII_SDI_SERVER_CFG_DIR=c:nxplotters 11. Restart NX, open a part or drawing. The select File > Plot http://teamwiki/wiki/index.php/NX_Plotting_Basic_Setup_Guide 5-3-2012
  • 8. NX Plotting Basic Setup Guide - TeamWiki Page 8 of 12 http://teamwiki/wiki/index.php/NX_Plotting_Basic_Setup_Guide 5-3-2012
  • 9. NX Plotting Basic Setup Guide - TeamWiki Page 9 of 12 Change any settings as necessary, for more advanced options you can select the "Advanced Plot" button which will bring up the following dialog. http://teamwiki/wiki/index.php/NX_Plotting_Basic_Setup_Guide 5-3-2012
  • 10. NX Plotting Basic Setup Guide - TeamWiki Page 10 of 12 http://teamwiki/wiki/index.php/NX_Plotting_Basic_Setup_Guide 5-3-2012
  • 11. NX Plotting Basic Setup Guide - TeamWiki Page 11 of 12 The CGM Viewer button will show you a preview of the display that is to be plotted. For Multiple Seats of Unigraphics Once configured correctly, to roll out to multiple seats of NX, ensure that UGII_SDI_SERVER_CFG_DIR is set correctly for each client, and that the Windows printer(s) are set up the same on each client. To Plot Drawing Line Widths Correctly(in NX3 and NX4) After Selecting File > Plot , enable the Use Drawing Sheet Widths toggle. If this does not work change the Option under widths to Custom 3 Widths and define widths as required In NX3 and NX4: In NX5: http://teamwiki/wiki/index.php/NX_Plotting_Basic_Setup_Guide 5-3-2012
  • 12. NX Plotting Basic Setup Guide - TeamWiki Page 12 of 12 Useful Tips If you frequently get the message: "image exceeds printable area" when in reality you plot is an acceptable size. This message can be suppressed by setting the environment variable "UGII_SDI_IGNORE_SIZE_WARNING=1" Retrieved from "http://teamwiki/wiki/index.php/NX_Plotting_Basic_Setup_Guide" Category: NX tips and tricks „ This page was last modified 10:36, 27 May 2008. http://teamwiki/wiki/index.php/NX_Plotting_Basic_Setup_Guide 5-3-2012