SlideShare a Scribd company logo
1 of 22
Download to read offline
Copyright © Rutgers Writing Program
Contact Barclay Barrios (barclay.barrios@rutgers.edu)


What is Adobe Photoshop 7.0?
Photoshop, now up to version 7.0, is the leading professional image-editing program,
released by Adobe. Photoshop is useful for both creating and editing images to be
used in print or online. Easy to use, but full of high-quality features, Photoshop is
the best choice for any image manipulation job.

Opening Adobe Photoshop 7.0
Click the "Start" menu and go to the "Programs" folder. You will see an "Adobe"
folder with "Photoshop 7.0" inside; click this icon.


Photoshop will initially open with a tool panel and a variety of windows, all of which
look incredibly intimidating at first. You can ignore the right-most set of windows for
now. First, let’s familiarize ourselves with the main menu.


File – create new images, open pre-existing images, print, exit the program, etc.
Edit – undo, copy, paste, cut, preferences, basic image manipulation, etc.
Image – change the image or canvas size, rotate, adjust brightness & contrast, etc.
Layer – Create / delete layers, merge layers together, layer effects, etc.
Select – Adjust the selected area of your image
Filter – Apply filters and effects to your images
View – Zoom in and out of your images
Window – Open or close different windows within Photoshop

Creating a New Canvas / Image
Go to the “File” menu and select “New” (or press Ctrl+N).
Copyright © Rutgers Writing Program
Contact Barclay Barrios (barclay.barrios@rutgers.edu)


A window will appear asking you how large you would like your canvas (or working
area) to be. Pick a size large enough to work with; you can always “crop” your
image later, so it’s better to have too large an area than too small an area. For
comparisons sake, your monitor’s total space is probably 1024 x 768. Make your
decision, and click “OK.”


Your canvas will open as a blank, white window. The top of it will say “Untitled”
(until you save it), and will be at 100% (unless it is too large to fit on the screen at
once, in which case it may appear at 66.7% or smaller).

Opening a Pre-existing Image
Go to the “File” menu and select “Open” (or press Ctrl+O).


Find the image on your computer that you wish to edit, and click “Open.” Your
image will open in a new window within Photoshop.
Copyright © Rutgers Writing Program
Contact Barclay Barrios (barclay.barrios@rutgers.edu)


Editing an Image
Once you have an image created or opened, you can edit or draw on top of it with
Photoshop’s “Tools” window, which is the long, thin window that is automatically
open on the left side. Here is a break down of all the tools contained on this bar:


                                                   1. Marquee Tool – used for selecting
                                                      areas of an image
                                                   2. Move Tool – used for moving an image
                                                      to a different area of the canvas
                                                   3. Lasso Tool – used for selecting areas of
                                                      an image that may not necessarily be
                                                      comprised of straight lines
                                                   4. Magic Wand Tool – used for auto-
                                                      selecting large areas of an image that
                                                      are similar in color
                                                   5. Crop Tool – used for reducing the
                                                      image to a certain area (“cropping”)
                                                   6. Slice Tool – used to “slice” an image
                                                      into different sections; generally used
                                                      for the creation of images for a web
                                                      page design
                                                   7. Healing Brush Tool – used to fix
                                                      imperfections in an image by copying
                                                      other pixels from the image. The
                                                      Healing Brush tool will also match the
                                                      texture, lighting, and shading to
                                                      perfectly match the are you are fixing
                                                   8. Brush Tool – used with the mouse to
                                                      simply draw lines on your image
Copyright © Rutgers Writing Program
Contact Barclay Barrios (barclay.barrios@rutgers.edu)


    9. Clone Stamp Tool – used to “clone” or copy one area of an image to another;
        first hold “Alt” and click an area of the image to copy, then click on a different
        area to copy it there
    10. History Brush Tool – used to copy and draw a pre-existing image in different
        artistic styles
    11. Eraser Tool – used to erase certain areas of an image
    12. Gradient Tool – used to create gradient fills for an image, of any color
    13. Blur Tool – used to blur or blend areas of an image
    14. Dodge Tool – used to uniquely adjust the brightness and contrast of an image
    15. Path Selection Tool – used merge overlapping components into a single
        component
    16. Type Tool – used to place text on an image
    17. Pen Tool – used to draw lines and curves with better precision
    18. Rectangle Tool – used to draw rectangles and other polygons
    19. Notes Tool – used to leave notes for yourself on your image
    20. Eyedropper Tool – used to select and match specific colors
    21. Hand Tool – used to quickly view different areas of an image
    22. Zoom Tool – used to zoom in and out of an image
    23. Set Foreground / Background Color – used to set the foreground (front) and
        background (back) colors of an image; can also be used to change the colors
        of text, etc. Click on the boxes to change the colors (a new window will
        appear).
    24. Edit Modes – used to switch back and forth between modes
    25. Switch Screen Modes – used to switch between full screen and standard
        screen modes
    26. Jump to ImageReady – used to easily launch the ImageReady program

Understanding Layers
One of Photoshop’s most powerful features is the ability to create and use multiple
layers within the same image. A layer is literally what it sounds like: one layer on
top of another, all of which can be edited independently of each other and laid on top
of or beneath one another, and then later combined to form a single, flat image.

When you first create an image, you will be working with the “Background” layer.
You cannot always use all effects on a background layer, so you may wish to start
working directly with normal layers. To create a new layer, click the “Layer” menu,
and pick “Layer” from the “New” menu (or click Shift+Ctrl+N).


In the new window that pops up, click “OK.”

Now look down in the bottom-right of the screen to the lower-most window, which
we haven’t looked at yet. It will have three tabs on it: Layers, Channels, and Paths.
We’ll be staying on the main “Layers” tab, for now. It should look something like
this:
Copyright © Rutgers Writing Program
Contact Barclay Barrios (barclay.barrios@rutgers.edu)


You will notice that “Layer 1” is above “Background” in the window. This means that
anything that’s on Layer 1 will take priority over anything in the Background layer.
Things in the Background layer will be obscured by things in Layer 1. Why would
you want to do this? You can switch back and forth between layers to move items
independently of items in other layers, allowing you to lay things out exactly as you
want.

So what are all these options in the layers window?


    1. Paintbrush Symbol – This
       symbol (and the blue
       shading of the layer) notes
       the currently active layer
    2. Show / Hide Layer – When
       the eye icon is visible, the
       layer is displayed in your
       project. If the eye is
       clicked, then the layer is
       hidden but not deleted.
    3. Link Icon – Indicates if the
       layer is currently linked to
       another layer. When linked,
       layers act “locked” together
       (and will move with each
       other, accordingly), but still
       remain separate layers.
       Layers can be linked together by selecting one layer, and then clicking the
       boxes in the other layers to display the “Link” icon (number three on the
       above list and image).
    4. Background – The Background is technically not a layer, however, it can be
       edited. It is the bottom-most portion of the image.
    5. Layer – Each layer has its own name (default is by numbering). Click a
       layer’s name to edit on that layer.
    6. Text Layer – Adding text creates a new text-specific layer.
Copyright © Rutgers Writing Program
Contact Barclay Barrios (barclay.barrios@rutgers.edu)


    7. Effects – When you add effects to a layer, a sub-menu appears with that layer
        listing the effect applied to it. Double-click an effect’s name to bring up that
        effect’s menu to make adjustments.
    8. Add a Layer Style – By picking an option from this menu (such as Drop
        Shadow, Inner Glow, or Bevel and Emboss), you can apply special effects to a
        layer.
    9. Add a Mask – Masks are used to hide pixels on a layer in order to view the
        rest of the image. Layer masks are either a black or white background color.
        The default color is white, which lets pixels be seen, while black hides pixels.
    10. Create a New Set – By making a new set, you can create a separate folder for
        layer storage.
    11. Create New Fill or Adjustment Layer – The options in this menu allow you to
        change the color properties and dimensions of a layer. For example, you can
        make a layer lighter or darker, add a gradient (a blending of two colors), or
        invert the entire layer.
    12. Create a New Layer – Clicking on this icon creates a new layer. You can
        name your layer in the text box that appears and position it in the palette.
    13. Delete a Layer – Deletes the currently selected layer. You can also drag a
        layer to the trash.
    14. Opacity – Use this to adjust a layer’s opacity (its transparency).

Some notes about layers:
   • Layers can be repositioned in different orders in the Layers palette by clicking
      on a layer and dragging it to a new position in the palette. To make a layer
      appear on the top-most part of the image, drag it higher up on the list. Do
      the opposite to position a layer at the bottom-most area of an image.
   • Only a selected layer can be edited. To select a layer, click on the layer name
      in the palette.
   • You can only work with layers in a *.psd file (Photoshop’s native format). If
      you want to modify a *.gif or *.jpg file (or any other type of image file) with
      layers, copy and paste that image into a new, blank Photoshop canvas.

Switching Back and Forth Between Layers
The layer that’s selected under the “Layers” tab will be the one changes are made to
when working on the canvas. If you wish to work on a different layer, click the name
of that layer. Remember, if you want to bring a different layer to the front of the
image, click and drag it above or below to where you want it.
Copyright © Rutgers Writing Program
Contact Barclay Barrios (barclay.barrios@rutgers.edu)


Cropping an Image
If an image is too large and you would like to cut it to just focus on one section of
the image, you can “crop” it to that size and area. Select the “Crop” tool, and click
and drag around the area you want.


You can resize the area (or rotate it) with the mouse by clicking any of the corners.
When you’re done, just click over to any other tool and a window will appear asking
you if you’d like to crop the image. Click yes, and the image will be reduced to the
area you’ve specified.

Resizing an Image
If you don’t want to crop your image (meaning you want the ENTIRE image, just at a
smaller size), you can resize your image to any dimensions you wish. Select “Image
Size” from the “Image” menu.


The default in Photoshop is to keep image resizing at “Constrain Proportions.” This
means that if the height is changed, the width will be changed at the same ratio.
This keeps your image looking approximately the same, only at different sizes. If
Copyright © Rutgers Writing Program
Contact Barclay Barrios (barclay.barrios@rutgers.edu)


you wish to change this, just un-click the “Constrain Proportions” check box at the
bottom of the “Image Size” window.


You can change the image size either by pixels or percentages. Use either you wish
to either enlarge or reduce the size of your image (keep in mind that enlarging
images will reduce the quality).

Moving an Image
You can move an image to any area of the canvas you wish. Select the “Move” tool,
and click and drag the image to any area of the canvas you wish.
Copyright © Rutgers Writing Program
Contact Barclay Barrios (barclay.barrios@rutgers.edu)


Selecting / Deleting a Part of an Image
Choose the “Marquee” tool, and click and drag around a part of an image. A
rotating, dotted line will surround that area. To delete this section that you’ve
selected, hit the “Delete” key on your keyboard.


The “Magic Wand” can select a larger area of an image by grabbing similar looking
pixels and grouping them together. Select the Magic Wand tool and click an area of
an image. It will select a large portion of the area which you can move, delete, etc.


Adding Text
Click the “Text” tool on the tool bar and click in your image where you’d like to add
text.
Copyright © Rutgers Writing Program
Contact Barclay Barrios (barclay.barrios@rutgers.edu)


The text will appear on top of the image, and it will be on its own new layer. You
can change the font, style, size, anti-aliasing, and color of your text on the menu
directly below the main Photoshop menu.


Altering Your Images
Photoshop’s most powerful aspect is its ability to edit and manipulate images easily
and with professional quality. The second section of the tool menu contains tools
that specifically help you to edit your images. When you click any of these tools,
Photoshop’s sub-main menu will change to reflect new options available to you.
Most will look something like this, or very similar:


    1. Name – The name of the tool you’re using.
    2. Brush Picker – Here you can select the diameter, hardness, and spacing of the
       brush / tool you are using.
    3. Mode – Effect mode
    4. Opacity – The transparency of the tool’s effects.
    5. Flow – The flow rate of the stroke.
    6. Airbrush – Click to enable airbrush capabilities with the tool.

Brush / Pencil Tool

The Brush tool can be right-clicked to also show the Pencil tool as an option. Both
are very simple tools that allow you to directly draw on top of an image. Select a
color with the Foreground Color option on the tool bar, and select a brush size from
Copyright © Rutgers Writing Program
Contact Barclay Barrios (barclay.barrios@rutgers.edu)


the tool’s sub-main menu, above. Click and drag across an image to draw on top of
it.


Clone Tool

The Clone tool will copy pixels from one part of an image and copy them to a new
part of the image. The Clone tool is most useful in situations such as removing
blemishes from a face in a photograph, clearing a few clouds out of a bright blue sky,
etc.

Choose the Clone tool. Hold the “Alt” button on your keyboard, and click in an area
of the image that you’d like to copy. Now click elsewhere in the image, and move
the cursor around. The image will “clone” itself to that second area.
Copyright © Rutgers Writing Program
Contact Barclay Barrios (barclay.barrios@rutgers.edu)


Eraser Tool

The eraser simply deletes sections of an image. Click the Eraser tool, and click and
drag around your image. The eraser will “erase” the image to what’s set as the
Background color.


Gradient / Paint Bucket Tool

The Gradient tool can be used on its own, or right-clicked to also select the Paint
Bucket tool.
Copyright © Rutgers Writing Program
Contact Barclay Barrios (barclay.barrios@rutgers.edu)


A gradient is a horizontal fading of colors, most commonly used in the creation of
banners for web pages. Select the Gradient tool, and go to the sub-main menu for a
drop-down of available gradients. The default is the most common.


Once you’ve selected which gradient you wish (and a color in the Foreground color
tool), just click and drag across your image. The direction you drag (left to right,
right to left, etc.) determines the flow of the gradient.


The Paint Bucket lets you fill in a large section with the same color. Select the Paint
Bucket by right-clicking the Gradient tool, and click in an area of your image. It will
fill with the color selected as the Foreground color.
Copyright © Rutgers Writing Program
Contact Barclay Barrios (barclay.barrios@rutgers.edu)


Blur Tool

The Blur tool is useful for covering up small distortions in an image by blending the
surrounding pixels together. To blur something, select the Blur tool, and click and
drag around the area you wish to blur.


Rotating an Image
You can rotate and flip your image in any direction you wish. In the “Rotate Canvas”
list under the “Image” menu, there’s a wide variety of options to choose from.
Copyright © Rutgers Writing Program
Contact Barclay Barrios (barclay.barrios@rutgers.edu)


If you select “Arbitrary” for a rotation, a new window will appear asking you for the
direction (clockwise or counter-clockwise) and the degree of the rotation.


Drawing Shapes
While Photoshop’s main power is in manipulation of images, it’s also possible to draw
your own (as seen with the pencil and pen tools). The Rectangle tool (and all of its
sub-tools) allows you to draw shapes on a canvas. To draw a simple rectangle, pick
a Foreground color (which will be the fill color for the shape), select the Rectangle
tool, and click and drag on the canvas until it’s the size you wish.


Note that drawing a shape will create a new layer.

You can draw a wide variety of shapes with the Rectangle tool and its sub-tools,
including the Custom Shape Tool, which gives you even more options. Select the
Custom Shapes Tool (by right-clicking the Rectangle tool), and look through your
options in the drop-down box from the sub-main menu.
Copyright © Rutgers Writing Program
Contact Barclay Barrios (barclay.barrios@rutgers.edu)


Your choices include word bubbles, arrows, and even shapes that don’t fill
themselves in with a color.

Eyedropper Tool
When working with images, you may find that you want to reselect a color you’ve
used, but aren’t sure exactly what color it is. You can use the Eyedropper tool to
reselect that exact color for you. Select the Eyedropper tool, and click anywhere on
an image that has the color you want to select.


The Foreground color will change itself to the color you’ve selected.

Zoom Tool
If you find that you need to zoom in or out of your image for any reason (for
example, to be more precise in deleting areas), you can use the Zoom tool. Click the
Zoom tool (it looks like a magnifying glass). If you click once on your image, it will
zoom to double its size (100% to 200%, and so on).
Copyright © Rutgers Writing Program
Contact Barclay Barrios (barclay.barrios@rutgers.edu)


If you right-click, you can select the “Zoom Out,” which will reduce its size. Note
that this doesn’t actually change the size of the image. It simply changes your view
of the image on the canvas.

History
One of Photoshop’s most powerful and useful abilities is the option to go back in the
“history” of your image. This means that at any point, you can go back to a previous
version of your image. This is particularly useful if you find you’ve made a mistake
several steps back. You’ll notice that the History window (which can be opened via
the “Windows” >> “History” menu if it’s not already open) lists all of the steps
you’ve made in your image.


To “go back” to any of these instances, just click the name of one of the steps, and
your image will go back to how it previously looked at that point in time.

Brightness & Contrast
Sometimes when working with images, you may need to adjust the brightness
and/or contrast (especially with scanned images). Photoshop makes this very easy.
Select “Brightness/Contrast” from the “Adjustments” >> “Image” menu.
Copyright © Rutgers Writing Program
Contact Barclay Barrios (barclay.barrios@rutgers.edu)


A new window will appear allowing you to slide the brightness and contrast any way
you wish.


The Brightness/Contrast command lets you make adjustments to the overall tonal
range of an image. Adjustments made in here will affect every pixel in your image,
unless a selection is made beforehand.

Layer Styles
You can do much more with layers other than piling images on top of each other.
Once you have added images or text to a layer, you can add distinctive styles to
them, making them stand out even more.

Once you’ve added an item to a layer (such as text), click the “Add a layer style”
button in the “Layers” window. A list of styles will appear which you can add to your
layer.
Copyright © Rutgers Writing Program
Contact Barclay Barrios (barclay.barrios@rutgers.edu)


The most common layer style you will see and use is the traditional “Drop Shadow.”
Click “Drop Shadow” to bring up the “Layer Style” window, which will automatically
open to the “Drop Shadow” section.


“Opacity” refers to the transparency of the shadow (how well can you see it / see
through it). The “Angle” is the angle at which the imaginary light is coming from to
create the shadow. “Distance” is the amount of space near or away from the object
or text the shadow appears. “Spread” refers to the thickness or solidity of the
shadow. “Size” is, simply, how big the shadow is. Experiment with the different
settings. You’ll notice that as you adjust these settings, your image on the canvas
will take on the changes. This is just a preview; none of the changes will actually
take effect until you click “OK.”


There are a wide variety of layer styles. Experiment with the different layer styles to
find one (or a combination of some) that suit your needs. For example, “Inner Glow”
will create textures and colors within your text or objects, while “Outer Glow” will do
the same outside your objects (similar to a Drop Shadow).

Filters
Photoshop has a wide variety of filters you can apply to your images. They include
obvious ones such as blurring and sharpening, but also very advanced ones such as
ripples, distortions, and rendering clouds. You can browse through the available
filters by selecting the Filters menu.
Copyright © Rutgers Writing Program
Contact Barclay Barrios (barclay.barrios@rutgers.edu)


Play around with the available filters, and remember that you can undo your actions
at any time with the History window.

Saving Images – PSD Format
If you are working with a very complex image (lots of layers, filters, etc.), you may
want to think about saving it. Saving as a PSD file (Photoshop’s native format)
allows you to open it up again with all the layers and such intact. If you save it as
another type of image, Photoshop will “flatten” the image. To save your image as a
PSD, just select “Save” from the “File” menu, and select a place on your hard drive
or disk to save it.


Saving Images – For the Web
On the Internet, there are two file types for images on websites that are the most
predominant: GIF (*.gif) and JPEG (*.jpg). The GIF format is geared towards
images that do not need to be viewed with a large amount of colors. The standard
GIF file will be of 256 colors or less. This is perfect for the Internet, and more
specifically, images that will appear directly on a web page. The JPEG format is
geared toward images of a “real world” or “natural” sense, such as photographs.
JPEG images are generally of thousands of colors or grayscale. JPEG can hold up to
16 million colors. High quality, larger images stored in a website’s “Image Gallery”
may be saved as JPEGs. Photoshop comes with features specifically geared to
optimize pictures for the web.
Copyright © Rutgers Writing Program
Contact Barclay Barrios (barclay.barrios@rutgers.edu)


Select “Save for the Web” from the “File” menu.


Saving as a GIF File

Underneath “Settings,” select “GIF” from the drop-down menu. One of the most
important features in this menu is the “Colors” setting. The more colors your image
has, the more colors you should allow your GIF to have. However, since you want to
create optimized images for the web, it is best to use as little possible color as
possible, while still saving a clear image. If your image has very few colors, you
should change the color setting to reflect the small number of colors. The small the
number of colors, the small the file size the GIF will have. If you want, your image
can have a solid outline color. You can choose this by going to the “Matte” selection,
and picking a color. Other options in this menu need not be changed. These are
standard defaults for saving GIFs. When you are ready, click “Save” and save the
image by giving it a file name.


Saving as a JPEG File

Underneath “Settings,” select “JPEG” from the drop-down menu. Go to the drop-
down menu with “JPEG High” displayed. There you can determine the quality of the
image for the web. Naturally, higher quality images will have a larger file size. It is
not necessary that images be extremely high quality. Usually, “Medium” is a good
Copyright © Rutgers Writing Program
Contact Barclay Barrios (barclay.barrios@rutgers.edu)


setting to choose. To refine the quality of the image, use the “Quality” setting.
Here, you can save the JPEG as a percentage of the original image’s quality. For
example, 50% would be half the quality of the original image. When you are ready,
click “Save” and save the image by giving it a file name.

More Related Content

What's hot

Adobe Photoshop | Introduction to the User Interface
Adobe Photoshop | Introduction to the User InterfaceAdobe Photoshop | Introduction to the User Interface
Adobe Photoshop | Introduction to the User InterfaceBrainPlayLLP
 
Basic Photoshop Tutorial
Basic Photoshop TutorialBasic Photoshop Tutorial
Basic Photoshop TutorialMarc Dy
 
Photoshop Basics
Photoshop BasicsPhotoshop Basics
Photoshop BasicsAllieW
 
Create 3D Type in Photoshop CS6
Create 3D Type in Photoshop CS6Create 3D Type in Photoshop CS6
Create 3D Type in Photoshop CS6marcusbyrne
 
Photoshop_CS_Tutorial
Photoshop_CS_TutorialPhotoshop_CS_Tutorial
Photoshop_CS_Tutorialtutorialsruby
 
Presentation on Photoshop Tools By Batra Computer Centre
Presentation on Photoshop Tools By Batra Computer CentrePresentation on Photoshop Tools By Batra Computer Centre
Presentation on Photoshop Tools By Batra Computer CentreBatra Computer Centre
 
Photoshop tools
Photoshop toolsPhotoshop tools
Photoshop toolstss000037
 
Adobe Photoshop Toolbox definition term
Adobe Photoshop Toolbox definition termAdobe Photoshop Toolbox definition term
Adobe Photoshop Toolbox definition termAllan Roloma
 
Photoshop step by step powerpoint presentation - hayley ip 10 f
Photoshop step by step   powerpoint presentation - hayley ip 10 fPhotoshop step by step   powerpoint presentation - hayley ip 10 f
Photoshop step by step powerpoint presentation - hayley ip 10 fHayley Ip
 
Tools used photography
Tools used photographyTools used photography
Tools used photographykannkarry
 
Adobe photoshop tools by kp tripathy
Adobe photoshop tools by kp tripathyAdobe photoshop tools by kp tripathy
Adobe photoshop tools by kp tripathyKamakshya Tripathy
 
Session 2.2 photoshop interface
Session 2.2   photoshop interfaceSession 2.2   photoshop interface
Session 2.2 photoshop interfaceJohn Josef Jimenez
 
Digital photography handbook
Digital photography handbookDigital photography handbook
Digital photography handbookMrLawler
 

What's hot (20)

Adobe Photoshop | Introduction to the User Interface
Adobe Photoshop | Introduction to the User InterfaceAdobe Photoshop | Introduction to the User Interface
Adobe Photoshop | Introduction to the User Interface
 
Basic Photoshop Tutorial
Basic Photoshop TutorialBasic Photoshop Tutorial
Basic Photoshop Tutorial
 
Photoshop tools
Photoshop toolsPhotoshop tools
Photoshop tools
 
Photoshop
PhotoshopPhotoshop
Photoshop
 
Basics of Photoshop Tutorial
Basics of Photoshop TutorialBasics of Photoshop Tutorial
Basics of Photoshop Tutorial
 
Photoshop tools
Photoshop tools Photoshop tools
Photoshop tools
 
Photoshop Basics
Photoshop BasicsPhotoshop Basics
Photoshop Basics
 
Create 3D Type in Photoshop CS6
Create 3D Type in Photoshop CS6Create 3D Type in Photoshop CS6
Create 3D Type in Photoshop CS6
 
Photoshop_CS_Tutorial
Photoshop_CS_TutorialPhotoshop_CS_Tutorial
Photoshop_CS_Tutorial
 
Presentation on Photoshop Tools By Batra Computer Centre
Presentation on Photoshop Tools By Batra Computer CentrePresentation on Photoshop Tools By Batra Computer Centre
Presentation on Photoshop Tools By Batra Computer Centre
 
Photoshop tools
Photoshop toolsPhotoshop tools
Photoshop tools
 
Adobe Photoshop Toolbox definition term
Adobe Photoshop Toolbox definition termAdobe Photoshop Toolbox definition term
Adobe Photoshop Toolbox definition term
 
Photoshop step by step powerpoint presentation - hayley ip 10 f
Photoshop step by step   powerpoint presentation - hayley ip 10 fPhotoshop step by step   powerpoint presentation - hayley ip 10 f
Photoshop step by step powerpoint presentation - hayley ip 10 f
 
Tools used photography
Tools used photographyTools used photography
Tools used photography
 
Photoshop
PhotoshopPhotoshop
Photoshop
 
Adobe photoshop tools by kp tripathy
Adobe photoshop tools by kp tripathyAdobe photoshop tools by kp tripathy
Adobe photoshop tools by kp tripathy
 
Image Editor
Image EditorImage Editor
Image Editor
 
Session 2.2 photoshop interface
Session 2.2   photoshop interfaceSession 2.2   photoshop interface
Session 2.2 photoshop interface
 
Adobe Photoshop Tools
Adobe Photoshop ToolsAdobe Photoshop Tools
Adobe Photoshop Tools
 
Digital photography handbook
Digital photography handbookDigital photography handbook
Digital photography handbook
 

Viewers also liked

Getting started with Adobe Photoshop 7.0
Getting started with Adobe Photoshop 7.0Getting started with Adobe Photoshop 7.0
Getting started with Adobe Photoshop 7.0Najma Alam
 
8 killer adobe photoshop tips for designers
8 killer adobe photoshop tips for designers8 killer adobe photoshop tips for designers
8 killer adobe photoshop tips for designersRemon Mia
 
Photoshop graphic intro ppt by kartik mandothiya
Photoshop graphic intro ppt by kartik mandothiyaPhotoshop graphic intro ppt by kartik mandothiya
Photoshop graphic intro ppt by kartik mandothiyaKartik Mandothiya
 
Photoshop Tutorial
Photoshop TutorialPhotoshop Tutorial
Photoshop TutorialAnne
 
Photoshop lesson 1
Photoshop lesson 1Photoshop lesson 1
Photoshop lesson 1ahunneyball
 
Heena Soni,B.Sc fashion Technology+2 years Diploma
 Heena Soni,B.Sc fashion Technology+2 years Diploma Heena Soni,B.Sc fashion Technology+2 years Diploma
Heena Soni,B.Sc fashion Technology+2 years Diplomadezyneecole
 
My Fashion portfolio
My Fashion portfolioMy Fashion portfolio
My Fashion portfoliomehtabbadwal
 
1 banasik-the implementation of the mipaa directives in australia
1 banasik-the implementation of the  mipaa  directives in australia1 banasik-the implementation of the  mipaa  directives in australia
1 banasik-the implementation of the mipaa directives in australiaifa2012_2
 
Cho thuê căn hộ the estella quận 2 cực đẹp
Cho thuê căn hộ the estella quận 2 cực đẹpCho thuê căn hộ the estella quận 2 cực đẹp
Cho thuê căn hộ the estella quận 2 cực đẹpnhaviet9
 
8 What Is the Human Body Made Of?
8 What Is the Human Body Made Of?8 What Is the Human Body Made Of?
8 What Is the Human Body Made Of?Sebastian De Haro
 
Case analysis of harry's hi fi center
Case analysis of harry's hi fi centerCase analysis of harry's hi fi center
Case analysis of harry's hi fi centerDadhich Bhatt
 
Liberal Arts Conference - Core Texts in the Sciences
Liberal Arts Conference - Core Texts in the SciencesLiberal Arts Conference - Core Texts in the Sciences
Liberal Arts Conference - Core Texts in the SciencesSebastian De Haro
 
Viviana veloza santamaria (1)
Viviana veloza santamaria (1)Viviana veloza santamaria (1)
Viviana veloza santamaria (1)klaumilenitha
 
7  myths about  weight loss tips that most people never knew.
7  myths about  weight loss tips that most people never knew.7  myths about  weight loss tips that most people never knew.
7  myths about  weight loss tips that most people never knew.Satyamrut Uttarkabat
 
Andres bladimir daza ibañez1
Andres bladimir daza ibañez1Andres bladimir daza ibañez1
Andres bladimir daza ibañez1klaumilenitha
 

Viewers also liked (20)

Getting started with Adobe Photoshop 7.0
Getting started with Adobe Photoshop 7.0Getting started with Adobe Photoshop 7.0
Getting started with Adobe Photoshop 7.0
 
8 killer adobe photoshop tips for designers
8 killer adobe photoshop tips for designers8 killer adobe photoshop tips for designers
8 killer adobe photoshop tips for designers
 
Photoshop graphic intro ppt by kartik mandothiya
Photoshop graphic intro ppt by kartik mandothiyaPhotoshop graphic intro ppt by kartik mandothiya
Photoshop graphic intro ppt by kartik mandothiya
 
Photoshop Tutorial
Photoshop TutorialPhotoshop Tutorial
Photoshop Tutorial
 
Basic tutorials
Basic tutorialsBasic tutorials
Basic tutorials
 
Fashion.Illus.class_01
Fashion.Illus.class_01Fashion.Illus.class_01
Fashion.Illus.class_01
 
Photoshop lesson 1
Photoshop lesson 1Photoshop lesson 1
Photoshop lesson 1
 
Heena Soni,B.Sc fashion Technology+2 years Diploma
 Heena Soni,B.Sc fashion Technology+2 years Diploma Heena Soni,B.Sc fashion Technology+2 years Diploma
Heena Soni,B.Sc fashion Technology+2 years Diploma
 
My Fashion portfolio
My Fashion portfolioMy Fashion portfolio
My Fashion portfolio
 
1 lane-pdd
1 lane-pdd1 lane-pdd
1 lane-pdd
 
TexasSno Photos
TexasSno PhotosTexasSno Photos
TexasSno Photos
 
Tugas b.inggris
Tugas b.inggrisTugas b.inggris
Tugas b.inggris
 
1 banasik-the implementation of the mipaa directives in australia
1 banasik-the implementation of the  mipaa  directives in australia1 banasik-the implementation of the  mipaa  directives in australia
1 banasik-the implementation of the mipaa directives in australia
 
Cho thuê căn hộ the estella quận 2 cực đẹp
Cho thuê căn hộ the estella quận 2 cực đẹpCho thuê căn hộ the estella quận 2 cực đẹp
Cho thuê căn hộ the estella quận 2 cực đẹp
 
8 What Is the Human Body Made Of?
8 What Is the Human Body Made Of?8 What Is the Human Body Made Of?
8 What Is the Human Body Made Of?
 
Case analysis of harry's hi fi center
Case analysis of harry's hi fi centerCase analysis of harry's hi fi center
Case analysis of harry's hi fi center
 
Liberal Arts Conference - Core Texts in the Sciences
Liberal Arts Conference - Core Texts in the SciencesLiberal Arts Conference - Core Texts in the Sciences
Liberal Arts Conference - Core Texts in the Sciences
 
Viviana veloza santamaria (1)
Viviana veloza santamaria (1)Viviana veloza santamaria (1)
Viviana veloza santamaria (1)
 
7  myths about  weight loss tips that most people never knew.
7  myths about  weight loss tips that most people never knew.7  myths about  weight loss tips that most people never knew.
7  myths about  weight loss tips that most people never knew.
 
Andres bladimir daza ibañez1
Andres bladimir daza ibañez1Andres bladimir daza ibañez1
Andres bladimir daza ibañez1
 

Similar to Photoshop 7.0 Beginner's Guide

Ppt
PptPpt
Pptlkpd
 
Photoshop skills
Photoshop skills Photoshop skills
Photoshop skills imogenbav
 
Print skills development
Print skills developmentPrint skills development
Print skills developmentJasmine Lakhani
 
Print skills development
Print skills developmentPrint skills development
Print skills developmentJasmine Lakhani
 
Gateway To Adobe Photoshop
Gateway To Adobe PhotoshopGateway To Adobe Photoshop
Gateway To Adobe PhotoshopBUDNET
 
Managing Visual Design in Axure
Managing Visual Design in AxureManaging Visual Design in Axure
Managing Visual Design in AxureFred Beecher
 
Photoshop layers
Photoshop layersPhotoshop layers
Photoshop layersMarche Ygar
 
photoshoddddddddddddddddddddffp quiz.pptx
photoshoddddddddddddddddddddffp quiz.pptxphotoshoddddddddddddddddddddffp quiz.pptx
photoshoddddddddddddddddddddffp quiz.pptxNestthe Casidsid
 
Photoshop intro to basics
Photoshop intro to basicsPhotoshop intro to basics
Photoshop intro to basicsNatalie Hurd
 
Adobe photoshop cs6
Adobe photoshop cs6Adobe photoshop cs6
Adobe photoshop cs6Ila Azmil
 
Adobe photoshop cs6
Adobe photoshop cs6Adobe photoshop cs6
Adobe photoshop cs6ilaazmil2
 
Adobe photoshop cs6 tutorial
Adobe photoshop cs6 tutorialAdobe photoshop cs6 tutorial
Adobe photoshop cs6 tutorialAgung Yuwono
 
Introduction to PowerPoint 2007
Introduction to PowerPoint 2007Introduction to PowerPoint 2007
Introduction to PowerPoint 2007misscrawleymfl
 
Evaluation – Question 6
Evaluation – Question 6Evaluation – Question 6
Evaluation – Question 6SaskiaHalman
 
Photoshop notes cs-4
Photoshop notes  cs-4Photoshop notes  cs-4
Photoshop notes cs-4SirajRock
 
Photoshop pdf
Photoshop pdfPhotoshop pdf
Photoshop pdfKim B
 
Adobe Photoshop CS6 tutorial 2013
Adobe Photoshop CS6 tutorial 2013Adobe Photoshop CS6 tutorial 2013
Adobe Photoshop CS6 tutorial 2013Jessie Doan
 

Similar to Photoshop 7.0 Beginner's Guide (20)

Ppt
PptPpt
Ppt
 
Photoshop skills
Photoshop skills Photoshop skills
Photoshop skills
 
Photoshop basics
Photoshop basicsPhotoshop basics
Photoshop basics
 
Print skills development
Print skills developmentPrint skills development
Print skills development
 
Print skills development
Print skills developmentPrint skills development
Print skills development
 
Gateway To Adobe Photoshop
Gateway To Adobe PhotoshopGateway To Adobe Photoshop
Gateway To Adobe Photoshop
 
Managing Visual Design in Axure
Managing Visual Design in AxureManaging Visual Design in Axure
Managing Visual Design in Axure
 
Photoshop layers
Photoshop layersPhotoshop layers
Photoshop layers
 
photoshoddddddddddddddddddddffp quiz.pptx
photoshoddddddddddddddddddddffp quiz.pptxphotoshoddddddddddddddddddddffp quiz.pptx
photoshoddddddddddddddddddddffp quiz.pptx
 
Photoshop intro to basics
Photoshop intro to basicsPhotoshop intro to basics
Photoshop intro to basics
 
Adobe photoshop cs6
Adobe photoshop cs6Adobe photoshop cs6
Adobe photoshop cs6
 
Adobe photoshop cs6
Adobe photoshop cs6Adobe photoshop cs6
Adobe photoshop cs6
 
Adobe photoshop cs6 tutorial
Adobe photoshop cs6 tutorialAdobe photoshop cs6 tutorial
Adobe photoshop cs6 tutorial
 
Photo Shop
Photo ShopPhoto Shop
Photo Shop
 
Introduction to PowerPoint 2007
Introduction to PowerPoint 2007Introduction to PowerPoint 2007
Introduction to PowerPoint 2007
 
Evaluation – Question 6
Evaluation – Question 6Evaluation – Question 6
Evaluation – Question 6
 
Photoshop notes cs-4
Photoshop notes  cs-4Photoshop notes  cs-4
Photoshop notes cs-4
 
Photoshop pdf
Photoshop pdfPhotoshop pdf
Photoshop pdf
 
Photoshop cs6
Photoshop cs6Photoshop cs6
Photoshop cs6
 
Adobe Photoshop CS6 tutorial 2013
Adobe Photoshop CS6 tutorial 2013Adobe Photoshop CS6 tutorial 2013
Adobe Photoshop CS6 tutorial 2013
 

Recently uploaded

Gomti Nagar & High Profile Call Girls in Lucknow (Adult Only) 8923113531 Esc...
Gomti Nagar & High Profile Call Girls in Lucknow  (Adult Only) 8923113531 Esc...Gomti Nagar & High Profile Call Girls in Lucknow  (Adult Only) 8923113531 Esc...
Gomti Nagar & High Profile Call Girls in Lucknow (Adult Only) 8923113531 Esc...gurkirankumar98700
 
Editorial sephora annual report design project
Editorial sephora annual report design projectEditorial sephora annual report design project
Editorial sephora annual report design projecttbatkhuu1
 
FULL ENJOY - 9953040155 Call Girls in Kotla Mubarakpur | Delhi
FULL ENJOY - 9953040155 Call Girls in Kotla Mubarakpur | DelhiFULL ENJOY - 9953040155 Call Girls in Kotla Mubarakpur | Delhi
FULL ENJOY - 9953040155 Call Girls in Kotla Mubarakpur | DelhiMalviyaNagarCallGirl
 
Bridge Fight Board by Daniel Johnson dtjohnsonart.com
Bridge Fight Board by Daniel Johnson dtjohnsonart.comBridge Fight Board by Daniel Johnson dtjohnsonart.com
Bridge Fight Board by Daniel Johnson dtjohnsonart.comthephillipta
 
FULL ENJOY - 9953040155 Call Girls in Burari | Delhi
FULL ENJOY - 9953040155 Call Girls in Burari | DelhiFULL ENJOY - 9953040155 Call Girls in Burari | Delhi
FULL ENJOY - 9953040155 Call Girls in Burari | DelhiMalviyaNagarCallGirl
 
Lucknow 💋 Call Girls in Lucknow | Service-oriented sexy call girls 8923113531...
Lucknow 💋 Call Girls in Lucknow | Service-oriented sexy call girls 8923113531...Lucknow 💋 Call Girls in Lucknow | Service-oriented sexy call girls 8923113531...
Lucknow 💋 Call Girls in Lucknow | Service-oriented sexy call girls 8923113531...anilsa9823
 
Hazratganj ] (Call Girls) in Lucknow - 450+ Call Girl Cash Payment 🧄 89231135...
Hazratganj ] (Call Girls) in Lucknow - 450+ Call Girl Cash Payment 🧄 89231135...Hazratganj ] (Call Girls) in Lucknow - 450+ Call Girl Cash Payment 🧄 89231135...
Hazratganj ] (Call Girls) in Lucknow - 450+ Call Girl Cash Payment 🧄 89231135...akbard9823
 
Lucknow 💋 Escorts Service Lucknow Phone No 8923113531 Elite Escort Service Av...
Lucknow 💋 Escorts Service Lucknow Phone No 8923113531 Elite Escort Service Av...Lucknow 💋 Escorts Service Lucknow Phone No 8923113531 Elite Escort Service Av...
Lucknow 💋 Escorts Service Lucknow Phone No 8923113531 Elite Escort Service Av...anilsa9823
 
Deconstructing Gendered Language; Feminist World-Making 2024
Deconstructing Gendered Language; Feminist World-Making 2024Deconstructing Gendered Language; Feminist World-Making 2024
Deconstructing Gendered Language; Feminist World-Making 2024samlnance
 
FULL ENJOY - 9953040155 Call Girls in Wazirabad | Delhi
FULL ENJOY - 9953040155 Call Girls in Wazirabad | DelhiFULL ENJOY - 9953040155 Call Girls in Wazirabad | Delhi
FULL ENJOY - 9953040155 Call Girls in Wazirabad | DelhiMalviyaNagarCallGirl
 
Vip Hisar Call Girls #9907093804 Contact Number Escorts Service Hisar
Vip Hisar Call Girls #9907093804 Contact Number Escorts Service HisarVip Hisar Call Girls #9907093804 Contact Number Escorts Service Hisar
Vip Hisar Call Girls #9907093804 Contact Number Escorts Service Hisarsrsj9000
 
RAK Call Girls Service # 971559085003 # Call Girl Service In RAK
RAK Call Girls Service # 971559085003 # Call Girl Service In RAKRAK Call Girls Service # 971559085003 # Call Girl Service In RAK
RAK Call Girls Service # 971559085003 # Call Girl Service In RAKedwardsara83
 
Charbagh ! (Call Girls) in Lucknow Finest Escorts Service 🥗 8923113531 🏊 Avai...
Charbagh ! (Call Girls) in Lucknow Finest Escorts Service 🥗 8923113531 🏊 Avai...Charbagh ! (Call Girls) in Lucknow Finest Escorts Service 🥗 8923113531 🏊 Avai...
Charbagh ! (Call Girls) in Lucknow Finest Escorts Service 🥗 8923113531 🏊 Avai...gurkirankumar98700
 
FULL ENJOY - 9953040155 Call Girls in Shahdara | Delhi
FULL ENJOY - 9953040155 Call Girls in Shahdara | DelhiFULL ENJOY - 9953040155 Call Girls in Shahdara | Delhi
FULL ENJOY - 9953040155 Call Girls in Shahdara | DelhiMalviyaNagarCallGirl
 
Patrakarpuram ) Cheap Call Girls In Lucknow (Adult Only) 🧈 8923113531 𓀓 Esco...
Patrakarpuram ) Cheap Call Girls In Lucknow  (Adult Only) 🧈 8923113531 𓀓 Esco...Patrakarpuram ) Cheap Call Girls In Lucknow  (Adult Only) 🧈 8923113531 𓀓 Esco...
Patrakarpuram ) Cheap Call Girls In Lucknow (Adult Only) 🧈 8923113531 𓀓 Esco...akbard9823
 
FULL ENJOY - 9953040155 Call Girls in Shaheen Bagh | Delhi
FULL ENJOY - 9953040155 Call Girls in Shaheen Bagh | DelhiFULL ENJOY - 9953040155 Call Girls in Shaheen Bagh | Delhi
FULL ENJOY - 9953040155 Call Girls in Shaheen Bagh | DelhiMalviyaNagarCallGirl
 
Authentic # 00971556872006 # Hot Call Girls Service in Dubai By International...
Authentic # 00971556872006 # Hot Call Girls Service in Dubai By International...Authentic # 00971556872006 # Hot Call Girls Service in Dubai By International...
Authentic # 00971556872006 # Hot Call Girls Service in Dubai By International...home
 
Alex and Chloe by Daniel Johnson Storyboard
Alex and Chloe by Daniel Johnson StoryboardAlex and Chloe by Daniel Johnson Storyboard
Alex and Chloe by Daniel Johnson Storyboardthephillipta
 
Turn Lock Take Key Storyboard Daniel Johnson
Turn Lock Take Key Storyboard Daniel JohnsonTurn Lock Take Key Storyboard Daniel Johnson
Turn Lock Take Key Storyboard Daniel Johnsonthephillipta
 

Recently uploaded (20)

Gomti Nagar & High Profile Call Girls in Lucknow (Adult Only) 8923113531 Esc...
Gomti Nagar & High Profile Call Girls in Lucknow  (Adult Only) 8923113531 Esc...Gomti Nagar & High Profile Call Girls in Lucknow  (Adult Only) 8923113531 Esc...
Gomti Nagar & High Profile Call Girls in Lucknow (Adult Only) 8923113531 Esc...
 
Editorial sephora annual report design project
Editorial sephora annual report design projectEditorial sephora annual report design project
Editorial sephora annual report design project
 
FULL ENJOY - 9953040155 Call Girls in Kotla Mubarakpur | Delhi
FULL ENJOY - 9953040155 Call Girls in Kotla Mubarakpur | DelhiFULL ENJOY - 9953040155 Call Girls in Kotla Mubarakpur | Delhi
FULL ENJOY - 9953040155 Call Girls in Kotla Mubarakpur | Delhi
 
Bridge Fight Board by Daniel Johnson dtjohnsonart.com
Bridge Fight Board by Daniel Johnson dtjohnsonart.comBridge Fight Board by Daniel Johnson dtjohnsonart.com
Bridge Fight Board by Daniel Johnson dtjohnsonart.com
 
FULL ENJOY - 9953040155 Call Girls in Burari | Delhi
FULL ENJOY - 9953040155 Call Girls in Burari | DelhiFULL ENJOY - 9953040155 Call Girls in Burari | Delhi
FULL ENJOY - 9953040155 Call Girls in Burari | Delhi
 
Lucknow 💋 Call Girls in Lucknow | Service-oriented sexy call girls 8923113531...
Lucknow 💋 Call Girls in Lucknow | Service-oriented sexy call girls 8923113531...Lucknow 💋 Call Girls in Lucknow | Service-oriented sexy call girls 8923113531...
Lucknow 💋 Call Girls in Lucknow | Service-oriented sexy call girls 8923113531...
 
Hazratganj ] (Call Girls) in Lucknow - 450+ Call Girl Cash Payment 🧄 89231135...
Hazratganj ] (Call Girls) in Lucknow - 450+ Call Girl Cash Payment 🧄 89231135...Hazratganj ] (Call Girls) in Lucknow - 450+ Call Girl Cash Payment 🧄 89231135...
Hazratganj ] (Call Girls) in Lucknow - 450+ Call Girl Cash Payment 🧄 89231135...
 
Lucknow 💋 Escorts Service Lucknow Phone No 8923113531 Elite Escort Service Av...
Lucknow 💋 Escorts Service Lucknow Phone No 8923113531 Elite Escort Service Av...Lucknow 💋 Escorts Service Lucknow Phone No 8923113531 Elite Escort Service Av...
Lucknow 💋 Escorts Service Lucknow Phone No 8923113531 Elite Escort Service Av...
 
Deconstructing Gendered Language; Feminist World-Making 2024
Deconstructing Gendered Language; Feminist World-Making 2024Deconstructing Gendered Language; Feminist World-Making 2024
Deconstructing Gendered Language; Feminist World-Making 2024
 
FULL ENJOY - 9953040155 Call Girls in Wazirabad | Delhi
FULL ENJOY - 9953040155 Call Girls in Wazirabad | DelhiFULL ENJOY - 9953040155 Call Girls in Wazirabad | Delhi
FULL ENJOY - 9953040155 Call Girls in Wazirabad | Delhi
 
Vip Hisar Call Girls #9907093804 Contact Number Escorts Service Hisar
Vip Hisar Call Girls #9907093804 Contact Number Escorts Service HisarVip Hisar Call Girls #9907093804 Contact Number Escorts Service Hisar
Vip Hisar Call Girls #9907093804 Contact Number Escorts Service Hisar
 
RAK Call Girls Service # 971559085003 # Call Girl Service In RAK
RAK Call Girls Service # 971559085003 # Call Girl Service In RAKRAK Call Girls Service # 971559085003 # Call Girl Service In RAK
RAK Call Girls Service # 971559085003 # Call Girl Service In RAK
 
Charbagh ! (Call Girls) in Lucknow Finest Escorts Service 🥗 8923113531 🏊 Avai...
Charbagh ! (Call Girls) in Lucknow Finest Escorts Service 🥗 8923113531 🏊 Avai...Charbagh ! (Call Girls) in Lucknow Finest Escorts Service 🥗 8923113531 🏊 Avai...
Charbagh ! (Call Girls) in Lucknow Finest Escorts Service 🥗 8923113531 🏊 Avai...
 
FULL ENJOY - 9953040155 Call Girls in Shahdara | Delhi
FULL ENJOY - 9953040155 Call Girls in Shahdara | DelhiFULL ENJOY - 9953040155 Call Girls in Shahdara | Delhi
FULL ENJOY - 9953040155 Call Girls in Shahdara | Delhi
 
Patrakarpuram ) Cheap Call Girls In Lucknow (Adult Only) 🧈 8923113531 𓀓 Esco...
Patrakarpuram ) Cheap Call Girls In Lucknow  (Adult Only) 🧈 8923113531 𓀓 Esco...Patrakarpuram ) Cheap Call Girls In Lucknow  (Adult Only) 🧈 8923113531 𓀓 Esco...
Patrakarpuram ) Cheap Call Girls In Lucknow (Adult Only) 🧈 8923113531 𓀓 Esco...
 
FULL ENJOY - 9953040155 Call Girls in Shaheen Bagh | Delhi
FULL ENJOY - 9953040155 Call Girls in Shaheen Bagh | DelhiFULL ENJOY - 9953040155 Call Girls in Shaheen Bagh | Delhi
FULL ENJOY - 9953040155 Call Girls in Shaheen Bagh | Delhi
 
Bur Dubai Call Girls # 971504361175 # Call Girls In Bur Dubai || (UAE)
Bur Dubai Call Girls # 971504361175 # Call Girls In Bur Dubai || (UAE)Bur Dubai Call Girls # 971504361175 # Call Girls In Bur Dubai || (UAE)
Bur Dubai Call Girls # 971504361175 # Call Girls In Bur Dubai || (UAE)
 
Authentic # 00971556872006 # Hot Call Girls Service in Dubai By International...
Authentic # 00971556872006 # Hot Call Girls Service in Dubai By International...Authentic # 00971556872006 # Hot Call Girls Service in Dubai By International...
Authentic # 00971556872006 # Hot Call Girls Service in Dubai By International...
 
Alex and Chloe by Daniel Johnson Storyboard
Alex and Chloe by Daniel Johnson StoryboardAlex and Chloe by Daniel Johnson Storyboard
Alex and Chloe by Daniel Johnson Storyboard
 
Turn Lock Take Key Storyboard Daniel Johnson
Turn Lock Take Key Storyboard Daniel JohnsonTurn Lock Take Key Storyboard Daniel Johnson
Turn Lock Take Key Storyboard Daniel Johnson
 

Photoshop 7.0 Beginner's Guide

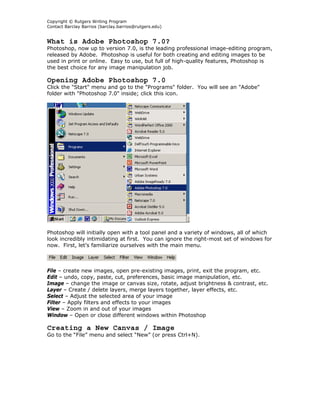
  • 1. Copyright © Rutgers Writing Program Contact Barclay Barrios (barclay.barrios@rutgers.edu) What is Adobe Photoshop 7.0? Photoshop, now up to version 7.0, is the leading professional image-editing program, released by Adobe. Photoshop is useful for both creating and editing images to be used in print or online. Easy to use, but full of high-quality features, Photoshop is the best choice for any image manipulation job. Opening Adobe Photoshop 7.0 Click the "Start" menu and go to the "Programs" folder. You will see an "Adobe" folder with "Photoshop 7.0" inside; click this icon. Photoshop will initially open with a tool panel and a variety of windows, all of which look incredibly intimidating at first. You can ignore the right-most set of windows for now. First, let’s familiarize ourselves with the main menu. File – create new images, open pre-existing images, print, exit the program, etc. Edit – undo, copy, paste, cut, preferences, basic image manipulation, etc. Image – change the image or canvas size, rotate, adjust brightness & contrast, etc. Layer – Create / delete layers, merge layers together, layer effects, etc. Select – Adjust the selected area of your image Filter – Apply filters and effects to your images View – Zoom in and out of your images Window – Open or close different windows within Photoshop Creating a New Canvas / Image Go to the “File” menu and select “New” (or press Ctrl+N).
  • 2. Copyright © Rutgers Writing Program Contact Barclay Barrios (barclay.barrios@rutgers.edu) A window will appear asking you how large you would like your canvas (or working area) to be. Pick a size large enough to work with; you can always “crop” your image later, so it’s better to have too large an area than too small an area. For comparisons sake, your monitor’s total space is probably 1024 x 768. Make your decision, and click “OK.” Your canvas will open as a blank, white window. The top of it will say “Untitled” (until you save it), and will be at 100% (unless it is too large to fit on the screen at once, in which case it may appear at 66.7% or smaller). Opening a Pre-existing Image Go to the “File” menu and select “Open” (or press Ctrl+O). Find the image on your computer that you wish to edit, and click “Open.” Your image will open in a new window within Photoshop.
  • 3. Copyright © Rutgers Writing Program Contact Barclay Barrios (barclay.barrios@rutgers.edu) Editing an Image Once you have an image created or opened, you can edit or draw on top of it with Photoshop’s “Tools” window, which is the long, thin window that is automatically open on the left side. Here is a break down of all the tools contained on this bar: 1. Marquee Tool – used for selecting areas of an image 2. Move Tool – used for moving an image to a different area of the canvas 3. Lasso Tool – used for selecting areas of an image that may not necessarily be comprised of straight lines 4. Magic Wand Tool – used for auto- selecting large areas of an image that are similar in color 5. Crop Tool – used for reducing the image to a certain area (“cropping”) 6. Slice Tool – used to “slice” an image into different sections; generally used for the creation of images for a web page design 7. Healing Brush Tool – used to fix imperfections in an image by copying other pixels from the image. The Healing Brush tool will also match the texture, lighting, and shading to perfectly match the are you are fixing 8. Brush Tool – used with the mouse to simply draw lines on your image
  • 4. Copyright © Rutgers Writing Program Contact Barclay Barrios (barclay.barrios@rutgers.edu) 9. Clone Stamp Tool – used to “clone” or copy one area of an image to another; first hold “Alt” and click an area of the image to copy, then click on a different area to copy it there 10. History Brush Tool – used to copy and draw a pre-existing image in different artistic styles 11. Eraser Tool – used to erase certain areas of an image 12. Gradient Tool – used to create gradient fills for an image, of any color 13. Blur Tool – used to blur or blend areas of an image 14. Dodge Tool – used to uniquely adjust the brightness and contrast of an image 15. Path Selection Tool – used merge overlapping components into a single component 16. Type Tool – used to place text on an image 17. Pen Tool – used to draw lines and curves with better precision 18. Rectangle Tool – used to draw rectangles and other polygons 19. Notes Tool – used to leave notes for yourself on your image 20. Eyedropper Tool – used to select and match specific colors 21. Hand Tool – used to quickly view different areas of an image 22. Zoom Tool – used to zoom in and out of an image 23. Set Foreground / Background Color – used to set the foreground (front) and background (back) colors of an image; can also be used to change the colors of text, etc. Click on the boxes to change the colors (a new window will appear). 24. Edit Modes – used to switch back and forth between modes 25. Switch Screen Modes – used to switch between full screen and standard screen modes 26. Jump to ImageReady – used to easily launch the ImageReady program Understanding Layers One of Photoshop’s most powerful features is the ability to create and use multiple layers within the same image. A layer is literally what it sounds like: one layer on top of another, all of which can be edited independently of each other and laid on top of or beneath one another, and then later combined to form a single, flat image. When you first create an image, you will be working with the “Background” layer. You cannot always use all effects on a background layer, so you may wish to start working directly with normal layers. To create a new layer, click the “Layer” menu, and pick “Layer” from the “New” menu (or click Shift+Ctrl+N). In the new window that pops up, click “OK.” Now look down in the bottom-right of the screen to the lower-most window, which we haven’t looked at yet. It will have three tabs on it: Layers, Channels, and Paths. We’ll be staying on the main “Layers” tab, for now. It should look something like this:
  • 5. Copyright © Rutgers Writing Program Contact Barclay Barrios (barclay.barrios@rutgers.edu) You will notice that “Layer 1” is above “Background” in the window. This means that anything that’s on Layer 1 will take priority over anything in the Background layer. Things in the Background layer will be obscured by things in Layer 1. Why would you want to do this? You can switch back and forth between layers to move items independently of items in other layers, allowing you to lay things out exactly as you want. So what are all these options in the layers window? 1. Paintbrush Symbol – This symbol (and the blue shading of the layer) notes the currently active layer 2. Show / Hide Layer – When the eye icon is visible, the layer is displayed in your project. If the eye is clicked, then the layer is hidden but not deleted. 3. Link Icon – Indicates if the layer is currently linked to another layer. When linked, layers act “locked” together (and will move with each other, accordingly), but still remain separate layers. Layers can be linked together by selecting one layer, and then clicking the boxes in the other layers to display the “Link” icon (number three on the above list and image). 4. Background – The Background is technically not a layer, however, it can be edited. It is the bottom-most portion of the image. 5. Layer – Each layer has its own name (default is by numbering). Click a layer’s name to edit on that layer. 6. Text Layer – Adding text creates a new text-specific layer.
  • 6. Copyright © Rutgers Writing Program Contact Barclay Barrios (barclay.barrios@rutgers.edu) 7. Effects – When you add effects to a layer, a sub-menu appears with that layer listing the effect applied to it. Double-click an effect’s name to bring up that effect’s menu to make adjustments. 8. Add a Layer Style – By picking an option from this menu (such as Drop Shadow, Inner Glow, or Bevel and Emboss), you can apply special effects to a layer. 9. Add a Mask – Masks are used to hide pixels on a layer in order to view the rest of the image. Layer masks are either a black or white background color. The default color is white, which lets pixels be seen, while black hides pixels. 10. Create a New Set – By making a new set, you can create a separate folder for layer storage. 11. Create New Fill or Adjustment Layer – The options in this menu allow you to change the color properties and dimensions of a layer. For example, you can make a layer lighter or darker, add a gradient (a blending of two colors), or invert the entire layer. 12. Create a New Layer – Clicking on this icon creates a new layer. You can name your layer in the text box that appears and position it in the palette. 13. Delete a Layer – Deletes the currently selected layer. You can also drag a layer to the trash. 14. Opacity – Use this to adjust a layer’s opacity (its transparency). Some notes about layers: • Layers can be repositioned in different orders in the Layers palette by clicking on a layer and dragging it to a new position in the palette. To make a layer appear on the top-most part of the image, drag it higher up on the list. Do the opposite to position a layer at the bottom-most area of an image. • Only a selected layer can be edited. To select a layer, click on the layer name in the palette. • You can only work with layers in a *.psd file (Photoshop’s native format). If you want to modify a *.gif or *.jpg file (or any other type of image file) with layers, copy and paste that image into a new, blank Photoshop canvas. Switching Back and Forth Between Layers The layer that’s selected under the “Layers” tab will be the one changes are made to when working on the canvas. If you wish to work on a different layer, click the name of that layer. Remember, if you want to bring a different layer to the front of the image, click and drag it above or below to where you want it.
  • 7. Copyright © Rutgers Writing Program Contact Barclay Barrios (barclay.barrios@rutgers.edu) Cropping an Image If an image is too large and you would like to cut it to just focus on one section of the image, you can “crop” it to that size and area. Select the “Crop” tool, and click and drag around the area you want. You can resize the area (or rotate it) with the mouse by clicking any of the corners. When you’re done, just click over to any other tool and a window will appear asking you if you’d like to crop the image. Click yes, and the image will be reduced to the area you’ve specified. Resizing an Image If you don’t want to crop your image (meaning you want the ENTIRE image, just at a smaller size), you can resize your image to any dimensions you wish. Select “Image Size” from the “Image” menu. The default in Photoshop is to keep image resizing at “Constrain Proportions.” This means that if the height is changed, the width will be changed at the same ratio. This keeps your image looking approximately the same, only at different sizes. If
  • 8. Copyright © Rutgers Writing Program Contact Barclay Barrios (barclay.barrios@rutgers.edu) you wish to change this, just un-click the “Constrain Proportions” check box at the bottom of the “Image Size” window. You can change the image size either by pixels or percentages. Use either you wish to either enlarge or reduce the size of your image (keep in mind that enlarging images will reduce the quality). Moving an Image You can move an image to any area of the canvas you wish. Select the “Move” tool, and click and drag the image to any area of the canvas you wish.
  • 9. Copyright © Rutgers Writing Program Contact Barclay Barrios (barclay.barrios@rutgers.edu) Selecting / Deleting a Part of an Image Choose the “Marquee” tool, and click and drag around a part of an image. A rotating, dotted line will surround that area. To delete this section that you’ve selected, hit the “Delete” key on your keyboard. The “Magic Wand” can select a larger area of an image by grabbing similar looking pixels and grouping them together. Select the Magic Wand tool and click an area of an image. It will select a large portion of the area which you can move, delete, etc. Adding Text Click the “Text” tool on the tool bar and click in your image where you’d like to add text.
  • 10. Copyright © Rutgers Writing Program Contact Barclay Barrios (barclay.barrios@rutgers.edu) The text will appear on top of the image, and it will be on its own new layer. You can change the font, style, size, anti-aliasing, and color of your text on the menu directly below the main Photoshop menu. Altering Your Images Photoshop’s most powerful aspect is its ability to edit and manipulate images easily and with professional quality. The second section of the tool menu contains tools that specifically help you to edit your images. When you click any of these tools, Photoshop’s sub-main menu will change to reflect new options available to you. Most will look something like this, or very similar: 1. Name – The name of the tool you’re using. 2. Brush Picker – Here you can select the diameter, hardness, and spacing of the brush / tool you are using. 3. Mode – Effect mode 4. Opacity – The transparency of the tool’s effects. 5. Flow – The flow rate of the stroke. 6. Airbrush – Click to enable airbrush capabilities with the tool. Brush / Pencil Tool The Brush tool can be right-clicked to also show the Pencil tool as an option. Both are very simple tools that allow you to directly draw on top of an image. Select a color with the Foreground Color option on the tool bar, and select a brush size from
  • 11. Copyright © Rutgers Writing Program Contact Barclay Barrios (barclay.barrios@rutgers.edu) the tool’s sub-main menu, above. Click and drag across an image to draw on top of it. Clone Tool The Clone tool will copy pixels from one part of an image and copy them to a new part of the image. The Clone tool is most useful in situations such as removing blemishes from a face in a photograph, clearing a few clouds out of a bright blue sky, etc. Choose the Clone tool. Hold the “Alt” button on your keyboard, and click in an area of the image that you’d like to copy. Now click elsewhere in the image, and move the cursor around. The image will “clone” itself to that second area.
  • 12. Copyright © Rutgers Writing Program Contact Barclay Barrios (barclay.barrios@rutgers.edu) Eraser Tool The eraser simply deletes sections of an image. Click the Eraser tool, and click and drag around your image. The eraser will “erase” the image to what’s set as the Background color. Gradient / Paint Bucket Tool The Gradient tool can be used on its own, or right-clicked to also select the Paint Bucket tool.
  • 13. Copyright © Rutgers Writing Program Contact Barclay Barrios (barclay.barrios@rutgers.edu) A gradient is a horizontal fading of colors, most commonly used in the creation of banners for web pages. Select the Gradient tool, and go to the sub-main menu for a drop-down of available gradients. The default is the most common. Once you’ve selected which gradient you wish (and a color in the Foreground color tool), just click and drag across your image. The direction you drag (left to right, right to left, etc.) determines the flow of the gradient. The Paint Bucket lets you fill in a large section with the same color. Select the Paint Bucket by right-clicking the Gradient tool, and click in an area of your image. It will fill with the color selected as the Foreground color.
  • 14. Copyright © Rutgers Writing Program Contact Barclay Barrios (barclay.barrios@rutgers.edu) Blur Tool The Blur tool is useful for covering up small distortions in an image by blending the surrounding pixels together. To blur something, select the Blur tool, and click and drag around the area you wish to blur. Rotating an Image You can rotate and flip your image in any direction you wish. In the “Rotate Canvas” list under the “Image” menu, there’s a wide variety of options to choose from.
  • 15. Copyright © Rutgers Writing Program Contact Barclay Barrios (barclay.barrios@rutgers.edu) If you select “Arbitrary” for a rotation, a new window will appear asking you for the direction (clockwise or counter-clockwise) and the degree of the rotation. Drawing Shapes While Photoshop’s main power is in manipulation of images, it’s also possible to draw your own (as seen with the pencil and pen tools). The Rectangle tool (and all of its sub-tools) allows you to draw shapes on a canvas. To draw a simple rectangle, pick a Foreground color (which will be the fill color for the shape), select the Rectangle tool, and click and drag on the canvas until it’s the size you wish. Note that drawing a shape will create a new layer. You can draw a wide variety of shapes with the Rectangle tool and its sub-tools, including the Custom Shape Tool, which gives you even more options. Select the Custom Shapes Tool (by right-clicking the Rectangle tool), and look through your options in the drop-down box from the sub-main menu.
  • 16. Copyright © Rutgers Writing Program Contact Barclay Barrios (barclay.barrios@rutgers.edu) Your choices include word bubbles, arrows, and even shapes that don’t fill themselves in with a color. Eyedropper Tool When working with images, you may find that you want to reselect a color you’ve used, but aren’t sure exactly what color it is. You can use the Eyedropper tool to reselect that exact color for you. Select the Eyedropper tool, and click anywhere on an image that has the color you want to select. The Foreground color will change itself to the color you’ve selected. Zoom Tool If you find that you need to zoom in or out of your image for any reason (for example, to be more precise in deleting areas), you can use the Zoom tool. Click the Zoom tool (it looks like a magnifying glass). If you click once on your image, it will zoom to double its size (100% to 200%, and so on).
  • 17. Copyright © Rutgers Writing Program Contact Barclay Barrios (barclay.barrios@rutgers.edu) If you right-click, you can select the “Zoom Out,” which will reduce its size. Note that this doesn’t actually change the size of the image. It simply changes your view of the image on the canvas. History One of Photoshop’s most powerful and useful abilities is the option to go back in the “history” of your image. This means that at any point, you can go back to a previous version of your image. This is particularly useful if you find you’ve made a mistake several steps back. You’ll notice that the History window (which can be opened via the “Windows” >> “History” menu if it’s not already open) lists all of the steps you’ve made in your image. To “go back” to any of these instances, just click the name of one of the steps, and your image will go back to how it previously looked at that point in time. Brightness & Contrast Sometimes when working with images, you may need to adjust the brightness and/or contrast (especially with scanned images). Photoshop makes this very easy. Select “Brightness/Contrast” from the “Adjustments” >> “Image” menu.
  • 18. Copyright © Rutgers Writing Program Contact Barclay Barrios (barclay.barrios@rutgers.edu) A new window will appear allowing you to slide the brightness and contrast any way you wish. The Brightness/Contrast command lets you make adjustments to the overall tonal range of an image. Adjustments made in here will affect every pixel in your image, unless a selection is made beforehand. Layer Styles You can do much more with layers other than piling images on top of each other. Once you have added images or text to a layer, you can add distinctive styles to them, making them stand out even more. Once you’ve added an item to a layer (such as text), click the “Add a layer style” button in the “Layers” window. A list of styles will appear which you can add to your layer.
  • 19. Copyright © Rutgers Writing Program Contact Barclay Barrios (barclay.barrios@rutgers.edu) The most common layer style you will see and use is the traditional “Drop Shadow.” Click “Drop Shadow” to bring up the “Layer Style” window, which will automatically open to the “Drop Shadow” section. “Opacity” refers to the transparency of the shadow (how well can you see it / see through it). The “Angle” is the angle at which the imaginary light is coming from to create the shadow. “Distance” is the amount of space near or away from the object or text the shadow appears. “Spread” refers to the thickness or solidity of the shadow. “Size” is, simply, how big the shadow is. Experiment with the different settings. You’ll notice that as you adjust these settings, your image on the canvas will take on the changes. This is just a preview; none of the changes will actually take effect until you click “OK.” There are a wide variety of layer styles. Experiment with the different layer styles to find one (or a combination of some) that suit your needs. For example, “Inner Glow” will create textures and colors within your text or objects, while “Outer Glow” will do the same outside your objects (similar to a Drop Shadow). Filters Photoshop has a wide variety of filters you can apply to your images. They include obvious ones such as blurring and sharpening, but also very advanced ones such as ripples, distortions, and rendering clouds. You can browse through the available filters by selecting the Filters menu.
  • 20. Copyright © Rutgers Writing Program Contact Barclay Barrios (barclay.barrios@rutgers.edu) Play around with the available filters, and remember that you can undo your actions at any time with the History window. Saving Images – PSD Format If you are working with a very complex image (lots of layers, filters, etc.), you may want to think about saving it. Saving as a PSD file (Photoshop’s native format) allows you to open it up again with all the layers and such intact. If you save it as another type of image, Photoshop will “flatten” the image. To save your image as a PSD, just select “Save” from the “File” menu, and select a place on your hard drive or disk to save it. Saving Images – For the Web On the Internet, there are two file types for images on websites that are the most predominant: GIF (*.gif) and JPEG (*.jpg). The GIF format is geared towards images that do not need to be viewed with a large amount of colors. The standard GIF file will be of 256 colors or less. This is perfect for the Internet, and more specifically, images that will appear directly on a web page. The JPEG format is geared toward images of a “real world” or “natural” sense, such as photographs. JPEG images are generally of thousands of colors or grayscale. JPEG can hold up to 16 million colors. High quality, larger images stored in a website’s “Image Gallery” may be saved as JPEGs. Photoshop comes with features specifically geared to optimize pictures for the web.
  • 21. Copyright © Rutgers Writing Program Contact Barclay Barrios (barclay.barrios@rutgers.edu) Select “Save for the Web” from the “File” menu. Saving as a GIF File Underneath “Settings,” select “GIF” from the drop-down menu. One of the most important features in this menu is the “Colors” setting. The more colors your image has, the more colors you should allow your GIF to have. However, since you want to create optimized images for the web, it is best to use as little possible color as possible, while still saving a clear image. If your image has very few colors, you should change the color setting to reflect the small number of colors. The small the number of colors, the small the file size the GIF will have. If you want, your image can have a solid outline color. You can choose this by going to the “Matte” selection, and picking a color. Other options in this menu need not be changed. These are standard defaults for saving GIFs. When you are ready, click “Save” and save the image by giving it a file name. Saving as a JPEG File Underneath “Settings,” select “JPEG” from the drop-down menu. Go to the drop- down menu with “JPEG High” displayed. There you can determine the quality of the image for the web. Naturally, higher quality images will have a larger file size. It is not necessary that images be extremely high quality. Usually, “Medium” is a good
  • 22. Copyright © Rutgers Writing Program Contact Barclay Barrios (barclay.barrios@rutgers.edu) setting to choose. To refine the quality of the image, use the “Quality” setting. Here, you can save the JPEG as a percentage of the original image’s quality. For example, 50% would be half the quality of the original image. When you are ready, click “Save” and save the image by giving it a file name.