SlideShare uma empresa Scribd logo
1 de 10
Baixar para ler offline
Complete Bike Assembly Instructions
These instructions are to be used as a guide only. Improperly installed parts may lead to severe injury or harm. We strongly recommend that
a properly trained bike mechanic handle all installations, adjustments and repairs on your bike. As always...Ride Safe!
Dans Competition LLC. 1-888-888-DANS (3267) www.danscomp.com
Page 1
Tools Needed
• Allen Wrenches
• Open End/Adjustable Wrench/Ratchet & Socket
• Wire Cutters
• Screwdriver
• Grease
• Air Pump
Note: Tools needed may vary.
Unpacking the Bike
• Open the box and remove ALL of the staples in the box
flaps so you do not scratch or cut yourself, rip clothes or
even scratch the bike.
• Remove the bike and the small parts box.
• Cut the zip ties that are holding the handlebars and the
front wheel in place.
• Remove all of the cardboard that is wrapped around the
tubes of the frame and fork.
Inspecting the Bike
• Inspect the bike and all of the included parts to make sure
there is no damage or missing parts.
Complete Bike Assembly Instructions
These instructions are to be used as a guide only. Improperly installed parts may lead to severe injury or harm. We strongly recommend that
a properly trained bike mechanic handle all installations, adjustments and repairs on your bike. As always...Ride Safe!
Dans Competition LLC. 1-888-888-DANS (3267) www.danscomp.com
Page 2
Locate and Record the Serial Number
• Look for a bunch of numbers stamped on the underneath
side of the bottom bracket shell. Serial numbers are
stamped into the frame before it is painted, so some or
all of the numbers may be hard to read.
• Write ALL of the numbers down in the Owners Manual or
on the Invoice that was included with the bike and put it
in a safe place. Danscomp does not record serial
numbers!
Note: Some bikes may have the serial number stamped in
one of the rear dropouts.
Installing the Handlebars
• Loosen the pinch bolts and turn the stem forward. Since
you will probably have to re-align the stem once the bike
is all together, do not tighten it back down yet, just snug
the bolts for now to keep the stem from spinning around
on the fork.
• Loosen and remove the clamping bolts holding the face
plate on the top or front of the stem.
• Apply a little grease to the threads of the bolts before
treading them back into the stem.
• Place the handlebars in the stem.
• Use the knurling (the rough area) on the handlebars to
help center them in the stem.
• Place the face plate back on and start threading the bolts
back into the stem body.
• As you are tightening the bolts, the gap between the face
plate and stem body need to be equal all the way
around.
• Looking from the side of the bike, align the handlebars to
run parallel with the forks.
Complete Bike Assembly Instructions
These instructions are to be used as a guide only. Improperly installed parts may lead to severe injury or harm. We strongly recommend that
a properly trained bike mechanic handle all installations, adjustments and repairs on your bike. As always...Ride Safe!
Dans Competition LLC. 1-888-888-DANS (3267) www.danscomp.com
Page 3
Tightening the Stem and Handlebars
• Tighten the stem bolts in an X or cross pattern.
• Be sure you do not over-tighten the bolts.
Note: Over-tightening the stem bolts can cause damage to
the stem and/or handlebars.
Loosen the Seat Post Clamp
• Loosen, but do not remove the seat post clamp bolt.
• Apply a thin layer of grease to the inside of the seat tube
or to the outside of the seat post.
Installing the Seat and Seat Post
• Insert the seat post into the frame.
• Slide it down until it is to the desired height.
• Make sure the Maximum Height Line on the post is
below the top of the seat tube, so that it is not visible.
Failure to do so will damage the seat tube and void the
manufacturer’s warranty.
For detailed instructions on other types of seat, Check out
our seat installs at danscomp.com/tech
Complete Bike Assembly Instructions
These instructions are to be used as a guide only. Improperly installed parts may lead to severe injury or harm. We strongly recommend that
a properly trained bike mechanic handle all installations, adjustments and repairs on your bike. As always...Ride Safe!
Dans Competition LLC. 1-888-888-DANS (3267) www.danscomp.com
Page 4
Aligning the Seat
• While standing over the bike, look down, align the nose
of the seat to run parallel with the top tube of the frame.
Tightening the Seat Post Clamp
• Grab the seat and try to turn it. If it turns, re-align it and
continue tightening the seat post clamp until it does not
turn anymore.
Note: Over-tightening the seat post clamp bolt can cause
damage to the seat post clamp and/or the bolt.
Installing the Left Pedal
• There is a L stamped into the end of the spindle.
• The Left pedal has Left hand threads or reversed threads
and will thread into the Left crank arm.
• Tighten by turning the wrench counter-clockwise.
Note: You will damage the threads in the crank arms if you
thread the wrong pedal into the wrong crank arm.
Complete Bike Assembly Instructions
These instructions are to be used as a guide only. Improperly installed parts may lead to severe injury or harm. We strongly recommend that
a properly trained bike mechanic handle all installations, adjustments and repairs on your bike. As always...Ride Safe!
Dans Competition LLC. 1-888-888-DANS (3267) www.danscomp.com
Page 5
Installing the Right Pedal
• There is a R stamped into the end of the spindle.
• The Right pedal has Right hand threads and will thread
into the Right crank arm.
• Tighten by turning the wrench clockwise.
Note: You will damage the threads in the crank arms if you
thread the wrong pedal into the wrong crank arm.
Tightening the Cranks
• 1). Using an allen wrench, check to make sure the
spindle bolts are tight.
• 2). If your crank arms have pinch bolts, you will need to
check them as well.
Adjusting the Chain
• With the bike upside down, spin the cranks.
• If it is hard to pedal, the chain is too tight. If it is easy to
pedal and the chain has a lot of slack, it is too loose.
• To adjust the chain tension, loosen the axle nuts.
• Pull the wheel towards the end of the dropout slots and
tighten the axle nuts a little, do not tighten completely.
• Check to make sure the wheel is centered in the frame
and then spin the cranks to make sure the chain has no
more than ½” of up and down movement.
• Tighten both axle nuts.
Complete Bike Assembly Instructions
These instructions are to be used as a guide only. Improperly installed parts may lead to severe injury or harm. We strongly recommend that
a properly trained bike mechanic handle all installations, adjustments and repairs on your bike. As always...Ride Safe!
Dans Competition LLC. 1-888-888-DANS (3267) www.danscomp.com
Page 6
Hooking up the Brake Cable
• Unthread the adjusting barrel on the brake lever a couple
turns. Align the slots in the adjusting barrel, the jam nut
and the lever.
• Insert the lead head on the brake cable into the hole in
the lever.
• Insert the cable into the slot in the adjusting barrel.
Thread the adjusting barrel all the way into the lever.
• Tighten the nut on the cable hanger.
• Cut the excess from the brake cable leaving
approximately 1” – 1 ½” for you to install a cable end.
• Lightly crimp the cable end using a pair of wire cutters.
Be careful not to apply too much pressure and cut
through the cable end.
• This will keep the end of the brake cable from fraying.
• Squeeze both brake arms until the brake pads are
against the sidewall of the rim. Make sure both ends of
the cable housing are inside the adjusting barrels in the
cable stop (located on the underneath side of the top
tube) and the brake lever. Insert the lead head of the
straddle cable into the slot on the brake arm.
Complete Bike Assembly Instructions
These instructions are to be used as a guide only. Improperly installed parts may lead to severe injury or harm. We strongly recommend that
a properly trained bike mechanic handle all installations, adjustments and repairs on your bike. As always...Ride Safe!
Dans Competition LLC. 1-888-888-DANS (3267) www.danscomp.com
Page 7
• Cut the excess from the straddle cable leaving
approximately 1” – 1 ½” for you to install a cable end.
• Lightly crimp the cable end using a pair of wire cutters.
Be careful not to apply too much pressure and cut
through the cable end.
• This will keep the end of the straddle cable from fraying.
Align the Brake Pads
• Loosen, but do not remove the nut on the brake pad.
• Align the brake pad so it runs parallel to the sidewall of
the rim.
Toe in the Brake Pads
• Adjust the front of the brake pads so they make contact
with the rim first, there should be approximately 1mm
gap on the other end. This will lessen the chance of rim
squeal and improve your braking.
Complete Bike Assembly Instructions
These instructions are to be used as a guide only. Improperly installed parts may lead to severe injury or harm. We strongly recommend that
a properly trained bike mechanic handle all installations, adjustments and repairs on your bike. As always...Ride Safe!
Dans Competition LLC. 1-888-888-DANS (3267) www.danscomp.com
Page 8
• Tighten the nuts securely. You can rearrange the
spherical washers for more space between the rim and
the brake pad.
Tip 1: File or sand the flat braking surface of the pads. This
will remove the hard, slick surface and will help improve
braking.
Tip 2: Spin your wheel to make sure the brake pad is NOT
making contact with your tire.
Adjust Spring Tension
• Squeeze the brake lever a few times to determine if the
brake feels too hard, too easy or just right.
• For more spring tension, push the wrench towards the
front of the bike (this will cause the brake pad to move
away from the rim).
• For less spring tension, pull the wrench towards the rear
of the bike (this will cause the brake pad to move closer
to the rim).
• For both brake pads to hit the rim at the same time, you
will need equal spring tension on both brake arms.
For more detailed instructions, Check out our brake installs
at danscomp.com/tech
Installing the Front Wheel
• Loosen the axle nuts and slide the axle into the dropouts
of the fork.
Note: Some front hubs require the fork legs to be spread
apart a little for the axle hardware to clear the inside of the
dropouts. This will not damage your forks!
Complete Bike Assembly Instructions
These instructions are to be used as a guide only. Improperly installed parts may lead to severe injury or harm. We strongly recommend that
a properly trained bike mechanic handle all installations, adjustments and repairs on your bike. As always...Ride Safe!
Dans Competition LLC. 1-888-888-DANS (3267) www.danscomp.com
Page 9
Installing the Safety Washers
• You will need to unthread the axle nuts completely off
both ends of the axle.
• Slide the safety washer over the axle.
• Thread the axle nuts back on.
Note: Safety washer type may vary.
Tightening Down the Front Wheel
• Thread both axle nuts onto the axle and tighten them
securely by hand.
• Take a wrench or a ratchet and socket and tighten the
axle nuts. As you are tightening the axle nuts, be sure to
align the tire with the center of the fork crown.
Adjusting the Headset and Aligning the Stem
• Spin the handlebars and stem to determine if the
headset needs to be adjusted.
• If so, you will need to loosen the pinch bolts on the back
of the stem. Tighten the compression bolt/cap if the
headset has play in it or loosen it if it is hard to turn. You
may need to spin the stem and handlebars a few times
until you have it adjusted.
Note: Do not over-tighten the compression bolt! You can
damage the fork and/or the headset bearings.
Complete Bike Assembly Instructions
These instructions are to be used as a guide only. Improperly installed parts may lead to severe injury or harm. We strongly recommend that
a properly trained bike mechanic handle all installations, adjustments and repairs on your bike. As always...Ride Safe!
Dans Competition LLC. 1-888-888-DANS (3267) www.danscomp.com
Page 10
• Looking down on the handlebars and stem, align the
stem with the front tire. The stem should be parallel to the
tire.
• Tighten both of the pinch bolts.
Inflating the Tires
• Locate the recommended air pressure on the sidewall of
both tires.
• Use an air pump or compressor to inflate the tire to the
recommended air pressure. Be sure to stop periodically
to check the pressure by using an air pressure gauge.
Note: Exceeding the tire manufacturer’s recommended air
pressure can damage the rim, tire or tube.
Many States require that bikes be equipped with reflectors...
don't say we didn't warn you!
Installing Reflectors and Chain Guard
• Install the clear reflector on the front of the bike.
• Install the red reflector on the rear of the bike.
• Install the reflectors in both wheels.
• Install the chain guard.
Note: Reflectors and chain guards may vary in size, type or
how they fit on the bike.

Mais conteĂşdo relacionado

Mais procurados

Wheel Alignment Service in West Jordan, Utah
Wheel Alignment Service in West Jordan, UtahWheel Alignment Service in West Jordan, Utah
Wheel Alignment Service in West Jordan, UtahAce Auto Repair
 
Wheel alignment;Alignment terminology
Wheel alignment;Alignment terminologyWheel alignment;Alignment terminology
Wheel alignment;Alignment terminologySam Thai Aladeen
 
How to build up a bike
How to build up a bikeHow to build up a bike
How to build up a bikeesatmantaylor
 
Otr Wheel Engineering - Wheel inspection program 2012
Otr Wheel Engineering - Wheel inspection program 2012Otr Wheel Engineering - Wheel inspection program 2012
Otr Wheel Engineering - Wheel inspection program 2012OTR Wheel Engineering, Inc
 
What are the Basic Benefits of Wheel Alignment
What are the Basic Benefits of Wheel AlignmentWhat are the Basic Benefits of Wheel Alignment
What are the Basic Benefits of Wheel AlignmentUltimate Bimmer Service
 
Design and Fabrication of Kids Bike
Design and Fabrication of Kids BikeDesign and Fabrication of Kids Bike
Design and Fabrication of Kids Bikeiosrjce
 
Alignment Settings Wheel Camber & Caster
Alignment Settings Wheel Camber & CasterAlignment Settings Wheel Camber & Caster
Alignment Settings Wheel Camber & CasterSam Thai Aladeen
 
Tires and wheels
Tires and wheelsTires and wheels
Tires and wheelsCraig Kielb
 
Wheel alignment
Wheel alignmentWheel alignment
Wheel alignmentAdams Harry
 
Wheel balancing and the performance of your car
Wheel balancing and the performance of your carWheel balancing and the performance of your car
Wheel balancing and the performance of your carAutobahn Tires
 
Wheels and tyres for automobile
Wheels and tyres for automobileWheels and tyres for automobile
Wheels and tyres for automobilesgrsoni45
 
Ch9 brakes v1
Ch9 brakes v1Ch9 brakes v1
Ch9 brakes v1_AXE_PM
 
WebXpress Tyre Management
WebXpress Tyre ManagementWebXpress Tyre Management
WebXpress Tyre ManagementWebXpress.IN
 
Wheels and tyres page 1
Wheels and tyres page 1Wheels and tyres page 1
Wheels and tyres page 1Rob Ansell
 

Mais procurados (19)

Wheel Alignment
Wheel AlignmentWheel Alignment
Wheel Alignment
 
Wheel Alignment Service in West Jordan, Utah
Wheel Alignment Service in West Jordan, UtahWheel Alignment Service in West Jordan, Utah
Wheel Alignment Service in West Jordan, Utah
 
Wheel alignment;Alignment terminology
Wheel alignment;Alignment terminologyWheel alignment;Alignment terminology
Wheel alignment;Alignment terminology
 
How to build up a bike
How to build up a bikeHow to build up a bike
How to build up a bike
 
Otr Wheel Engineering - Wheel inspection program 2012
Otr Wheel Engineering - Wheel inspection program 2012Otr Wheel Engineering - Wheel inspection program 2012
Otr Wheel Engineering - Wheel inspection program 2012
 
What are the Basic Benefits of Wheel Alignment
What are the Basic Benefits of Wheel AlignmentWhat are the Basic Benefits of Wheel Alignment
What are the Basic Benefits of Wheel Alignment
 
Design and Fabrication of Kids Bike
Design and Fabrication of Kids BikeDesign and Fabrication of Kids Bike
Design and Fabrication of Kids Bike
 
Alignment for car
Alignment for carAlignment for car
Alignment for car
 
Alignment Settings Wheel Camber & Caster
Alignment Settings Wheel Camber & CasterAlignment Settings Wheel Camber & Caster
Alignment Settings Wheel Camber & Caster
 
Tires and wheels
Tires and wheelsTires and wheels
Tires and wheels
 
Wheel alignment
Wheel alignmentWheel alignment
Wheel alignment
 
WHEEL ALIGNMENT & BALANCING
WHEEL ALIGNMENT & BALANCINGWHEEL ALIGNMENT & BALANCING
WHEEL ALIGNMENT & BALANCING
 
Wheel balancing and the performance of your car
Wheel balancing and the performance of your carWheel balancing and the performance of your car
Wheel balancing and the performance of your car
 
Wheels and tyres for automobile
Wheels and tyres for automobileWheels and tyres for automobile
Wheels and tyres for automobile
 
Ch9 brakes v1
Ch9 brakes v1Ch9 brakes v1
Ch9 brakes v1
 
Wheel Safety, Inspection, & Maintenance
Wheel Safety, Inspection, & MaintenanceWheel Safety, Inspection, & Maintenance
Wheel Safety, Inspection, & Maintenance
 
Tyre life 1.1
Tyre life 1.1Tyre life 1.1
Tyre life 1.1
 
WebXpress Tyre Management
WebXpress Tyre ManagementWebXpress Tyre Management
WebXpress Tyre Management
 
Wheels and tyres page 1
Wheels and tyres page 1Wheels and tyres page 1
Wheels and tyres page 1
 

Destaque

4G's watches presentation
4G's watches presentation4G's watches presentation
4G's watches presentationJhen19
 
Driving in-thailand.com test-eng1
Driving in-thailand.com test-eng1Driving in-thailand.com test-eng1
Driving in-thailand.com test-eng1andonis-artist
 
L entrepreneuriat-a-le-vent-en-poupe-01-02
L entrepreneuriat-a-le-vent-en-poupe-01-02L entrepreneuriat-a-le-vent-en-poupe-01-02
L entrepreneuriat-a-le-vent-en-poupe-01-02Bernard Darty
 
Presentation Pitch
Presentation PitchPresentation Pitch
Presentation PitchMichael-i
 
Carb Calculator
Carb CalculatorCarb Calculator
Carb Calculatorlafavezva
 
Motorcycle electrics jerry skene
Motorcycle electrics jerry skeneMotorcycle electrics jerry skene
Motorcycle electrics jerry skeneandonis-artist
 
Ffive Guys
Ffive GuysFfive Guys
Ffive Guyslafavezva
 
Evaluation question 3 2
Evaluation question 3 2Evaluation question 3 2
Evaluation question 3 2Michael-i
 
Ovarian Cyst Miracle Scam
Ovarian Cyst Miracle ScamOvarian Cyst Miracle Scam
Ovarian Cyst Miracle Scamlafavezva
 
Honda vfr 400 nc30 checklist buyer guide
Honda vfr 400 nc30 checklist buyer guideHonda vfr 400 nc30 checklist buyer guide
Honda vfr 400 nc30 checklist buyer guideandonis-artist
 
Cognitive Retrieval Model
Cognitive Retrieval ModelCognitive Retrieval Model
Cognitive Retrieval ModelFirdaus Rahaman
 
Shimano SL-4S35 cartridge 3 speed bicycle shifter
Shimano SL-4S35 cartridge 3 speed bicycle shifterShimano SL-4S35 cartridge 3 speed bicycle shifter
Shimano SL-4S35 cartridge 3 speed bicycle shifterandonis-artist
 
Apple's Live Event: In Pictures
Apple's Live Event: In PicturesApple's Live Event: In Pictures
Apple's Live Event: In PicturesLinkedIn
 
Citizen promaster sky pmv65 2271 instruction manual
Citizen promaster sky pmv65 2271 instruction manualCitizen promaster sky pmv65 2271 instruction manual
Citizen promaster sky pmv65 2271 instruction manualandonis-artist
 
Apple Watch - Detail study and analysis
Apple Watch - Detail study and analysisApple Watch - Detail study and analysis
Apple Watch - Detail study and analysisSameer Mathur
 

Destaque (17)

Pjes 1
Pjes 1Pjes 1
Pjes 1
 
4G's watches presentation
4G's watches presentation4G's watches presentation
4G's watches presentation
 
Driving in-thailand.com test-eng1
Driving in-thailand.com test-eng1Driving in-thailand.com test-eng1
Driving in-thailand.com test-eng1
 
L entrepreneuriat-a-le-vent-en-poupe-01-02
L entrepreneuriat-a-le-vent-en-poupe-01-02L entrepreneuriat-a-le-vent-en-poupe-01-02
L entrepreneuriat-a-le-vent-en-poupe-01-02
 
Presentation Pitch
Presentation PitchPresentation Pitch
Presentation Pitch
 
Carb Calculator
Carb CalculatorCarb Calculator
Carb Calculator
 
Motorcycle electrics jerry skene
Motorcycle electrics jerry skeneMotorcycle electrics jerry skene
Motorcycle electrics jerry skene
 
Ffive Guys
Ffive GuysFfive Guys
Ffive Guys
 
Pdhpe
PdhpePdhpe
Pdhpe
 
Evaluation question 3 2
Evaluation question 3 2Evaluation question 3 2
Evaluation question 3 2
 
Ovarian Cyst Miracle Scam
Ovarian Cyst Miracle ScamOvarian Cyst Miracle Scam
Ovarian Cyst Miracle Scam
 
Honda vfr 400 nc30 checklist buyer guide
Honda vfr 400 nc30 checklist buyer guideHonda vfr 400 nc30 checklist buyer guide
Honda vfr 400 nc30 checklist buyer guide
 
Cognitive Retrieval Model
Cognitive Retrieval ModelCognitive Retrieval Model
Cognitive Retrieval Model
 
Shimano SL-4S35 cartridge 3 speed bicycle shifter
Shimano SL-4S35 cartridge 3 speed bicycle shifterShimano SL-4S35 cartridge 3 speed bicycle shifter
Shimano SL-4S35 cartridge 3 speed bicycle shifter
 
Apple's Live Event: In Pictures
Apple's Live Event: In PicturesApple's Live Event: In Pictures
Apple's Live Event: In Pictures
 
Citizen promaster sky pmv65 2271 instruction manual
Citizen promaster sky pmv65 2271 instruction manualCitizen promaster sky pmv65 2271 instruction manual
Citizen promaster sky pmv65 2271 instruction manual
 
Apple Watch - Detail study and analysis
Apple Watch - Detail study and analysisApple Watch - Detail study and analysis
Apple Watch - Detail study and analysis
 

Semelhante a Complete bicyle assembly

2006 ball bearing disc brake
2006 ball bearing disc brake2006 ball bearing disc brake
2006 ball bearing disc brakeAKILIPSI
 
Quick visual guide to basic brompton maintenance
Quick visual guide to basic brompton maintenanceQuick visual guide to basic brompton maintenance
Quick visual guide to basic brompton maintenanceWoon Taiwoon
 
Bike maintainance level 1
Bike maintainance level 1Bike maintainance level 1
Bike maintainance level 1Zulhikmi Zali
 
How to training series - changing a tire on the roadside
How to training series - changing a tire on the roadsideHow to training series - changing a tire on the roadside
How to training series - changing a tire on the roadsideSylvia Kay
 
Jonsered 2041 chainsaw service repair manual
Jonsered 2041 chainsaw service repair manualJonsered 2041 chainsaw service repair manual
Jonsered 2041 chainsaw service repair manualfujsjfjskekemmem
 
Jonsered 2077 chainsaw service repair manual
Jonsered 2077 chainsaw service repair manualJonsered 2077 chainsaw service repair manual
Jonsered 2077 chainsaw service repair manualfusjejfjskekemm
 
Jonsered 630 chainsaw service repair manual
Jonsered 630 chainsaw service repair manualJonsered 630 chainsaw service repair manual
Jonsered 630 chainsaw service repair manualfusjejfjsekfkem
 
Jonsered 2055 chainsaw service repair manual
Jonsered 2055 chainsaw service repair manualJonsered 2055 chainsaw service repair manual
Jonsered 2055 chainsaw service repair manualfujsjefjkskekfm
 
Jonsered 2050 chainsaw service repair manual
Jonsered 2050 chainsaw service repair manualJonsered 2050 chainsaw service repair manual
Jonsered 2050 chainsaw service repair manualufjjjdfjkksekmme
 
Jonsered 2050 chainsaw service repair manual
Jonsered 2050 chainsaw service repair manualJonsered 2050 chainsaw service repair manual
Jonsered 2050 chainsaw service repair manualfusjejfjsekfkem
 
Jonsered 2036 chainsaw service repair manual
Jonsered 2036 chainsaw service repair manualJonsered 2036 chainsaw service repair manual
Jonsered 2036 chainsaw service repair manualfujsjefjkskekfm
 
Jonsered 2083 chainsaw service repair manual
Jonsered 2083 chainsaw service repair manualJonsered 2083 chainsaw service repair manual
Jonsered 2083 chainsaw service repair manualfujsjfjskekemmem
 
Jonsered 2040 chainsaw service repair manual
Jonsered 2040 chainsaw service repair manualJonsered 2040 chainsaw service repair manual
Jonsered 2040 chainsaw service repair manualfusjejfjskekemm
 
Jonsered 2095 chainsaw service repair manual
Jonsered 2095 chainsaw service repair manualJonsered 2095 chainsaw service repair manual
Jonsered 2095 chainsaw service repair manualfjjsfkskemem
 
Chap75
Chap75Chap75
Chap75mcfalltj
 

Semelhante a Complete bicyle assembly (20)

2006 ball bearing disc brake
2006 ball bearing disc brake2006 ball bearing disc brake
2006 ball bearing disc brake
 
Bike manual
Bike manualBike manual
Bike manual
 
Quick visual guide to basic brompton maintenance
Quick visual guide to basic brompton maintenanceQuick visual guide to basic brompton maintenance
Quick visual guide to basic brompton maintenance
 
Drum brakes
Drum brakesDrum brakes
Drum brakes
 
Changing Motorcycle Tires: A DIY Guide
 Changing Motorcycle Tires: A DIY Guide Changing Motorcycle Tires: A DIY Guide
Changing Motorcycle Tires: A DIY Guide
 
Bike maintainance level 1
Bike maintainance level 1Bike maintainance level 1
Bike maintainance level 1
 
How to training series - changing a tire on the roadside
How to training series - changing a tire on the roadsideHow to training series - changing a tire on the roadside
How to training series - changing a tire on the roadside
 
Jonsered 2041 chainsaw service repair manual
Jonsered 2041 chainsaw service repair manualJonsered 2041 chainsaw service repair manual
Jonsered 2041 chainsaw service repair manual
 
Jonsered 2077 chainsaw service repair manual
Jonsered 2077 chainsaw service repair manualJonsered 2077 chainsaw service repair manual
Jonsered 2077 chainsaw service repair manual
 
Jonsered 630 chainsaw service repair manual
Jonsered 630 chainsaw service repair manualJonsered 630 chainsaw service repair manual
Jonsered 630 chainsaw service repair manual
 
Jonsered 2055 chainsaw service repair manual
Jonsered 2055 chainsaw service repair manualJonsered 2055 chainsaw service repair manual
Jonsered 2055 chainsaw service repair manual
 
Jonsered 2050 chainsaw service repair manual
Jonsered 2050 chainsaw service repair manualJonsered 2050 chainsaw service repair manual
Jonsered 2050 chainsaw service repair manual
 
Jonsered 2050 chainsaw service repair manual
Jonsered 2050 chainsaw service repair manualJonsered 2050 chainsaw service repair manual
Jonsered 2050 chainsaw service repair manual
 
Jonsered 2036 chainsaw service repair manual
Jonsered 2036 chainsaw service repair manualJonsered 2036 chainsaw service repair manual
Jonsered 2036 chainsaw service repair manual
 
Jonsered 2083 chainsaw service repair manual
Jonsered 2083 chainsaw service repair manualJonsered 2083 chainsaw service repair manual
Jonsered 2083 chainsaw service repair manual
 
Jonsered 2040 chainsaw service repair manual
Jonsered 2040 chainsaw service repair manualJonsered 2040 chainsaw service repair manual
Jonsered 2040 chainsaw service repair manual
 
Jonsered 2095 chainsaw service repair manual
Jonsered 2095 chainsaw service repair manualJonsered 2095 chainsaw service repair manual
Jonsered 2095 chainsaw service repair manual
 
Go kart
Go  kartGo  kart
Go kart
 
Chap75
Chap75Chap75
Chap75
 
OSHA 3421.pdf
OSHA 3421.pdfOSHA 3421.pdf
OSHA 3421.pdf
 

Mais de andonis-artist

OM-BRIVIS-SP4-SP5-SP6-BX5-CC3-2PWN-BX3-ISSUE-A-MARCH-2020 gas heater manual i...
OM-BRIVIS-SP4-SP5-SP6-BX5-CC3-2PWN-BX3-ISSUE-A-MARCH-2020 gas heater manual i...OM-BRIVIS-SP4-SP5-SP6-BX5-CC3-2PWN-BX3-ISSUE-A-MARCH-2020 gas heater manual i...
OM-BRIVIS-SP4-SP5-SP6-BX5-CC3-2PWN-BX3-ISSUE-A-MARCH-2020 gas heater manual i...andonis-artist
 
Miele hub 5000 oven user guide manual english
Miele hub 5000 oven user guide manual englishMiele hub 5000 oven user guide manual english
Miele hub 5000 oven user guide manual englishandonis-artist
 
netgear-WN2500G_IG_6Nov2012 manual english
netgear-WN2500G_IG_6Nov2012 manual englishnetgear-WN2500G_IG_6Nov2012 manual english
netgear-WN2500G_IG_6Nov2012 manual englishandonis-artist
 
pfaff sewing machine 132 manual ENglish language
pfaff sewing machine 132 manual ENglish languagepfaff sewing machine 132 manual ENglish language
pfaff sewing machine 132 manual ENglish languageandonis-artist
 
Pfaff_sewing machine 138-139-manual-ES-DE-FR-ES.
Pfaff_sewing machine 138-139-manual-ES-DE-FR-ES.Pfaff_sewing machine 138-139-manual-ES-DE-FR-ES.
Pfaff_sewing machine 138-139-manual-ES-DE-FR-ES.andonis-artist
 
Canon powershot G7X III camera manual
Canon powershot G7X III camera manualCanon powershot G7X III camera manual
Canon powershot G7X III camera manualandonis-artist
 
Casio gshock gx56bb1 manual
Casio gshock gx56bb1 manualCasio gshock gx56bb1 manual
Casio gshock gx56bb1 manualandonis-artist
 
Ducati 848-evo-2011-owners-manual
Ducati 848-evo-2011-owners-manualDucati 848-evo-2011-owners-manual
Ducati 848-evo-2011-owners-manualandonis-artist
 
Anthony Coundouris Introspection 2013-16
Anthony Coundouris Introspection 2013-16Anthony Coundouris Introspection 2013-16
Anthony Coundouris Introspection 2013-16andonis-artist
 
Honda Vfr400 r nc30 model info
Honda Vfr400 r nc30 model infoHonda Vfr400 r nc30 model info
Honda Vfr400 r nc30 model infoandonis-artist
 
YoloPay corporate rebrand
YoloPay corporate rebrandYoloPay corporate rebrand
YoloPay corporate rebrandandonis-artist
 
Sport Motorcycle Riding Techniques
Sport Motorcycle Riding TechniquesSport Motorcycle Riding Techniques
Sport Motorcycle Riding Techniquesandonis-artist
 
Honda vfr400 nc30 vfr 400 rr carburetor needle diagrams
Honda vfr400 nc30 vfr 400 rr carburetor needle diagramsHonda vfr400 nc30 vfr 400 rr carburetor needle diagrams
Honda vfr400 nc30 vfr 400 rr carburetor needle diagramsandonis-artist
 
Honda VFR 400 nc30 parts manual
Honda VFR 400 nc30 parts manualHonda VFR 400 nc30 parts manual
Honda VFR 400 nc30 parts manualandonis-artist
 
Honda VFR400 nc30 service manual
Honda VFR400 nc30  service manualHonda VFR400 nc30  service manual
Honda VFR400 nc30 service manualandonis-artist
 
Templates for soft toys
Templates for soft toysTemplates for soft toys
Templates for soft toysandonis-artist
 
2007 owner manual honda cbr600rr
2007 owner manual honda cbr600rr2007 owner manual honda cbr600rr
2007 owner manual honda cbr600rrandonis-artist
 
2012 owner manual honda cbr600rr
2012 owner manual honda cbr600rr2012 owner manual honda cbr600rr
2012 owner manual honda cbr600rrandonis-artist
 
Driving in-thailand.com test-eng3
Driving in-thailand.com test-eng3Driving in-thailand.com test-eng3
Driving in-thailand.com test-eng3andonis-artist
 
Driving in-thailand.com test-eng2
Driving in-thailand.com test-eng2Driving in-thailand.com test-eng2
Driving in-thailand.com test-eng2andonis-artist
 

Mais de andonis-artist (20)

OM-BRIVIS-SP4-SP5-SP6-BX5-CC3-2PWN-BX3-ISSUE-A-MARCH-2020 gas heater manual i...
OM-BRIVIS-SP4-SP5-SP6-BX5-CC3-2PWN-BX3-ISSUE-A-MARCH-2020 gas heater manual i...OM-BRIVIS-SP4-SP5-SP6-BX5-CC3-2PWN-BX3-ISSUE-A-MARCH-2020 gas heater manual i...
OM-BRIVIS-SP4-SP5-SP6-BX5-CC3-2PWN-BX3-ISSUE-A-MARCH-2020 gas heater manual i...
 
Miele hub 5000 oven user guide manual english
Miele hub 5000 oven user guide manual englishMiele hub 5000 oven user guide manual english
Miele hub 5000 oven user guide manual english
 
netgear-WN2500G_IG_6Nov2012 manual english
netgear-WN2500G_IG_6Nov2012 manual englishnetgear-WN2500G_IG_6Nov2012 manual english
netgear-WN2500G_IG_6Nov2012 manual english
 
pfaff sewing machine 132 manual ENglish language
pfaff sewing machine 132 manual ENglish languagepfaff sewing machine 132 manual ENglish language
pfaff sewing machine 132 manual ENglish language
 
Pfaff_sewing machine 138-139-manual-ES-DE-FR-ES.
Pfaff_sewing machine 138-139-manual-ES-DE-FR-ES.Pfaff_sewing machine 138-139-manual-ES-DE-FR-ES.
Pfaff_sewing machine 138-139-manual-ES-DE-FR-ES.
 
Canon powershot G7X III camera manual
Canon powershot G7X III camera manualCanon powershot G7X III camera manual
Canon powershot G7X III camera manual
 
Casio gshock gx56bb1 manual
Casio gshock gx56bb1 manualCasio gshock gx56bb1 manual
Casio gshock gx56bb1 manual
 
Ducati 848-evo-2011-owners-manual
Ducati 848-evo-2011-owners-manualDucati 848-evo-2011-owners-manual
Ducati 848-evo-2011-owners-manual
 
Anthony Coundouris Introspection 2013-16
Anthony Coundouris Introspection 2013-16Anthony Coundouris Introspection 2013-16
Anthony Coundouris Introspection 2013-16
 
Honda Vfr400 r nc30 model info
Honda Vfr400 r nc30 model infoHonda Vfr400 r nc30 model info
Honda Vfr400 r nc30 model info
 
YoloPay corporate rebrand
YoloPay corporate rebrandYoloPay corporate rebrand
YoloPay corporate rebrand
 
Sport Motorcycle Riding Techniques
Sport Motorcycle Riding TechniquesSport Motorcycle Riding Techniques
Sport Motorcycle Riding Techniques
 
Honda vfr400 nc30 vfr 400 rr carburetor needle diagrams
Honda vfr400 nc30 vfr 400 rr carburetor needle diagramsHonda vfr400 nc30 vfr 400 rr carburetor needle diagrams
Honda vfr400 nc30 vfr 400 rr carburetor needle diagrams
 
Honda VFR 400 nc30 parts manual
Honda VFR 400 nc30 parts manualHonda VFR 400 nc30 parts manual
Honda VFR 400 nc30 parts manual
 
Honda VFR400 nc30 service manual
Honda VFR400 nc30  service manualHonda VFR400 nc30  service manual
Honda VFR400 nc30 service manual
 
Templates for soft toys
Templates for soft toysTemplates for soft toys
Templates for soft toys
 
2007 owner manual honda cbr600rr
2007 owner manual honda cbr600rr2007 owner manual honda cbr600rr
2007 owner manual honda cbr600rr
 
2012 owner manual honda cbr600rr
2012 owner manual honda cbr600rr2012 owner manual honda cbr600rr
2012 owner manual honda cbr600rr
 
Driving in-thailand.com test-eng3
Driving in-thailand.com test-eng3Driving in-thailand.com test-eng3
Driving in-thailand.com test-eng3
 
Driving in-thailand.com test-eng2
Driving in-thailand.com test-eng2Driving in-thailand.com test-eng2
Driving in-thailand.com test-eng2
 

Último

VIP 💞🌷Call Girls In Karnal 08168329307 Escorts Service Nilokheri Call Girls
VIP 💞🌷Call Girls In Karnal 08168329307 Escorts Service Nilokheri Call GirlsVIP 💞🌷Call Girls In Karnal 08168329307 Escorts Service Nilokheri Call Girls
VIP 💞🌷Call Girls In Karnal 08168329307 Escorts Service Nilokheri Call GirlsApsara Of India
 
9892124323 - Book Call Girls in Andheri and escort services 9892124323
9892124323 - Book Call Girls in Andheri and escort services 98921243239892124323 - Book Call Girls in Andheri and escort services 9892124323
9892124323 - Book Call Girls in Andheri and escort services 9892124323Pooja Nehwal
 
💞Sexy Call Girls In Ambala 08168329307 Shahabad Call Girls Escort Service
💞Sexy Call Girls In Ambala 08168329307 Shahabad Call Girls Escort Service💞Sexy Call Girls In Ambala 08168329307 Shahabad Call Girls Escort Service
💞Sexy Call Girls In Ambala 08168329307 Shahabad Call Girls Escort ServiceApsara Of India
 
Call Girls in civil lines Delhi 8264348440 ✅ call girls ❤️
Call Girls in civil lines Delhi 8264348440 ✅ call girls ❤️Call Girls in civil lines Delhi 8264348440 ✅ call girls ❤️
Call Girls in civil lines Delhi 8264348440 ✅ call girls ❤️soniya singh
 
"Maximizing your savings:The power of financial planning".pptx
"Maximizing your savings:The power of financial planning".pptx"Maximizing your savings:The power of financial planning".pptx
"Maximizing your savings:The power of financial planning".pptxsadiisadiimano
 
Hi Profile Escorts In Udaipur 09602870969 Call Girls in Sobaghpura Bhopalpura
Hi Profile Escorts In Udaipur 09602870969 Call Girls in Sobaghpura BhopalpuraHi Profile Escorts In Udaipur 09602870969 Call Girls in Sobaghpura Bhopalpura
Hi Profile Escorts In Udaipur 09602870969 Call Girls in Sobaghpura BhopalpuraApsara Of India
 
A TO Z INDIA Monthly Magazine - MAY 2024
A TO Z INDIA Monthly Magazine - MAY 2024A TO Z INDIA Monthly Magazine - MAY 2024
A TO Z INDIA Monthly Magazine - MAY 2024Indira Srivatsa
 
Jumeirah Call Girls Dubai Concupis O528786472 Dubai Call Girls In Bur Dubai N...
Jumeirah Call Girls Dubai Concupis O528786472 Dubai Call Girls In Bur Dubai N...Jumeirah Call Girls Dubai Concupis O528786472 Dubai Call Girls In Bur Dubai N...
Jumeirah Call Girls Dubai Concupis O528786472 Dubai Call Girls In Bur Dubai N...hf8803863
 
Dubai Call Girls Phone O525547819 Take+ Call Girls Dubai=
Dubai Call Girls Phone O525547819 Take+ Call Girls Dubai=Dubai Call Girls Phone O525547819 Take+ Call Girls Dubai=
Dubai Call Girls Phone O525547819 Take+ Call Girls Dubai=kojalkojal131
 
Fun Call Girls In Yamunanagar 08168329307 Jagadhri Escort Services
Fun Call Girls In Yamunanagar 08168329307 Jagadhri Escort ServicesFun Call Girls In Yamunanagar 08168329307 Jagadhri Escort Services
Fun Call Girls In Yamunanagar 08168329307 Jagadhri Escort ServicesApsara Of India
 
Call Girls In Panipat 08860008073 ✨Top Call Girl Service Panipat Escorts
Call Girls In Panipat 08860008073 ✨Top Call Girl Service Panipat EscortsCall Girls In Panipat 08860008073 ✨Top Call Girl Service Panipat Escorts
Call Girls In Panipat 08860008073 ✨Top Call Girl Service Panipat EscortsApsara Of India
 
Mumbai Call Girls Malad West WhatsApp 9892124323 Full Night Enjoy -
Mumbai Call Girls Malad West WhatsApp 9892124323 Full Night Enjoy -Mumbai Call Girls Malad West WhatsApp 9892124323 Full Night Enjoy -
Mumbai Call Girls Malad West WhatsApp 9892124323 Full Night Enjoy -Pooja Nehwal
 
Call Girls In Karol Bagh__ 8448079011 Escort Service in Delhi
Call Girls In Karol Bagh__ 8448079011 Escort Service in DelhiCall Girls In Karol Bagh__ 8448079011 Escort Service in Delhi
Call Girls In Karol Bagh__ 8448079011 Escort Service in DelhiRaviSingh594208
 
💞ROYAL💞 UDAIPUR ESCORTS Call 09602870969 CaLL GiRLS in UdAiPuR EsCoRt SeRvIcE💞
💞ROYAL💞 UDAIPUR ESCORTS Call 09602870969 CaLL GiRLS in UdAiPuR EsCoRt SeRvIcE💞💞ROYAL💞 UDAIPUR ESCORTS Call 09602870969 CaLL GiRLS in UdAiPuR EsCoRt SeRvIcE💞
💞ROYAL💞 UDAIPUR ESCORTS Call 09602870969 CaLL GiRLS in UdAiPuR EsCoRt SeRvIcE💞Apsara Of India
 
Top 10 Makeup Brands in India for women
Top 10  Makeup Brands in India for womenTop 10  Makeup Brands in India for women
Top 10 Makeup Brands in India for womenAkshitaBhatt19
 
Dubai Call Girls O528786472 Call Girls Dubai OL
Dubai Call Girls O528786472 Call Girls Dubai OLDubai Call Girls O528786472 Call Girls Dubai OL
Dubai Call Girls O528786472 Call Girls Dubai OLhf8803863
 
Call Now ☎ 8264348440 !! Call Girls in Govindpuri Escort Service Delhi N.C.R.
Call Now ☎ 8264348440 !! Call Girls in Govindpuri Escort Service Delhi N.C.R.Call Now ☎ 8264348440 !! Call Girls in Govindpuri Escort Service Delhi N.C.R.
Call Now ☎ 8264348440 !! Call Girls in Govindpuri Escort Service Delhi N.C.R.soniya singh
 

Último (20)

VIP 💞🌷Call Girls In Karnal 08168329307 Escorts Service Nilokheri Call Girls
VIP 💞🌷Call Girls In Karnal 08168329307 Escorts Service Nilokheri Call GirlsVIP 💞🌷Call Girls In Karnal 08168329307 Escorts Service Nilokheri Call Girls
VIP 💞🌷Call Girls In Karnal 08168329307 Escorts Service Nilokheri Call Girls
 
9892124323 - Book Call Girls in Andheri and escort services 9892124323
9892124323 - Book Call Girls in Andheri and escort services 98921243239892124323 - Book Call Girls in Andheri and escort services 9892124323
9892124323 - Book Call Girls in Andheri and escort services 9892124323
 
💞Sexy Call Girls In Ambala 08168329307 Shahabad Call Girls Escort Service
💞Sexy Call Girls In Ambala 08168329307 Shahabad Call Girls Escort Service💞Sexy Call Girls In Ambala 08168329307 Shahabad Call Girls Escort Service
💞Sexy Call Girls In Ambala 08168329307 Shahabad Call Girls Escort Service
 
Call Girls in civil lines Delhi 8264348440 ✅ call girls ❤️
Call Girls in civil lines Delhi 8264348440 ✅ call girls ❤️Call Girls in civil lines Delhi 8264348440 ✅ call girls ❤️
Call Girls in civil lines Delhi 8264348440 ✅ call girls ❤️
 
"Maximizing your savings:The power of financial planning".pptx
"Maximizing your savings:The power of financial planning".pptx"Maximizing your savings:The power of financial planning".pptx
"Maximizing your savings:The power of financial planning".pptx
 
Hi Profile Escorts In Udaipur 09602870969 Call Girls in Sobaghpura Bhopalpura
Hi Profile Escorts In Udaipur 09602870969 Call Girls in Sobaghpura BhopalpuraHi Profile Escorts In Udaipur 09602870969 Call Girls in Sobaghpura Bhopalpura
Hi Profile Escorts In Udaipur 09602870969 Call Girls in Sobaghpura Bhopalpura
 
A TO Z INDIA Monthly Magazine - MAY 2024
A TO Z INDIA Monthly Magazine - MAY 2024A TO Z INDIA Monthly Magazine - MAY 2024
A TO Z INDIA Monthly Magazine - MAY 2024
 
Jumeirah Call Girls Dubai Concupis O528786472 Dubai Call Girls In Bur Dubai N...
Jumeirah Call Girls Dubai Concupis O528786472 Dubai Call Girls In Bur Dubai N...Jumeirah Call Girls Dubai Concupis O528786472 Dubai Call Girls In Bur Dubai N...
Jumeirah Call Girls Dubai Concupis O528786472 Dubai Call Girls In Bur Dubai N...
 
Dubai Call Girls Phone O525547819 Take+ Call Girls Dubai=
Dubai Call Girls Phone O525547819 Take+ Call Girls Dubai=Dubai Call Girls Phone O525547819 Take+ Call Girls Dubai=
Dubai Call Girls Phone O525547819 Take+ Call Girls Dubai=
 
Fun Call Girls In Yamunanagar 08168329307 Jagadhri Escort Services
Fun Call Girls In Yamunanagar 08168329307 Jagadhri Escort ServicesFun Call Girls In Yamunanagar 08168329307 Jagadhri Escort Services
Fun Call Girls In Yamunanagar 08168329307 Jagadhri Escort Services
 
Call Girls In Panipat 08860008073 ✨Top Call Girl Service Panipat Escorts
Call Girls In Panipat 08860008073 ✨Top Call Girl Service Panipat EscortsCall Girls In Panipat 08860008073 ✨Top Call Girl Service Panipat Escorts
Call Girls In Panipat 08860008073 ✨Top Call Girl Service Panipat Escorts
 
Mumbai Call Girls Malad West WhatsApp 9892124323 Full Night Enjoy -
Mumbai Call Girls Malad West WhatsApp 9892124323 Full Night Enjoy -Mumbai Call Girls Malad West WhatsApp 9892124323 Full Night Enjoy -
Mumbai Call Girls Malad West WhatsApp 9892124323 Full Night Enjoy -
 
Rohini Sector 9 Call Girls Delhi 9999965857 @Sabina Saikh No Advance
Rohini Sector 9 Call Girls Delhi 9999965857 @Sabina Saikh No AdvanceRohini Sector 9 Call Girls Delhi 9999965857 @Sabina Saikh No Advance
Rohini Sector 9 Call Girls Delhi 9999965857 @Sabina Saikh No Advance
 
Hauz Khas Call Girls Delhi ✌️Independent Escort Service 💕 Hot Model's 9999965857
Hauz Khas Call Girls Delhi ✌️Independent Escort Service 💕 Hot Model's 9999965857Hauz Khas Call Girls Delhi ✌️Independent Escort Service 💕 Hot Model's 9999965857
Hauz Khas Call Girls Delhi ✌️Independent Escort Service 💕 Hot Model's 9999965857
 
Call Girls In Karol Bagh__ 8448079011 Escort Service in Delhi
Call Girls In Karol Bagh__ 8448079011 Escort Service in DelhiCall Girls In Karol Bagh__ 8448079011 Escort Service in Delhi
Call Girls In Karol Bagh__ 8448079011 Escort Service in Delhi
 
💞ROYAL💞 UDAIPUR ESCORTS Call 09602870969 CaLL GiRLS in UdAiPuR EsCoRt SeRvIcE💞
💞ROYAL💞 UDAIPUR ESCORTS Call 09602870969 CaLL GiRLS in UdAiPuR EsCoRt SeRvIcE💞💞ROYAL💞 UDAIPUR ESCORTS Call 09602870969 CaLL GiRLS in UdAiPuR EsCoRt SeRvIcE💞
💞ROYAL💞 UDAIPUR ESCORTS Call 09602870969 CaLL GiRLS in UdAiPuR EsCoRt SeRvIcE💞
 
Top 10 Makeup Brands in India for women
Top 10  Makeup Brands in India for womenTop 10  Makeup Brands in India for women
Top 10 Makeup Brands in India for women
 
Dubai Call Girls O528786472 Call Girls Dubai OL
Dubai Call Girls O528786472 Call Girls Dubai OLDubai Call Girls O528786472 Call Girls Dubai OL
Dubai Call Girls O528786472 Call Girls Dubai OL
 
Call Now ☎ 8264348440 !! Call Girls in Govindpuri Escort Service Delhi N.C.R.
Call Now ☎ 8264348440 !! Call Girls in Govindpuri Escort Service Delhi N.C.R.Call Now ☎ 8264348440 !! Call Girls in Govindpuri Escort Service Delhi N.C.R.
Call Now ☎ 8264348440 !! Call Girls in Govindpuri Escort Service Delhi N.C.R.
 
Rohini Sector 24 Call Girls Delhi 9999965857 @Sabina Saikh No Advance
Rohini Sector 24 Call Girls Delhi 9999965857 @Sabina Saikh No AdvanceRohini Sector 24 Call Girls Delhi 9999965857 @Sabina Saikh No Advance
Rohini Sector 24 Call Girls Delhi 9999965857 @Sabina Saikh No Advance
 

Complete bicyle assembly

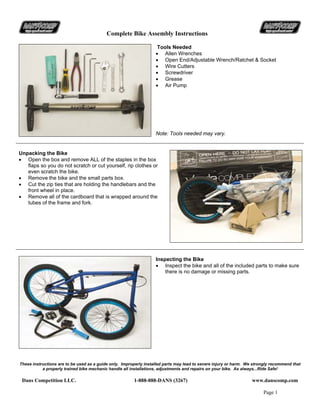
  • 1. Complete Bike Assembly Instructions These instructions are to be used as a guide only. Improperly installed parts may lead to severe injury or harm. We strongly recommend that a properly trained bike mechanic handle all installations, adjustments and repairs on your bike. As always...Ride Safe! Dans Competition LLC. 1-888-888-DANS (3267) www.danscomp.com Page 1 Tools Needed • Allen Wrenches • Open End/Adjustable Wrench/Ratchet & Socket • Wire Cutters • Screwdriver • Grease • Air Pump Note: Tools needed may vary. Unpacking the Bike • Open the box and remove ALL of the staples in the box flaps so you do not scratch or cut yourself, rip clothes or even scratch the bike. • Remove the bike and the small parts box. • Cut the zip ties that are holding the handlebars and the front wheel in place. • Remove all of the cardboard that is wrapped around the tubes of the frame and fork. Inspecting the Bike • Inspect the bike and all of the included parts to make sure there is no damage or missing parts.
  • 2. Complete Bike Assembly Instructions These instructions are to be used as a guide only. Improperly installed parts may lead to severe injury or harm. We strongly recommend that a properly trained bike mechanic handle all installations, adjustments and repairs on your bike. As always...Ride Safe! Dans Competition LLC. 1-888-888-DANS (3267) www.danscomp.com Page 2 Locate and Record the Serial Number • Look for a bunch of numbers stamped on the underneath side of the bottom bracket shell. Serial numbers are stamped into the frame before it is painted, so some or all of the numbers may be hard to read. • Write ALL of the numbers down in the Owners Manual or on the Invoice that was included with the bike and put it in a safe place. Danscomp does not record serial numbers! Note: Some bikes may have the serial number stamped in one of the rear dropouts. Installing the Handlebars • Loosen the pinch bolts and turn the stem forward. Since you will probably have to re-align the stem once the bike is all together, do not tighten it back down yet, just snug the bolts for now to keep the stem from spinning around on the fork. • Loosen and remove the clamping bolts holding the face plate on the top or front of the stem. • Apply a little grease to the threads of the bolts before treading them back into the stem. • Place the handlebars in the stem. • Use the knurling (the rough area) on the handlebars to help center them in the stem. • Place the face plate back on and start threading the bolts back into the stem body. • As you are tightening the bolts, the gap between the face plate and stem body need to be equal all the way around. • Looking from the side of the bike, align the handlebars to run parallel with the forks.
  • 3. Complete Bike Assembly Instructions These instructions are to be used as a guide only. Improperly installed parts may lead to severe injury or harm. We strongly recommend that a properly trained bike mechanic handle all installations, adjustments and repairs on your bike. As always...Ride Safe! Dans Competition LLC. 1-888-888-DANS (3267) www.danscomp.com Page 3 Tightening the Stem and Handlebars • Tighten the stem bolts in an X or cross pattern. • Be sure you do not over-tighten the bolts. Note: Over-tightening the stem bolts can cause damage to the stem and/or handlebars. Loosen the Seat Post Clamp • Loosen, but do not remove the seat post clamp bolt. • Apply a thin layer of grease to the inside of the seat tube or to the outside of the seat post. Installing the Seat and Seat Post • Insert the seat post into the frame. • Slide it down until it is to the desired height. • Make sure the Maximum Height Line on the post is below the top of the seat tube, so that it is not visible. Failure to do so will damage the seat tube and void the manufacturer’s warranty. For detailed instructions on other types of seat, Check out our seat installs at danscomp.com/tech
  • 4. Complete Bike Assembly Instructions These instructions are to be used as a guide only. Improperly installed parts may lead to severe injury or harm. We strongly recommend that a properly trained bike mechanic handle all installations, adjustments and repairs on your bike. As always...Ride Safe! Dans Competition LLC. 1-888-888-DANS (3267) www.danscomp.com Page 4 Aligning the Seat • While standing over the bike, look down, align the nose of the seat to run parallel with the top tube of the frame. Tightening the Seat Post Clamp • Grab the seat and try to turn it. If it turns, re-align it and continue tightening the seat post clamp until it does not turn anymore. Note: Over-tightening the seat post clamp bolt can cause damage to the seat post clamp and/or the bolt. Installing the Left Pedal • There is a L stamped into the end of the spindle. • The Left pedal has Left hand threads or reversed threads and will thread into the Left crank arm. • Tighten by turning the wrench counter-clockwise. Note: You will damage the threads in the crank arms if you thread the wrong pedal into the wrong crank arm.
  • 5. Complete Bike Assembly Instructions These instructions are to be used as a guide only. Improperly installed parts may lead to severe injury or harm. We strongly recommend that a properly trained bike mechanic handle all installations, adjustments and repairs on your bike. As always...Ride Safe! Dans Competition LLC. 1-888-888-DANS (3267) www.danscomp.com Page 5 Installing the Right Pedal • There is a R stamped into the end of the spindle. • The Right pedal has Right hand threads and will thread into the Right crank arm. • Tighten by turning the wrench clockwise. Note: You will damage the threads in the crank arms if you thread the wrong pedal into the wrong crank arm. Tightening the Cranks • 1). Using an allen wrench, check to make sure the spindle bolts are tight. • 2). If your crank arms have pinch bolts, you will need to check them as well. Adjusting the Chain • With the bike upside down, spin the cranks. • If it is hard to pedal, the chain is too tight. If it is easy to pedal and the chain has a lot of slack, it is too loose. • To adjust the chain tension, loosen the axle nuts. • Pull the wheel towards the end of the dropout slots and tighten the axle nuts a little, do not tighten completely. • Check to make sure the wheel is centered in the frame and then spin the cranks to make sure the chain has no more than ½” of up and down movement. • Tighten both axle nuts.
  • 6. Complete Bike Assembly Instructions These instructions are to be used as a guide only. Improperly installed parts may lead to severe injury or harm. We strongly recommend that a properly trained bike mechanic handle all installations, adjustments and repairs on your bike. As always...Ride Safe! Dans Competition LLC. 1-888-888-DANS (3267) www.danscomp.com Page 6 Hooking up the Brake Cable • Unthread the adjusting barrel on the brake lever a couple turns. Align the slots in the adjusting barrel, the jam nut and the lever. • Insert the lead head on the brake cable into the hole in the lever. • Insert the cable into the slot in the adjusting barrel. Thread the adjusting barrel all the way into the lever. • Tighten the nut on the cable hanger. • Cut the excess from the brake cable leaving approximately 1” – 1 ½” for you to install a cable end. • Lightly crimp the cable end using a pair of wire cutters. Be careful not to apply too much pressure and cut through the cable end. • This will keep the end of the brake cable from fraying. • Squeeze both brake arms until the brake pads are against the sidewall of the rim. Make sure both ends of the cable housing are inside the adjusting barrels in the cable stop (located on the underneath side of the top tube) and the brake lever. Insert the lead head of the straddle cable into the slot on the brake arm.
  • 7. Complete Bike Assembly Instructions These instructions are to be used as a guide only. Improperly installed parts may lead to severe injury or harm. We strongly recommend that a properly trained bike mechanic handle all installations, adjustments and repairs on your bike. As always...Ride Safe! Dans Competition LLC. 1-888-888-DANS (3267) www.danscomp.com Page 7 • Cut the excess from the straddle cable leaving approximately 1” – 1 ½” for you to install a cable end. • Lightly crimp the cable end using a pair of wire cutters. Be careful not to apply too much pressure and cut through the cable end. • This will keep the end of the straddle cable from fraying. Align the Brake Pads • Loosen, but do not remove the nut on the brake pad. • Align the brake pad so it runs parallel to the sidewall of the rim. Toe in the Brake Pads • Adjust the front of the brake pads so they make contact with the rim first, there should be approximately 1mm gap on the other end. This will lessen the chance of rim squeal and improve your braking.
  • 8. Complete Bike Assembly Instructions These instructions are to be used as a guide only. Improperly installed parts may lead to severe injury or harm. We strongly recommend that a properly trained bike mechanic handle all installations, adjustments and repairs on your bike. As always...Ride Safe! Dans Competition LLC. 1-888-888-DANS (3267) www.danscomp.com Page 8 • Tighten the nuts securely. You can rearrange the spherical washers for more space between the rim and the brake pad. Tip 1: File or sand the flat braking surface of the pads. This will remove the hard, slick surface and will help improve braking. Tip 2: Spin your wheel to make sure the brake pad is NOT making contact with your tire. Adjust Spring Tension • Squeeze the brake lever a few times to determine if the brake feels too hard, too easy or just right. • For more spring tension, push the wrench towards the front of the bike (this will cause the brake pad to move away from the rim). • For less spring tension, pull the wrench towards the rear of the bike (this will cause the brake pad to move closer to the rim). • For both brake pads to hit the rim at the same time, you will need equal spring tension on both brake arms. For more detailed instructions, Check out our brake installs at danscomp.com/tech Installing the Front Wheel • Loosen the axle nuts and slide the axle into the dropouts of the fork. Note: Some front hubs require the fork legs to be spread apart a little for the axle hardware to clear the inside of the dropouts. This will not damage your forks!
  • 9. Complete Bike Assembly Instructions These instructions are to be used as a guide only. Improperly installed parts may lead to severe injury or harm. We strongly recommend that a properly trained bike mechanic handle all installations, adjustments and repairs on your bike. As always...Ride Safe! Dans Competition LLC. 1-888-888-DANS (3267) www.danscomp.com Page 9 Installing the Safety Washers • You will need to unthread the axle nuts completely off both ends of the axle. • Slide the safety washer over the axle. • Thread the axle nuts back on. Note: Safety washer type may vary. Tightening Down the Front Wheel • Thread both axle nuts onto the axle and tighten them securely by hand. • Take a wrench or a ratchet and socket and tighten the axle nuts. As you are tightening the axle nuts, be sure to align the tire with the center of the fork crown. Adjusting the Headset and Aligning the Stem • Spin the handlebars and stem to determine if the headset needs to be adjusted. • If so, you will need to loosen the pinch bolts on the back of the stem. Tighten the compression bolt/cap if the headset has play in it or loosen it if it is hard to turn. You may need to spin the stem and handlebars a few times until you have it adjusted. Note: Do not over-tighten the compression bolt! You can damage the fork and/or the headset bearings.
  • 10. Complete Bike Assembly Instructions These instructions are to be used as a guide only. Improperly installed parts may lead to severe injury or harm. We strongly recommend that a properly trained bike mechanic handle all installations, adjustments and repairs on your bike. As always...Ride Safe! Dans Competition LLC. 1-888-888-DANS (3267) www.danscomp.com Page 10 • Looking down on the handlebars and stem, align the stem with the front tire. The stem should be parallel to the tire. • Tighten both of the pinch bolts. Inflating the Tires • Locate the recommended air pressure on the sidewall of both tires. • Use an air pump or compressor to inflate the tire to the recommended air pressure. Be sure to stop periodically to check the pressure by using an air pressure gauge. Note: Exceeding the tire manufacturer’s recommended air pressure can damage the rim, tire or tube. Many States require that bikes be equipped with reflectors... don't say we didn't warn you! Installing Reflectors and Chain Guard • Install the clear reflector on the front of the bike. • Install the red reflector on the rear of the bike. • Install the reflectors in both wheels. • Install the chain guard. Note: Reflectors and chain guards may vary in size, type or how they fit on the bike.