
Recomendados
Mais conteúdo relacionado
Mais procurados
Mais procurados (20)
Destaque
Semelhante a Lição 1 oração
Semelhante a Lição 1 oração (20)
Mais de Wilson Paulo de Santana Paulo
Mais de Wilson Paulo de Santana Paulo (9)
Lição 1 oração
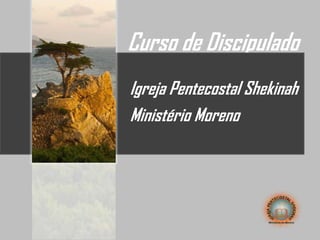
- 1. Curso de Discipulado Igreja Pentecostal Shekinah Ministério Moreno
- 2. Lição 1 - Oração Lição 2 - Jejum Lição 3 - Tentação Lição 4 - Fé MÓDULO II
- 3. Oração
- 4. O que é oração ? Orar é falar com Deus.
- 6. Para expressar nossa confiança e dependência em Deus. Mt 6.9 Para mantermos nossa comunhão com Deus. Gn 5.24 Para sermos participantes do avanço do Reino de Deus. Mt 9.38
- 7. A oração eficaz. Responde-me, ó Senhor, responde-me para que este povo conheça que tu, ó Senhor, és Deus, e que tu fizeste voltar o seu coração; Então caiu fogo do Senhor, e consumiu o holocausto, a lenha, as pedras, e o pó, e ainda lambeu a água que estava no rego.
- 8. A EFICÁCIA DA ORAÇÃO
- 9. 1 Tm 2.5 Porque há um só Deus, e um só Mediador entre Deus e os homens, Cristo Jesus, homem.
- 10. E tudo quanto pedirdes em meu nome, eu o farei, para que o Pai seja glorificado no Filho. Jo 14.13 Até agora nada pedistes em meu nome; pedi, e recebereis, para que o vosso gozo seja completo. Jo 16.24 Orar no nome de Jesus.
- 11. ...Seja feita a tua vontade, assim na terra como no céu. Mt 6.10 Orar segundo a vontade de Deus.
- 12. Pela fé Abel ofereceu a Deus mais excelente sacrifício que Caim.. Hb 11.4 Orar com fé.
- 13. A quem enviarei, e quem irá por nós? Então disse eu: Eis-me aqui, envia-me a mim. Is 6.8 Obediência
- 14. Se formos desobediêntes? Se eu tivesse guardado iniqüidade no meu coração, o Senhor não me teria ouvido. Sl 66.18 O que desvia os seus ouvidos de ouvir a lei, até a sua oração é abominável. Pv 28.9
- 15. Se confessarmos os nossos pecados, ele é fiel e justo para nos perdoar os pecados e nos purificar de toda injustiça. 1 Jo 1.9 Confissão de pecado
- 16. Perdoar aos outros Quando estiverdes orando, perdoai, se tendes alguma coisa contra alguém, para que também vosso Pai que está no céu, vos perdoe as vossas ofensas. Mc 11.25
- 17. Humildade O fariseu, de pé, assim orava consigo mesmo: ó Deus, graças te dou que não sou como os demais homens, roubadores, injustos, adúlteros, nem ainda com este publicano; Jejuo duas vezes na semana, e dou o dízimo de tudo quanto ganho. Mas o publicano, estando em pé de longe, nem ainda queria levantar os olhos ao céu, mas batia no peito, dizendo: ó Deus, sê propício a mim, o pecador! Lc 18.11-13
- 18. Persistência na oração Mas nós perseveraremos na oração e no ministério da palavra. At 6.4
- 20. A Oração desse apóstolo é sincera ?
- 22. Oração do rei Ezequias E orou ao Senhor, dizendo: ¨.... Lembra-te agora, ó Senhor, te peço, de como tenho andado diante de ti com fidelidade e integridade de coração, e tenho feito o que era reto aos teus olhos. E Ezequias chorou muitíssimo¨. 2Rs 20.2,3
- 23. Quem foi o rei Ezequias ? Tinha vinte e cinco anos quando começou a reinar, e reinou vinte e nove anos em Jerusalém. O nome de sua mãe era Abi, filha de Zacarias. Ele fez o que era reto aos olhos do Senhor, conforme tudo o que fizera Davi, seu pai. Tirou os altos, quebrou as colunas, e deitou abaixo a Asera; e despedaçou a serpente de bronze que Moisés fizera (porquanto até aquele dia os filhos de Israel lhe queimavam incenso), e chamou-lhe Neüstã. Confiou no Senhor Deus de Israel, de modo que depois dele não houve seu semelhante entre todos os reis de Judá, nem entre os que foram antes dele. 2 Rs 18.2-5
- 24. Ana soube esperar no Senhor. Esperei com paciência pelo Senhor, e ele se inclinou para mim e ouviu o meu clamor. Sl 40.1
Notas do Editor
- Custom animation effects: title fade-in on path and text fade by letter(Intermediate)Tip: For the effects on this slide, use a picture that measures 7.5” high (the height of the slide) and 2.61” wide.To reproduce the shape effects on this slide, do the following:On the Home tab, in theDrawing group, clickShapes, and then under Rectangles click Rectangle (first option from the left). On the slide, drag to draw a rectangle.Select the rectangle. Under DrawingTools, on the Format tab, in the Size group, do the following: In the ShapeHeight box, enter 3.17”.In the ShapeWidth box, enter 9.5”.Drag the rectangle slightly above the middle of the slide. Select the rectangle. On the Home tab, in the Drawing group, click Arrange, point to Align, and then do the following:Click Align to Slide.Click Align Left.Under DrawingTools, on theFormat tab, in the ShapeStyles group, click the next to ShapeOutline, and then click NoOutline.Under DrawingTools, on the Format tab, in the bottom right corner of the ShapeStyles group, click the FormatShape dialog box launcher. In the FormatShape dialog box, click Fill in the left pane, select Gradient fill in the Fill pane, and then do the following:In the Type list, select Linear.Click the button next to Direction, and then click Linear Right (first row, fourth option from the left). Under Gradient stops, click Add or Remove until two stops appear in the drop-down list.Also under Gradient stops, customize the gradient stops that you added as follows:Select Stop 1 from the list, and then do the following:In the Stop position box, enter 0%.Click the button next to Color, and then under Theme Colors click Orange, Accent 6, Darker 50% (fifth row, 10th option from the left).Select Stop 2 from the list, and then do the following: In the Stop position box, enter 100%.Click the button next to Color, and then under Theme Colors click Orange, Accent 6, Darker 25% (fourth row, 10th option from the left).To reproduce the “heading” text box on this slide, do the following:On the Insert tab, in the Text group, select TextBox. On the slide, drag to draw a text box.Enter the heading text, and then select text. On the Home tab, in the Font group, do the following:In the Font list, select Calibri.In the FontSize box, enter 38.Click Bold.Click the arrow next to FontColor, and then under ThemeColors click Orange, Accent 6, Darker 25% (fourth row, 10th option from the left).On the Home tab, in the Paragraph group, click AlignTextLeft.Drag the text box just above the rectangle, in the right half of the slide. To reproduce the second text box on this slide, do the following:On the Insert tab, in the Text group, click TextBox. On the slide, drag to draw a text box.Enter three lines of text with paragraph breaks, and then select the text. On the Home tab, in the Font group, do the following:In the Font list, select Calibri.In the FontSize list, select 28.Click Bold.Click the arrow next to FontColor, and then under ThemeColors click White, Background 1 (first row, first option from the left).On the Home tab, in the Paragraph group, click AlignTextLeft.Drag the second text box onto the rectangle, below the “heading” text box. To reproduce the full-color picture on this slide, do the following:On the Home tab, in theSlides group, click Layout, and then click Blank.On the Insert tab, in the Illustrations group, clickPicture. In the InsertPicture dialog box, select the 7.5” x 2.61” picture, and then click Insert.On the slide, select the picture. Under Picture Tools, on the Format tab, in the bottom right corner of the Size group, click the Size and Position dialog box launcher. In the Size and Position dialog box, on the Size tab, under Crop from,in the Bottom box, enter 2.43”. (Note: Under Size and rotate, the Height should now be 5.08”.)On the slide, select the picture. UnderPicture Tools, on the Format tab, in the Picture Styles group, click Picture Effects, point to Glow, and then under Glow Variations click Accent color 1, 5 pt glow (first row, first option from the left).Also under PictureTools, on the Format tab, in the PictureStyles group, click PictureEffects, point to Glow, point to MoreGlowColors, and then under ThemeColors click White, Background 1 (first row, first option from the left).Drag the full-color picture on top of the rectangle, to the left of the text boxes. On the Home tab, in the Drawing group, click Arrange, point to Align, and then do the following:Click Align to Slide.Click Align Top. To reproduce the second picture on this slide, do the following:On the Insert tab, in the Illustrations group, click Picture. In the InsertPicture dialog box, select the same 7.5” x 2.61” picture, and then click Insert. On the slide, select the picture. Under Picture Tools, on the Format tab, in the bottom right corner of the Size group, click the Size and Position dialog box launcher. In the Size and Position dialog box, on the Size tab, under Crop from,in the Top box, enter 5.08”. (Note: Under Size and rotate, the Height should now be 2.43”.)On the slide, select the second, smaller picture. Under PictureTools, on the Format tab, in the PictureStyles group, click the FormatShape dialog box launcher. In the FormatPicture dialog box, click Picture in the left pane, and in the Picture pane do the following:In the Brightness box, enter 70%.In the Contrast box, enter -70%.On the slide, drag the smaller picture until it is directly underneath the larger full-color picture.Select the smaller picture. On the Home tab, in the Drawing group, click Arrange, point to Align, and then do the following:Click Align to Slide.Click Align Bottom. Press and hold CTRL, and then select both pictures. On the Home tab, in the Drawing group, click Arrange, point to Align, and then do the following:Click Align Selected Objects.Click Align Center. To reproduce the animation effects on this slide, do the following:On the Animations tab, in the Animations group, click CustomAnimation. On the slide, select the “heading” text box. In the CustomAnimation task pane, do the following:Click AddEffect, point to Entrance, and then click MoreEffects. In the AddEntranceEffect dialog box, under Subtle, click Fade.Select the animation effect (fade effect for the “heading” text box). Click the arrow to the right of the selected text box, and then click Timing. In the Fade dialog box, on the Timing tab, do the following:In the Start list, select WithPrevious.In the Delay box, enter 1.5.In the Speed list, select 2 seconds (Medium).On the slide, select the “heading” text box. In the CustomAnimation task pane, do the following:ClickAddEffect, point to MotionPaths, and then click Left.Select the second animation effect (left motion path for the “heading” text box). Under Modify: Left,do the following:In the Start list, select WithPrevious.In the Speed list, select Medium. On the slide, right-click the left motion path and click ReversePathDirection. With the motion path still selected,point to the starting point (green arrow) of the motion path until the cursor becomes a two-headed arrow. Press and hold SHIFT, and then drag the starting pointabout 1.5” off the left edge of the slide. (Note: It may help to display the ruler. On the View tab, in the Show/Hide group, select Ruler. If your lines of text are longer than in the example above, you may need to further increase the length of the motion path. )On the slide, select the second text box. In the CustomAnimation task pane, do the following:Click AddEffect, point to Entrance, and then click MoreEffects. In the AddEntranceEffect dialog box, under Subtle, click Fade.Select the third animation effect (fade effect for the second text box). Click the arrow to the right of the selected effect, and then click Effect Options. In the Fade dialog box, do the following:On the Effect tab, do the following:In the Animate text list, select By Letter.In the % delay between letters box, enter 5.On the Timing tab, do the following:In the Start list, select AfterPrevious.In the Speed list, select 0.5 seconds (VeryFast).On the TextAnimation tab, in the Grouptext list, select By 1st Level Paragraphs.To reproduce the background on this slide, do the following:Right-click the slide background area, and then click Format Background. In the Format Background dialog box, click Fill in the left pane, select Gradient fill in the Fill pane, and then do the following:In the Type list, select Radial.Click the button next to Direction, and then click From Center (third option from the left).Under Gradient stops, click Add or Remove until three stops appear in the drop-down list.Also under Gradient stops, customize the gradient stops that you added as follows:Select Stop 1 from the list, and then do the following:In the Stop position box, enter 0%.Click the button next to Color, and then under Theme Colors click White, Background 1 (first row, first option from the left).Select Stop 2 from the list, and then do the following: In the Stop position box, enter 40%.Click the button next to Color, and then under Theme Colors click White, Background 1 (first row, first option from the left).Select Stop 3 from the list, and then do the following: In the Stop position box, enter 100%.Click the button next to Color, click More Colors, and then in the Colors dialog box, on the Custom tab, enter values for Red: 232, Green: 227, and Blue: 216.
- Custom animation effects: line sweeps in picture and text(Basic)To reproduce the shape effects on this slide, do the following:On the Home tab, in theSlides group, click Layout, and then click Blank.On the Home tab, in the Drawing group, click Shapes, and then under Lines click Line (first option from the left).On the slide, press and hold SHIFT, and then drag to draw a straight, vertical line.Select the line. Under DrawingTools, on the Format tab, in the Size group, in the Shape Width box, enter 7.5”.Under DrawingTools, on the Format tab, in the ShapeStyles group, click the Format Shape dialog box launcher. In the Format Shape dialog box, click LineColor in the left pane. In the LineColor pane, select Solidline, click the button next to Color, and then under ThemeColors click Black, Text 1 (first row, second option from the left).Also in the Format Shape dialog box, click LineStyle in the left pane. In the LineStyle pane, in the Weight box, enter 2 pt.Under DrawingTools, on the Format tab, in the ShapeStyles group, click ShapeEffects, point to Glow, and then under GlowVariations click Accent color 1, 5 pt glow (first row, first option from the left). Under DrawingTools, on the Format tab, in the ShapeStyles group, click ShapeEffects, point to Glow, point to MoreGlowColors, and then under ThemeColors click White, Background 1 (first row, first option from the left).On the Home tab, in the Drawing group, click Arrange, point to Align, and then do the following:Click Align to Slide.Click AlignCenter.Click AlignMiddle.On the slide, select the line. On the Home tab, in the Clipboard group, click the arrow under Paste, and then click Duplicate.Drag the duplicate line slightly off the right edge of the slide.With the duplicate line still selected, on the Home tab, in the Drawing group, click Arrange, point to Align, and then do the following: Click Align to Slide. Click Align Middle.On the Insert tab, in the Illustrations group, click Picture. In the InsertPicture dialog box, select a picture, and then click Insert.On the slide, select the picture. Under Picture Tools, on the Format tab, in the bottom right corner of the Size group, click the Size and Position dialog box launcher. In the Size and Position dialog box, on the Size tab, resize or crop the picture as needed so that under Size and rotate, the Height box is set to 7.5” and the Width box is set to 5”. Resize the picture under Size and rotate by entering values into the Height and Width boxes. Crop the picture under Crop from by entering values into the Left, Right, Top, and Bottom boxes. On the Home tab, in the Drawing group, click Arrange, point to Align, and then do the following:Click Align to Slide.ClickAlignRight.ClickAlignMiddle.To reproduce the text effects on this slide, do the following:On the Insert tab, in the Illustrations group, click TextBox. On the slide, drag to draw a text box.Enter text in the text box, and then select the text. On the Home tab, in the Font group, do the following:In the Font list, select Arial.In the FontSize list, select 28.Click Bold.Click the button next to FontColor, and then under ThemeColors click White, Background 1 (first row, first option from the left).On the Home tab, in the Paragraph group, click AlignTextRight to align the text right in the text box. Drag the text box onto the left half of the slide.To reproduce the background effects on this slide, do the following:Right-click the slide background area, and then click Format Background. In the Format Background dialog box, click Fill in the left pane, select Gradient fill in the Fill pane, and then do the following:In the Type list, select Linear.Click the button next to Direction, and then click Linear Down (first row, second option from the left).Under Gradient stops, click Add or Remove until two stops appear in the drop-down list.Also under Gradient stops, customize the gradient stops that you added as follows:Select Stop 1 from the list, and then do the following:In the Stop position box, enter 40%.Click the button next to Color, and then click Black, Text 1 (first row, second option from the left).Select Stop 2 from the list, and then do the following: In the Stop position box, enter 100%.Click the button next to Color, and then click Black, Text 1, Lighter 50% (second row, second option from the left).To reproduce the animation effects on this slide, do the following:On the Animations tab, in the Animations group, click CustomAnimation. Select the line off the right edge of the slide. In the CustomAnimation task pane, do the following:Click AddEffect, point to Entrance, and then click MoreEffects. In the AddEntranceEffect dialog box, under Basic, click FlyIn.Select the animation effect (fly-in effect for the second line). Under Modify: Fly In,do the following:In the Start list, select After Previous.In the Direction list, select FromLeft.In the Speed list, select Fast.On the Home tab, in the Editing group, click Select, and then click Selection Pane.In the Selection and Visibility pane, select the first line you created (in the middle of the slide). In the CustomAnimation task pane, do the following:Click AddEffect, point to Entrance, and then click MoreEffects. In the AddEntranceEffect dialog box, under Basic, click FlyIn.Select the second animation effect (fly-in effect for the first line). Under Modify: Fly In,do the following:In the Start list, select AfterPrevious.In the Direction list, select FromRight.In the Speed list, select Fast.On the slide, select the picture. In the CustomAnimation task pane, do the following:Click AddEffect, point to Entrance, and then click MoreEffects. In the AddEntranceEffect dialog box, under Basic, click Wipe.Select the third animation effect (wipe effect for the picture). Under Modify: Wipe,do the following:In the Start list, select WithPrevious.In the Direction list, select FromRight.In the Speed list, select Fast.On the slide, select the text box. In the CustomAnimation task pane, do the following:Click AddEffect, point to Entrance, and then click MoreEffects. In the AddEntranceEffect dialog box, under Basic, clickFlyIn.Select the fourth animation effect (fly-in effect for the text box). Under Modify: Fly In,do the following:In the Start list, select WithPrevious.In the Direction list, select FromRight.In the Speed list, select Fast.
- Custom animation effects: line sweeps in picture and text(Basic)To reproduce the shape effects on this slide, do the following:On the Home tab, in theSlides group, click Layout, and then click Blank.On the Home tab, in the Drawing group, click Shapes, and then under Lines click Line (first option from the left).On the slide, press and hold SHIFT, and then drag to draw a straight, vertical line.Select the line. Under DrawingTools, on the Format tab, in the Size group, in the Shape Width box, enter 7.5”.Under DrawingTools, on the Format tab, in the ShapeStyles group, click the Format Shape dialog box launcher. In the Format Shape dialog box, click LineColor in the left pane. In the LineColor pane, select Solidline, click the button next to Color, and then under ThemeColors click Black, Text 1 (first row, second option from the left).Also in the Format Shape dialog box, click LineStyle in the left pane. In the LineStyle pane, in the Weight box, enter 2 pt.Under DrawingTools, on the Format tab, in the ShapeStyles group, click ShapeEffects, point to Glow, and then under GlowVariations click Accent color 1, 5 pt glow (first row, first option from the left). Under DrawingTools, on the Format tab, in the ShapeStyles group, click ShapeEffects, point to Glow, point to MoreGlowColors, and then under ThemeColors click White, Background 1 (first row, first option from the left).On the Home tab, in the Drawing group, click Arrange, point to Align, and then do the following:Click Align to Slide.Click AlignCenter.Click AlignMiddle.On the slide, select the line. On the Home tab, in the Clipboard group, click the arrow under Paste, and then click Duplicate.Drag the duplicate line slightly off the right edge of the slide.With the duplicate line still selected, on the Home tab, in the Drawing group, click Arrange, point to Align, and then do the following: Click Align to Slide. Click Align Middle.On the Insert tab, in the Illustrations group, click Picture. In the InsertPicture dialog box, select a picture, and then click Insert.On the slide, select the picture. Under Picture Tools, on the Format tab, in the bottom right corner of the Size group, click the Size and Position dialog box launcher. In the Size and Position dialog box, on the Size tab, resize or crop the picture as needed so that under Size and rotate, the Height box is set to 7.5” and the Width box is set to 5”. Resize the picture under Size and rotate by entering values into the Height and Width boxes. Crop the picture under Crop from by entering values into the Left, Right, Top, and Bottom boxes. On the Home tab, in the Drawing group, click Arrange, point to Align, and then do the following:Click Align to Slide.ClickAlignRight.ClickAlignMiddle.To reproduce the text effects on this slide, do the following:On the Insert tab, in the Illustrations group, click TextBox. On the slide, drag to draw a text box.Enter text in the text box, and then select the text. On the Home tab, in the Font group, do the following:In the Font list, select Arial.In the FontSize list, select 28.Click Bold.Click the button next to FontColor, and then under ThemeColors click White, Background 1 (first row, first option from the left).On the Home tab, in the Paragraph group, click AlignTextRight to align the text right in the text box. Drag the text box onto the left half of the slide.To reproduce the background effects on this slide, do the following:Right-click the slide background area, and then click Format Background. In the Format Background dialog box, click Fill in the left pane, select Gradient fill in the Fill pane, and then do the following:In the Type list, select Linear.Click the button next to Direction, and then click Linear Down (first row, second option from the left).Under Gradient stops, click Add or Remove until two stops appear in the drop-down list.Also under Gradient stops, customize the gradient stops that you added as follows:Select Stop 1 from the list, and then do the following:In the Stop position box, enter 40%.Click the button next to Color, and then click Black, Text 1 (first row, second option from the left).Select Stop 2 from the list, and then do the following: In the Stop position box, enter 100%.Click the button next to Color, and then click Black, Text 1, Lighter 50% (second row, second option from the left).To reproduce the animation effects on this slide, do the following:On the Animations tab, in the Animations group, click CustomAnimation. Select the line off the right edge of the slide. In the CustomAnimation task pane, do the following:Click AddEffect, point to Entrance, and then click MoreEffects. In the AddEntranceEffect dialog box, under Basic, click FlyIn.Select the animation effect (fly-in effect for the second line). Under Modify: Fly In,do the following:In the Start list, select After Previous.In the Direction list, select FromLeft.In the Speed list, select Fast.On the Home tab, in the Editing group, click Select, and then click Selection Pane.In the Selection and Visibility pane, select the first line you created (in the middle of the slide). In the CustomAnimation task pane, do the following:Click AddEffect, point to Entrance, and then click MoreEffects. In the AddEntranceEffect dialog box, under Basic, click FlyIn.Select the second animation effect (fly-in effect for the first line). Under Modify: Fly In,do the following:In the Start list, select AfterPrevious.In the Direction list, select FromRight.In the Speed list, select Fast.On the slide, select the picture. In the CustomAnimation task pane, do the following:Click AddEffect, point to Entrance, and then click MoreEffects. In the AddEntranceEffect dialog box, under Basic, click Wipe.Select the third animation effect (wipe effect for the picture). Under Modify: Wipe,do the following:In the Start list, select WithPrevious.In the Direction list, select FromRight.In the Speed list, select Fast.On the slide, select the text box. In the CustomAnimation task pane, do the following:Click AddEffect, point to Entrance, and then click MoreEffects. In the AddEntranceEffect dialog box, under Basic, clickFlyIn.Select the fourth animation effect (fly-in effect for the text box). Under Modify: Fly In,do the following:In the Start list, select WithPrevious.In the Direction list, select FromRight.In the Speed list, select Fast.
- Custom animation effects: dotted line with text fade by letter(Basic)To reproduce the text effects on this slide, do the following:On the Home tab, in the Slides group, click Layout, and then click Blank.On the Insert tab, in the Text group, click Text Box, and then on the slide, drag to draw a text box that spans the entire width of the slide.On the Insert tab, in the Text group, click Symbol. In the Symbol dialog box, do the following:In the Font list, select (normal text).In the Subset list, select General Punctuation.In the Character Code box, enter 2022 to select BULLET, and then click Insert.Click Insert 33 more times until there is a row of 34 bullets in the text box. In the text box, select the text, and then on the Home tab, in the Font group do the following:In the Font list, select ArialBlack.In the FontSize list, select 44.Click the arrow next to FontColor, and then under ThemeColors click White, Background 1 (first row, first option from the left).On the Home tab, in the Drawing group, click Arrange, point to Align, and then do the following:Click Align to Slide.Click AlignCenter.Click AlignMiddle.On the Insert tab, in the Text group, click TextBox. Drag to draw a text box on the slide.Enter and select the text. On the Home tab, in the Font group, do the following:In the Font list, select Corbel.In the FontSize box, enter 50.Click the arrow next to FontColor, and then under ThemeColors click White, Background 1 (first row, first option from the left).Click Bold.With the text still selected, on the Home tab, in the Paragraph group, click Center.Select the second text box. On the Home tab, in the Drawing group, click Arrange, point to Align, and then do the following:Click Align to Slide.Click AlignCenter.Click AlignMiddle.To reproduce the background effects on this slide, do the following:Right-click the slide background area, and then click Format Background. In the Format Background dialog box, click Fill in the left pane, select Gradient fill in the Fill pane, and then do the following:In the Type list, select Radial.Click the button next to Direction, and then click From Center (third option from the left). Under Gradient stops, click Add or Remove until two stops appear in the drop-down list.Also under Gradient stops, customize the gradient stops that you added as follows:Select Stop 1 from the list, and then do the following:In the Stop position box, enter 0%.Click the button next to Color, and then under ThemeColors select Blue, Accent 1, Darker 25% (fifth row, fifth option from the left). Select Stop 2 from the list, and then do the following: In the Stop position box, enter 100%.Click the button next to Color, and then under ThemeColors select Black, Text 1 (first row, second option from the left). To reproduce the animation effects on this slide, do the following:On the Animations tab, in the Animations group, click CustomAnimation. On the slide, select the first text box. In the CustomAnimation task pane, do the following:Click AddEffect, point to Entrance, and then click MoreEffects. In the AddEntrance Effect dialog box, under Basic, click Fly In.Select the animation effect (fly-in effect for the first text box). Click the arrow to the right of the selected effect, and then click EffectOptions. In the Fly In dialog box, do the following:On the Effect tab, do the following:In the Direction list, select FromLeft.In the Animatetext list, selectByLetter.In the % delay between letters box, enter 10.On the Timing tab, do the following:In the Start list, select WithPrevious.In the Speed list, select 0.5 seconds (Very Fast).On the slide, select the first text box. In the CustomAnimation task pane, do the following:Click AddEffect, point to Exit, and then click MoreEffects. In the Add Exit Effect dialog box, under Subtle, click Fade. Select the second animation effect (fade effect for the first text box). Click the arrow to the right of the selected effect, and then click EffectOptions. In the Fade dialog box, do the following:On the Effect tab, do the following:In the Animatetext list, selectByLetter.In the % delay between letters box, enter 10.On the Timing tab, do the following:In the Start list, select WithPrevious.In the Delay box, enter 1.5.In the Speed list, select 0.5 seconds (Very Fast).On the slide, select the second text box. In the CustomAnimation task pane, do the following.Click AddEffect, point to Entrance, and then click MoreEffects. In the AddEntranceEffect dialog box, under Subtle, click Fade.Select the third animation effect (fade effect for the second text box). Click the arrow to the right of the selected effect, and then click EffectOptions. In the Fade dialog box, do the following:On the Effect tab, do the following:In the Animatetext list, selectByLetter.In the % delay between letters box, enter 6.On the Timing tab, do the following:In the Start list, select WithPrevious.In the Delay box,enter 2.In the Speed list, select 0.5 seconds (Very Fast).
- Custom animation effects: fly-in and shrink lines, stretch rectangles(Intermediate)To reproduce the first vertical line on this slide, do the following:On the Home tab, in the Slides group, click Layout, and then click Blank.On the Home tab, in the Drawing group, click Shapes, and then under Lines click Line. On the slide, press and hold SHIFT, and then drag to draw a straight, vertical line.UnderDrawing Tools, on the Format tab, in the Size group, in the Shape Width box, enter 4.5”.On the Home tab, in the bottom right corner of the Drawing group, click the Format Shape dialog box launcher. In the Format Shape dialog box, click Line Color in the left pane, select Gradient fill in the Line Color pane, and then do the following:In the Type list, select Linear.Click the button next to Direction, and then click Linear Right (first row, fourth option from the left).In the Angle box, enter 0°.Under Gradient stops, click Add or Remove until three stops appear in the drop-down list.Also under Gradient stops, customize the gradient stops that you added as follows:Select Stop 1 from the list, and then do the following:In the Stop position box, enter 0%.Click the button next to Color, select More Colors, and then in the Colors dialog box, on the Custom tab, enter values for Red: 148, Green: 172, and Blue: 208.In the Transparency box, enter 100%.Select Stop 2 from the list, and then do the following: In the Stop position box, enter 50%.Click the button next to Color, select More Colors, and then in the Colors dialog box, on the Custom tab, enter values for Red: 148, Green: 172, and Blue: 208.In the Transparency box, enter 0%.Select Stop 3 from the list, and then do the following:In the Stop position box, enter 99%.Click the button next to Color, select More Colors, and then in the Colors dialog box, on the Custom tab, enter values for Red: 148, Green: 172, and Blue: 208.In the Transparency box, enter 100%.Also in the Format Shape dialog box, click Line Style in the left pane. In the Line Style pane, in the Width box, enter 6 pt.To reproduce the first rectangle on this slide, do the following:On the Home tab, in the Drawing group, click Shapes, and then under Rectangles click Rectangle (first option from the left). On the slide, drag to draw a rectangle.Select the rectangle. Under DrawingTools, on the Format tab, in the Size group, do the following:In the ShapeHeight box, enter 2”.In the ShapeWidth box, enter 2”.Under Drawing Tools, on the Format tab, in the bottom right corner of the ShapeStyles group, click the FormatShape dialog box launcher. In the FormatShape dialog box, click Fill in the left pane, select Gradient fill in the Fill pane, and then do the following:In the Type list, select Linear.Click the button next to Direction, and then click Linear Up (second row, second option from the left).In the Angle box, enter 270°.Under Gradient stops, click Add or Remove until three stops appear in the drop-down list.Also under Gradient stops, customize the gradient stops that you added as follows:Select Stop 1 from the list, and then do the following:In the Stop position box, enter 0%.Click the button next to Color, click More Colors, and then in the Colors dialog box, on the Custom tab, enter values for Red: 44, Green: 93, and Blue: 152.In the Transparency box, enter 0%.Select Stop 2 from the list, and then do the following: In the Stop position box, enter 80%.Click the button next to Color, click More Colors, and then in the Colors dialog box, on the Custom tab, enter values for Red: 60, Green: 123, Blue: 199.In the Transparency box, enter 0%.Select Stop 3 from the list, and then do the following:In the Stop position box, enter 100%.Click the button next to Color, click More Colors, and then in the Colors dialog box, on the Custom tab, enter values for Red: 58, Green: 124, Blue: 203.In the Transparency box, enter 0%.Also in the Format Shape dialog box, click Line Color in the left pane. In the Line Color pane, select No line. Also in the Format Shape dialog box, click 3-D Format in the left pane, and in the 3-D Format pane, do the following:Under Bevel, click the button next to Top, and then under Bevel click Circle (first row, first option from the left). Next to Top, in the Width box, enter 5 pt, and in the Height box, enter 2 pt.Under Surface, in the Angle box, enter 20°.On the slide, right-click the rectangle and then click Edit Text.Enter text in the text box and select the text. On the Home tab, in the Font group, do the following:In the Font list, select Calibri.In the Font Size list, select 32.Click the button next to Font Color, and then under Theme Colors click White, Background 1 (first row, first option from the left).On the slide, press and hold CTRL, and then select the line and the rectangle.On the Home tab, in the Drawing group, click Arrange, point to Align, and then do the following:Click Align Selected Objects.Click Align Left.With the line and rectangle still selected, drag them to the left side of the slide. To reproduce the animation effects for the first vertical line and rectangle on this slide, do the following:On the Animations tab, in the Animations group, click CustomAnimation. On the slide, select the line. In the CustomAnimation task pane, do the following:Click AddEffect, point to Entrance, and then click MoreEffects. In the AddEntranceEffect dialog box, under Basic, click FlyIn.Select the first animation effect (fly-in effect for the line), and then under Modify: Fly In,do the following:In the Start list, select WithPrevious.In the Direction list, select FromTop.In the Speed list, select Fast.On the slide, select the line. In the CustomAnimation task pane, do the following:Click AddEffect, point to Emphasis, and then click MoreEffects. In the AddEmphasisEffect dialog box, under Basic, click Grow/Shrink.Select the second animation effect (grow/shrink effect for the line). Click the arrow to the right of the effect, and then click Effect Options. In the Grow/Shrink dialog box, do the following:On the Effect tab, do the following:In the Size list, select Tiny. Also in the Size list, select Vertical.On the Timing tab, do the following:In the Start list, select WithPrevious.In the Delay box, enter 0.5.In the Speed list, select 1 seconds (Fast).On the slide, select the rectangle. In the CustomAnimation task pane, do the following:Click AddEffect, point to Entrance, and then click MoreEffects. In the AddEntranceEffect dialog box, under Moderate, click Stretch.Select the third animation effect (stretch effect for the rectangle), and then under Modify: Stretch,do the following:In the Start list, select AfterPrevious.In the Direction list, select FromLeft.In the Speed list, select Fast.To reproduce the other shapes with animation effects on this slide, do the following:On the slide, press and hold CTRL, and then select the rectangle and the line. On the Home tab, in the Clipboard group, click the arrow under Paste, and then click Duplicate. On the slide, drag the second line and rectangle to the center of the slide. With the second line and rectangle still selected, on the Home tab, in the Clipboard group, click the arrow under Paste, and then click Duplicate. On the slide, drag the third line and rectangle to the right side of the slide. On the slide, press CTRL+A to select all the objects. On the Home tab, in the Drawing group, click Arrange, point to Align, and then do the following:Click Align to Slide.Click Align Middle. Click the text in each of the duplicate rectangles, and then edit the text.On the slide, select the second (middle) line. On the Home tab, in the bottom right corner of the Drawing group, click the Format Shape dialog box launcher. In the Format Shape dialog box, click Line Color in the left pane, select Gradient fill in the Line Color pane, and then do the following:In the Type list, select Linear.Click the button next to Direction, and then click Linear Right (first row, fourth option from the left).In the Angle box, enter 0°.Under Gradient stops, click Add or Remove until three stops appear in the drop-down list.Also under Gradient stops, customize the gradient stops that you added as follows:Select Stop 1 from the list, and then do the following:In the Stop position box, enter 0%.Click the button next to Color, select More Colors, and then in the Colors dialog box, on the Custom tab, enter values for Red: 154, Green: 181, Blue: 228.In the Transparency box, enter 100%.Select Stop 2 from the list, and then do the following: In the Stop position box, enter 50%.Click the button next to Color, and then under Theme Colors click White, Background 1, Darker 25% (fourth row, first option from the left).In the Transparency box, enter 0%.Select Stop 3 from the list, and then do the following:In the Stop position box, enter 99%.Click the button next to Color, and then under Theme Colors click White, Background 1, Darker 25% (fourth row, first option from the left).In the Transparency box, enter 100%.On the slide, select the second (middle) rectangle. On the Home tab, in the bottom right corner of the Drawing group, click the Format Shape dialog box launcher. In the Format Shape dialog box, click Fill in the left pane, select Gradient fill in the Fill pane, and then do the following:In the Type list, select Linear.Click the button next to Direction, and then click Linear Up (second row, second option from the left).In the Angle box, enter 270°.Under Gradient stops, click Add or Remove until three stops appear in the drop-down list.Also under Gradient stops, customize the gradient stops that you added as follows:Select Stop 1 from the list, and then do the following:In the Stop position box, enter 0%.Click the button next to Color, click More Colors, and then in the Colors dialog box, on the Custom tab, enter values for Red: 118, Green: 149, Blue: 53.Select Stop 2 from the list, and then do the following: In the Stop position box, enter 80%.Click the button next to Color, click More Colors, and then in the Colors dialog box, on the Custom tab, enter values for Red: 115, Green: 195, Blue: 72.Select Stop 3 from the list, and then do the following:In the Stop position box, enter 100%.Click the button next to Color, click More Colors, and then in the Colors dialog box, on the Custom tab, enter values for Red: 156, Green: 199, Blue: 70.On the slide, select the third (right) line. On the Home tab, in the bottom right corner of the Drawing group, click the Format Shape dialog box launcher. In the Format Shape dialog box, click Line Color in the left pane, select Gradient fill in the Line Color pane, and then do the following:In the Type list, select Linear.Click the button next to Direction, and then click Linear Right (first row, fourth option from the left).In the Angle box, enter 0°.Under Gradient stops, click Add or Remove until three stops appear in the drop-down list.Also under Gradient stops, customize the gradient stops that you added as follows:Select Stop 1 from the list, and then do the following:In the Stop position box, enter 0%.Click the button next to Color, and then underTheme Colorsclick Aqua, Accent 5, Lighter 40% (fourth row, ninth option from the left).In the Transparency box, enter 100%.Select Stop 2 from the list, and then do the following: In the Stop position box, enter 50%.Click the button next to Color, and then underTheme Colorsclick Aqua, Accent 5, Lighter 40% (fourth row, ninth option from the left).In the Transparency box, enter 0%.Select Stop 3 from the list, and then do the following:In the Stop position box, enter 99%.Click the button next to Color, and then underTheme Colorsclick Aqua, Accent 5, Lighter 40% (fourth row, ninth option from the left).In the Transparency box, enter 100%.On the slide, select the third (right) rectangle. On the Home tab, in the bottom right corner of the Drawing group, click the Format Shape dialog box launcher. In the Format Shape dialog box, click Fill in the left pane, select Gradient fill in the Fill pane, and then do the following:In the Type list, select Linear.Click the button next to Direction, and then click Linear Up (second row, second option from the left).In the Angle box, enter 270°.Under Gradient stops, click Add or Remove until three stops appear in the drop-down list.Also under Gradient stops, customize the gradient stops that you added as follows:Select Stop 1 from the list, and then do the following:In the Stop position box, enter 0%.Click the button next to Color, select More Colors, and then in the Colors dialog box, on the Custom tab, enter values for Red: 39, Green: 135, Blue: 160.Select Stop 2 from the list, and then do the following: In the Stop position box, enter 80%.Click the button next to Color, select More Colors, and then in the Colors dialog box, on the Custom tab, enter values for Red: 54, Green: 177, Blue: 210.Select Stop 3 from the list, and then do the following:In the Stop position box, enter 100%.Click the button next to Color, select More Colors, and then in the Colors dialog box, on the Custom tab, enter values for Red: 52, Green: 179, Blue: 214.To reproduce the background effects on this slide, do the following:Right-click the slide background area, and then click Format Background. In the Format Background dialog box, click Fill in the left pane, select Gradient fill in the Fill pane, and then do the following:In the Type list, select Radial.Click the button next to Direction, and then click From Center (third option from the left).Under Gradient stops, click Add or Remove until three stops appear in the drop-down list.Also under Gradient stops, customize the gradient stops that you added as follows:Select Stop 1 from the list, and then do the following:In the Stop position box, enter 33%.Click the button next to Color, and then under Theme Colors click White, Background 1 (first row, first option from the left).Select Stop 2 from the list, and then do the following: In the Stop position box, enter 67%.Click the button next to Color, select More Colors, and then in the Colors dialog box, on the Custom tab, enter values for Red: 228, Green: 233, Blue: 236.Select Stop 3 from the list, and then do the following: In the Stop position box, enter 100%.Click the button next to Color, select More Colors, and then in the Colors dialog box, on the Custom tab, enter values for Red: 178, Green: 186, Blue: 210.
- Custom animation effects: line sweeps in picture and text(Basic)To reproduce the shape effects on this slide, do the following:On the Home tab, in theSlides group, click Layout, and then click Blank.On the Home tab, in the Drawing group, click Shapes, and then under Lines click Line (first option from the left).On the slide, press and hold SHIFT, and then drag to draw a straight, vertical line.Select the line. Under DrawingTools, on the Format tab, in the Size group, in the Shape Width box, enter 7.5”.Under DrawingTools, on the Format tab, in the ShapeStyles group, click the Format Shape dialog box launcher. In the Format Shape dialog box, click LineColor in the left pane. In the LineColor pane, select Solidline, click the button next to Color, and then under ThemeColors click Black, Text 1 (first row, second option from the left).Also in the Format Shape dialog box, click LineStyle in the left pane. In the LineStyle pane, in the Weight box, enter 2 pt.Under DrawingTools, on the Format tab, in the ShapeStyles group, click ShapeEffects, point to Glow, and then under GlowVariations click Accent color 1, 5 pt glow (first row, first option from the left). Under DrawingTools, on the Format tab, in the ShapeStyles group, click ShapeEffects, point to Glow, point to MoreGlowColors, and then under ThemeColors click White, Background 1 (first row, first option from the left).On the Home tab, in the Drawing group, click Arrange, point to Align, and then do the following:Click Align to Slide.Click AlignCenter.Click AlignMiddle.On the slide, select the line. On the Home tab, in the Clipboard group, click the arrow under Paste, and then click Duplicate.Drag the duplicate line slightly off the right edge of the slide.With the duplicate line still selected, on the Home tab, in the Drawing group, click Arrange, point to Align, and then do the following: Click Align to Slide. Click Align Middle.On the Insert tab, in the Illustrations group, click Picture. In the InsertPicture dialog box, select a picture, and then click Insert.On the slide, select the picture. Under Picture Tools, on the Format tab, in the bottom right corner of the Size group, click the Size and Position dialog box launcher. In the Size and Position dialog box, on the Size tab, resize or crop the picture as needed so that under Size and rotate, the Height box is set to 7.5” and the Width box is set to 5”. Resize the picture under Size and rotate by entering values into the Height and Width boxes. Crop the picture under Crop from by entering values into the Left, Right, Top, and Bottom boxes. On the Home tab, in the Drawing group, click Arrange, point to Align, and then do the following:Click Align to Slide.ClickAlignRight.ClickAlignMiddle.To reproduce the text effects on this slide, do the following:On the Insert tab, in the Illustrations group, click TextBox. On the slide, drag to draw a text box.Enter text in the text box, and then select the text. On the Home tab, in the Font group, do the following:In the Font list, select Arial.In the FontSize list, select 28.Click Bold.Click the button next to FontColor, and then under ThemeColors click White, Background 1 (first row, first option from the left).On the Home tab, in the Paragraph group, click AlignTextRight to align the text right in the text box. Drag the text box onto the left half of the slide.To reproduce the background effects on this slide, do the following:Right-click the slide background area, and then click Format Background. In the Format Background dialog box, click Fill in the left pane, select Gradient fill in the Fill pane, and then do the following:In the Type list, select Linear.Click the button next to Direction, and then click Linear Down (first row, second option from the left).Under Gradient stops, click Add or Remove until two stops appear in the drop-down list.Also under Gradient stops, customize the gradient stops that you added as follows:Select Stop 1 from the list, and then do the following:In the Stop position box, enter 40%.Click the button next to Color, and then click Black, Text 1 (first row, second option from the left).Select Stop 2 from the list, and then do the following: In the Stop position box, enter 100%.Click the button next to Color, and then click Black, Text 1, Lighter 50% (second row, second option from the left).To reproduce the animation effects on this slide, do the following:On the Animations tab, in the Animations group, click CustomAnimation. Select the line off the right edge of the slide. In the CustomAnimation task pane, do the following:Click AddEffect, point to Entrance, and then click MoreEffects. In the AddEntranceEffect dialog box, under Basic, click FlyIn.Select the animation effect (fly-in effect for the second line). Under Modify: Fly In,do the following:In the Start list, select After Previous.In the Direction list, select FromLeft.In the Speed list, select Fast.On the Home tab, in the Editing group, click Select, and then click Selection Pane.In the Selection and Visibility pane, select the first line you created (in the middle of the slide). In the CustomAnimation task pane, do the following:Click AddEffect, point to Entrance, and then click MoreEffects. In the AddEntranceEffect dialog box, under Basic, click FlyIn.Select the second animation effect (fly-in effect for the first line). Under Modify: Fly In,do the following:In the Start list, select AfterPrevious.In the Direction list, select FromRight.In the Speed list, select Fast.On the slide, select the picture. In the CustomAnimation task pane, do the following:Click AddEffect, point to Entrance, and then click MoreEffects. In the AddEntranceEffect dialog box, under Basic, click Wipe.Select the third animation effect (wipe effect for the picture). Under Modify: Wipe,do the following:In the Start list, select WithPrevious.In the Direction list, select FromRight.In the Speed list, select Fast.On the slide, select the text box. In the CustomAnimation task pane, do the following:Click AddEffect, point to Entrance, and then click MoreEffects. In the AddEntranceEffect dialog box, under Basic, clickFlyIn.Select the fourth animation effect (fly-in effect for the text box). Under Modify: Fly In,do the following:In the Start list, select WithPrevious.In the Direction list, select FromRight.In the Speed list, select Fast.
- Custom animation effects: shrink picture circle with text(Intermediate)To reproduce the picture effects on this slide, do the following:On the Home tab, in theSlides group, click Layout, and then click Blank.On the Insert tab, in the Illustrations group, click Picture. In the InsertPicture dialog box, select a picture, and then click Insert.On the slide, select the picture. Under PictureTools, on the Format tab, in the PictureStyles group, click PictureShape, and then under BasicShapes click Oval (first row, first option from the left).Select the picture-filled oval. Under Picture Tools, on the Format tab, in the bottom right corner of the Size group, click the Size and Position dialog box launcher. In the Size and Position dialog box, on the Size tab, resize or crop the picture as needed so that under Size and rotate, the Height box is set to 6” and the Width box is set to 6”. Resize the picture under Size and rotate by entering values into the Height and Width boxes. Crop the picture under Crop from by entering values into the Left, Right, Top, and Bottom boxes. Under PictureTools, on the Format tab, in the PictureStyles group, click PictureEffects, point to Glow, and then under GlowVariations click Accent color 1, 18 pt glow (fourth row, first option from the left).Under PictureTools, on the Format tab, in the PictureStyles group, click PictureEffects, point to Glow, point to More Glow Colors, and then under ThemeColors click White, Background 1 (first row, first option from the left).On the Home tab, in the Drawing group, click the Format Shape dialog box launcher. In the Format Picture dialog box, click Shadow in the left pane. In the Shadow pane, click the button next to Presets, under Inner click InsideDiagonalBottomLeft (third row, first option from the left), and then do the following:In the Transparency box, enter 50%.In the Blur box, enter 8 pt.In the Angle box, enter 135°.In the Distance box, enter 8 pt.On the Insert tab, in the Text group, click TextBox. On the slide, drag to draw a text box.Enter text, and then select the text. On the Home tab, in the Font group, do the following:In the Font list, select Candara.In the FontSize box, enter 30.Click the arrow next to FontColor, and then click Black, Text 1, Lighter 25% (fourth row, second option from the left).On the Home tab, in the Paragraph group, click AlignTextLeft.On the slide, select the text box. Under DrawingTools, on the Format tab, in the WordArt Styles group, click TextEffects, point to Reflection, and then under ReflectionVariations click TightReflection, touching (first row, first option from the left).Drag the text box onto the right half of the slide.With the text box still selected, on the Home tab, in the Drawing group, click Arrange, and then do the following:Point to Align, and then click Align to Slide.Point to Align, and then click Align Right.Point to Align, and then click Align Middle.Click Send to Back. To reproduce the animation effects on this slide, do the following:On the Animations tab, in the Animations group, click CustomAnimation. On the slide, select the picture. In CustomAnimation task pane, do the following:Click Add Effect, point to Entrance, and then click More Effects. In the Add Entrance Effect dialog box, under Basic, click Wheel.Select the animation effect (wheel effect for the picture). Under Modify: Wheel,do the following:In the Start list, select WithPrevious.In the Spokes list, select 1 Spoke.In the Speed list, select Medium. On the slide, select the picture. In CustomAnimation task pane, do the following:Click Add Effect, point to Entrance, and then click More Effects. In the Add Entrance Effect dialog box, under Subtle, click FadedZoom.Select the second animation effect (faded zoom effect for the picture). Under Modify: FadedZoom,do the following:In the Start list, select WithPrevious.In the Speed list, select Medium. On the slide, select the picture. In CustomAnimation task pane, do the following:Click Add Effect, point to Emphasis, and then click More Effects. In the Add Emphasis Effect dialog box, under Basic, click Grow/Shrink.Select the third animation effect (grow/shrink effect for the picture). Click the arrow to the right of the selected effect, and then click EffectOptions. In the Grow/Shrink dialog box, do the following:On the Effect tab, under Settings, do the following:In the Size list, in the Custom box, enter 95%, and then press ENTER.Select SmoothStart.Select SmoothEnd.Select Auto-reverse.On the Timing tab, do the following: In the Start list, select AfterPrevious. In the Speed box, enter 0.3 seconds. On the slide, select the picture. In CustomAnimation task pane, do the following:Click Add Effect, point to Emphasis, and then click More Effects. In the Add Emphasis Effect dialog box, under Basic, click Grow/Shrink.Select the fourth animation effect (grow/shrink effect for the picture). Under Grow/Shrink, do the following:In the Start list, select AfterPrevious.In the Size list, select Smaller.In the Speed list, select Medium. On the slide, select the picture. In CustomAnimation task pane, do the following:ClickAddEffect, point to MotionPaths, and then click Left.Select the fifth animation effect (left motion path for the picture). Under Modify: Left,do the following:In the Start list, select WithPrevious.In the Speed list, select Medium.On the slide, select the text box. In the CustomAnimation task pane, do the following:Click Add Effect, point to Entrance, and then click More Effects. In the Add Entrance Effect dialog box, under Subtle, select Fade.Select the sixth animation effect (fade effect for the text box). Click the arrow to the right of the selected effect, and then click Timing. In the Fade dialog box, on the Timing tab, do the following:In the Start list, select WithPrevious.In the Delay box, enter 1.5.In the Speed list, select 1 seconds (Fast).On the slide, select the text box. In CustomAnimation task pane, do the following:ClickAddEffect, point to MotionPaths, and then click Left.Select the seventh animation effect (left motion path for the text box). Under Modify: Left,do the following:In the Start list, select WithPrevious.In the Speed list, select Fast.On the slide, right–click the selected motion path for the text box, and then clickReversePathDirection. To reproduce the rectangle on this slide, do the following: On the Home tab, in theDrawing group, clickShapes, and then under Rectangles click Rectangle (first option from the left). On the slide, drag to draw a rectangle.Select the rectangle.Under DrawingTools, on the Format tab, in the Size group, do the following:In the ShapeHeight box, enter 1.54”.In theShapeWidth box, enter 10”.Under DrawingTools, on theFormat tab, in the ShapeStyles group, click the arrow next to ShapeOutline, and then click NoOutline.Under DrawingTools, on the Format tab, in the bottom right corner of the ShapeStyles group, click the FormatShape dialog box launcher. In the Format Shape dialog box, clickFill in the left pane, selectGradientfill in the Fill pane, and then do the following:In the Type list, select Linear.Click the button next to Direction, and then click Linear Right (first row, fourth option from the left). Under Gradient stops, click Add or Remove until two stops appear in the drop-down list.Also under Gradient stops, customize the gradient stops that you added as follows:Select Stop 1 from the list, and then do the following:In the Stop position box, enter 0%.Click the button next to Color, and then under Theme Colors click White, Background 1 (first row, first option from the left).In the Transparency box, enter 88%.Select Stop 2 from the list, and then do the following: In the Stop position box, enter 100%.Click the button next to Color, and then under Theme Colors click White, Background 1 (first row, first option from the left).In the Transparency box, enter 43%.On the Home tab, in the Drawinggroup, click Arrange, and then do the following:Point to Align, and then click Align to Slide. Point to Align, and then clickAlignMiddle.Point to Align, and then clickAlignCenter.Click Send to Back. To reproduce the background effects on this slide, do the following:Right-click the slide background area, and then click Format Background. In the Format Background dialog box, click Fill in the left pane, select Gradient fill in the Fill pane, and then do the following:In the Type list, select Radial.Click the button next to Direction, and then click From Center (third option from the left).Under Gradient stops, click Add or Remove until two stops appear in the drop-down list.Also under Gradient stops, customize the gradient stops that you added as follows:Select Stop 1 from the list, and then do the following:In the Stop position box, enter 0%.Click the button next to Color, and then under Theme Colors click White, Background 1 (first row, first option from the left).Select Stop 2 from the list, and then do the following: In the Stop position box, enter 100%.Click the button next to Color, and then under Theme Colors click Black, Text 1, Lighter 50% (second row, second option from the left).
- Custom animation effects: countdown(Advanced)Tip: For the effects on this slide, use a large picture that measures 7.5” high and 10” wide (the dimensions of the slide). To reproduce the animated picture effects on this slide, do the following:On the Home tab, in theSlides group, click Layout, and then click Blank.On the Insert tab, in the Illustrations group, click Picture. In the Insert Picture dialog box, select the 7.5” x 10” picture, and then click Insert.On the slide, select the picture. Under Picture Tools, on the Format tab, in the bottom right corner of the Size group, click the Size and Position dialog box launcher. In the Size and Position dialog box, on the Size tab, under Crop from, in the Right box, enter 5.33”. (Note: Under Size and rotate, the Height should now be 7.5” and the Width should now be 5”.)On the Home tab, in the Drawing group, click Arrange, point to Align, and then do the following:Click Align to Slide.Click Align Left.Click Align Middle.On the Insert tab, in the Illustrations group, click Picture. In the Insert Picture dialog box, select the same 7.5” x 10” picture, and then click Insert.On the slide, select the second picture. Under Picture Tools, on the Format tab, in the bottom right corner of the Size group, click the Size and Position dialog box launcher. In the Size and Position dialog box, on the Size tab, under Crop from, in the Left box, enter 5.33”. (Note: Under Size and rotate, the Height should be 7.5” and the Width should now be 5”.)On the Home tab, in the Drawing group, click Arrange, point to Align, and then do the following:Click Align to Slide.Click Align Right.Click Align Middle.On the Home tab, in the Drawing group, click Shapes, and then under Rectangle click Rectangle (first option from the left). On the slide, drag to draw a rectangle. Select the rectangle. On the Home tab, in the Drawing group, click Arrange, point to Align, and then do the following:Click Align to Slide.Click Align Right.Click Align Middle. With the rectangle still selected, on the Home tab, in the bottom right corner of the Drawing group, click the Format Shape dialog box launcher. In the Format Shape dialog box, click Fill in the left pane. In the Fill pane, select Solid fill, and then do the following:Click the button next to Color, and then under Theme Colors click White, Background 1 (first row, first option from the left).In the Transparency box, enter 10%.On the Animations tab, in the Animations group, click Custom Animation.On the slide, select the left picture. In the Custom Animation task pane, do the following:Click Add Effect, point toEntrance, and then click More Effects. In the Add Entrance Effect dialog box, under Basic, click Peek In. Select the animation effect (peek-in effect for the left picture). Under Modify: Peek In, do the following:In the Start list, select With Previous.In the Direction list, select From Right.In the Speed list, select Medium. On the slide, select the second (right) picture. In the Custom Animation task pane, do the following:Click Add Effect, point toEntrance, and then click More Effects. In the Add Entrance Effect dialog box, under Basic, click Peek In. Select the second animation effect (peek-in effect for the right picture). Under Modify: Peek In, do the following:In the Start list, select With Previous.In the Direction list, select From Left.In the Speed list, select Medium. To reproduce the first animated text effects on this slide, do the following:On the Insert tab, in the Text group, click Text Box. On the slide, drag to draw a text box. Enter Time for a short break in the text box. Select the text. On the Home tab, in the Font group, do the following:In the Font list, select TW Cen MT.In the Font Size list, select 40. Click Bold. Click the arrow next to Font Color, and then under Theme Colors click White, Background 1 (first row, first option from the left). On the Home tab, in the Paragraph group, click Align Text Right to align the text right in the text box.On the text box, drag the adjustment handles to adjust the size of the text box so that the text wraps onto two lines, as in the example above. Drag the text box onto the lower half of the slide, to the left of the middle.On the slide, select the text box. In the Custom Animation task pane, do the following:Click Add Effect, point toEntrance, and then click More Effects. In the Add Entrance Effect dialog box, under Moderate, click Ascend. Select the third animation effect (ascend effect for the first text box). Click the arrow to the right of the selected effect, and then click Timing. In the Ascend dialog box, do the following:In the Start list, select With Previous.In the Delay box, enter 1.In the Speed list, select 1 seconds (Fast).To reproduce the other animated text effects on this slide, do the following:On the Insert tab, in the Text group, click Text Box. On the slide, drag to draw a text box. Enter : in the second text box. Select the text in the second text box. On the Home tab, in the Font group, do the following:In the Font list, select TW Cen MT.In the Font Size list, select 90. Click Bold. Click the arrow next to Font Color, and then under Theme Colors click Black, Text 1 (first row, second option from the left). On the Home tab, in the Paragraph group, click Align Text Left to align the colon left in the second text box. Drag the second text box into the upper half of the slide, to the right of the middle.On the slide, select the second text box. In the Custom Animation task pane, do the following:Click Add Effect, point toEntrance, and then click More Effects. In the Add Entrance Effect dialog box, under Moderate, click Descend. Select the fourth animation effect (descend effect for the second text box). Under Modify: Descend, do the following:In the Start list, select With Previous.In the Speed list, select Fast.On the slide, select the second text box. On the Home tab, in the Clipboard group, click the arrow under Paste, and then click Duplicate. Click in the third text box, delete the colon, and then enter 10.Drag the 10 text box on top of the second text box, until the number is positioned to the right of the colon.On the Home tab, in the Editing group, click Select, and then click Selection Pane. In the Selection and Visibility pane, select the 10 text box. In the Custom Animation task pane, do the following:Click Add Effect, point toExit, and then click More Effects. In the Add Exit Effect dialog box, under Basic, click Disappear. Select the sixth animation effect (disappear effect for the second text box). Click the arrow to the right of the selected effect, and then click Timing. In the Disappear dialog box, on the Timing tab, do the following:In the Start list, select After Previous.In the Delay box, enter 1.In the Selection and Visibility pane, select the 10 text box. On the Home tab, in the Clipboard group, click the arrow under Paste, and then click Duplicate. Click in the fourth text box, delete 10, and then enter 09 (the content of the previous text box, minus one second).In the Selection and Visibility pane, select the 09 text box. On the slide, drag the selected text box on top of the other text boxes.In the Custom Animation task pane, do the following:Select the seventh animation effect (descend effect for the 09 text box). Click Change, point to Entrance, and then click More Effects. In the Change Entrance Effect dialog box, under Basic, click Appear. Select the seventh animation effect (appear effect for the 09 text box). Click the arrow to the right of the selected effect, and then click Timing. In the Appear dialog box, on the Timing tab, in the Delay box, enter 1.In the Selection and Visibility pane, select the 09 text box. On the Home tab, in the Clipboard group, click the arrow under Paste, and then click Duplicate. On the slide, click in the duplicate text box, delete 09, and enter 08 (the content of the previous text box, minus one second).In the Selection and Visibility pane, select the 08 text box. On the slide, drag the selected text box on top of the other text boxes. On the slide, continue to duplicate, edit, and drag the text boxes as in steps 16-18, entering a number in each new text box that is one second less than the previous text box, until there is a total of 11 numbered text boxes. (Note: The final text box will contain 00). In the Custom Animation task pane, select the last animation effect (disappear effect for the 00 text box), and then click Remove.
- Custom animation effects: shrink transparent shapes(Intermediate)Tip: You will need to use drawing guides to reproduce the effects on this slide. To display and set the drawing guides, do the following:On the Home tab, in theSlides group, click Layout, and then click Blank.Right-click the slide background area, and then click Grid and Guides.In the Grid and Guides dialog box, do the following:Under Snap to, select Snap objects to grid.Under Gridsettings, in the Spacing box, enter 0.25.Under Guide settings, select Displaydrawingguideson screen.On the slide, press and hold CTRL, select the vertical guide, and then drag it left to the 2.00 position. (Note: One horizontal and one vertical guide will display on the slide at 0.00, the default position. As you drag the guides, the cursor will display the new position.) Press and hold CTRL, select the vertical guide, and then drag it left to the 2.00 position. Press and hold CTRL, select the horizontal guide, and then drag it up to the 2.00 position. Press and hold CTRL, select the horizontal guide, and then drag it down to the 1.25 position. Right-click the slide background area, and then click Grid and Guides.In the Grid and Guides dialog box, under Snap to, clear Snap objects to grid.To reproduce the animated shape effects on this slide, do the following:On the Home tab, in the Drawing group, click Shapes, and then under Rectangle click Rounded Diagonal Corner Rectangle (ninth option from the left). On the slide, drag to draw a rectangle.Select the rectangle. Under Drawing Tools, on the Format tab, in the Size group, do the following:In the Shape Height box, enter 8.1”. In the Shape Width box, enter 10.5”.Under the Drawing Tools, on the Format tab, in the Shapes Styles group, click the arrow next to Shape Outline, and then click No Outline.On the Home tab, in the Drawing group, click Arrange, point to Align, and then do the following:Click Align to Slide.Click Align Center.Click Align Middle.On the Animations tab, in the Animations group, click Custom Animation.On the slide, select the rectangle. In the CustomAnimation task pane, do the following:Click AddEffect, point to Emphasis, and then click More Effects. In the Add Emphasis Effect dialog box, under Basic, click Grow/Shrink.Select the animation effect (grow/shrink effect for the rectangle). Click the arrow next to the selected effect, and then click Effect Options. In the Grow/Shrink dialog box, do the following:On the Effect tab, in the Size list, in the Custom box, enter 37%, and then press ENTER. On the Timing tab, do the following:In theStart list, selectWith Previous. In the Speed box, enter 1.5 seconds.On the slide, select the rectangle. In the CustomAnimation task pane, do the following:Click AddEffect, point to Motion Paths,and then click Left. Select the second animation effect (left motion path for the rectangle). Click the arrow next to the selected effect, and then click Timing. In the Left dialog box, on the Timing tab, do the following:In theStart list, selectWith Previous. In the Delay box, enter 0.7.In the Speed box, enter 0.8 seconds.On the slide, select the motion path. Point to the endpoint (red arrow) until the cursor becomes a two-headed arrow, and then drag the endpoint to the intersection of the 2.00 top horizontal and the 2.00 left vertical drawing guides. Select the rectangle. On the Home tab, in the Clipboard group, click the arrow under Paste, and then click Duplicate.Select the duplicate rectangle. On the Home tab, in the Drawing group, click Arrange, point to Align, and then do the following:Click Align Center.Click Align Middle.With the second rectangle still selected, under Drawing Tools, on the Format tab, in the bottom right corner of the Shape Styles group, click the Format Shape dialog box launcher. In the Format Shape dialog box, click Fill in the left pane, select Solid fill in the Fill pane, and then do the following: Click the button next to Color, and then under Theme Colors click White, Background 1 (first row, first option from the left).In the Transparency box, enter 50%.In the Custom Animation task pane, select the fourth animation effect (motion path for the second rectangle). On the slide, point to the endpoint (red arrow) until the cursor becomes a two-headed arrow, and then drag the endpoint to the intersection of the 1.25 bottom horizontal and the 2.00 left vertical drawing guides.To reproduce the animated text effects on this slide, do the following: On the Insert tab, in the Text group, click Text Box, and then on the slide, drag to draw the text box. Enter text in the text box, and then select the text. On the Home tab, in the Font group, do the following:In the Font list, select Gill Sans MT.In the Font Size box, enter 26.On the Home tab, in the Paragraph group, click Center to center the text in the text box.On the slide, drag the text box until it is centered at the intersection of the 2.00 top horizontal and the 2.00 left vertical drawing guides. On the Animations tab, in the Animations group, click Custom Animation.With the text box still selected, in the Custom Animation task pane, do the following:Click AddEffect, point to Entrance, and then click More Effects. In the Add Entrance Effect dialog box, under Subtle, click Fade.Select the fifth animation effect (fade effect for the first text box). Under Modify: Fade, do the following:In the Start list, select After Previous.In the Speed list, select Medium.On the slide, select the text box. On the Home tab, in the Clipboard group, click the arrow under Paste, and then click Duplicate.Click in the second, duplicate text box, and then edit the text. Select the text in the second text box. On the Home tab, in the Font group, click the arrow next to Font Color, and then click Black, Text 1 (first row, second option from the left).On the slide, drag the second text box until it is centered at the intersection of the 1.25 bottom horizontal and the 2.00 left vertical drawing guides.With the second text box still selected, in the Custom Animation task pane, select the sixth animation effect (fade effect for the second text box). Click the arrow next to the selected effect, and then click Timing. In the Fade dialog box, on the Timing tab, in the Delay box, enter 1. Right-click off the slide, and then click Grid and Guides. In the Grid and Guides dialog box, under Guide settings, clear Display drawing guides on screen. To modify the color of the objects on the slide, do the following:In the Selection and Visibility pane, select the first rectangle you created on the slide. Under the DrawingTools, on the Format tab, in the bottom right corner in the Shapes Styles group, click the Format Shape dialog box launcher. In the Format Shape dialog box, click Fill in the left pane, select Solid fill in the Fill pane, and then do the following:Click the button next to Colors, and then under Theme Colors click Black, Text 1 (first row, second option from the left). In the Transparency box, enter 50%.On the slide, select the text in the first text box. On the Home tab, in the Font group, click the arrow next to Font Color,and then under Theme Colors click White, Background 1 (first row, first option from the left).On the slide, select the text in the second text box. On the Home tab, in the Font group, click the arrow next to Font Color,and then under Theme Colors click Black, Text 1, Lighter 15% (fifth row, second option from the left). To reproduce the background effects on this slide, do the following: On the Design tab, in the bottom right corner of the Background group, click the Format Background dialog box launcher.In the Format Background dialog box, click Fill in the left pane, select Picture or texture fill in the Fill pane, and then under Insert from, click File.In the Insert Picture dialog box, select a picture, and then click Insert.
- Custom animation effects: recolored picture with full-color section and motion path(Advanced)To reproduce the picture effects on this slide, do the following:On the Home tab, in the Slides group, click Layout and then click Blank. On the Insert tab, in the Illustrations group, click Picture. In the Insert Picture dialog box, select a picture, and then click Insert. Select the picture. Under Picture Tools, on the Format tab, in the bottom right corner of the Size group, click the Size and Position dialog box launcher. In the Size and Position dialog box, on the Size tab, resize or crop the picture as needed so that under Size and rotate, the Height box is set to 3.58” and the Width box is set to 8”. Resize the picture under Size and rotate by entering values into the Height and Width boxes. Crop the picture under Crop from by entering values into the Left, Right, Top, and Bottom boxes. Under Picture Tools, on the Format tab, in the Adjust group, click Recolor, and then under Dark Variations click Text color 2 Dark (first option from the left). Under Picture Tools, on the Format tab, in the Picture Styles group, click Picture Effects, point to Shadow, and then under Inner click Inside Diagonal Top Left (first row, first option from the left).Drag the picture so that it is positioned above the middle of the slide. On the Home tab, in the Clipboard group, click the arrow next to Paste, and then click Duplicate.Press and hold CTRL and select both pictures on the slide. On the Home tab, in the Drawing group, click Arrange, point to Align, and then do the following:Click Align to Slide.Click Align Center. Click Align Selected Objects. Click Align Middle. Click the slide background area to cancel the selection of both pictures. Select the duplicate (top) picture. Under Picture Tools, on the Format tab, in the bottom right corner of the Size group, click the Size and Position dialog box launcher. In the Size and Position dialog box, on the Size tab, under Crop from,enter valuesinto the Left andRight boxes so that under Size and rotate, and the Width box is set to 2.33”. (Note: For best results, crop the duplicate picture to tightly focus on a single element in the original picture.)Under Picture Tools, on the Format tab, in the Adjust group, click Recolor, and then under No Recolor click No Recolor. On the Home tab, in the Drawing group, click Shapes, and then under Rectangles click Rectangle (first option from the left). On the slide, drag to draw a rectangle. Select the rectangle. Under Drawing Tools, on the Format tab, in the Size group, do the following:In the Shape Height box, enter 7.5”.In the Shape Width box, enter 2.33”.Under Drawing Tools, on the Format tab, in the Shape Styles group, click the arrow next to Shape Fill, point to Gradient, and then click More Gradients. In the Format Shape dialog box, click Fill in the left pane, select Gradient fill in the Fill pane, and then do the following:In the Type list, select Linear.Click the button next to Direction, and then click Linear Down (first row, second option from the left).Under Gradient stops, click Add or Remove until two stops appear in the drop-down list.Also under Gradient stops, customize the gradient stops that you added as follows:Select Stop 1 from the list, and then do the following:In the Stop position box, enter 0%.Click the button next to Color, then under Theme Colors click White, Background 1 (first row, first option from the left).In the Transparency box, enter 55%.Select Stop 2 from the list, and then do the following: In the Stop position box, enter 100%.Click the button next to Color, and then under Theme Colors click White, Background 1 (first row, first option from the left).In the Transparency box, enter 100%.On the slide, drag the rectangle to cover the duplicate picture. Select the rectangle. On the Home tab, in the Drawing group, click Arrange, and then do the following:Point to Align, and then click Align to Slide.Point to Align, and then click Align Middle. Click Send Backward. On the Home tab, in the Drawing group, click Shapes, and then under Rectangles click Rectangle (first option from the left). On the slide, drag to draw another rectangle. Select the rectangle. Under Drawing Tools, on the Format tab, in the Size group, do the following:In the Shape Height box, enter 4”.In the Shape Width box, enter 2.67”.Under Drawing Tools, on the Format tab, in the Shape Styles group, click the arrow next to Shape Fill, point to Gradient, and then click More Gradients. In the Format Shape dialog box, click Fill in the left pane. In the Fill pane, select No fill. Also in the Format Shape dialog box, click Line Color in the left pane, select Solid line in the Line Color pane, and then do the following:Click the button next to Color, and then under Theme Colors click White, Background 1 (first row, first option from the left). In the Transparency box, enter 70%.Also in the Format Shape dialog box, click Line Style in the left pane, and then do the following in the Line Style pane:In the Width box, enter 0.75 pt. Click the button next to Dash type, and then click Square Dot (third option from the top).Drag the dotted rectangle on top of the small, full-color picture. Press and hold SHIFT and select the dotted rectangle, the small picture, and the large picture on the slide. On the Home tab, in the Drawing group, click Arrange, point to Align, and then do the following:Click Align Selected Objects. Click Align Middle. On the Insert tab, in the Text group, click Text Box, and then on the slide, drag to draw the text box.Enter text in the text box, select the text, and then on the Home tab, in the Font group, select Gill Sans MT Condensedfrom the Font list, select 24 from the Font Size list, click the button next to Font Color, and then under Theme Colors click White, Background 1 (first row, first option from the left).On the Home tab, in the Paragraph group, click Center to center the text within the text box.On the slide, drag the text box below the dotted rectangle.To reproduce the background effects on this slide, do the following:Right-click the slide background area, and then click Format Background. In the Format Background dialog box, click Fill in the left pane, and then select Solid fill in the Fill pane. Also in the Fill pane, click the button next to Color, and then under Theme Colors click Black, Text 1, Lighter 15% (fifth row, second option from the left).To reproduce the animation effects on this slide, do the following:To view the area beyond the slide, on the View tab, click Zoom, and then in the Zoom dialog box, in the Percent box, enter 70%. (Note: Make sure that Fit is not selected in the Zoom dialog box.)On the Animations tab, in the Animations group, click Custom Animation. On the slide, select the dotted rectangle. In the Custom Animation task pane, click Add Effect, point to Motion Paths, point to Draw Custom Path, and then click Freeform. Press and hold SHIFT to conform the path to a straight, horizontal line, and then do the following on the slide:Click the center of the dotted rectangle to create the first motion-path point.Click approximately ½” beyond the right edge of the rectangle to create the second motion-path point. Double-click approximately 2” beyond the left edge of the slide to create the third and final motion-path point. On the slide, right-click the freeform motion path, and then click Reverse Path Direction. On the slide, select the freeform motion path. In the Custom Animation task pane, under Modify: Custom Path, in the Start list, select With Previous. On the slide, select the gradient-filled rectangle. In the Custom Animation task pane, do the following:Click Add Effect, point to Entrance, and then click More Effects. In the Add Entrance Effect dialog box, under Subtle, click Fade, and then click OK. Under Modify: Fade, in the Start list, select With Previous.Under Modify: Fade, in the Speed list, select Very Fast.Click Add Effect, point to Motion Paths, and then click Down.Under Modify: Down, in the Start list, select With Previous. Under Modify: Down, in the Speed list, select Medium. On the slide, right-click the down motion path and click ReversePathDirection.On the slide, select the smaller, full-color picture. In the Custom Animation task pane, do the following:Click Add Effect, point to Entrance, and then click More Effects. In the Add Entrance Effect dialog box, under Subtle, click Fade, and then click OK. Under Modify: Fade, in the Start list, select With Previous.Under Modify: Fade, in the Speed list, select Very Fast.Right-click the picture fade effect in the pane, and then click Timing. In the Fade dialog box, on the Timing tab, in the Delay box, enter 1.5.On the slide, select the text box. In the Custom Animation task pane, do the following:Click Add Effect, point to Entrance, and then click More Effects. In the Add Entrance Effect dialog box, under Moderate, click Descend, and then click OK. Under Modify: Descend, in the Start list, select With Previous. Under Modify:Descend, in the Speed list, select Fast.
- Custom animation effects: grow and shrink picture(Advanced)Tip:This slide includes three small pictures and one large version of the top small picture. The small pictures are 1.88” high and 2.5” wide. The large picture is 7.5” high and 10” wide (the dimensions of the slide). Before following the procedures below, size each of the three pictures you will insert into the slide to 7.5” high by 10” wide. You will also need to use drawing guides to position your pictures on the slide. To display and set the drawing guides, do the following:On the Home tab, in the Slides group, click Layout, and then clickBlank. Right-click the slide background area, and then click Grid and Guides.In the Grid and Guides dialog box, underGuidesettings, select Display drawing guides on screen. (Note: One horizontal and one vertical guide will display on the slide at 0.00, the default position. As you drag the guides, the cursor will display the new position.) On the slide, do the following:Press and hold CTRL, select the horizontal guide, and then drag it up to the 2.17 position.Press and hold CTRL, select the horizontal guide, and then drag it down to the 2.17 position.Press and hold CTRL, select the vertical guide, and then drag it right to the 3.50 position.Press and hold CTRL, select the vertical guide, and then drag it left to the 2.50 position.To reproduce the shape effects on this slide, do the following:On the Home tab, in the Drawing group, click Shapes, and then under Rectangles click Snip Diagonal Corner Rectangle (fifth option from the left).On the Home tab, in the Drawing group, click the arrow next to Shape Outline, and then click No Outline.On the Home tab, in the Drawing group, click the arrow next to Shape Fill, point to Gradient, and then click MoreGradients. In the Format Shape dialog box, in the left pane, click Fill, select Gradient fill in the Fill pane, and then do the following:In the Type list, select Linear.Click the button next to Direction, and then click Linear Right(first row, fourth option from the left). Under Gradient stops, click Add or Remove until two stops appear in the drop-down list.Also under Gradient stops, customize the gradient stops as follows:Select Stop 1 from the list, and then do the following:In the Stop position box, enter 0%.Click the button next to Color, and then under Theme Colors click Black, Text 1 (first row, second option from the left). In the Transparency box, enter 51%.Select Stop 2 from the list, and then do the following: In the Stop position box, enter 100%.Click the button next to Color, and then under Theme Colors click Black, Text 1 (first row, second option from the left). In the Transparency box, enter 85%.Under Drawing Tools, on the Format tab, in the Size group, do the following:In the Shape Height box, enter 1.5”.In the Shape Width box, enter 8.42”.Select the rectangle. On the Home tab, in the Clipboard group, click the arrow under Paste, and then click Duplicate. Repeat this process one more time for a total of three rectangles.Drag the first rectangle and center it vertically on the top horizontal drawing guide (2.17).Drag the second rectangle and center it vertically on the middle horizontal drawing guide (0.00).Drag the third rectangle and center it vertically on the bottom horizontal drawing guide (2.17).Press and hold CTRL, and then select all three rectangles. On the Home tab, in the Drawing group, click Arrange, point to Align, and then do the following:Click Alignto Slide.Click Align Center.To reproduce the picture effects on this slide, do the following:On the Insert tab, in the Illustrations group, click Picture. In the Insert Picture dialog box, select a picture and then click Insert.On the slide, select the picture.UnderPicture Tools, on the Format tab, in the bottom right corner of the Size group, click the Size and Position dialog box launcher. In the Size and Position dialog box, on the Size tab, under Scale, clear Lock aspect ratio, and then under Size and rotate, do the following:In the Height box, enter 1.88”. In the Width box, enter 2.5”.UnderPicture Tools, on the Format tab, in the Picture Styles group, click the arrow next to Picture Border, and then do the following:Under Theme Colors click Dark Blue, Text 2, Darker 25% (fifth row, fourth option from the left). Point to Weight, and then click 1 ½ pt.On the slide, drag the picture until it is centered at the intersection of the top horizontal drawing guide (2.17) and the left vertical drawing guide (2.50).Select the picture. On the Home tab, in the Clipboard group, click the arrow under Paste, and then click Duplicate. Right-click the second picture, and then select ChangePicture. In the Insert Picture dialog box, select a picture and then click Insert.On the slide, drag the second picture until it is centered at the intersection of the center horizontal drawing guide (0.00) and the left vertical drawing guide (2.50).Select the second picture. On the Home tab, in the Clipboard group, click the arrow under Paste, and then click Duplicate. Right-click the third picture, and then select ChangePicture. In the Insert Picture dialog box, select a picture and then click Insert.On the slide, drag the third picture until it is centered at the intersection of the bottom horizontal drawing guide (2.17) and the left vertical drawing guide (2.50).To reproduce the text effects on this slide, do the following:On the Insert tab, in the Text group, click TextBox. On the slide, drag to draw a text box.Enter text for the first picture caption in the text box, and then select the text. On the Home tab, in the Font group, select Calibri from the Font list, select 18 from the Font Size list, click the arrow next to Font Color, and then under Theme Colors click White, Background 1 (first row, first option from the left).Select the text box, and then drag the it to the right of the first picture, above the top horizontal drawing guide (2.17). Select the text box. On the Home tab, in the Clipboard group, click the arrow under Paste, and then click Duplicate. Click in the second text box, and then enter text for the second picture caption.Select the second text box, and then drag the it to the right of the second picture, above the center horizontal drawing guide (0.00). Select the second text box. On the Home tab, in the Clipboard group, click the arrow under Paste, and then click Duplicate. Click in the third text box, and then enter text for the third picture caption.Select the third text box, and then drag the it to the right of the third picture, above the bottom horizontal drawing guide (2.17).To reproduce the animation effects on this slide, do the following:On the Insert tab, in the Illustrations group, click Picture. In the Insert Picture dialog box, select the 7.5” x 10” version of the picture that fills the top small rectangle on the slide, and then click Insert. On the Animations tab, in the Animations group, click CustomAnimation.On the slide, select the new large picture.In the Custom Animation task pane, do the following:Click Add Effect, point to Exit, and then click MoreEffects. In the Add Exit Effect dialog box, under Basic, click Disappear,and then click OK. Under Modify: Disappear, in the Start list, select After Previous.Click Add Effect, point to Emphasis, and then click MoreEffects. In the Add Emphasis Effect dialog box, under Basic, click Grow/Shrink,and then click OK. Under Modify: Grow/Shrink, do the following:In the Start list, select After Previous. In the Size list, in the Custom box, enter 25%, and then press ENTER.Also in the Custom Animation task pane, click the arrow to the right of the second animation effect (grow/shrink effect), and then click Timing. In the Grow/Shrink dialog box, on the Timing tab, in the Speed box, enter 0.01 seconds.With the large picture still selected on the slide, do the following in theCustom Animation task pane:Click Add Effect, point to Entrance, and then click MoreEffects. In the Add Entrance Effect dialog box, under Basic, click Appear, and then click OK. Under Modify: Appear, in the Start list, select On Click.Click Add Effect, point to Emphasis, and then click MoreEffects. In the Add Emphasis Effect dialog box, under Basic, click Grow/Shrink,and then click OK. Under Modify: Grow/Shrink, do the following:In the Start list, select With Previous. In the Size list, in the Custom box, enter 400%, and then press ENTER.In the Speed list, select Medium. Click Add Effect, point to Motion Paths, and then click Up. Under Modify: Up, do the following:In the Start list, select With Previous.In the Speed list, select Medium.On the slide, selectthe upmotion path. Point to the endpoint (red arrow) until the cursor becomes a two-headed arrow. Drag the endpoint to the intersection of the top horizontal drawing guide (2.17) and the left vertical drawing guide (2.50), at the center of the first small picture. Right-click the up motion path, and then click Reverse Path Direction. In the CustomAnimation task pane, select the fifth animation effect (up motion path). Under Modify: Up, in the Path list, select Locked.On the slide, select the large picture. In the Custom Animation task pane, do the following:Click Add Effect, point to Emphasis, and then click MoreEffects. In the Add Emphasis Effect dialog box, under Basic, click Grow/Shrink,and then click OK. Under Modify: Grow/Shrink, do the following:In the Start list, select On Click. In the Size list, in the Custom box, enter 25%, and then press ENTER.In the Speed list, select Medium. Click Add Effect, point to Motion Paths, and then click Up. Under Modify: Up, do the following:In the Start list, select With Previous.In the Speed list, select Medium.On the slide, select the second up motion path. Point to the endpoint (red arrow) until the cursor becomes a two-headed arrow. Drag the endpoint to the intersection of the top horizontal drawing guide (2.17) and the left vertical drawing guide (2.50), at the center of the first small picture. In the CustomAnimation task pane, select the seventh animation effect (second up motion path). Under Modify: Up, in the Path list, select Locked.On the slide, select the large picture. In the Custom Animation task pane, do the following:Click Add Effect, point to Exit, and thenclick MoreEffects. In the Add Exit Effect dialog box, under Basic, click Disappear, and then click OK.Under Modify: Disappear, in the Start list, select After Previous.On the slide, select the large picture. Press the LEFT ARROW key to position the picture off the left edge of the slide.Right-click the slide background area, and then click Grid and Guides. In the Grid and Guides dialog box, under Guide settings, clear Display drawing guides on screen, and then click OK. To reproduce the background effects on this slide, do the following:On the Design tab, in the bottom right corner of the Background group, click theFormat Background dialog box launcher. In the Format Background dialog box, click Fill in the left pane, select Gradient fill in the Fill pane, and then do the following:In the Type list, select Linear.In the Direction list, click Linear Up (second row, second option from the left).Under Gradient stops, click Add or Remove until three stops appear in the drop-down list.Also under Gradient stops, customize the gradient stops as follows:Select Stop 1 from the list, and then do the following:In the Stop position box, enter 0%.Click the button next to Color, and then under Theme Colors click Dark Blue, Text 2, Darker 50% (sixth row, fourth option from the left). Select Stop 2 from the list, and then do the following: In the Stop position box, enter 50%.Click the button next to Color, and then under Theme Colors click Dark Blue, Text 2, Lighter 40%(fourth row, fourth option from the left). Select Stop 3 from the list, and then do the following: In the Stop position box, enter 100%.Click the button next to Color, and then under Theme Colors click Dark Blue, Text 2, Darker 25% (fifth row, fourth option from the left).
- Custom animation effects: Shrink and position circular pictures(Intermediate)Tip: This slide design includes three large, circle-shaped pictures. Each picture has a 12” diameter and is larger than the slide. You will want to use drawing guides to reproduce the effects on this slide.To display and set the drawing guides, do the following:On the Home tab, in the Slides group, click Layout, and then clickBlank. On the View tab, in the Show/Hide group, select Ruler. Right-click the slide background and select Grid and Guides.In the Grid and Guides dialog box, under Guidesettings, selectDisplaydrawingguideson screen. (Note: One horizontal and one vertical guide will display on the slide at 0.00, the default position. As you drag the guides, the cursor will display the new position.) Do the following on the slide:Press and hold CTRL, select the vertical guide, and then drag it left to the 2.83 position. Press and hold CTRL, select the vertical guide, and then drag it right to the 2.83 position.Press and hold CTRL, select the horizontal guide, and then drag it upto the 0.83 position.To reproduce the first animated picture effect on this slide, do the following:On the Insert tab, in the Illustrations group, click Picture. In the Insert Picture dialog box, select a picture and then click Insert.On the slide, select the picture. Under PictureTools, on the Format tab, in the PictureStyles group, click Picture Shape, and then under BasicShapes click Oval (first row, first option from the left).Select the oval picture. Under Picture Tools, on the Format tab, in the bottom right corner of the Size group, click the Size and Position dialog box launcher. In the Size and Position dialog box, on the Size tab, resize or crop the picture as needed so that under Size and rotate, the Height box is set to 12” and the Width box is set to 12”. Resize the picture under Size and rotate by entering values into the Height and Width boxes. Crop the picture under Crop from by entering values into the Left, Right, Top, and Bottom boxes. On the Home tab, in the Drawing group, click Arrange, point to Align, and then do the following:Click Align to Slide.Click AlignCenter.Click AlignMiddle. On the Animations tab, in the Animations group, click CustomAnimation.On the slide, select the picture. In the CustomAnimation task pane, do the following:Click Add Effect, point to Entrance, and then click MoreEffects. In the Add Entrance Effect dialog box, under Subtle, click Fade, and then click OK. Under Modify: Fade, do the following:In theStart list, select With Previous.In the Speed list, select Medium.Click Add Effect, point to Emphasis, and then click MoreEffects. In the Add Emphasis Effect dialog box, under Basic, click Grow/Shrink, and then click OK. Under Modify: Grow/Shrink, do the following: In the Start list, select After Previous.In the Size list, in the Custom box, enter 20%, and then press ENTER. In the Speed list, select Medium.Click Add Effect, point to Motion Paths, and then click Left. Under Modify: Left, do the following:In the Start list, select With Previous.In the Speed list, select Medium.In the Custom Animation task pane, select the third animation effect (left motion path for the first picture). On the slide, select the left motion path. Point to the endpoint (red arrow) of the selected motion path until the cursor becomes a two-headed arrow. Drag the endpoint to the intersection of the drawing guides in the upper left area of the slide (2.83 vertical left and 0.83 horizontal top).To reproduce the second animated picture effect on this slide, do the following:On the Insert tab, in the Illustrations group, click Picture. In the Insert Picture dialog box, select a picture and then click Insert.On the slide, select the picture. Under PictureTools, on the Format tab, in the PictureStyles group, click Picture Shape, and then under BasicShapes click Oval (first row, first option from the left).Select the oval picture. Under Picture Tools, on the Format tab, in the bottom right corner of the Size group, click the Size and Position dialog box launcher. In the Size and Position dialog box, on the Size tab, resize or crop the picture as needed so that under Size and rotate, the Height box is set to 12” and the Width box is set to 12”. Resize the picture under Size and rotate by entering values into the Height and Width boxes. Crop the picture under Crop from by entering values into the Left, Right, Top, and Bottom boxes. On the Home tab, in the Drawing group, click Arrange, point to Align, and then do the following:Click Align to Slide.Click AlignCenter.Click AlignMiddle. On the Animations tab, in the Animations group, click CustomAnimation.On the slide, select the picture. In the CustomAnimation task pane, do the following:Click Add Effect, point to Entrance, and then click MoreEffects. In the Add Entrance Effect dialog box, under Subtle, click Fade, and then click OK. Under Modify: Fade, do the following:In theStart list, select With Previous.In the Speed list, select Medium.Click Add Effect, point to Emphasis, and then click MoreEffects. In the Add Emphasis Effect dialog box, under Basic, click Grow/Shrink, and then click OK. Under Modify: Grow/Shrink, do the following: In the Start list, select After Previous.In the Size list, in the Custom box, enter 20%, and then press ENTER. In the Speed list, select Medium.Click Add Effect, point to Motion Paths, and then click Up. Under Modify: Up, do the following:In the Start list, select With Previous.In the Speed list, select Medium.In the Custom Animation task pane, select the sixth animation effect (up motion path for the second picture). On the slide, point to the endpoint (red arrow) of the selected motion path until the cursor becomes a two-headed arrow. Drag the endpoint to the intersection of the drawing guides in the upper middle area of the slide (0.00 vertical and 0.83 horizontal top). To reproduce the third animated picture effect on this slide, do the following:On the Insert tab, in the Illustrations group, click Picture. In the Insert Picture dialog box, select a picture and then click Insert.On the slide, select the picture. Under PictureTools, on the Format tab, in the PictureStyles group, click Picture Shape, and then under BasicShapes click Oval (first row, first option from the left).Select the oval picture. Under Picture Tools, on the Format tab, in the bottom right corner of the Size group, click the Size and Position dialog box launcher. In the Size and Position dialog box, on the Size tab, resize or crop the picture as needed so that under Size and rotate, the Height box is set to 12” and the Width box is set to 12”. Resize the picture under Size and rotate by entering values into the Height and Width boxes. Crop the picture under Crop from by entering values into the Left, Right, Top, and Bottom boxes. On the Home tab, in the Drawing group, click Arrange, point to Align, and then do the following:Click Align to Slide.Click AlignCenter.Click AlignMiddle. On the Animations tab, in the Animations group, click CustomAnimation.On the slide, select the picture. In the CustomAnimation task pane, do the following:Click Add Effect, point to Entrance, and then click MoreEffects. In the Add Entrance Effect dialog box, under Subtle, click Fade, and then click OK. Under Modify: Fade, do the following:In theStart list, select With Previous.In the Speed list, select Medium.Click Add Effect, point to Emphasis, and then click MoreEffects. In the Add Emphasis Effect dialog box, under Basic, click Grow/Shrink, and then click OK. Under Modify: Grow/Shrink, do the following: In the Start list, select After Previous.In the Size list, in the Custom box, enter 20%, and then press ENTER. In the Speed list, select Medium.Click Add Effect, point to Motion Paths, and then click Right. Under Modify: Right, do the following:In the Start list, select With Previous.In the Speed list, select Medium.In the Custom Animation task pane, select the ninth animation effect (right motion path for the third picture). On the slide, point to the endpoint (red arrow) of the selected motion path until the cursor becomes a two-headed arrow. Drag the endpoint to the intersection of the drawing guides in the upper right area of the slide (0.83 horizontal top and 2.83 vertical right).To reproduce the animated text effects on this slide, do the following:On the Insert tab, in the Text group, click TextBox. On the slide, drag to draw a text box.Enter text in the text box, and then select the text. On the Home tab, in the Font group, select Candarafrom the Font list, select24from the Font Size list, click the arrow next to Font Color, and then under Theme Colors click White, Background 1 (first row, first option from the left).On the Home tab, in the Paragraph group, click Center.On the slide, select the text box.On the Home tab, in the Clipboard group, click the arrow under Paste, and then click Duplicate. Repeat this process once more for a total of three text boxes.Click in the duplicate text boxes, and then edit the text. Select the first text box, and then drag it on the slide so that it is centered on the left vertical drawing guide at 2.83 and below the horizontal drawing guide at 0.00.Select the second text box, and then drag it on the slide so that it is centered on the vertical drawing guide at 0.00 and below the horizontal drawing guide at 0.00.Select the third text box, and then drag it on the slide so that it is centered on the right vertical drawing guide at 2.83 and below the horizontal drawing guide at 0.00.On the slide, select the first (left)text box.In the CustomAnimation task pane, do the following:Click Add Effect, point to Entrance, and then click MoreEffects. In the Add Entrance Effect dialog box, under Moderate, click Descend, and then click OK. Under Modify: Descend, in theStart list, select With Previous.Under Modify: Descend, in the Speed list, select Fast.Also in the CustomAnimation task pane, click the arrow to the right of the 10th animation effect (descend effect for the first text box), and then click Timing. In the Descend dialog box, on the Timing tab, in the Delay box, enter 2, and then click OK.On the slide, select the second (center) text box. In the CustomAnimation task pane, do the following:Click Add Effect, point to Entrance, and then click MoreEffects. In the Add Entrance Effect dialog box, under Moderate, click Descend, and then click OK. Under Modify: Descend, in theStart list, select With Previous.Under Modify: Descend, in the Speed list, select Fast.Also in the CustomAnimation task pane, click the arrow to the right of the 10th animation effect (descend effect for the first text box), and then click Timing. In the Descend dialog box, on the Timing tab, in the Delay box, enter 3, and then click OK.On the slide, select the third (right) text box. In the CustomAnimation task pane, do the following:Click Add Effect, point to Entrance, and then click MoreEffects. In the Add Entrance Effect dialog box, under Moderate, click Descend, and then click OK. Under Modify: Descend, in theStart list, select With Previous.Under Modify: Descend, in the Speed list, select Fast.Also in the CustomAnimation task pane, click the arrow to the right of the 10th animation effect (descend effect for the first text box), and then click Timing. In the Descend dialog box, on the Timing tab, in the Delay box, enter 4, and then click OK.To reproduce the background effects on this slide, do the following:On the Design tab, in the bottom right corner of the Background group, click the FormatBackground dialog box launcher. In the FormatBackground dialog box, in the left pane, click Fill. In the Fill pane, click Picture or text fill, and then under InsertFrom, click File. In the Insert Picture dialog box, select a picture and then click Insert.Also the FormatBackground dialog box, in the left pane, click Picture. In the Picture pane, click the button next to Recolor, and then under ColorModes click Grayscale (first option from the left).
- Custom animation effects: line sweeps in picture and text(Basic)To reproduce the shape effects on this slide, do the following:On the Home tab, in theSlides group, click Layout, and then click Blank.On the Home tab, in the Drawing group, click Shapes, and then under Lines click Line (first option from the left).On the slide, press and hold SHIFT, and then drag to draw a straight, vertical line.Select the line. Under DrawingTools, on the Format tab, in the Size group, in the Shape Width box, enter 7.5”.Under DrawingTools, on the Format tab, in the ShapeStyles group, click the Format Shape dialog box launcher. In the Format Shape dialog box, click LineColor in the left pane. In the LineColor pane, select Solidline, click the button next to Color, and then under ThemeColors click Black, Text 1 (first row, second option from the left).Also in the Format Shape dialog box, click LineStyle in the left pane. In the LineStyle pane, in the Weight box, enter 2 pt.Under DrawingTools, on the Format tab, in the ShapeStyles group, click ShapeEffects, point to Glow, and then under GlowVariations click Accent color 1, 5 pt glow (first row, first option from the left). Under DrawingTools, on the Format tab, in the ShapeStyles group, click ShapeEffects, point to Glow, point to MoreGlowColors, and then under ThemeColors click White, Background 1 (first row, first option from the left).On the Home tab, in the Drawing group, click Arrange, point to Align, and then do the following:Click Align to Slide.Click AlignCenter.Click AlignMiddle.On the slide, select the line. On the Home tab, in the Clipboard group, click the arrow under Paste, and then click Duplicate.Drag the duplicate line slightly off the right edge of the slide.With the duplicate line still selected, on the Home tab, in the Drawing group, click Arrange, point to Align, and then do the following: Click Align to Slide. Click Align Middle.On the Insert tab, in the Illustrations group, click Picture. In the InsertPicture dialog box, select a picture, and then click Insert.On the slide, select the picture. Under Picture Tools, on the Format tab, in the bottom right corner of the Size group, click the Size and Position dialog box launcher. In the Size and Position dialog box, on the Size tab, resize or crop the picture as needed so that under Size and rotate, the Height box is set to 7.5” and the Width box is set to 5”. Resize the picture under Size and rotate by entering values into the Height and Width boxes. Crop the picture under Crop from by entering values into the Left, Right, Top, and Bottom boxes. On the Home tab, in the Drawing group, click Arrange, point to Align, and then do the following:Click Align to Slide.ClickAlignRight.ClickAlignMiddle.To reproduce the text effects on this slide, do the following:On the Insert tab, in the Illustrations group, click TextBox. On the slide, drag to draw a text box.Enter text in the text box, and then select the text. On the Home tab, in the Font group, do the following:In the Font list, select Arial.In the FontSize list, select 28.Click Bold.Click the button next to FontColor, and then under ThemeColors click White, Background 1 (first row, first option from the left).On the Home tab, in the Paragraph group, click AlignTextRight to align the text right in the text box. Drag the text box onto the left half of the slide.To reproduce the background effects on this slide, do the following:Right-click the slide background area, and then click Format Background. In the Format Background dialog box, click Fill in the left pane, select Gradient fill in the Fill pane, and then do the following:In the Type list, select Linear.Click the button next to Direction, and then click Linear Down (first row, second option from the left).Under Gradient stops, click Add or Remove until two stops appear in the drop-down list.Also under Gradient stops, customize the gradient stops that you added as follows:Select Stop 1 from the list, and then do the following:In the Stop position box, enter 40%.Click the button next to Color, and then click Black, Text 1 (first row, second option from the left).Select Stop 2 from the list, and then do the following: In the Stop position box, enter 100%.Click the button next to Color, and then click Black, Text 1, Lighter 50% (second row, second option from the left).To reproduce the animation effects on this slide, do the following:On the Animations tab, in the Animations group, click CustomAnimation. Select the line off the right edge of the slide. In the CustomAnimation task pane, do the following:Click AddEffect, point to Entrance, and then click MoreEffects. In the AddEntranceEffect dialog box, under Basic, click FlyIn.Select the animation effect (fly-in effect for the second line). Under Modify: Fly In,do the following:In the Start list, select After Previous.In the Direction list, select FromLeft.In the Speed list, select Fast.On the Home tab, in the Editing group, click Select, and then click Selection Pane.In the Selection and Visibility pane, select the first line you created (in the middle of the slide). In the CustomAnimation task pane, do the following:Click AddEffect, point to Entrance, and then click MoreEffects. In the AddEntranceEffect dialog box, under Basic, click FlyIn.Select the second animation effect (fly-in effect for the first line). Under Modify: Fly In,do the following:In the Start list, select AfterPrevious.In the Direction list, select FromRight.In the Speed list, select Fast.On the slide, select the picture. In the CustomAnimation task pane, do the following:Click AddEffect, point to Entrance, and then click MoreEffects. In the AddEntranceEffect dialog box, under Basic, click Wipe.Select the third animation effect (wipe effect for the picture). Under Modify: Wipe,do the following:In the Start list, select WithPrevious.In the Direction list, select FromRight.In the Speed list, select Fast.On the slide, select the text box. In the CustomAnimation task pane, do the following:Click AddEffect, point to Entrance, and then click MoreEffects. In the AddEntranceEffect dialog box, under Basic, clickFlyIn.Select the fourth animation effect (fly-in effect for the text box). Under Modify: Fly In,do the following:In the Start list, select WithPrevious.In the Direction list, select FromRight.In the Speed list, select Fast.
- Custom animation effects: grow and shrink picture(Advanced)Tip:This slide includes three small pictures and one large version of the top small picture. The small pictures are 1.88” high and 2.5” wide. The large picture is 7.5” high and 10” wide (the dimensions of the slide). Before following the procedures below, size each of the three pictures you will insert into the slide to 7.5” high by 10” wide. You will also need to use drawing guides to position your pictures on the slide. To display and set the drawing guides, do the following:On the Home tab, in the Slides group, click Layout, and then clickBlank. Right-click the slide background area, and then click Grid and Guides.In the Grid and Guides dialog box, underGuidesettings, select Display drawing guides on screen. (Note: One horizontal and one vertical guide will display on the slide at 0.00, the default position. As you drag the guides, the cursor will display the new position.) On the slide, do the following:Press and hold CTRL, select the horizontal guide, and then drag it up to the 2.17 position.Press and hold CTRL, select the horizontal guide, and then drag it down to the 2.17 position.Press and hold CTRL, select the vertical guide, and then drag it right to the 3.50 position.Press and hold CTRL, select the vertical guide, and then drag it left to the 2.50 position.To reproduce the shape effects on this slide, do the following:On the Home tab, in the Drawing group, click Shapes, and then under Rectangles click Snip Diagonal Corner Rectangle (fifth option from the left).On the Home tab, in the Drawing group, click the arrow next to Shape Outline, and then click No Outline.On the Home tab, in the Drawing group, click the arrow next to Shape Fill, point to Gradient, and then click MoreGradients. In the Format Shape dialog box, in the left pane, click Fill, select Gradient fill in the Fill pane, and then do the following:In the Type list, select Linear.Click the button next to Direction, and then click Linear Right(first row, fourth option from the left). Under Gradient stops, click Add or Remove until two stops appear in the drop-down list.Also under Gradient stops, customize the gradient stops as follows:Select Stop 1 from the list, and then do the following:In the Stop position box, enter 0%.Click the button next to Color, and then under Theme Colors click Black, Text 1 (first row, second option from the left). In the Transparency box, enter 51%.Select Stop 2 from the list, and then do the following: In the Stop position box, enter 100%.Click the button next to Color, and then under Theme Colors click Black, Text 1 (first row, second option from the left). In the Transparency box, enter 85%.Under Drawing Tools, on the Format tab, in the Size group, do the following:In the Shape Height box, enter 1.5”.In the Shape Width box, enter 8.42”.Select the rectangle. On the Home tab, in the Clipboard group, click the arrow under Paste, and then click Duplicate. Repeat this process one more time for a total of three rectangles.Drag the first rectangle and center it vertically on the top horizontal drawing guide (2.17).Drag the second rectangle and center it vertically on the middle horizontal drawing guide (0.00).Drag the third rectangle and center it vertically on the bottom horizontal drawing guide (2.17).Press and hold CTRL, and then select all three rectangles. On the Home tab, in the Drawing group, click Arrange, point to Align, and then do the following:Click Alignto Slide.Click Align Center.To reproduce the picture effects on this slide, do the following:On the Insert tab, in the Illustrations group, click Picture. In the Insert Picture dialog box, select a picture and then click Insert.On the slide, select the picture.UnderPicture Tools, on the Format tab, in the bottom right corner of the Size group, click the Size and Position dialog box launcher. In the Size and Position dialog box, on the Size tab, under Scale, clear Lock aspect ratio, and then under Size and rotate, do the following:In the Height box, enter 1.88”. In the Width box, enter 2.5”.UnderPicture Tools, on the Format tab, in the Picture Styles group, click the arrow next to Picture Border, and then do the following:Under Theme Colors click Dark Blue, Text 2, Darker 25% (fifth row, fourth option from the left). Point to Weight, and then click 1 ½ pt.On the slide, drag the picture until it is centered at the intersection of the top horizontal drawing guide (2.17) and the left vertical drawing guide (2.50).Select the picture. On the Home tab, in the Clipboard group, click the arrow under Paste, and then click Duplicate. Right-click the second picture, and then select ChangePicture. In the Insert Picture dialog box, select a picture and then click Insert.On the slide, drag the second picture until it is centered at the intersection of the center horizontal drawing guide (0.00) and the left vertical drawing guide (2.50).Select the second picture. On the Home tab, in the Clipboard group, click the arrow under Paste, and then click Duplicate. Right-click the third picture, and then select ChangePicture. In the Insert Picture dialog box, select a picture and then click Insert.On the slide, drag the third picture until it is centered at the intersection of the bottom horizontal drawing guide (2.17) and the left vertical drawing guide (2.50).To reproduce the text effects on this slide, do the following:On the Insert tab, in the Text group, click TextBox. On the slide, drag to draw a text box.Enter text for the first picture caption in the text box, and then select the text. On the Home tab, in the Font group, select Calibri from the Font list, select 18 from the Font Size list, click the arrow next to Font Color, and then under Theme Colors click White, Background 1 (first row, first option from the left).Select the text box, and then drag the it to the right of the first picture, above the top horizontal drawing guide (2.17). Select the text box. On the Home tab, in the Clipboard group, click the arrow under Paste, and then click Duplicate. Click in the second text box, and then enter text for the second picture caption.Select the second text box, and then drag the it to the right of the second picture, above the center horizontal drawing guide (0.00). Select the second text box. On the Home tab, in the Clipboard group, click the arrow under Paste, and then click Duplicate. Click in the third text box, and then enter text for the third picture caption.Select the third text box, and then drag the it to the right of the third picture, above the bottom horizontal drawing guide (2.17).To reproduce the animation effects on this slide, do the following:On the Insert tab, in the Illustrations group, click Picture. In the Insert Picture dialog box, select the 7.5” x 10” version of the picture that fills the top small rectangle on the slide, and then click Insert. On the Animations tab, in the Animations group, click CustomAnimation.On the slide, select the new large picture.In the Custom Animation task pane, do the following:Click Add Effect, point to Exit, and then click MoreEffects. In the Add Exit Effect dialog box, under Basic, click Disappear,and then click OK. Under Modify: Disappear, in the Start list, select After Previous.Click Add Effect, point to Emphasis, and then click MoreEffects. In the Add Emphasis Effect dialog box, under Basic, click Grow/Shrink,and then click OK. Under Modify: Grow/Shrink, do the following:In the Start list, select After Previous. In the Size list, in the Custom box, enter 25%, and then press ENTER.Also in the Custom Animation task pane, click the arrow to the right of the second animation effect (grow/shrink effect), and then click Timing. In the Grow/Shrink dialog box, on the Timing tab, in the Speed box, enter 0.01 seconds.With the large picture still selected on the slide, do the following in theCustom Animation task pane:Click Add Effect, point to Entrance, and then click MoreEffects. In the Add Entrance Effect dialog box, under Basic, click Appear, and then click OK. Under Modify: Appear, in the Start list, select On Click.Click Add Effect, point to Emphasis, and then click MoreEffects. In the Add Emphasis Effect dialog box, under Basic, click Grow/Shrink,and then click OK. Under Modify: Grow/Shrink, do the following:In the Start list, select With Previous. In the Size list, in the Custom box, enter 400%, and then press ENTER.In the Speed list, select Medium. Click Add Effect, point to Motion Paths, and then click Up. Under Modify: Up, do the following:In the Start list, select With Previous.In the Speed list, select Medium.On the slide, selectthe upmotion path. Point to the endpoint (red arrow) until the cursor becomes a two-headed arrow. Drag the endpoint to the intersection of the top horizontal drawing guide (2.17) and the left vertical drawing guide (2.50), at the center of the first small picture. Right-click the up motion path, and then click Reverse Path Direction. In the CustomAnimation task pane, select the fifth animation effect (up motion path). Under Modify: Up, in the Path list, select Locked.On the slide, select the large picture. In the Custom Animation task pane, do the following:Click Add Effect, point to Emphasis, and then click MoreEffects. In the Add Emphasis Effect dialog box, under Basic, click Grow/Shrink,and then click OK. Under Modify: Grow/Shrink, do the following:In the Start list, select On Click. In the Size list, in the Custom box, enter 25%, and then press ENTER.In the Speed list, select Medium. Click Add Effect, point to Motion Paths, and then click Up. Under Modify: Up, do the following:In the Start list, select With Previous.In the Speed list, select Medium.On the slide, select the second up motion path. Point to the endpoint (red arrow) until the cursor becomes a two-headed arrow. Drag the endpoint to the intersection of the top horizontal drawing guide (2.17) and the left vertical drawing guide (2.50), at the center of the first small picture. In the CustomAnimation task pane, select the seventh animation effect (second up motion path). Under Modify: Up, in the Path list, select Locked.On the slide, select the large picture. In the Custom Animation task pane, do the following:Click Add Effect, point to Exit, and thenclick MoreEffects. In the Add Exit Effect dialog box, under Basic, click Disappear, and then click OK.Under Modify: Disappear, in the Start list, select After Previous.On the slide, select the large picture. Press the LEFT ARROW key to position the picture off the left edge of the slide.Right-click the slide background area, and then click Grid and Guides. In the Grid and Guides dialog box, under Guide settings, clear Display drawing guides on screen, and then click OK. To reproduce the background effects on this slide, do the following:On the Design tab, in the bottom right corner of the Background group, click theFormat Background dialog box launcher. In the Format Background dialog box, click Fill in the left pane, select Gradient fill in the Fill pane, and then do the following:In the Type list, select Linear.In the Direction list, click Linear Up (second row, second option from the left).Under Gradient stops, click Add or Remove until three stops appear in the drop-down list.Also under Gradient stops, customize the gradient stops as follows:Select Stop 1 from the list, and then do the following:In the Stop position box, enter 0%.Click the button next to Color, and then under Theme Colors click Dark Blue, Text 2, Darker 50% (sixth row, fourth option from the left). Select Stop 2 from the list, and then do the following: In the Stop position box, enter 50%.Click the button next to Color, and then under Theme Colors click Dark Blue, Text 2, Lighter 40%(fourth row, fourth option from the left). Select Stop 3 from the list, and then do the following: In the Stop position box, enter 100%.Click the button next to Color, and then under Theme Colors click Dark Blue, Text 2, Darker 25% (fifth row, fourth option from the left).
- Custom animation effects: line sweeps in picture and text(Basic)To reproduce the shape effects on this slide, do the following:On the Home tab, in theSlides group, click Layout, and then click Blank.On the Home tab, in the Drawing group, click Shapes, and then under Lines click Line (first option from the left).On the slide, press and hold SHIFT, and then drag to draw a straight, vertical line.Select the line. Under DrawingTools, on the Format tab, in the Size group, in the Shape Width box, enter 7.5”.Under DrawingTools, on the Format tab, in the ShapeStyles group, click the Format Shape dialog box launcher. In the Format Shape dialog box, click LineColor in the left pane. In the LineColor pane, select Solidline, click the button next to Color, and then under ThemeColors click Black, Text 1 (first row, second option from the left).Also in the Format Shape dialog box, click LineStyle in the left pane. In the LineStyle pane, in the Weight box, enter 2 pt.Under DrawingTools, on the Format tab, in the ShapeStyles group, click ShapeEffects, point to Glow, and then under GlowVariations click Accent color 1, 5 pt glow (first row, first option from the left). Under DrawingTools, on the Format tab, in the ShapeStyles group, click ShapeEffects, point to Glow, point to MoreGlowColors, and then under ThemeColors click White, Background 1 (first row, first option from the left).On the Home tab, in the Drawing group, click Arrange, point to Align, and then do the following:Click Align to Slide.Click AlignCenter.Click AlignMiddle.On the slide, select the line. On the Home tab, in the Clipboard group, click the arrow under Paste, and then click Duplicate.Drag the duplicate line slightly off the right edge of the slide.With the duplicate line still selected, on the Home tab, in the Drawing group, click Arrange, point to Align, and then do the following: Click Align to Slide. Click Align Middle.On the Insert tab, in the Illustrations group, click Picture. In the InsertPicture dialog box, select a picture, and then click Insert.On the slide, select the picture. Under Picture Tools, on the Format tab, in the bottom right corner of the Size group, click the Size and Position dialog box launcher. In the Size and Position dialog box, on the Size tab, resize or crop the picture as needed so that under Size and rotate, the Height box is set to 7.5” and the Width box is set to 5”. Resize the picture under Size and rotate by entering values into the Height and Width boxes. Crop the picture under Crop from by entering values into the Left, Right, Top, and Bottom boxes. On the Home tab, in the Drawing group, click Arrange, point to Align, and then do the following:Click Align to Slide.ClickAlignRight.ClickAlignMiddle.To reproduce the text effects on this slide, do the following:On the Insert tab, in the Illustrations group, click TextBox. On the slide, drag to draw a text box.Enter text in the text box, and then select the text. On the Home tab, in the Font group, do the following:In the Font list, select Arial.In the FontSize list, select 28.Click Bold.Click the button next to FontColor, and then under ThemeColors click White, Background 1 (first row, first option from the left).On the Home tab, in the Paragraph group, click AlignTextRight to align the text right in the text box. Drag the text box onto the left half of the slide.To reproduce the background effects on this slide, do the following:Right-click the slide background area, and then click Format Background. In the Format Background dialog box, click Fill in the left pane, select Gradient fill in the Fill pane, and then do the following:In the Type list, select Linear.Click the button next to Direction, and then click Linear Down (first row, second option from the left).Under Gradient stops, click Add or Remove until two stops appear in the drop-down list.Also under Gradient stops, customize the gradient stops that you added as follows:Select Stop 1 from the list, and then do the following:In the Stop position box, enter 40%.Click the button next to Color, and then click Black, Text 1 (first row, second option from the left).Select Stop 2 from the list, and then do the following: In the Stop position box, enter 100%.Click the button next to Color, and then click Black, Text 1, Lighter 50% (second row, second option from the left).To reproduce the animation effects on this slide, do the following:On the Animations tab, in the Animations group, click CustomAnimation. Select the line off the right edge of the slide. In the CustomAnimation task pane, do the following:Click AddEffect, point to Entrance, and then click MoreEffects. In the AddEntranceEffect dialog box, under Basic, click FlyIn.Select the animation effect (fly-in effect for the second line). Under Modify: Fly In,do the following:In the Start list, select After Previous.In the Direction list, select FromLeft.In the Speed list, select Fast.On the Home tab, in the Editing group, click Select, and then click Selection Pane.In the Selection and Visibility pane, select the first line you created (in the middle of the slide). In the CustomAnimation task pane, do the following:Click AddEffect, point to Entrance, and then click MoreEffects. In the AddEntranceEffect dialog box, under Basic, click FlyIn.Select the second animation effect (fly-in effect for the first line). Under Modify: Fly In,do the following:In the Start list, select AfterPrevious.In the Direction list, select FromRight.In the Speed list, select Fast.On the slide, select the picture. In the CustomAnimation task pane, do the following:Click AddEffect, point to Entrance, and then click MoreEffects. In the AddEntranceEffect dialog box, under Basic, click Wipe.Select the third animation effect (wipe effect for the picture). Under Modify: Wipe,do the following:In the Start list, select WithPrevious.In the Direction list, select FromRight.In the Speed list, select Fast.On the slide, select the text box. In the CustomAnimation task pane, do the following:Click AddEffect, point to Entrance, and then click MoreEffects. In the AddEntranceEffect dialog box, under Basic, clickFlyIn.Select the fourth animation effect (fly-in effect for the text box). Under Modify: Fly In,do the following:In the Start list, select WithPrevious.In the Direction list, select FromRight.In the Speed list, select Fast.
- Custom animation effects: line sweeps in picture and text(Basic)To reproduce the shape effects on this slide, do the following:On the Home tab, in theSlides group, click Layout, and then click Blank.On the Home tab, in the Drawing group, click Shapes, and then under Lines click Line (first option from the left).On the slide, press and hold SHIFT, and then drag to draw a straight, vertical line.Select the line. Under DrawingTools, on the Format tab, in the Size group, in the Shape Width box, enter 7.5”.Under DrawingTools, on the Format tab, in the ShapeStyles group, click the Format Shape dialog box launcher. In the Format Shape dialog box, click LineColor in the left pane. In the LineColor pane, select Solidline, click the button next to Color, and then under ThemeColors click Black, Text 1 (first row, second option from the left).Also in the Format Shape dialog box, click LineStyle in the left pane. In the LineStyle pane, in the Weight box, enter 2 pt.Under DrawingTools, on the Format tab, in the ShapeStyles group, click ShapeEffects, point to Glow, and then under GlowVariations click Accent color 1, 5 pt glow (first row, first option from the left). Under DrawingTools, on the Format tab, in the ShapeStyles group, click ShapeEffects, point to Glow, point to MoreGlowColors, and then under ThemeColors click White, Background 1 (first row, first option from the left).On the Home tab, in the Drawing group, click Arrange, point to Align, and then do the following:Click Align to Slide.Click AlignCenter.Click AlignMiddle.On the slide, select the line. On the Home tab, in the Clipboard group, click the arrow under Paste, and then click Duplicate.Drag the duplicate line slightly off the right edge of the slide.With the duplicate line still selected, on the Home tab, in the Drawing group, click Arrange, point to Align, and then do the following: Click Align to Slide. Click Align Middle.On the Insert tab, in the Illustrations group, click Picture. In the InsertPicture dialog box, select a picture, and then click Insert.On the slide, select the picture. Under Picture Tools, on the Format tab, in the bottom right corner of the Size group, click the Size and Position dialog box launcher. In the Size and Position dialog box, on the Size tab, resize or crop the picture as needed so that under Size and rotate, the Height box is set to 7.5” and the Width box is set to 5”. Resize the picture under Size and rotate by entering values into the Height and Width boxes. Crop the picture under Crop from by entering values into the Left, Right, Top, and Bottom boxes. On the Home tab, in the Drawing group, click Arrange, point to Align, and then do the following:Click Align to Slide.ClickAlignRight.ClickAlignMiddle.To reproduce the text effects on this slide, do the following:On the Insert tab, in the Illustrations group, click TextBox. On the slide, drag to draw a text box.Enter text in the text box, and then select the text. On the Home tab, in the Font group, do the following:In the Font list, select Arial.In the FontSize list, select 28.Click Bold.Click the button next to FontColor, and then under ThemeColors click White, Background 1 (first row, first option from the left).On the Home tab, in the Paragraph group, click AlignTextRight to align the text right in the text box. Drag the text box onto the left half of the slide.To reproduce the background effects on this slide, do the following:Right-click the slide background area, and then click Format Background. In the Format Background dialog box, click Fill in the left pane, select Gradient fill in the Fill pane, and then do the following:In the Type list, select Linear.Click the button next to Direction, and then click Linear Down (first row, second option from the left).Under Gradient stops, click Add or Remove until two stops appear in the drop-down list.Also under Gradient stops, customize the gradient stops that you added as follows:Select Stop 1 from the list, and then do the following:In the Stop position box, enter 40%.Click the button next to Color, and then click Black, Text 1 (first row, second option from the left).Select Stop 2 from the list, and then do the following: In the Stop position box, enter 100%.Click the button next to Color, and then click Black, Text 1, Lighter 50% (second row, second option from the left).To reproduce the animation effects on this slide, do the following:On the Animations tab, in the Animations group, click CustomAnimation. Select the line off the right edge of the slide. In the CustomAnimation task pane, do the following:Click AddEffect, point to Entrance, and then click MoreEffects. In the AddEntranceEffect dialog box, under Basic, click FlyIn.Select the animation effect (fly-in effect for the second line). Under Modify: Fly In,do the following:In the Start list, select After Previous.In the Direction list, select FromLeft.In the Speed list, select Fast.On the Home tab, in the Editing group, click Select, and then click Selection Pane.In the Selection and Visibility pane, select the first line you created (in the middle of the slide). In the CustomAnimation task pane, do the following:Click AddEffect, point to Entrance, and then click MoreEffects. In the AddEntranceEffect dialog box, under Basic, click FlyIn.Select the second animation effect (fly-in effect for the first line). Under Modify: Fly In,do the following:In the Start list, select AfterPrevious.In the Direction list, select FromRight.In the Speed list, select Fast.On the slide, select the picture. In the CustomAnimation task pane, do the following:Click AddEffect, point to Entrance, and then click MoreEffects. In the AddEntranceEffect dialog box, under Basic, click Wipe.Select the third animation effect (wipe effect for the picture). Under Modify: Wipe,do the following:In the Start list, select WithPrevious.In the Direction list, select FromRight.In the Speed list, select Fast.On the slide, select the text box. In the CustomAnimation task pane, do the following:Click AddEffect, point to Entrance, and then click MoreEffects. In the AddEntranceEffect dialog box, under Basic, clickFlyIn.Select the fourth animation effect (fly-in effect for the text box). Under Modify: Fly In,do the following:In the Start list, select WithPrevious.In the Direction list, select FromRight.In the Speed list, select Fast.
- Custom animation effects: line sweeps in picture and text(Basic)To reproduce the shape effects on this slide, do the following:On the Home tab, in theSlides group, click Layout, and then click Blank.On the Home tab, in the Drawing group, click Shapes, and then under Lines click Line (first option from the left).On the slide, press and hold SHIFT, and then drag to draw a straight, vertical line.Select the line. Under DrawingTools, on the Format tab, in the Size group, in the Shape Width box, enter 7.5”.Under DrawingTools, on the Format tab, in the ShapeStyles group, click the Format Shape dialog box launcher. In the Format Shape dialog box, click LineColor in the left pane. In the LineColor pane, select Solidline, click the button next to Color, and then under ThemeColors click Black, Text 1 (first row, second option from the left).Also in the Format Shape dialog box, click LineStyle in the left pane. In the LineStyle pane, in the Weight box, enter 2 pt.Under DrawingTools, on the Format tab, in the ShapeStyles group, click ShapeEffects, point to Glow, and then under GlowVariations click Accent color 1, 5 pt glow (first row, first option from the left). Under DrawingTools, on the Format tab, in the ShapeStyles group, click ShapeEffects, point to Glow, point to MoreGlowColors, and then under ThemeColors click White, Background 1 (first row, first option from the left).On the Home tab, in the Drawing group, click Arrange, point to Align, and then do the following:Click Align to Slide.Click AlignCenter.Click AlignMiddle.On the slide, select the line. On the Home tab, in the Clipboard group, click the arrow under Paste, and then click Duplicate.Drag the duplicate line slightly off the right edge of the slide.With the duplicate line still selected, on the Home tab, in the Drawing group, click Arrange, point to Align, and then do the following: Click Align to Slide. Click Align Middle.On the Insert tab, in the Illustrations group, click Picture. In the InsertPicture dialog box, select a picture, and then click Insert.On the slide, select the picture. Under Picture Tools, on the Format tab, in the bottom right corner of the Size group, click the Size and Position dialog box launcher. In the Size and Position dialog box, on the Size tab, resize or crop the picture as needed so that under Size and rotate, the Height box is set to 7.5” and the Width box is set to 5”. Resize the picture under Size and rotate by entering values into the Height and Width boxes. Crop the picture under Crop from by entering values into the Left, Right, Top, and Bottom boxes. On the Home tab, in the Drawing group, click Arrange, point to Align, and then do the following:Click Align to Slide.ClickAlignRight.ClickAlignMiddle.To reproduce the text effects on this slide, do the following:On the Insert tab, in the Illustrations group, click TextBox. On the slide, drag to draw a text box.Enter text in the text box, and then select the text. On the Home tab, in the Font group, do the following:In the Font list, select Arial.In the FontSize list, select 28.Click Bold.Click the button next to FontColor, and then under ThemeColors click White, Background 1 (first row, first option from the left).On the Home tab, in the Paragraph group, click AlignTextRight to align the text right in the text box. Drag the text box onto the left half of the slide.To reproduce the background effects on this slide, do the following:Right-click the slide background area, and then click Format Background. In the Format Background dialog box, click Fill in the left pane, select Gradient fill in the Fill pane, and then do the following:In the Type list, select Linear.Click the button next to Direction, and then click Linear Down (first row, second option from the left).Under Gradient stops, click Add or Remove until two stops appear in the drop-down list.Also under Gradient stops, customize the gradient stops that you added as follows:Select Stop 1 from the list, and then do the following:In the Stop position box, enter 40%.Click the button next to Color, and then click Black, Text 1 (first row, second option from the left).Select Stop 2 from the list, and then do the following: In the Stop position box, enter 100%.Click the button next to Color, and then click Black, Text 1, Lighter 50% (second row, second option from the left).To reproduce the animation effects on this slide, do the following:On the Animations tab, in the Animations group, click CustomAnimation. Select the line off the right edge of the slide. In the CustomAnimation task pane, do the following:Click AddEffect, point to Entrance, and then click MoreEffects. In the AddEntranceEffect dialog box, under Basic, click FlyIn.Select the animation effect (fly-in effect for the second line). Under Modify: Fly In,do the following:In the Start list, select After Previous.In the Direction list, select FromLeft.In the Speed list, select Fast.On the Home tab, in the Editing group, click Select, and then click Selection Pane.In the Selection and Visibility pane, select the first line you created (in the middle of the slide). In the CustomAnimation task pane, do the following:Click AddEffect, point to Entrance, and then click MoreEffects. In the AddEntranceEffect dialog box, under Basic, click FlyIn.Select the second animation effect (fly-in effect for the first line). Under Modify: Fly In,do the following:In the Start list, select AfterPrevious.In the Direction list, select FromRight.In the Speed list, select Fast.On the slide, select the picture. In the CustomAnimation task pane, do the following:Click AddEffect, point to Entrance, and then click MoreEffects. In the AddEntranceEffect dialog box, under Basic, click Wipe.Select the third animation effect (wipe effect for the picture). Under Modify: Wipe,do the following:In the Start list, select WithPrevious.In the Direction list, select FromRight.In the Speed list, select Fast.On the slide, select the text box. In the CustomAnimation task pane, do the following:Click AddEffect, point to Entrance, and then click MoreEffects. In the AddEntranceEffect dialog box, under Basic, clickFlyIn.Select the fourth animation effect (fly-in effect for the text box). Under Modify: Fly In,do the following:In the Start list, select WithPrevious.In the Direction list, select FromRight.In the Speed list, select Fast.
- Custom animation effects: sparkle(Basic)To reproduce the text on this slide, do the following:On the Home tab, in the Slides group, click Layout, and then click Blank.On the Insert tab, in the Text group, click TextBox. On the slide, drag to draw a text box.Enter text and select it. On the Home tab, in the Font group, in the Font list select FranklinGothicHeavy, and then in the FontSize box, select 96 pt.On the Home tab, in the Paragraph group, click Center.Select the text box, and then under DrawingTools, on the Format tab, in the WordArtStyles group, click TextEffects, point to Reflection, and under ReflectionVariations select Tight Reflection, Touching (first row, the first option from the left).With the text box still selected, under DrawingTools, on the Format tab, in the bottom right corner of the WordArtStyles group, click the FormatTextEffects: Text Box dialog box launcher. In the FormatTextEffects dialog box, click TextFill in the left pane, select Gradient fill in the TextFill pane, and then do the following:Click the button next to Presetcolors, and then click Ocean (second row, second option from the left).In the Type list, select Linear.Click the button next to Direction, and then click LinearUp (second row, second option from the left).Also in the FormatTextEffects dialog box, click 3-DFormat in the left pane. In the 3-DFormat pane, under Bevel, click the button next to Top, and then under Bevel click Circle (first row, first option from the left). To reproduce the first star on this slide, do the following:On the Home tab, in the Drawing group, click Shapes, and then under Stars and Banners click 4-Point Star (first row, third option from the left). On the slide, drag to draw a star.On the slide, drag the star onto the top of the first letter (in the example slide, it is “S”) in the text box.With the star still selected, drag the yellow diamond adjustment handle down to make the points thinner.On the Home tab, in the bottom right corner in the Drawing group, click the FormatShape dialog box launcher. In the FormatShape dialog box, clickFill in the left pane, select Gradient fillin the Fill pane, and then do the following:In the Type list, select Radial.Click the button next to Direction, and then click From Center (third option from the left). Under Gradient stops, click Add or Remove until two stops appear in the drop-down list.Also under Gradient stops, customize the gradient stops that you added as follows:Select Stop 1 from the list, and then do the following:In the Stop position box, enter 0%.Click the button next to Color, and then under ThemeColors click White, Background 1 (first row, first option from the left). Select Stop 2 from the list, and then do the following: In the Stop position box, enter 100%.Click the button next to Color, and then under ThemeColors click White, Background 1 (first row, first option from the left). In the Transparency box, enter 100%.Also in the FormatShape dialog box, click LineColor in the left pane, and in the LineColor pane click Noline. UnderDrawingTools, on the Format tab, in the bottom right corner of the Size group, click the Size and Position dialog box launcher. In the Size and Position dialog box, on the Size tab, under Sizeand rotation do the following:In the Height box, enter 0.51”.In the Width box, enter 0.51”.In the Rotation box, enter 15°.To reproduce the other stars on this slide, do the following:On the slide, select the star. On the Home tab, in the Clipboard group, click the arrow under Paste, and then click Duplicate. On the slide, drag the second star until it slightly overlaps the edge of a letter in the text box.Change the size of the star in the Drawing Tools, on the Format tab, in the Size group.Repeat steps 1-3 for a total of five stars.To reproduce the animation effects on this slide, do the following:On the Animations tab, in the Animations group, click CustomAnimation.On the slide, select the first star from the left. In the CustomAnimation task pane, do the following:ClickAddEffect, point to Entrance, and then click MoreEffects. In the AddEntranceEffect dialog box, under Moderate, clickGrow & Turn.Select the animation effect (grow & turn entrance effect for the first star). Under Modify: Grow & Turn,do the following:In the Start list, select WithPrevious.In the Speed list, select VeryFast.On the slide, select the first star from the left. In the CustomAnimation task pane, do the following:Click AddEffect, point to Exit, and then click MoreEffects. In the AddExitEffect dialog box, under Moderate, click Grow & Turn.Select the second animation effect (grow & turn exit effect for the first star). Click the arrow to the right of the selected effect, and then click Effect Options. In the Grow & Turn dialog box, on the Timing tab, do the following:In the Start list, select WithPrevious.In the Delay box enter 0.7. In the Speed list, select 0.5 seconds (VeryFast).On the slide, select the second star from the left. In the CustomAnimation task pane, do the following:Click AddEffect, point to Entrance, and then click MoreEffects. In the AddEntranceEffect dialog box, under Moderate, click Grow & Turn.Select the third animation effect (grow & turn entrance effect for the second star). Click the arrow to the right of the selected effect, and then click Effect Options. In the Grow & Turn dialog box, on the Timing tab, do the following:In the Start list, select WithPrevious.In the Delay box enter 0.2. In the Speed list, select 0.5 seconds (VeryFast).On the slide, select the second star from the left. In the CustomAnimation task pane, do the following:Click AddEffect, point to Exit, and then click MoreEffects. In the AddExitEffect dialog box, under Moderate, click Grow & Turn.Select the fourth animation effect (grow & turn exit effect for the second star). Click the arrow to the right of the selected effect, and then click Effect Options. In the Grow & Turn dialog box, on the Timing tab, do the following:In the Start list, select WithPrevious.In the Delay box enter 0.9. In the Speed list, select 0.5 seconds (VeryFast).On the slide, select the third star from the left. In the CustomAnimation task pane, do the following:Click AddEffect, point to Entrance, and then click MoreEffects. In the AddEntranceEffect dialog box, under Moderate, click Grow & Turn.Select the fifth animation effect (grow & turn entrance effect for the third star). Click the arrow to the right of the selected effect, and then click Effect Options. In the Grow & Turn dialog box, on the Timing tab, do the following:In the Start list, select WithPrevious.In the Delay box enter 0.4. In the Speed list, select 0.5 seconds (VeryFast).On the slide, select the third star from the left. In the CustomAnimation task pane, do the following:Click AddEffect, point to Exit, and then click MoreEffects. In the AddExitEffect dialog box, under Moderate, click Grow & Turn.Select the sixth animation effect (grow & turn exit effect for the third star). Click the arrow to the right of the selected effect, and then click Effect Options. In the Grow & Turn dialog box, on the Timing tab, do the following:In the Start list, select WithPrevious.In the Delay box enter 1.1. In the Speed list, select 0.5 seconds (VeryFast).On the slide, select the fourth star from the left. In the CustomAnimation task pane, do the following:Click AddEffect, point to Entrance, and then click MoreEffects. In the AddEntranceEffect dialog box, under Moderate, click Grow & Turn.Select the seventh animation effect (grow & turn entrance effect for the fourth star). Click the arrow to the right of the selected effect, and then click Effect Options. In the Grow & Turn dialog box, on the Timing tab, do the following:In the Start list, select WithPrevious.In the Delay box enter 0.8. In the Speed list, select 0.5 seconds (VeryFast).On the slide, select the fourth star from the left. In the CustomAnimation task pane, do the following:Click AddEffect, point to Exit, and then click MoreEffects. In the AddExitEffect dialog box, under Moderate, click Grow & Turn.Select the eighth animation effect (grow & turn exit effect for the fourth star). Click the arrow to the right of the selected effect, and then click Effect Options. In the Grow & Turn dialog box, on the Timing tab, do the following:In the Start list, select WithPrevious.In the Delay box enter 1.4. In the Speed list, select 0.5 seconds (VeryFast).On the slide, select the fifth star from the left. In the CustomAnimation task pane, do the following:Click AddEffect, point to Entrance, and then click MoreEffects. In the AddEntranceEffect dialog box, under Moderate, click Grow & Turn.Select the ninth animation effect (grow & turn entrance effect for the fifth star). Click the arrow to the right of the selected effect, and then click Effect Options. In the Grow & Turn dialog box, on the Timing tab, do the following:In the Start list, select WithPrevious.In the Delay box enter 0.9. In the Speed list, select 0.5 seconds (VeryFast).On the slide, select the fifth star from the left. In the CustomAnimation task pane, do the following:Click AddEffect, point to Exit, and then click MoreEffects. In the AddExitEffect dialog box, under Moderate, click Grow & Turn.Select the 10th animation effect (grow & turn exit effect for the fifth star). Click the arrow to the right of the selected effect, and then click Effect Options. In the Grow & Turn dialog box, on the Timing tab, do the following:In the Start list, select WithPrevious.In the Delay box enter 1.5. In the Speed list, select 0.5 seconds (VeryFast).To reproduce the background effects on this slide, do the following:Right-click the slide background area, and then click Format Background. In the Format Background dialog box, click Fill in the left pane, select Gradient fill in the Fill pane, and then do the following:In the Type list, select Radial.Click the button next to Direction, and then click From Center (third option from the left). Under Gradient stops, click Add or Remove until two stops appear in the drop-down list.Also under Gradient stops, customize the gradient stops that you added as follows:Select Stop 1 from the list, and then do the following:In the Stop position box, enter 0%.Click the button next to Color, and then under ThemeColorsclick Black, Text 1, Lighter 35% (third row, second option from the left). Select Stop 2 from the list, and then do the following: In the Stop position box, enter 100%.Click the button next to Color, and then under ThemeColorsclick Black, Text 1 (first row, second option from the left).
- Custom animation effects: line sweeps in picture and text(Basic)To reproduce the shape effects on this slide, do the following:On the Home tab, in theSlides group, click Layout, and then click Blank.On the Home tab, in the Drawing group, click Shapes, and then under Lines click Line (first option from the left).On the slide, press and hold SHIFT, and then drag to draw a straight, vertical line.Select the line. Under DrawingTools, on the Format tab, in the Size group, in the Shape Width box, enter 7.5”.Under DrawingTools, on the Format tab, in the ShapeStyles group, click the Format Shape dialog box launcher. In the Format Shape dialog box, click LineColor in the left pane. In the LineColor pane, select Solidline, click the button next to Color, and then under ThemeColors click Black, Text 1 (first row, second option from the left).Also in the Format Shape dialog box, click LineStyle in the left pane. In the LineStyle pane, in the Weight box, enter 2 pt.Under DrawingTools, on the Format tab, in the ShapeStyles group, click ShapeEffects, point to Glow, and then under GlowVariations click Accent color 1, 5 pt glow (first row, first option from the left). Under DrawingTools, on the Format tab, in the ShapeStyles group, click ShapeEffects, point to Glow, point to MoreGlowColors, and then under ThemeColors click White, Background 1 (first row, first option from the left).On the Home tab, in the Drawing group, click Arrange, point to Align, and then do the following:Click Align to Slide.Click AlignCenter.Click AlignMiddle.On the slide, select the line. On the Home tab, in the Clipboard group, click the arrow under Paste, and then click Duplicate.Drag the duplicate line slightly off the right edge of the slide.With the duplicate line still selected, on the Home tab, in the Drawing group, click Arrange, point to Align, and then do the following: Click Align to Slide. Click Align Middle.On the Insert tab, in the Illustrations group, click Picture. In the InsertPicture dialog box, select a picture, and then click Insert.On the slide, select the picture. Under Picture Tools, on the Format tab, in the bottom right corner of the Size group, click the Size and Position dialog box launcher. In the Size and Position dialog box, on the Size tab, resize or crop the picture as needed so that under Size and rotate, the Height box is set to 7.5” and the Width box is set to 5”. Resize the picture under Size and rotate by entering values into the Height and Width boxes. Crop the picture under Crop from by entering values into the Left, Right, Top, and Bottom boxes. On the Home tab, in the Drawing group, click Arrange, point to Align, and then do the following:Click Align to Slide.ClickAlignRight.ClickAlignMiddle.To reproduce the text effects on this slide, do the following:On the Insert tab, in the Illustrations group, click TextBox. On the slide, drag to draw a text box.Enter text in the text box, and then select the text. On the Home tab, in the Font group, do the following:In the Font list, select Arial.In the FontSize list, select 28.Click Bold.Click the button next to FontColor, and then under ThemeColors click White, Background 1 (first row, first option from the left).On the Home tab, in the Paragraph group, click AlignTextRight to align the text right in the text box. Drag the text box onto the left half of the slide.To reproduce the background effects on this slide, do the following:Right-click the slide background area, and then click Format Background. In the Format Background dialog box, click Fill in the left pane, select Gradient fill in the Fill pane, and then do the following:In the Type list, select Linear.Click the button next to Direction, and then click Linear Down (first row, second option from the left).Under Gradient stops, click Add or Remove until two stops appear in the drop-down list.Also under Gradient stops, customize the gradient stops that you added as follows:Select Stop 1 from the list, and then do the following:In the Stop position box, enter 40%.Click the button next to Color, and then click Black, Text 1 (first row, second option from the left).Select Stop 2 from the list, and then do the following: In the Stop position box, enter 100%.Click the button next to Color, and then click Black, Text 1, Lighter 50% (second row, second option from the left).To reproduce the animation effects on this slide, do the following:On the Animations tab, in the Animations group, click CustomAnimation. Select the line off the right edge of the slide. In the CustomAnimation task pane, do the following:Click AddEffect, point to Entrance, and then click MoreEffects. In the AddEntranceEffect dialog box, under Basic, click FlyIn.Select the animation effect (fly-in effect for the second line). Under Modify: Fly In,do the following:In the Start list, select After Previous.In the Direction list, select FromLeft.In the Speed list, select Fast.On the Home tab, in the Editing group, click Select, and then click Selection Pane.In the Selection and Visibility pane, select the first line you created (in the middle of the slide). In the CustomAnimation task pane, do the following:Click AddEffect, point to Entrance, and then click MoreEffects. In the AddEntranceEffect dialog box, under Basic, click FlyIn.Select the second animation effect (fly-in effect for the first line). Under Modify: Fly In,do the following:In the Start list, select AfterPrevious.In the Direction list, select FromRight.In the Speed list, select Fast.On the slide, select the picture. In the CustomAnimation task pane, do the following:Click AddEffect, point to Entrance, and then click MoreEffects. In the AddEntranceEffect dialog box, under Basic, click Wipe.Select the third animation effect (wipe effect for the picture). Under Modify: Wipe,do the following:In the Start list, select WithPrevious.In the Direction list, select FromRight.In the Speed list, select Fast.On the slide, select the text box. In the CustomAnimation task pane, do the following:Click AddEffect, point to Entrance, and then click MoreEffects. In the AddEntranceEffect dialog box, under Basic, clickFlyIn.Select the fourth animation effect (fly-in effect for the text box). Under Modify: Fly In,do the following:In the Start list, select WithPrevious.In the Direction list, select FromRight.In the Speed list, select Fast.
- Custom animation effects: line sweeps in picture and text(Basic)To reproduce the shape effects on this slide, do the following:On the Home tab, in theSlides group, click Layout, and then click Blank.On the Home tab, in the Drawing group, click Shapes, and then under Lines click Line (first option from the left).On the slide, press and hold SHIFT, and then drag to draw a straight, vertical line.Select the line. Under DrawingTools, on the Format tab, in the Size group, in the Shape Width box, enter 7.5”.Under DrawingTools, on the Format tab, in the ShapeStyles group, click the Format Shape dialog box launcher. In the Format Shape dialog box, click LineColor in the left pane. In the LineColor pane, select Solidline, click the button next to Color, and then under ThemeColors click Black, Text 1 (first row, second option from the left).Also in the Format Shape dialog box, click LineStyle in the left pane. In the LineStyle pane, in the Weight box, enter 2 pt.Under DrawingTools, on the Format tab, in the ShapeStyles group, click ShapeEffects, point to Glow, and then under GlowVariations click Accent color 1, 5 pt glow (first row, first option from the left). Under DrawingTools, on the Format tab, in the ShapeStyles group, click ShapeEffects, point to Glow, point to MoreGlowColors, and then under ThemeColors click White, Background 1 (first row, first option from the left).On the Home tab, in the Drawing group, click Arrange, point to Align, and then do the following:Click Align to Slide.Click AlignCenter.Click AlignMiddle.On the slide, select the line. On the Home tab, in the Clipboard group, click the arrow under Paste, and then click Duplicate.Drag the duplicate line slightly off the right edge of the slide.With the duplicate line still selected, on the Home tab, in the Drawing group, click Arrange, point to Align, and then do the following: Click Align to Slide. Click Align Middle.On the Insert tab, in the Illustrations group, click Picture. In the InsertPicture dialog box, select a picture, and then click Insert.On the slide, select the picture. Under Picture Tools, on the Format tab, in the bottom right corner of the Size group, click the Size and Position dialog box launcher. In the Size and Position dialog box, on the Size tab, resize or crop the picture as needed so that under Size and rotate, the Height box is set to 7.5” and the Width box is set to 5”. Resize the picture under Size and rotate by entering values into the Height and Width boxes. Crop the picture under Crop from by entering values into the Left, Right, Top, and Bottom boxes. On the Home tab, in the Drawing group, click Arrange, point to Align, and then do the following:Click Align to Slide.ClickAlignRight.ClickAlignMiddle.To reproduce the text effects on this slide, do the following:On the Insert tab, in the Illustrations group, click TextBox. On the slide, drag to draw a text box.Enter text in the text box, and then select the text. On the Home tab, in the Font group, do the following:In the Font list, select Arial.In the FontSize list, select 28.Click Bold.Click the button next to FontColor, and then under ThemeColors click White, Background 1 (first row, first option from the left).On the Home tab, in the Paragraph group, click AlignTextRight to align the text right in the text box. Drag the text box onto the left half of the slide.To reproduce the background effects on this slide, do the following:Right-click the slide background area, and then click Format Background. In the Format Background dialog box, click Fill in the left pane, select Gradient fill in the Fill pane, and then do the following:In the Type list, select Linear.Click the button next to Direction, and then click Linear Down (first row, second option from the left).Under Gradient stops, click Add or Remove until two stops appear in the drop-down list.Also under Gradient stops, customize the gradient stops that you added as follows:Select Stop 1 from the list, and then do the following:In the Stop position box, enter 40%.Click the button next to Color, and then click Black, Text 1 (first row, second option from the left).Select Stop 2 from the list, and then do the following: In the Stop position box, enter 100%.Click the button next to Color, and then click Black, Text 1, Lighter 50% (second row, second option from the left).To reproduce the animation effects on this slide, do the following:On the Animations tab, in the Animations group, click CustomAnimation. Select the line off the right edge of the slide. In the CustomAnimation task pane, do the following:Click AddEffect, point to Entrance, and then click MoreEffects. In the AddEntranceEffect dialog box, under Basic, click FlyIn.Select the animation effect (fly-in effect for the second line). Under Modify: Fly In,do the following:In the Start list, select After Previous.In the Direction list, select FromLeft.In the Speed list, select Fast.On the Home tab, in the Editing group, click Select, and then click Selection Pane.In the Selection and Visibility pane, select the first line you created (in the middle of the slide). In the CustomAnimation task pane, do the following:Click AddEffect, point to Entrance, and then click MoreEffects. In the AddEntranceEffect dialog box, under Basic, click FlyIn.Select the second animation effect (fly-in effect for the first line). Under Modify: Fly In,do the following:In the Start list, select AfterPrevious.In the Direction list, select FromRight.In the Speed list, select Fast.On the slide, select the picture. In the CustomAnimation task pane, do the following:Click AddEffect, point to Entrance, and then click MoreEffects. In the AddEntranceEffect dialog box, under Basic, click Wipe.Select the third animation effect (wipe effect for the picture). Under Modify: Wipe,do the following:In the Start list, select WithPrevious.In the Direction list, select FromRight.In the Speed list, select Fast.On the slide, select the text box. In the CustomAnimation task pane, do the following:Click AddEffect, point to Entrance, and then click MoreEffects. In the AddEntranceEffect dialog box, under Basic, clickFlyIn.Select the fourth animation effect (fly-in effect for the text box). Under Modify: Fly In,do the following:In the Start list, select WithPrevious.In the Direction list, select FromRight.In the Speed list, select Fast.
- Custom animation effects: line sweeps in picture and text(Basic)To reproduce the shape effects on this slide, do the following:On the Home tab, in theSlides group, click Layout, and then click Blank.On the Home tab, in the Drawing group, click Shapes, and then under Lines click Line (first option from the left).On the slide, press and hold SHIFT, and then drag to draw a straight, vertical line.Select the line. Under DrawingTools, on the Format tab, in the Size group, in the Shape Width box, enter 7.5”.Under DrawingTools, on the Format tab, in the ShapeStyles group, click the Format Shape dialog box launcher. In the Format Shape dialog box, click LineColor in the left pane. In the LineColor pane, select Solidline, click the button next to Color, and then under ThemeColors click Black, Text 1 (first row, second option from the left).Also in the Format Shape dialog box, click LineStyle in the left pane. In the LineStyle pane, in the Weight box, enter 2 pt.Under DrawingTools, on the Format tab, in the ShapeStyles group, click ShapeEffects, point to Glow, and then under GlowVariations click Accent color 1, 5 pt glow (first row, first option from the left). Under DrawingTools, on the Format tab, in the ShapeStyles group, click ShapeEffects, point to Glow, point to MoreGlowColors, and then under ThemeColors click White, Background 1 (first row, first option from the left).On the Home tab, in the Drawing group, click Arrange, point to Align, and then do the following:Click Align to Slide.Click AlignCenter.Click AlignMiddle.On the slide, select the line. On the Home tab, in the Clipboard group, click the arrow under Paste, and then click Duplicate.Drag the duplicate line slightly off the right edge of the slide.With the duplicate line still selected, on the Home tab, in the Drawing group, click Arrange, point to Align, and then do the following: Click Align to Slide. Click Align Middle.On the Insert tab, in the Illustrations group, click Picture. In the InsertPicture dialog box, select a picture, and then click Insert.On the slide, select the picture. Under Picture Tools, on the Format tab, in the bottom right corner of the Size group, click the Size and Position dialog box launcher. In the Size and Position dialog box, on the Size tab, resize or crop the picture as needed so that under Size and rotate, the Height box is set to 7.5” and the Width box is set to 5”. Resize the picture under Size and rotate by entering values into the Height and Width boxes. Crop the picture under Crop from by entering values into the Left, Right, Top, and Bottom boxes. On the Home tab, in the Drawing group, click Arrange, point to Align, and then do the following:Click Align to Slide.ClickAlignRight.ClickAlignMiddle.To reproduce the text effects on this slide, do the following:On the Insert tab, in the Illustrations group, click TextBox. On the slide, drag to draw a text box.Enter text in the text box, and then select the text. On the Home tab, in the Font group, do the following:In the Font list, select Arial.In the FontSize list, select 28.Click Bold.Click the button next to FontColor, and then under ThemeColors click White, Background 1 (first row, first option from the left).On the Home tab, in the Paragraph group, click AlignTextRight to align the text right in the text box. Drag the text box onto the left half of the slide.To reproduce the background effects on this slide, do the following:Right-click the slide background area, and then click Format Background. In the Format Background dialog box, click Fill in the left pane, select Gradient fill in the Fill pane, and then do the following:In the Type list, select Linear.Click the button next to Direction, and then click Linear Down (first row, second option from the left).Under Gradient stops, click Add or Remove until two stops appear in the drop-down list.Also under Gradient stops, customize the gradient stops that you added as follows:Select Stop 1 from the list, and then do the following:In the Stop position box, enter 40%.Click the button next to Color, and then click Black, Text 1 (first row, second option from the left).Select Stop 2 from the list, and then do the following: In the Stop position box, enter 100%.Click the button next to Color, and then click Black, Text 1, Lighter 50% (second row, second option from the left).To reproduce the animation effects on this slide, do the following:On the Animations tab, in the Animations group, click CustomAnimation. Select the line off the right edge of the slide. In the CustomAnimation task pane, do the following:Click AddEffect, point to Entrance, and then click MoreEffects. In the AddEntranceEffect dialog box, under Basic, click FlyIn.Select the animation effect (fly-in effect for the second line). Under Modify: Fly In,do the following:In the Start list, select After Previous.In the Direction list, select FromLeft.In the Speed list, select Fast.On the Home tab, in the Editing group, click Select, and then click Selection Pane.In the Selection and Visibility pane, select the first line you created (in the middle of the slide). In the CustomAnimation task pane, do the following:Click AddEffect, point to Entrance, and then click MoreEffects. In the AddEntranceEffect dialog box, under Basic, click FlyIn.Select the second animation effect (fly-in effect for the first line). Under Modify: Fly In,do the following:In the Start list, select AfterPrevious.In the Direction list, select FromRight.In the Speed list, select Fast.On the slide, select the picture. In the CustomAnimation task pane, do the following:Click AddEffect, point to Entrance, and then click MoreEffects. In the AddEntranceEffect dialog box, under Basic, click Wipe.Select the third animation effect (wipe effect for the picture). Under Modify: Wipe,do the following:In the Start list, select WithPrevious.In the Direction list, select FromRight.In the Speed list, select Fast.On the slide, select the text box. In the CustomAnimation task pane, do the following:Click AddEffect, point to Entrance, and then click MoreEffects. In the AddEntranceEffect dialog box, under Basic, clickFlyIn.Select the fourth animation effect (fly-in effect for the text box). Under Modify: Fly In,do the following:In the Start list, select WithPrevious.In the Direction list, select FromRight.In the Speed list, select Fast.