SlideShare uma empresa Scribd logo
1 de 13
Baixar para ler offline
The TANDBERG
Video Conferencing System


Camera
The built-in camera includes a high quality color camera with a fast pan/tilt/zoom action. The camera is
controlled by the system’s infra-red remote control and operates pan/tilt, focus and zoom.

Codec
The codec is the heart of the system. Its main task is the compression of outgoing video, audio and data, the
transmission of this information to the far end and the decompression of the incoming information - the
name codec comes from a combination of the two words compression and decompression.

Remote Control
The remote control is used to control all functions of the system. If the screen saver is activated (black
monitor), touching the remote control will automatically wake up the system. The remote control uses 4
AAA batteries. The system will tell you when batteries are running low. Change the batteries at the back of
the remote control. The reach of the remote control signal is 20 meters. For users sitting in an open plan
office, this can cause problems. Use the little, white switch placed under the batteries to change the reach of
the signal from 20 meters to 2 meters. This will prevent you from unintentionally controlling another video
system, when you control your own system.

Microphone
The high quality table microphone is designed to be placed on a table during a videoconference. Up to two
microphones can be connected. The ideal location for the microphone is on a flat surface at least 2m (6.5 ft)
from the front of the system. The microphone cable should always point towards the system. The system
will automatically equalize sound levels. Loud and soft voices are picked up and transmitted to the far end
at approximately the same level.


                                                                                                             1
Getting Started
System start-up
Turn the Tandberg camera on, using the On/Off switch located at the rear of the camera
and turn the TV monitor on, using the power button on the front of the monitor. If the
blue light on the front of your Tandberg camera is on, your system is on and should be in
standby mode. When in standby mode, pressing any key or picking up the remote control
will wake up the system. An incoming call will also wake up the system. After a few
seconds you should see the ‘Welcome’ menu on the monitor.

Welcome Menu
After the system has performed a self-test routine, the product logo and a start menu will
be displayed on the monitor as well as the video source that is being displayed through
your Tandberg. This menu should provide you with the most important system
information. The icons at the bottom of the screen display the primary functions needed
to operate a Tandberg. For example, to make a call you can highlight the “Make a Call”
icon and press the “OK/Menu” button on your remote.


                                                                                        2
Basics
The system’s most commonly used functions are accessible directly from the remote
control by single key presses. In addition, the user interface is represented by on-screen
menus. Individual items within the menus and lists can be selected by moving a yellow
highlighter bar to the desired option.

1. Mic Off turns your microphone on and off.
2. Arrow keys are used for navigation in the menu
and for moving the camera when the menu is
hidden.
3. Volume + and – adjusts the Codec volume only
and not the monitor's volume.
4. The Layout key toggles between full screen and
different display layouts.
5. Cancel takes you back one step in the menu
system. Use Cancel to delete characters in an input
field.
6. Press the Call key to place a call.
7. Camera presets define specific camera positions.
Move the camera to the desired position and press
and hold a number key for 1 second to save the
current camera position to that number key. To
activate a preset whilst in a call, simply press and
release that number key.
8. Snapshot takes a snapshot of your video only
while you are in a call.
9. The Presentation key switches to a predefined
presentation source. If the Presentation key is held
down for 1 second then the Presentation video
sources menu will appear.
10. Press OK/Menu to show the menu and to
select menu items.
11. Use Zoom + and – to zoom the camera in and
out.
12. Selfview displays your outgoing video. Press Selfview again to turn Selfview off.
13. Use the Phone Book to store and recall video contacts for easy placement of calls.
14. Use the red End Call key to end the current call. Pressing this key when not in a call
will place the system in Standby mode.
15. Number/Letter keys function in the same manner as with a mobile or cellular phone.
16. Press Touch tones when you are in a call and need to dial extension numbers etc.
(instead of presets). Press the OK/Menu button to exit Touch Tones.


                                                                                        3
Making and Ending Calls

Make a Call
         Press the green Quick Key for “Make a Call", then enter the number or the IP-
         address of the unit you wish to call using the Dialing keys – the * is used as the
dot in the IP-address – highlight the “Make a Call” icon and press OK to connect.


Answer a Call

         To answer a call, select the accept option as displayed below.
         Manual answer of a call is needed if the auto-answer facility is switched off.


End a Call
                                                          TIP: ENDING A CALL
         To end a call, press the DISCONNECT              SWITCHING OFF THE TV MONITOR
         button.                                          WILL NOT DISCONNECT A CALL. TO
                                                          DISCONNECT A CALL YOU SHOULD
                                                          PRESS THE DISCONNECT KEY.

Correcting Keying Mistakes

         To delete the last digit (or character) entered, press the button.


                                                                                          4
Directory
The directory is a local phone book that stores up to 99 directory entries and the last
number dialed.
         Press the “DIRECTORY” button to bring up a menu similar to the following:


To find an entry, key in the first letter, for example D, and scroll with the up/down arrows
located in the center of your remote.

         To dial the selected number press the “Connect” button. To edit the selected
         number before dialing, press OK.


Adjusting Volume

      Press the “Volume” button to adjust the volume level. An on-screen indicator will
      show the current level. +


View Outgoing Video (Selfview)
    Press the “Selfview” button to view your outgoing video – in other words, to “see
    yourself”. This let’s you monitor what is being broadcast to the other site.


       Press the “Layout” button to move your selfview as a Picture-in-Picture to
       different corners of the screen or to switch it off.


                                                                                          5
Microphone On/Off
        To mute your microphone, press the “Mic Off” button. An on screen
        indicator will appear – a picture of a microphone with a line through it.
        Press “Mic Off” button again to activate the microphone again.


Controlling the Main Camera

Moving / zooming camera
To control the Main Camera use the keys below:

        This button is used to pan across the room or tilt up and down.


       This button is for zooming.


Selecting Video Sources
         To select a video source you must first press and hold the “Presentation”
         button. Once you selected that button a menu should appear that looks
         something like this:


                                                        The “doc cam” is typically your
     The “pc” selection is chosen to project            Elmo device.
     your computer screen through the
     Tandberg. For example, if you wanted to
     share a PowerPoint presentation or
     website during your videoconference.


From this point you merely highlight and select which video source that you would like
to view.


                                                                                          6
Presets
Presets are available from the menu. When you are in a call you can also activate presets
directly from the remote control. You can save up to 15 presets. Each camera preset is
able to store camera angle, video source and audio source selection.

How to use preset directly from the remote control:
When you are in a call you can activate presets with just one press on the number keys on
remote control. The number keys will however not work as presets when you are in an
input field, in order to write numbers or letters.
1. Press a number on the remote control. The camera will move to the corresponding
angle, or video source, stored on that number.

How to use presets via the menu:
1. Select Camera Control - Display Presets in the menu.
2. Select the wanted preset with the arrow keys on the remote control and press OK.


Storing Presets
How to save a new preset directly from the remote control:
1. Move the camera to the desired position or select the desired video source that you
would like to store as a preset.
2. Press a number on the remote control for 1 second to save the preset. It is possible to
store one camera preset on each of the number keys, 0-9, when storing camera presets
from the remote control. (Camera preset 10 is stored on the 0-key).
3. The new camera preset will overwrite any existing camera preset on that number.

How to save a new Preset via the menu:
1. Move the camera to the desired position or select the desired video source that you
would like to store as a preset.
2. Select Camera Control - Save New Camera Preset in the menu.
3. Enter a number between 1 and 15 and press OK.
4. Type a name for the preset to make it easier to separate the different presets.
5. Press Save. The new Camera Preset will overwrite any existing camera preset on that
number.


                                                                                        7
Far End Camera Control (FECC)
To gain access to the far end camera control, after you are connected you select the
camera control option highlighted in the diagram:
                                                       The Camera Control Option


Upon highlighting the control option simply toggle between you main camera of the far
end camera.

Once the “Far End Video” option has been selected you would control the video camera
in the same way you would your own:

         This button is used to pan across the room or tilt up and down.


       This button is for zooming.


Connecting a PC to Your Tandberg
• Set your PC desktop resolution to 800 X 600 pixels with 32 bit color (TrueColor).
• Connect a VGA-VGA cable from your PC (VGA Output) to ‘PC VGA In’ on your
  Tandberg.
• Start your PC.
• Press the “PC” option in the “Presentations” menu.
• Press SELFVIEW until the indicator ‘Selfview’ is displayed on your monitor. This
  allows you to see what is being transmitted to the other site(s), which at this point
  should be your computer screen.


                                                                                       8
Menu Structure
The on-screen menu structure is shown below.

Press the MENU key on the remote control to enter or leave the Main Menu.


          TIP: Under the Administrator Settings is where you will find the
          area to define your IP address, see the next page.


                                                                             9
TIP: To reset the IP Settings simply select the
admin section from you main menu and select:

    Network LAN Settings IP Settings

TIP: Remember after changing you IP settings
always restart you machine.


                                                  10
USDA Grant IP Videoconferencing Equipment Set-up


                                                    Insert
                                                    network
                                                    cable
                                                    into the
                                                    port
                                                    labeled
                                                    Ethernet.


              Back of Tandberg device


                Back of TV monitor


                                                   11
USDA Grant IP Videoconferencing Smart Cart Set-up

Depending on what type of smart cart you have there will two different variations of the
connection panel.

                                 Expression 103 Cart


                       Audio Connection                VGA Connection

         USB Connection                                         Network Connection


                                   Expressions Cart


           Audio Connection                                       Printer Connection

                                                       Projector Input Connection
                 USB Connection

                              Elmo / Data Connection


                                                                                       12
Hooking a Laptop to a Tandberg Through a Smart Cart


                                                                                       Network
                                                                                        Input
                                            Projector Cable from Smart Cart


VGA Cable Out of the Laptop into the Tandberg
                                                         Audio Cable from Smart Cart


NOTE: To toggle between video sources once they are connected please see page 6.


                                                                                           13

Mais conteúdo relacionado

Mais procurados

POST801 Video Conferencing
POST801 Video ConferencingPOST801 Video Conferencing
POST801 Video ConferencingVideoguy
 
Uv820 usb3.0 user manual 2014.7.14
Uv820 usb3.0 user manual 2014.7.14Uv820 usb3.0 user manual 2014.7.14
Uv820 usb3.0 user manual 2014.7.14Jill Liang
 
CamStudio User Guide - VIDEO EDITING AND MAKING SOFTWARE
CamStudio User Guide - VIDEO EDITING AND MAKING SOFTWARE CamStudio User Guide - VIDEO EDITING AND MAKING SOFTWARE
CamStudio User Guide - VIDEO EDITING AND MAKING SOFTWARE MUHAMMAD HUZAIFA CHAUDHARY
 
UF/IFAS Interactive Videoconferencing Network Handbook
UF/IFAS Interactive Videoconferencing Network HandbookUF/IFAS Interactive Videoconferencing Network Handbook
UF/IFAS Interactive Videoconferencing Network HandbookVideoguy
 
%5 bld550580 asia%5dbn68-03399a-02eng-0221
%5 bld550580 asia%5dbn68-03399a-02eng-0221%5 bld550580 asia%5dbn68-03399a-02eng-0221
%5 bld550580 asia%5dbn68-03399a-02eng-0221mannut2001
 
BWC Wireframes
BWC WireframesBWC Wireframes
BWC Wireframesleoqian4
 
Coolpad rogue user manual for 3320 a
Coolpad rogue user manual for 3320 aCoolpad rogue user manual for 3320 a
Coolpad rogue user manual for 3320 aRobert Weiner
 
OVR3D Beta installation guide
OVR3D Beta installation guideOVR3D Beta installation guide
OVR3D Beta installation guideguest0bd9b6
 
Ecom Ex-Handy 05 ATEX Certified Hazardous Area Mobile Phone - Manual
Ecom Ex-Handy 05 ATEX Certified Hazardous Area Mobile Phone - ManualEcom Ex-Handy 05 ATEX Certified Hazardous Area Mobile Phone - Manual
Ecom Ex-Handy 05 ATEX Certified Hazardous Area Mobile Phone - ManualThorne & Derrick International
 
Sytong HT-60 Instruction Manual | Optics Trade
Sytong HT-60 Instruction Manual | Optics TradeSytong HT-60 Instruction Manual | Optics Trade
Sytong HT-60 Instruction Manual | Optics TradeOptics-Trade
 
Designing and Making my Ident
Designing and Making my IdentDesigning and Making my Ident
Designing and Making my Identsydney20
 
designing and production
designing and productiondesigning and production
designing and productionsydney20
 
2012 Chevy Camaro at Jerry's Chevrolet in Baltimore, Maryland
2012 Chevy Camaro at Jerry's Chevrolet in Baltimore, Maryland2012 Chevy Camaro at Jerry's Chevrolet in Baltimore, Maryland
2012 Chevy Camaro at Jerry's Chevrolet in Baltimore, MarylandJerry's Chevrolet
 

Mais procurados (20)

POST801 Video Conferencing
POST801 Video ConferencingPOST801 Video Conferencing
POST801 Video Conferencing
 
XO tutorial March '08
XO tutorial March '08XO tutorial March '08
XO tutorial March '08
 
Uv820 usb3.0 user manual 2014.7.14
Uv820 usb3.0 user manual 2014.7.14Uv820 usb3.0 user manual 2014.7.14
Uv820 usb3.0 user manual 2014.7.14
 
Comcast on demand_remote_manual
Comcast on demand_remote_manualComcast on demand_remote_manual
Comcast on demand_remote_manual
 
Mackie control
Mackie controlMackie control
Mackie control
 
CamStudio User Guide - VIDEO EDITING AND MAKING SOFTWARE
CamStudio User Guide - VIDEO EDITING AND MAKING SOFTWARE CamStudio User Guide - VIDEO EDITING AND MAKING SOFTWARE
CamStudio User Guide - VIDEO EDITING AND MAKING SOFTWARE
 
UF/IFAS Interactive Videoconferencing Network Handbook
UF/IFAS Interactive Videoconferencing Network HandbookUF/IFAS Interactive Videoconferencing Network Handbook
UF/IFAS Interactive Videoconferencing Network Handbook
 
%5 bld550580 asia%5dbn68-03399a-02eng-0221
%5 bld550580 asia%5dbn68-03399a-02eng-0221%5 bld550580 asia%5dbn68-03399a-02eng-0221
%5 bld550580 asia%5dbn68-03399a-02eng-0221
 
Adobe Premiere CC Handbook
Adobe Premiere CC HandbookAdobe Premiere CC Handbook
Adobe Premiere CC Handbook
 
G1manual
G1manualG1manual
G1manual
 
BWC Wireframes
BWC WireframesBWC Wireframes
BWC Wireframes
 
Coolpad rogue user manual for 3320 a
Coolpad rogue user manual for 3320 aCoolpad rogue user manual for 3320 a
Coolpad rogue user manual for 3320 a
 
OVR3D Beta installation guide
OVR3D Beta installation guideOVR3D Beta installation guide
OVR3D Beta installation guide
 
740688 001
740688 001740688 001
740688 001
 
Ecom Ex-Handy 05 ATEX Certified Hazardous Area Mobile Phone - Manual
Ecom Ex-Handy 05 ATEX Certified Hazardous Area Mobile Phone - ManualEcom Ex-Handy 05 ATEX Certified Hazardous Area Mobile Phone - Manual
Ecom Ex-Handy 05 ATEX Certified Hazardous Area Mobile Phone - Manual
 
K yan pro user manual.
K yan pro user manual.K yan pro user manual.
K yan pro user manual.
 
Sytong HT-60 Instruction Manual | Optics Trade
Sytong HT-60 Instruction Manual | Optics TradeSytong HT-60 Instruction Manual | Optics Trade
Sytong HT-60 Instruction Manual | Optics Trade
 
Designing and Making my Ident
Designing and Making my IdentDesigning and Making my Ident
Designing and Making my Ident
 
designing and production
designing and productiondesigning and production
designing and production
 
2012 Chevy Camaro at Jerry's Chevrolet in Baltimore, Maryland
2012 Chevy Camaro at Jerry's Chevrolet in Baltimore, Maryland2012 Chevy Camaro at Jerry's Chevrolet in Baltimore, Maryland
2012 Chevy Camaro at Jerry's Chevrolet in Baltimore, Maryland
 

Destaque

Hybrid AM / MEMS micromirror assembly
Hybrid AM / MEMS micromirror assemblyHybrid AM / MEMS micromirror assembly
Hybrid AM / MEMS micromirror assemblyScott Merry
 
Free-riding Resilient Video Streaming in Peer-to-Peer Networks
Free-riding Resilient Video Streaming in Peer-to-Peer NetworksFree-riding Resilient Video Streaming in Peer-to-Peer Networks
Free-riding Resilient Video Streaming in Peer-to-Peer NetworksVideoguy
 
Proxy Cache Management for Fine-Grained Scalable Video Streaming
Proxy Cache Management for Fine-Grained Scalable Video StreamingProxy Cache Management for Fine-Grained Scalable Video Streaming
Proxy Cache Management for Fine-Grained Scalable Video StreamingVideoguy
 
Microsoft PowerPoint - WirelessCluster_Pres
Microsoft PowerPoint - WirelessCluster_PresMicrosoft PowerPoint - WirelessCluster_Pres
Microsoft PowerPoint - WirelessCluster_PresVideoguy
 
Energy-Aware Wireless Video Streaming
Energy-Aware Wireless Video StreamingEnergy-Aware Wireless Video Streaming
Energy-Aware Wireless Video StreamingVideoguy
 

Destaque (7)

Laser projection
Laser projection Laser projection
Laser projection
 
Hybrid AM / MEMS micromirror assembly
Hybrid AM / MEMS micromirror assemblyHybrid AM / MEMS micromirror assembly
Hybrid AM / MEMS micromirror assembly
 
Adobe
AdobeAdobe
Adobe
 
Free-riding Resilient Video Streaming in Peer-to-Peer Networks
Free-riding Resilient Video Streaming in Peer-to-Peer NetworksFree-riding Resilient Video Streaming in Peer-to-Peer Networks
Free-riding Resilient Video Streaming in Peer-to-Peer Networks
 
Proxy Cache Management for Fine-Grained Scalable Video Streaming
Proxy Cache Management for Fine-Grained Scalable Video StreamingProxy Cache Management for Fine-Grained Scalable Video Streaming
Proxy Cache Management for Fine-Grained Scalable Video Streaming
 
Microsoft PowerPoint - WirelessCluster_Pres
Microsoft PowerPoint - WirelessCluster_PresMicrosoft PowerPoint - WirelessCluster_Pres
Microsoft PowerPoint - WirelessCluster_Pres
 
Energy-Aware Wireless Video Streaming
Energy-Aware Wireless Video StreamingEnergy-Aware Wireless Video Streaming
Energy-Aware Wireless Video Streaming
 

Semelhante a The TANDBERG Video Conferencing System

Video Conferencing.ppt
Video Conferencing.pptVideo Conferencing.ppt
Video Conferencing.pptVideoguy
 
Video Conferencing.ppt
Video Conferencing.pptVideo Conferencing.ppt
Video Conferencing.pptVideoguy
 
Vodafone Smart prime 6 Manual / User Guide
Vodafone Smart prime 6 Manual / User GuideVodafone Smart prime 6 Manual / User Guide
Vodafone Smart prime 6 Manual / User Guidemanualsheet
 
Yealink cp860 quick_start_guide_v80_10
Yealink cp860 quick_start_guide_v80_10Yealink cp860 quick_start_guide_v80_10
Yealink cp860 quick_start_guide_v80_10Miluska Guerra Guerra
 
Videoconferencing Presentation
Videoconferencing PresentationVideoconferencing Presentation
Videoconferencing PresentationVideoguy
 
Vodafone Smart Platinum 7 Manual / User Guide
Vodafone Smart Platinum 7 Manual / User GuideVodafone Smart Platinum 7 Manual / User Guide
Vodafone Smart Platinum 7 Manual / User Guidemanualsheet
 
Sagemcom D750A Digital Cordless Phone User Guide
Sagemcom D750A Digital Cordless Phone User GuideSagemcom D750A Digital Cordless Phone User Guide
Sagemcom D750A Digital Cordless Phone User GuideTelephones Online
 
Instruction Manual | Sytong HT-66 | Optics Trade
Instruction Manual | Sytong HT-66 | Optics TradeInstruction Manual | Sytong HT-66 | Optics Trade
Instruction Manual | Sytong HT-66 | Optics TradeOptics-Trade
 
LifeSize_VC_Cheat_Sheet28May08
LifeSize_VC_Cheat_Sheet28May08LifeSize_VC_Cheat_Sheet28May08
LifeSize_VC_Cheat_Sheet28May08Videoguy
 
Your Guide On How To Use The Canon XA20/25
Your Guide On How To Use The Canon XA20/25Your Guide On How To Use The Canon XA20/25
Your Guide On How To Use The Canon XA20/25Campbell Cameras
 
Manual Cisco spa512g
Manual Cisco spa512gManual Cisco spa512g
Manual Cisco spa512gLojamundi
 
User Manual for G11 Phone
User Manual for G11 PhoneUser Manual for G11 Phone
User Manual for G11 PhoneTVC Skyshop
 
Vodafone Smart first 6 Manual / User Guide
Vodafone Smart first 6 Manual / User GuideVodafone Smart first 6 Manual / User Guide
Vodafone Smart first 6 Manual / User Guidemanualsheet
 
Group Study Technology Instructions
Group Study Technology InstructionsGroup Study Technology Instructions
Group Study Technology InstructionsPeter Thayer
 
STUDIO RECORDER GUIDExx
STUDIO RECORDER GUIDExxSTUDIO RECORDER GUIDExx
STUDIO RECORDER GUIDExxMike Hayden
 
Guide to Using the Canon VIXIA HF G30
Guide to Using the Canon VIXIA HF G30Guide to Using the Canon VIXIA HF G30
Guide to Using the Canon VIXIA HF G30Campbell Cameras
 
Sagemcom D21V Digital Cordless Phone User Guide
Sagemcom D21V Digital Cordless Phone User GuideSagemcom D21V Digital Cordless Phone User Guide
Sagemcom D21V Digital Cordless Phone User GuideTelephones Online
 

Semelhante a The TANDBERG Video Conferencing System (20)

Video Conferencing.ppt
Video Conferencing.pptVideo Conferencing.ppt
Video Conferencing.ppt
 
Video Conferencing.ppt
Video Conferencing.pptVideo Conferencing.ppt
Video Conferencing.ppt
 
K
KK
K
 
Vodafone Smart prime 6 Manual / User Guide
Vodafone Smart prime 6 Manual / User GuideVodafone Smart prime 6 Manual / User Guide
Vodafone Smart prime 6 Manual / User Guide
 
Yealink cp860 quick_start_guide_v80_10
Yealink cp860 quick_start_guide_v80_10Yealink cp860 quick_start_guide_v80_10
Yealink cp860 quick_start_guide_v80_10
 
Videoconferencing Presentation
Videoconferencing PresentationVideoconferencing Presentation
Videoconferencing Presentation
 
Vodafone Smart Platinum 7 Manual / User Guide
Vodafone Smart Platinum 7 Manual / User GuideVodafone Smart Platinum 7 Manual / User Guide
Vodafone Smart Platinum 7 Manual / User Guide
 
Sagemcom D750A Digital Cordless Phone User Guide
Sagemcom D750A Digital Cordless Phone User GuideSagemcom D750A Digital Cordless Phone User Guide
Sagemcom D750A Digital Cordless Phone User Guide
 
Instruction Manual | Sytong HT-66 | Optics Trade
Instruction Manual | Sytong HT-66 | Optics TradeInstruction Manual | Sytong HT-66 | Optics Trade
Instruction Manual | Sytong HT-66 | Optics Trade
 
LifeSize_VC_Cheat_Sheet28May08
LifeSize_VC_Cheat_Sheet28May08LifeSize_VC_Cheat_Sheet28May08
LifeSize_VC_Cheat_Sheet28May08
 
Equipment Usage
Equipment UsageEquipment Usage
Equipment Usage
 
Your Guide On How To Use The Canon XA20/25
Your Guide On How To Use The Canon XA20/25Your Guide On How To Use The Canon XA20/25
Your Guide On How To Use The Canon XA20/25
 
Manual Cisco spa512g
Manual Cisco spa512gManual Cisco spa512g
Manual Cisco spa512g
 
LECTURE-4.pptx
LECTURE-4.pptxLECTURE-4.pptx
LECTURE-4.pptx
 
User Manual for G11 Phone
User Manual for G11 PhoneUser Manual for G11 Phone
User Manual for G11 Phone
 
Vodafone Smart first 6 Manual / User Guide
Vodafone Smart first 6 Manual / User GuideVodafone Smart first 6 Manual / User Guide
Vodafone Smart first 6 Manual / User Guide
 
Group Study Technology Instructions
Group Study Technology InstructionsGroup Study Technology Instructions
Group Study Technology Instructions
 
STUDIO RECORDER GUIDExx
STUDIO RECORDER GUIDExxSTUDIO RECORDER GUIDExx
STUDIO RECORDER GUIDExx
 
Guide to Using the Canon VIXIA HF G30
Guide to Using the Canon VIXIA HF G30Guide to Using the Canon VIXIA HF G30
Guide to Using the Canon VIXIA HF G30
 
Sagemcom D21V Digital Cordless Phone User Guide
Sagemcom D21V Digital Cordless Phone User GuideSagemcom D21V Digital Cordless Phone User Guide
Sagemcom D21V Digital Cordless Phone User Guide
 

Mais de Videoguy

Instant video streaming
Instant video streamingInstant video streaming
Instant video streamingVideoguy
 
Video Streaming over Bluetooth: A Survey
Video Streaming over Bluetooth: A SurveyVideo Streaming over Bluetooth: A Survey
Video Streaming over Bluetooth: A SurveyVideoguy
 
Video Streaming
Video StreamingVideo Streaming
Video StreamingVideoguy
 
Reaching a Broader Audience
Reaching a Broader AudienceReaching a Broader Audience
Reaching a Broader AudienceVideoguy
 
Considerations for Creating Streamed Video Content over 3G ...
Considerations for Creating Streamed Video Content over 3G ...Considerations for Creating Streamed Video Content over 3G ...
Considerations for Creating Streamed Video Content over 3G ...Videoguy
 
ADVANCES IN CHANNEL-ADAPTIVE VIDEO STREAMING
ADVANCES IN CHANNEL-ADAPTIVE VIDEO STREAMINGADVANCES IN CHANNEL-ADAPTIVE VIDEO STREAMING
ADVANCES IN CHANNEL-ADAPTIVE VIDEO STREAMINGVideoguy
 
Impact of FEC Overhead on Scalable Video Streaming
Impact of FEC Overhead on Scalable Video StreamingImpact of FEC Overhead on Scalable Video Streaming
Impact of FEC Overhead on Scalable Video StreamingVideoguy
 
Application Brief
Application BriefApplication Brief
Application BriefVideoguy
 
Video Streaming Services – Stage 1
Video Streaming Services – Stage 1Video Streaming Services – Stage 1
Video Streaming Services – Stage 1Videoguy
 
Streaming Video into Second Life
Streaming Video into Second LifeStreaming Video into Second Life
Streaming Video into Second LifeVideoguy
 
Flash Live Video Streaming Software
Flash Live Video Streaming SoftwareFlash Live Video Streaming Software
Flash Live Video Streaming SoftwareVideoguy
 
Videoconference Streaming Solutions Cookbook
Videoconference Streaming Solutions CookbookVideoconference Streaming Solutions Cookbook
Videoconference Streaming Solutions CookbookVideoguy
 
Streaming Video Formaten
Streaming Video FormatenStreaming Video Formaten
Streaming Video FormatenVideoguy
 
iPhone Live Video Streaming Software
iPhone Live Video Streaming SoftwareiPhone Live Video Streaming Software
iPhone Live Video Streaming SoftwareVideoguy
 
Glow: Video streaming training guide - Firefox
Glow: Video streaming training guide - FirefoxGlow: Video streaming training guide - Firefox
Glow: Video streaming training guide - FirefoxVideoguy
 
Video and Streaming in Nokia Phones v1.0
Video and Streaming in Nokia Phones v1.0Video and Streaming in Nokia Phones v1.0
Video and Streaming in Nokia Phones v1.0Videoguy
 
Video Streaming across wide area networks
Video Streaming across wide area networksVideo Streaming across wide area networks
Video Streaming across wide area networksVideoguy
 
University Information Systems Product Service Offering
University Information Systems Product Service OfferingUniversity Information Systems Product Service Offering
University Information Systems Product Service OfferingVideoguy
 
Video Communications and Video Streaming
Video Communications and Video StreamingVideo Communications and Video Streaming
Video Communications and Video StreamingVideoguy
 
Mixed Streaming of Video over Wireless Networks
Mixed Streaming of Video over Wireless NetworksMixed Streaming of Video over Wireless Networks
Mixed Streaming of Video over Wireless NetworksVideoguy
 

Mais de Videoguy (20)

Instant video streaming
Instant video streamingInstant video streaming
Instant video streaming
 
Video Streaming over Bluetooth: A Survey
Video Streaming over Bluetooth: A SurveyVideo Streaming over Bluetooth: A Survey
Video Streaming over Bluetooth: A Survey
 
Video Streaming
Video StreamingVideo Streaming
Video Streaming
 
Reaching a Broader Audience
Reaching a Broader AudienceReaching a Broader Audience
Reaching a Broader Audience
 
Considerations for Creating Streamed Video Content over 3G ...
Considerations for Creating Streamed Video Content over 3G ...Considerations for Creating Streamed Video Content over 3G ...
Considerations for Creating Streamed Video Content over 3G ...
 
ADVANCES IN CHANNEL-ADAPTIVE VIDEO STREAMING
ADVANCES IN CHANNEL-ADAPTIVE VIDEO STREAMINGADVANCES IN CHANNEL-ADAPTIVE VIDEO STREAMING
ADVANCES IN CHANNEL-ADAPTIVE VIDEO STREAMING
 
Impact of FEC Overhead on Scalable Video Streaming
Impact of FEC Overhead on Scalable Video StreamingImpact of FEC Overhead on Scalable Video Streaming
Impact of FEC Overhead on Scalable Video Streaming
 
Application Brief
Application BriefApplication Brief
Application Brief
 
Video Streaming Services – Stage 1
Video Streaming Services – Stage 1Video Streaming Services – Stage 1
Video Streaming Services – Stage 1
 
Streaming Video into Second Life
Streaming Video into Second LifeStreaming Video into Second Life
Streaming Video into Second Life
 
Flash Live Video Streaming Software
Flash Live Video Streaming SoftwareFlash Live Video Streaming Software
Flash Live Video Streaming Software
 
Videoconference Streaming Solutions Cookbook
Videoconference Streaming Solutions CookbookVideoconference Streaming Solutions Cookbook
Videoconference Streaming Solutions Cookbook
 
Streaming Video Formaten
Streaming Video FormatenStreaming Video Formaten
Streaming Video Formaten
 
iPhone Live Video Streaming Software
iPhone Live Video Streaming SoftwareiPhone Live Video Streaming Software
iPhone Live Video Streaming Software
 
Glow: Video streaming training guide - Firefox
Glow: Video streaming training guide - FirefoxGlow: Video streaming training guide - Firefox
Glow: Video streaming training guide - Firefox
 
Video and Streaming in Nokia Phones v1.0
Video and Streaming in Nokia Phones v1.0Video and Streaming in Nokia Phones v1.0
Video and Streaming in Nokia Phones v1.0
 
Video Streaming across wide area networks
Video Streaming across wide area networksVideo Streaming across wide area networks
Video Streaming across wide area networks
 
University Information Systems Product Service Offering
University Information Systems Product Service OfferingUniversity Information Systems Product Service Offering
University Information Systems Product Service Offering
 
Video Communications and Video Streaming
Video Communications and Video StreamingVideo Communications and Video Streaming
Video Communications and Video Streaming
 
Mixed Streaming of Video over Wireless Networks
Mixed Streaming of Video over Wireless NetworksMixed Streaming of Video over Wireless Networks
Mixed Streaming of Video over Wireless Networks
 

The TANDBERG Video Conferencing System

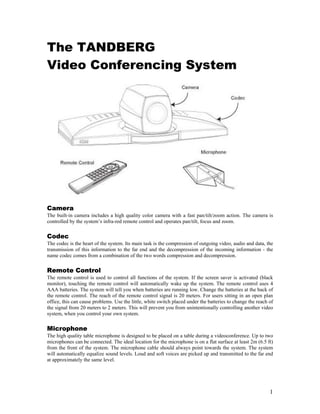
  • 1. The TANDBERG Video Conferencing System Camera The built-in camera includes a high quality color camera with a fast pan/tilt/zoom action. The camera is controlled by the system’s infra-red remote control and operates pan/tilt, focus and zoom. Codec The codec is the heart of the system. Its main task is the compression of outgoing video, audio and data, the transmission of this information to the far end and the decompression of the incoming information - the name codec comes from a combination of the two words compression and decompression. Remote Control The remote control is used to control all functions of the system. If the screen saver is activated (black monitor), touching the remote control will automatically wake up the system. The remote control uses 4 AAA batteries. The system will tell you when batteries are running low. Change the batteries at the back of the remote control. The reach of the remote control signal is 20 meters. For users sitting in an open plan office, this can cause problems. Use the little, white switch placed under the batteries to change the reach of the signal from 20 meters to 2 meters. This will prevent you from unintentionally controlling another video system, when you control your own system. Microphone The high quality table microphone is designed to be placed on a table during a videoconference. Up to two microphones can be connected. The ideal location for the microphone is on a flat surface at least 2m (6.5 ft) from the front of the system. The microphone cable should always point towards the system. The system will automatically equalize sound levels. Loud and soft voices are picked up and transmitted to the far end at approximately the same level. 1
  • 2. Getting Started System start-up Turn the Tandberg camera on, using the On/Off switch located at the rear of the camera and turn the TV monitor on, using the power button on the front of the monitor. If the blue light on the front of your Tandberg camera is on, your system is on and should be in standby mode. When in standby mode, pressing any key or picking up the remote control will wake up the system. An incoming call will also wake up the system. After a few seconds you should see the ‘Welcome’ menu on the monitor. Welcome Menu After the system has performed a self-test routine, the product logo and a start menu will be displayed on the monitor as well as the video source that is being displayed through your Tandberg. This menu should provide you with the most important system information. The icons at the bottom of the screen display the primary functions needed to operate a Tandberg. For example, to make a call you can highlight the “Make a Call” icon and press the “OK/Menu” button on your remote. 2
  • 3. Basics The system’s most commonly used functions are accessible directly from the remote control by single key presses. In addition, the user interface is represented by on-screen menus. Individual items within the menus and lists can be selected by moving a yellow highlighter bar to the desired option. 1. Mic Off turns your microphone on and off. 2. Arrow keys are used for navigation in the menu and for moving the camera when the menu is hidden. 3. Volume + and – adjusts the Codec volume only and not the monitor's volume. 4. The Layout key toggles between full screen and different display layouts. 5. Cancel takes you back one step in the menu system. Use Cancel to delete characters in an input field. 6. Press the Call key to place a call. 7. Camera presets define specific camera positions. Move the camera to the desired position and press and hold a number key for 1 second to save the current camera position to that number key. To activate a preset whilst in a call, simply press and release that number key. 8. Snapshot takes a snapshot of your video only while you are in a call. 9. The Presentation key switches to a predefined presentation source. If the Presentation key is held down for 1 second then the Presentation video sources menu will appear. 10. Press OK/Menu to show the menu and to select menu items. 11. Use Zoom + and – to zoom the camera in and out. 12. Selfview displays your outgoing video. Press Selfview again to turn Selfview off. 13. Use the Phone Book to store and recall video contacts for easy placement of calls. 14. Use the red End Call key to end the current call. Pressing this key when not in a call will place the system in Standby mode. 15. Number/Letter keys function in the same manner as with a mobile or cellular phone. 16. Press Touch tones when you are in a call and need to dial extension numbers etc. (instead of presets). Press the OK/Menu button to exit Touch Tones. 3
  • 4. Making and Ending Calls Make a Call Press the green Quick Key for “Make a Call", then enter the number or the IP- address of the unit you wish to call using the Dialing keys – the * is used as the dot in the IP-address – highlight the “Make a Call” icon and press OK to connect. Answer a Call To answer a call, select the accept option as displayed below. Manual answer of a call is needed if the auto-answer facility is switched off. End a Call TIP: ENDING A CALL To end a call, press the DISCONNECT SWITCHING OFF THE TV MONITOR button. WILL NOT DISCONNECT A CALL. TO DISCONNECT A CALL YOU SHOULD PRESS THE DISCONNECT KEY. Correcting Keying Mistakes To delete the last digit (or character) entered, press the button. 4
  • 5. Directory The directory is a local phone book that stores up to 99 directory entries and the last number dialed. Press the “DIRECTORY” button to bring up a menu similar to the following: To find an entry, key in the first letter, for example D, and scroll with the up/down arrows located in the center of your remote. To dial the selected number press the “Connect” button. To edit the selected number before dialing, press OK. Adjusting Volume Press the “Volume” button to adjust the volume level. An on-screen indicator will show the current level. + View Outgoing Video (Selfview) Press the “Selfview” button to view your outgoing video – in other words, to “see yourself”. This let’s you monitor what is being broadcast to the other site. Press the “Layout” button to move your selfview as a Picture-in-Picture to different corners of the screen or to switch it off. 5
  • 6. Microphone On/Off To mute your microphone, press the “Mic Off” button. An on screen indicator will appear – a picture of a microphone with a line through it. Press “Mic Off” button again to activate the microphone again. Controlling the Main Camera Moving / zooming camera To control the Main Camera use the keys below: This button is used to pan across the room or tilt up and down. This button is for zooming. Selecting Video Sources To select a video source you must first press and hold the “Presentation” button. Once you selected that button a menu should appear that looks something like this: The “doc cam” is typically your The “pc” selection is chosen to project Elmo device. your computer screen through the Tandberg. For example, if you wanted to share a PowerPoint presentation or website during your videoconference. From this point you merely highlight and select which video source that you would like to view. 6
  • 7. Presets Presets are available from the menu. When you are in a call you can also activate presets directly from the remote control. You can save up to 15 presets. Each camera preset is able to store camera angle, video source and audio source selection. How to use preset directly from the remote control: When you are in a call you can activate presets with just one press on the number keys on remote control. The number keys will however not work as presets when you are in an input field, in order to write numbers or letters. 1. Press a number on the remote control. The camera will move to the corresponding angle, or video source, stored on that number. How to use presets via the menu: 1. Select Camera Control - Display Presets in the menu. 2. Select the wanted preset with the arrow keys on the remote control and press OK. Storing Presets How to save a new preset directly from the remote control: 1. Move the camera to the desired position or select the desired video source that you would like to store as a preset. 2. Press a number on the remote control for 1 second to save the preset. It is possible to store one camera preset on each of the number keys, 0-9, when storing camera presets from the remote control. (Camera preset 10 is stored on the 0-key). 3. The new camera preset will overwrite any existing camera preset on that number. How to save a new Preset via the menu: 1. Move the camera to the desired position or select the desired video source that you would like to store as a preset. 2. Select Camera Control - Save New Camera Preset in the menu. 3. Enter a number between 1 and 15 and press OK. 4. Type a name for the preset to make it easier to separate the different presets. 5. Press Save. The new Camera Preset will overwrite any existing camera preset on that number. 7
  • 8. Far End Camera Control (FECC) To gain access to the far end camera control, after you are connected you select the camera control option highlighted in the diagram: The Camera Control Option Upon highlighting the control option simply toggle between you main camera of the far end camera. Once the “Far End Video” option has been selected you would control the video camera in the same way you would your own: This button is used to pan across the room or tilt up and down. This button is for zooming. Connecting a PC to Your Tandberg • Set your PC desktop resolution to 800 X 600 pixels with 32 bit color (TrueColor). • Connect a VGA-VGA cable from your PC (VGA Output) to ‘PC VGA In’ on your Tandberg. • Start your PC. • Press the “PC” option in the “Presentations” menu. • Press SELFVIEW until the indicator ‘Selfview’ is displayed on your monitor. This allows you to see what is being transmitted to the other site(s), which at this point should be your computer screen. 8
  • 9. Menu Structure The on-screen menu structure is shown below. Press the MENU key on the remote control to enter or leave the Main Menu. TIP: Under the Administrator Settings is where you will find the area to define your IP address, see the next page. 9
  • 10. TIP: To reset the IP Settings simply select the admin section from you main menu and select: Network LAN Settings IP Settings TIP: Remember after changing you IP settings always restart you machine. 10
  • 11. USDA Grant IP Videoconferencing Equipment Set-up Insert network cable into the port labeled Ethernet. Back of Tandberg device Back of TV monitor 11
  • 12. USDA Grant IP Videoconferencing Smart Cart Set-up Depending on what type of smart cart you have there will two different variations of the connection panel. Expression 103 Cart Audio Connection VGA Connection USB Connection Network Connection Expressions Cart Audio Connection Printer Connection Projector Input Connection USB Connection Elmo / Data Connection 12
  • 13. Hooking a Laptop to a Tandberg Through a Smart Cart Network Input Projector Cable from Smart Cart VGA Cable Out of the Laptop into the Tandberg Audio Cable from Smart Cart NOTE: To toggle between video sources once they are connected please see page 6. 13