SlideShare uma empresa Scribd logo
1 de 3
Baixar para ler offline
Chapter 13: Class Configuration
     After you configure the system’s database and hardware, setting up the system classes is the next step you take
     to prepare the Pro-Watch NT program. When you define a group of users (known as a class) you specify the access
     privileges to programs and functions, workstations, routing groups, event pages, event procedures, keystroke acceler-
     ators, event toolbars, and partitions. You also assign the badge profiles for the class and can create class partitions to
     restrict a designated class to viewing only certain portions of the database. For example, you may want to partition a
     group of users who work during the day to view database information involving only the day shift.
     Classes are configured through a series of dialog boxes and property sheets, all of which are accessed from the Edit
     Classes dialog box. From here you can customize the class configurations to specific needs.


 Adding a Class to the System
     When adding a class to the system you first define what the description of this class will be. For example, you might
     have a group of users who work only at night. You could then designate this group of users as the "Night Staff" class.
     Later—when you define the users in the class—you determine the class access to properties such as programs, work-
     stations, and badge profiles. Do the following to add a class to the system.

         1.   Open the Database Configuration window by selecting the Viewers bar from the left pane of the Pro-Watch
              NT application screen.

         2.   Select the Database Configuration icon (         ) to display the Database Configuration window in the right
              pane of the application screen.
         3.   Right-click Classes from the left pane of the Data Configuration window and click New. The system
              displays the Add Classes dialog box (Figure 13-1).


              Figure 13-1     Add Classes dialog box

         4.   Enter the title of the class in the Description box
         5.   Click No PIN Code, which is the system default, if you do not wish to use a PIN Code. Otherwise, click Use
              PIN Code and designate the pincode number in the Pincode box.


                                                                                                                           173
Class Configuration


                6.    On the lower-right portion of the dialog box is a list of users that are available or assigned to another class in
                      the system. Select those individual users you wish to include in the designated class and click Add. If you
                      want to include all users, click Add All.
                7.    The system moves the selected users to the lower-left portion of the dialog box, indicating they are assigned
                      to the new class.
                8.    Click OK. The system returns to the Data Configuration window. See the next section to configure class
                      properties.


      Opening the Edit Classes Dialog Box
            After designating what your system classes will be, the next step is to define the class access properties. This involves
            selecting each of your classes in the Data Configuration window and opening the associated Edit Classes dialog box.
            From here determine which properties will be designated to the selected class.
            To do access each of the class properties use the following steps:

                1.    From the right pane in the Data Configuration window, right-click the class whose properties you want to
                      define.
                2.    Choose Properties. The system displays the Edit Classes dialog box (Figure 13-2).


                      Figure 13-2     Edit Classes dialog box

                3.    From this dialog box determine which options you want to assign to the selected class. These include decid-
                      ing what users belong in the class, deciding what programs are necessary, designating workstations, adding
                      routing groups, creating event pages, deciding on badge profiles, establishing event procedures, specifying
                      Eventview columns and keystroke accelerators, customizing event toolbars, and creating class partitions
                      where applicable. Refer to the following sections to complete your class configurations.


174
Modifying a Class and its Users


Modifying a Class and its Users
    Any of the users you add to a class automatically receive the designated class properties; thus, granting the necessary
    permissions to utilize the system database effectively. However, all system users can belong to more than one class,
    and each user can have access rights other than those assigned to the class. You customize
    individual user rights from the instructions found in Chapter 4: User Configuration on page 189.
    In this section you can modify the class information and Pincode, and you can add individual or all users to a
    designated class. See the following for instructions.

        1.   Select Classes from the left pane of the Database Configuration window. Then, from the right pane, right-click
             the class you want to configure and click Properties.
        2.   Click the Class tab from the Edit Classes dialog box (Figure 13-3).


             Figure 13-3     Edit Classes property sheet

        3.   If necessary, edit the class information in the Description box. This information was originally entered from
             the Add Class dialog box. See “Adding a Class to the System” on page 173 for details. Change the number
             in the Pincode box if necessary.
        4.   On the lower-right portion of the dialog box is a list of users that are available or assigned to another class in
             the system. Select those individual users you wish to include in the designated class and click Add. If you
             want to include all users, click Add All.
        5.   The system moves the selected users to the lower-left portion of the dialog box, indicating they are assigned
             to the selected class. Click OK to return to the Data Configuration window, or select another tab in the
             dialog box to access other class properties.


                                                                                                                           175

Mais conteúdo relacionado

Semelhante a Technical writing sample

How to manage Users information with the Docebo E-Learning platform - Part 01...
How to manage Users information with the Docebo E-Learning platform - Part 01...How to manage Users information with the Docebo E-Learning platform - Part 01...
How to manage Users information with the Docebo E-Learning platform - Part 01...DoceboElearning
 
Data Mining Lab Manual.docx
Data Mining Lab Manual.docxData Mining Lab Manual.docx
Data Mining Lab Manual.docxpadmavathi95
 
24 - Panorama Necto 14 administration - visualization & data discovery solution
24  - Panorama Necto 14 administration - visualization & data discovery solution24  - Panorama Necto 14 administration - visualization & data discovery solution
24 - Panorama Necto 14 administration - visualization & data discovery solutionPanorama Software
 
Unit4 NMA working with user accounts WINDOWS SERVER 2008
Unit4 NMA working with user accounts WINDOWS SERVER 2008Unit4 NMA working with user accounts WINDOWS SERVER 2008
Unit4 NMA working with user accounts WINDOWS SERVER 2008Sangeetha Rangarajan
 
Create a basic performance point dashboard epc
Create a basic performance point dashboard   epcCreate a basic performance point dashboard   epc
Create a basic performance point dashboard epcEPC Group
 
Delegating Active Directory Permission to Reset Passwords
Delegating Active Directory Permission to Reset PasswordsDelegating Active Directory Permission to Reset Passwords
Delegating Active Directory Permission to Reset PasswordsTravis Kench
 
Ca1 report
Ca1 reportCa1 report
Ca1 reportaeehhhly
 
PS4100 EqualLogic Storage Installation Guide
PS4100 EqualLogic Storage Installation GuidePS4100 EqualLogic Storage Installation Guide
PS4100 EqualLogic Storage Installation GuideALAMGIR HOSSAIN
 
Classifications in IBM Maximo Asset Management
Classifications in IBM Maximo Asset ManagementClassifications in IBM Maximo Asset Management
Classifications in IBM Maximo Asset ManagementRobert Zientara
 
Section C Exercise Slides 1 windows 2003
Section C Exercise Slides 1 windows 2003Section C Exercise Slides 1 windows 2003
Section C Exercise Slides 1 windows 2003Spark48
 
D2L Site Admin Tools Discussion at Brightspace South Carolina Connection
D2L Site Admin Tools Discussion at Brightspace South Carolina ConnectionD2L Site Admin Tools Discussion at Brightspace South Carolina Connection
D2L Site Admin Tools Discussion at Brightspace South Carolina ConnectionD2L Barry
 
Smart view for-planning-part-ii
Smart view for-planning-part-iiSmart view for-planning-part-ii
Smart view for-planning-part-iiAmit Sharma
 
Programming Paradigms Seminar 3
Programming Paradigms Seminar 3Programming Paradigms Seminar 3
Programming Paradigms Seminar 3neoxiuting
 

Semelhante a Technical writing sample (20)

How to manage Users information with the Docebo E-Learning platform - Part 01...
How to manage Users information with the Docebo E-Learning platform - Part 01...How to manage Users information with the Docebo E-Learning platform - Part 01...
How to manage Users information with the Docebo E-Learning platform - Part 01...
 
Intern-Report
Intern-ReportIntern-Report
Intern-Report
 
Presentation gggffggggg.pdf
Presentation                     gggffggggg.pdfPresentation                     gggffggggg.pdf
Presentation gggffggggg.pdf
 
Sadcw 6e chapter4
Sadcw 6e chapter4Sadcw 6e chapter4
Sadcw 6e chapter4
 
Data Mining Lab Manual.docx
Data Mining Lab Manual.docxData Mining Lab Manual.docx
Data Mining Lab Manual.docx
 
24 - Panorama Necto 14 administration - visualization & data discovery solution
24  - Panorama Necto 14 administration - visualization & data discovery solution24  - Panorama Necto 14 administration - visualization & data discovery solution
24 - Panorama Necto 14 administration - visualization & data discovery solution
 
Unit4 NMA working with user accounts WINDOWS SERVER 2008
Unit4 NMA working with user accounts WINDOWS SERVER 2008Unit4 NMA working with user accounts WINDOWS SERVER 2008
Unit4 NMA working with user accounts WINDOWS SERVER 2008
 
Create a basic performance point dashboard epc
Create a basic performance point dashboard   epcCreate a basic performance point dashboard   epc
Create a basic performance point dashboard epc
 
Delegating Active Directory Permission to Reset Passwords
Delegating Active Directory Permission to Reset PasswordsDelegating Active Directory Permission to Reset Passwords
Delegating Active Directory Permission to Reset Passwords
 
Ca1 report
Ca1 reportCa1 report
Ca1 report
 
Grid view control
Grid view controlGrid view control
Grid view control
 
PS4100 EqualLogic Storage Installation Guide
PS4100 EqualLogic Storage Installation GuidePS4100 EqualLogic Storage Installation Guide
PS4100 EqualLogic Storage Installation Guide
 
Classifications in IBM Maximo Asset Management
Classifications in IBM Maximo Asset ManagementClassifications in IBM Maximo Asset Management
Classifications in IBM Maximo Asset Management
 
Packing User Guide v1
Packing User Guide v1Packing User Guide v1
Packing User Guide v1
 
Arena tutorial
Arena tutorialArena tutorial
Arena tutorial
 
Section C Exercise Slides 1 windows 2003
Section C Exercise Slides 1 windows 2003Section C Exercise Slides 1 windows 2003
Section C Exercise Slides 1 windows 2003
 
D2L Site Admin Tools Discussion at Brightspace South Carolina Connection
D2L Site Admin Tools Discussion at Brightspace South Carolina ConnectionD2L Site Admin Tools Discussion at Brightspace South Carolina Connection
D2L Site Admin Tools Discussion at Brightspace South Carolina Connection
 
Smart view for-planning-part-ii
Smart view for-planning-part-iiSmart view for-planning-part-ii
Smart view for-planning-part-ii
 
Smarttuts Project ppt
Smarttuts Project pptSmarttuts Project ppt
Smarttuts Project ppt
 
Programming Paradigms Seminar 3
Programming Paradigms Seminar 3Programming Paradigms Seminar 3
Programming Paradigms Seminar 3
 

Mais de TimelyEdits

Eve Armour\'s Resume
Eve Armour\'s ResumeEve Armour\'s Resume
Eve Armour\'s ResumeTimelyEdits
 
Rmhbda Newsletter Sept 2009 Reduced
Rmhbda Newsletter   Sept  2009 ReducedRmhbda Newsletter   Sept  2009 Reduced
Rmhbda Newsletter Sept 2009 ReducedTimelyEdits
 
Technical writing sample
Technical writing sampleTechnical writing sample
Technical writing sampleTimelyEdits
 
Brochure design sample 2
Brochure design sample 2Brochure design sample 2
Brochure design sample 2TimelyEdits
 
Flyer design sample
Flyer design sampleFlyer design sample
Flyer design sampleTimelyEdits
 
Brochure design sample
Brochure design sampleBrochure design sample
Brochure design sampleTimelyEdits
 
Newsletter Sample 2
Newsletter Sample 2Newsletter Sample 2
Newsletter Sample 2TimelyEdits
 
Newsletter Sample
Newsletter SampleNewsletter Sample
Newsletter SampleTimelyEdits
 

Mais de TimelyEdits (10)

Sample Flyer
Sample FlyerSample Flyer
Sample Flyer
 
Eve Armour\'s Resume
Eve Armour\'s ResumeEve Armour\'s Resume
Eve Armour\'s Resume
 
Rmhbda Newsletter Sept 2009 Reduced
Rmhbda Newsletter   Sept  2009 ReducedRmhbda Newsletter   Sept  2009 Reduced
Rmhbda Newsletter Sept 2009 Reduced
 
Writing sample
Writing sampleWriting sample
Writing sample
 
Technical writing sample
Technical writing sampleTechnical writing sample
Technical writing sample
 
Brochure design sample 2
Brochure design sample 2Brochure design sample 2
Brochure design sample 2
 
Flyer design sample
Flyer design sampleFlyer design sample
Flyer design sample
 
Brochure design sample
Brochure design sampleBrochure design sample
Brochure design sample
 
Newsletter Sample 2
Newsletter Sample 2Newsletter Sample 2
Newsletter Sample 2
 
Newsletter Sample
Newsletter SampleNewsletter Sample
Newsletter Sample
 

Technical writing sample

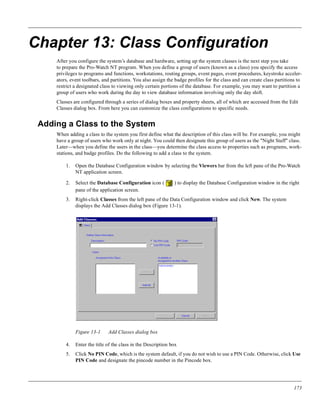
  • 1. Chapter 13: Class Configuration After you configure the system’s database and hardware, setting up the system classes is the next step you take to prepare the Pro-Watch NT program. When you define a group of users (known as a class) you specify the access privileges to programs and functions, workstations, routing groups, event pages, event procedures, keystroke acceler- ators, event toolbars, and partitions. You also assign the badge profiles for the class and can create class partitions to restrict a designated class to viewing only certain portions of the database. For example, you may want to partition a group of users who work during the day to view database information involving only the day shift. Classes are configured through a series of dialog boxes and property sheets, all of which are accessed from the Edit Classes dialog box. From here you can customize the class configurations to specific needs. Adding a Class to the System When adding a class to the system you first define what the description of this class will be. For example, you might have a group of users who work only at night. You could then designate this group of users as the "Night Staff" class. Later—when you define the users in the class—you determine the class access to properties such as programs, work- stations, and badge profiles. Do the following to add a class to the system. 1. Open the Database Configuration window by selecting the Viewers bar from the left pane of the Pro-Watch NT application screen. 2. Select the Database Configuration icon ( ) to display the Database Configuration window in the right pane of the application screen. 3. Right-click Classes from the left pane of the Data Configuration window and click New. The system displays the Add Classes dialog box (Figure 13-1). Figure 13-1 Add Classes dialog box 4. Enter the title of the class in the Description box 5. Click No PIN Code, which is the system default, if you do not wish to use a PIN Code. Otherwise, click Use PIN Code and designate the pincode number in the Pincode box. 173
  • 2. Class Configuration 6. On the lower-right portion of the dialog box is a list of users that are available or assigned to another class in the system. Select those individual users you wish to include in the designated class and click Add. If you want to include all users, click Add All. 7. The system moves the selected users to the lower-left portion of the dialog box, indicating they are assigned to the new class. 8. Click OK. The system returns to the Data Configuration window. See the next section to configure class properties. Opening the Edit Classes Dialog Box After designating what your system classes will be, the next step is to define the class access properties. This involves selecting each of your classes in the Data Configuration window and opening the associated Edit Classes dialog box. From here determine which properties will be designated to the selected class. To do access each of the class properties use the following steps: 1. From the right pane in the Data Configuration window, right-click the class whose properties you want to define. 2. Choose Properties. The system displays the Edit Classes dialog box (Figure 13-2). Figure 13-2 Edit Classes dialog box 3. From this dialog box determine which options you want to assign to the selected class. These include decid- ing what users belong in the class, deciding what programs are necessary, designating workstations, adding routing groups, creating event pages, deciding on badge profiles, establishing event procedures, specifying Eventview columns and keystroke accelerators, customizing event toolbars, and creating class partitions where applicable. Refer to the following sections to complete your class configurations. 174
  • 3. Modifying a Class and its Users Modifying a Class and its Users Any of the users you add to a class automatically receive the designated class properties; thus, granting the necessary permissions to utilize the system database effectively. However, all system users can belong to more than one class, and each user can have access rights other than those assigned to the class. You customize individual user rights from the instructions found in Chapter 4: User Configuration on page 189. In this section you can modify the class information and Pincode, and you can add individual or all users to a designated class. See the following for instructions. 1. Select Classes from the left pane of the Database Configuration window. Then, from the right pane, right-click the class you want to configure and click Properties. 2. Click the Class tab from the Edit Classes dialog box (Figure 13-3). Figure 13-3 Edit Classes property sheet 3. If necessary, edit the class information in the Description box. This information was originally entered from the Add Class dialog box. See “Adding a Class to the System” on page 173 for details. Change the number in the Pincode box if necessary. 4. On the lower-right portion of the dialog box is a list of users that are available or assigned to another class in the system. Select those individual users you wish to include in the designated class and click Add. If you want to include all users, click Add All. 5. The system moves the selected users to the lower-left portion of the dialog box, indicating they are assigned to the selected class. Click OK to return to the Data Configuration window, or select another tab in the dialog box to access other class properties. 175