
Recomendados
Recomendados
Mais conteúdo relacionado
Mais procurados
Mais procurados (20)
Semelhante a GA: Rain Gardens - University of Georgia
Semelhante a GA: Rain Gardens - University of Georgia (20)
Mais de Sotirakou964
Mais de Sotirakou964 (20)
Último
Último (20)
GA: Rain Gardens - University of Georgia
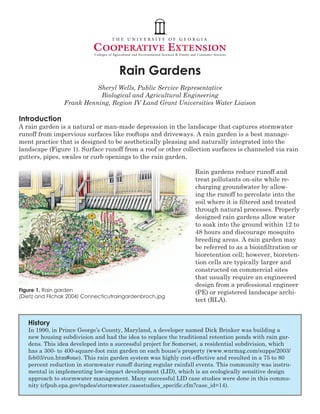
- 1. Rain Gardens Sheryl Wells, Public Service Representative Biological and Agricultural Engineering Frank Henning, Region IV Land Grant Universities Water Liaison Introduction A rain garden is a natural or man-made depression in the landscape that captures stormwater runoff from impervious surfaces like rooftops and driveways. A rain garden is a best manage- ment practice that is designed to be aesthetically pleasing and naturally integrated into the landscape (Figure 1). Surface runoff from a roof or other collection surfaces is channeled via rain gutters, pipes, swales or curb openings to the rain garden. Rain gardens reduce runoff and treat pollutants on-site while re- charging groundwater by allow- ing the runoff to percolate into the soil where it is filtered and treated through natural processes. Properly designed rain gardens allow water to soak into the ground within 12 to 48 hours and discourage mosquito breeding areas. A rain garden may be referred to as a bioinfiltration or bioretention cell; however, bioreten- tion cells are typically larger and constructed on commercial sites that usually require an engineered design from a professional engineer Figure 1. Rain garden (PE) or registered landscape archi- (Dietz and Filchak 2004) Connecticutraingardenbroch.jpg tect (RLA). History In 1990, in Prince George’s County, Maryland, a developer named Dick Brinker was building a new housing subdivision and had the idea to replace the traditional retention ponds with rain gar- dens. This idea developed into a successful project for Somerset, a residential subdivision, which has a 300- to 400-square-foot rain garden on each house’s property (www.wnrmag.com/supps/2003/ feb03/run.htm#one). This rain garden system was highly cost-effective and resulted in a 75 to 80 percent reduction in stormwater runoff during regular rainfall events. This community was instru- mental in implementing low-impact development (LID), which is an ecologically sensitive design approach to stormwater management. Many successful LID case studies were done in this commu- nity (cfpub.epa.gov/npdes/stormwater.casestudies_specific.cfm?case_id=14).
- 2. Benefits Expanded development of impervious surfaces such as streets, buildings, parking lots, drive- ways, roofs and patios increases the quantity of surface water that must be managed. A 1-inch rainfall event will produce more than 600 gallons of stormwater runoff for every 1,000 square feet of impervious surface (Van Giesen and Carpenter, 2009). Stormwater runoff can cause flood- ing, increase erosion and sedimentation and pollute surface and groundwater (Figure 2). Rain gardens are an attractive option for areas in which the property owner can mitigate the impact of their impervious surfaces. Rain gardens are designed to capture stormwater runoff and allow it to slowly seep into the ground. Rain gardens remove pollutants such as nutrients, chemi- cals, bacteria, sediments, litter, oil metals and other contaminants through physical, chemical and biologi- cal processes. Some of these mechanisms include: ab- sorption, microbial processes, plant uptake, sedimen- tation and filtration. By slowing stormwater so that it can infiltrate into the soil, rain gardens enhance sedi- mentation and filtration. Vegetation in rain gardens has the potential to reduce or remove dissolved nutri- ents and pollutants through plant uptake and adsorp- tion. Dissolved metals and nutrients bind or adsorb to Figure 2. Stormwater runoff. soil particles such as clay and organic matter, which reduces their impact on surface and groundwater sources. Soil microorganisms help break down pollutants into less detrimental compounds and use them as food sources. Well-designed rain gardens provide more than water quality benefits. Because stormwater and the nutrients it contains are diverted to rain gardens, additional irrigation and fertilization may not be necessary after initial plant establishment. This reduces energy inputs since the need to operate irrigation systems and to manufacture fertilizers is lower. Desirable wildlife such as birds, butterflies, bees and other important pollinators are attracted to diverse habitats. Aquatic ecosystems are also improved with reduced pollutant loads that improve water quality. Rain gar- dens can be an attractive addition to any property and can help increase the property’s value. Rain gardens have many benefits, including: • Stormwater runoff is treated on-site instead of entering streams • Stormwater runoff is reduced • Water infiltration increases, resulting in more water entering the soil and less pollution entering streams • Water and energy conservation • Wildlife habitats are created and aquatic ecosystems are improved • Attractive gardens can increase property values Rain Gardens 2 University of Georgia Cooperative Extension Bulletin 1380
- 3. If you live in an urban area, pay attention to the water levels in the local streams and rivers shortly after a rainfall. Impervious surfaces like pavement, curbs, roofs and gutters efficiently transport stormwater to our streams. Because water reaches streams faster, less of it is ab- sorbed, adding to the impact on stream bank erosion. The water levels in local streams can peak and fall to base flow in hours instead of days or weeks. Rainfall and stream events in more natu- ral areas are less erosive and in-stream flow is usually more consistent. Rain gardens help return the hydrologic function, water treatment capacity and other environmental services of a devel- oped landscape back to pre-developed conditions. Location/Site Before selecting a site in the landscape for a rain garden, it is best to observe the direction of sur- face runoff during a rainfall event. Choosing an area downslope from a roof downspout or drive- way area is ideal. Often, natural depressions in the landscape can be used successfully. Always locate wells, septic system tanks, drain lines and any underground utilities by contacting your buried utility locating service (dial 811). Also, check your local building codes before installing a rain garden. These guidelines will help ensure the garden is optimally located: • Construct the rain garden at least 10 feet from buildings to prevent seepage into foundations (Figure 3). • Construct the rain garden at least 25 feet from a septic tank, septic drain field or well head. • Avoid locations with slopes greater than 12 percent. • Avoid low areas in the landscape that retain water or where ponding occurs frequently. • Avoid soils that have low or extremely slow infiltration. • Avoid placing the rain garden on top of underground utilities. • Avoid placing the garden over shallow water tables. In areas with elevated water tables, con- sider a wetland garden. • Choose a location with full or partial sun. • Do not place the rain garden directly under trees since the root system may create competi- tion for other plant material and the canopy may create a shading problem. Figure 3. Rain garden location (Dietz and Filchak 2004) foundation.jpg University of Georgia Cooperative Extension Bulletin 1380 3 Rain Gardens
- 4. Design Rain garden design can vary considerably depending on the site constraints and owner/designer preferences; however, it should naturally complement the layout of the landscape. Common shapes include oval, round, oblong and kidney bean (Figure 4). The longest side of the rain gar- den should be perpendicular to the slope of the property. Figure 4. Rain garden design (Dietz and Filchak)http://dnr.wi.jpg Size Residential rain gardens are typically 100 to 300 square feet. There are different methods of siz- ing rain gardens. A common method is to determine the size of the collection area draining to the garden, the volume of water it will need to temporarily store (ponding depth), and the type of soil located under the garden. Most contaminants are found in the first inch or first-flush of runoff. Properly designed rain gardens are constructed to catch the first-flush. In the event a storm produces more than 1 inch of rainfall in a 24-hour period, an overflow area or berm should be installed to safely divert the water out of the garden in a manner that minimizes erosion or other damage. The overflow from rain gardens is often delivered directly to nearby streams. The Natural Resource Conservation Service uses a curve number to calculate the size of a rain garden. The curve number represents a measure of how much water will infiltrate versus runoff during a storm. For an in-depth sizing discussion on this method refer to (www.legacy.ncsu.edu/classes-a/bae/cont_ed/bioretention/lec- ture/design_rain.pdf). Rain Gardens 4 University of Georgia Cooperative Extension Bulletin 1380
- 5. A soil survey or classification analysis provides useful information about the soil under a rain garden. Sandy loam or loamy sand is ideal because it typically results in a permeability rate of 1 to 6 inches per hour. Infiltration can often be improved by either 1) amending the existing soil with organic matter, or 2) aerating the soil to reduce compaction. An ideal soil mixture should contain 50 to 60 percent sand, 20 to 30 percent topsoil and 20 to 30 percent compost (see: www.ct.nrcs.usda.gov/eln-site_assessment.html). Coarse, washed sand is recommended. River sand is less desirable due to its rounded shape and because it may contain silt. The following table is used to calculate the size of a rain garden based on soil type, impervious drainage area and ponding depth (http://dnr.wi.gov/runoff/pdf/rg/rgmanual.pdf). Rain garden ponding depth Soil type 4-5 inches 6-7 inches 8-9 inches Clay 0.19 0.15 0.08 Silt 0.34 0.25 0.16 Sand 0.43 0.32 0.20 Example: A 1,000 ft2 roof drains into a clay soil rain garden with a 4” ponding depth Solution: 1,000 ft2 x 0.19 = 190 ft2 rain garden A soil percolation test should be conducted to determine infiltration rate. Conduct a simple perco- lation test by digging a hole with a shovel or post-hole digger. The hole should be dug to approxi- mately the same depth as the deepest area that will be excavated during rain garden construc- tion. Saturate the hole by filling it with water and allowing it to drain. Place a yardstick in the hole then refill it with water to determine how many inches of water infiltrates in an hour (www. dnr.sc.gov/marine/NERR/pdf/Clemson_raingardenmanual.pdf). The hole should drain within 12 to 48 hours. In the event that there is still water in the hole after 48 hours, the site will probably not be suited for a basic rain garden. Sites with poor drainage may require either a rain garden with an under-drain system or they may be better suited for wetland gardens. Under-drain installation information can be found at www.legacy.ncsu.edu/classes-a/bae/cont_ed/bioretention/lecture/design_rain.pdf. Wetland garden information can be found at http://legacy.ncsu.edu/classes-a/bae/cont_ed/stormwater/index.htm. Signs of impermeable soils: • The site remains saturated or ponds water for several days after a storm event. • After digging for a percolation test, water fails to drain from the hole for more than 48 hours, provided it has not rained. • Signs of a wetland soil are evident within 1 foot of the surface. Wetland soils are often gray with ribbons or areas of brown color. University of Georgia Cooperative Extension Bulletin 1380 5 Rain Gardens
- 6. Slope and Ponding Depth Ponding depth is a term used to describe the depression area between the top of the mulch layer and the bottom of the overflow outlet. Rainwater is captured in the depression and held there until it infiltrates into the soil. The slope of the garden and the underlying soils determines the ponding depth. Typical rain gardens are normally 4 to 9 inches deep (Figure 5). A rain garden that is less than 4 inches deep will need an excessive amount of surface area to provide enough storage area for large storm events to infiltrate properly. A garden with a depth of more than 9 inches might pond water too long. Regardless of the ponding depth, the goal is to keep the rain garden level. Figure 5. Rain garden depth. (Wisconsin Department of Natural Resources 2008) SizingaRainGarden.jpg The slope of the lawn determines the rain garden’s depth. To determine the slope of the lawn, fol- low these steps: • Pound a stake in the ground at the uphill and downhill end of the rain garden. • Tie a string to the bottom of the uphill stake and run the string to the downhill stake. • Place a level on the string and tie the string to the downhill stake at the position in which the string is level. • Measure the width between the stakes. • Measure the height on the downhill stake between the ground and the string. • Divide the height by the width and multiply by 100 to find the percent slope of the lawn. Areas with a slope of 12 percent or more are not recommended for rain gardens. Use the slope of the lawn to select the ponding depth from the following options: • Slope less than 4 percent = ponding depth 4 to 5 inches deep. • Slope between 5 and 7 percent = ponding depth of 6 to 7 inches. • Slope between 8 and 12 percent = ponding depth of 8 to 9 inches. Rain Gardens 6 University of Georgia Cooperative Extension Bulletin 1380
- 7. Example: The length of the string between the stakes is 150 inches and the height is 8 inches. Height/width x 100 = % slope. Therefore, 8/150 x 100 = 5% slope With a 5 percent slope, the rain garden should be approximately 6 inches deep. Connecting / Conveyance of Rainwater Harvesting Systems to Rain Gardens Partnering rain gardens with rainwater harvesting systems is a good way to capture irrigation water for the rain garden as it is establishing and to reduce the amount of sediment entering the garden. The cistern will act as a settling basin as sediment enters the tank and sinks to the bottom. The cistern can drain into the garden via a gutter downspout extension pipe that can be left on top of the ground or buried. Water can also be channeled through downspouts that flow through grass or stone swales. The stone will stabilize the swale and prevent soil erosion. The swales or flow channels should have a minimum 2 percent slope. The width/depth of the flow channel should be a 2:1 ratio. For example, if the depth of the channel is 1 foot, the width of the channel should be 2 feet. The channel will act as a pretreatment filter for pollutants before they enter the garden. Garden Construction and Installation If there is existing vegetation where the garden will be located it will need to be removed. A chemical can be used, but a more environmental approach is to use black plastic to cover the lawn or grass until it dies. After choosing a location, the shape and size of the garden can be out- lined with paint or a rope. This can be a boundary outline while digging the garden. Some of the soil that is removed from the depression can be used to create a berm along the downhill slope and on the sides if necessary to help to retain water (Figure 5). Excavate the rain garden depres- sion 2 to 3 inches deeper than the designed final depth in order to account for mulch. The berm on the downhill side of the rain garden should be the same level as the uphill side. Soil that is not needed for the rain garden’s berm should be removed and utilized else- where in the landscape. The bottom of the rain garden can be tilled and/ or amended with organic matter in order to facilitate planting and improve infil- tration (planting depth is typically 2 to 3 feet). Once the rain garden construc- tion phase is complete, in- stall plant material (Figure 6) and mulch the rain gar- den area with 2 to 3 inches of hardwood mulch. The Figure 6. Soil amendment rain garden berm should (Dietz and Filchak 2004) http://www.tredyffrin.jpg be covered with mulch, rock or stone to prevent erosion. University of Georgia Cooperative Extension Bulletin 1380 7 Rain Gardens
- 8. Plants Plants adapted to regional climatic conditions are recommended. Native, non-invasive plant species are good choices for rain gardens. They will reduce the introduction of non-native plants to the natural riparian areas that are found along streams. For a list of Georgia native plants see University of Georgia Cooperative Extension Bulletin 987, Native Plants for Georgia Part I: Trees, Shrubs and Woody Vines (Wade et al, 2008) and (www.gnps.org). Plants that provide a habitat for wildlife are also recommended. A variety of plants that are resistant to stress from periods of water pooling and periods of drought should be used (Figure 7). Plants that tolerate both wet and dry conditions are prefer- able for the bottom of the garden. Plants that tolerate dry conditions should be used toward the edges of the garden. Small trees can be used on the edges or berms. Large trees are not recom- mended for small rain gardens since the root system will create competition for other plants and could interfere with under-drains. Leaf debris and shade can also be a problem with large trees. Below is a partial plant list with soil moisture recommendations. Partial plant list for rain gardens Scientific name Common name Soil Moisture Shrubs Callicarpa americana American Beauty Berry M-D Calycanthus floridus Sweet Shrub M Clethera alnifolia Clethra M Myrica ceifera Southern Wax Myrtle A Itea virginica Sweetspire M Perennials Aster spp Aster M-A Echinacea angustiflora Purple Cone Flower A-D Iris versicolor Blue Flag Iris M Ruellia spp Mexican Petunia A-D Rudbeckia Black Eyed Susan M-A Monarda dydima Bee Balm M-A Iris hexagona Louisiana Iris M Hemerocallis Daylilly M-D Hibiscus Rose mallow A-D Helianthus angustafolius Swamp Sun Flower M-D Lantana ‘New Gold’ Lantana (annual/perennial) M-D Ornamental Grasses Panicum virgatum Switchgrass M-A Miscanthus sinensis ‘Zebrinus’ Zebra grass M-D Miscanthus sinensis ‘Gracillimus’ Maiden grass M-D Small Trees Ilex vomitoria Yaupon Holly M-D Crataegus spathulata Littlehop Hawthorn M-A Vitex agnus-castus Chaste Tree A-D Lagerstromia indica Crape Myrtle M-D M = Wet soil, A = Average soil moisture, D = Dry soil Rain Gardens 8 University of Georgia Cooperative Extension Bulletin 1380
- 9. Figure 7. Plant placement (Glen 2011)http://www.bae.ncsuplant placement.bmp 1 1 small tree or tree form shrub 2 3 perennials 3 6 small perennials or groundcovers 4 3 perennials 5 3 large perennials or ornamental grasses 6 3 small shrubs * Each square equals 1 square foot. Maintenance Regular visual inspections of the garden should be conducted to check for erosion, excessive sediment deposits and dead or diseased vegetation. The plants in the rain garden will need to be watered during establishment (usually the first growing season) to encourage a healthy root system. Once established, plants may only need to be watered when they show signs of drought. Annual mulching, with hardwood chips, is recommended. To maintain the proper functioning of the rain garden, the ponding zone must be maintained as designed and not reduced with the addition of mulch. Pruning is typically needed and will depend on the owner’s preference. Hand pulling of weeds may be necessary. Herbicides are seldom recommended; if necessary, those with low impacts on aquatic organisms should be chosen. Fertilizers are usually not necessary after establishment. If for some reason water ponds in the garden for more than 72 hours, mosquito briquettes may need to be incorporated until the ponding problem can be corrected. University of Georgia Cooperative Extension Bulletin 1380 9 Rain Gardens
- 10. References Clemson Public Service. Carolina Clear. 2008. Rain Gardens. A rain garden manual for South Carolina. Green solutions to stormwater pollution. Information Leaflet 87. www. media.clemson.edu/public/restoration/carolina%20clear/toolbox/publication_ raingardenmanual_022709b.pdf Dietz, M. and K. Filchak. 2004. Rain gardens in Connecticut: A design for homeowners. Univer- sity of Connecticut Cooperative Extension Service. 51130-03108. www.sustainability.uconn.edu. EPA “Stormwater Case Studies” cfpub.epa.gov/npdes/stormwater.casestudies_specific.cfm?case_id=14 Georgia Native Plant Society. www.gnps.org Glen, C. 2011. Oval rain garden. www.ncstate-plants.net Hunt, W. F. and N. White. 2006. Designing rain gardens. (Bio-retention areas). North Carolina Cooperative Extension Service. AG-588-3. legacy.ncsu.edu/classes-a/bae/cont_ed/bioretention/lecture/design_rain.pdf Natural Resource Conservation Service. Rain garden site and soil assessment. www.ct.nrcs.usda.gov/eln-site_assessment.html North Carolina State University Cooperative Extension. Backyard rain gardens. http://www.bae.ncsu.edu/topic/raingarden/material.htm Van Giesen, E. and F. Carpenter. 2009. Georgia rainwater harvesting guidelines. www.dca.ga.gov/development/ConstructionCodes/programs/documents/GARainWaterG- dlns.040209.pdf Wade, G., E. Nash, E. McDowell, B. Beckham, and S. Crisafulli. 2008. Native Plants of Georgia. Part I. Trees, Shrubs and Woody Vines. University of Georgia Cooperative Extension B-987. Wisconsin Department of Natural Resources. 2003. Rain Gardens. A how-to manual for hom- eowners. University of Wisconsin-Extension. UWEX Publication GW0037. http://dnr.wi.gov/runoff/pdf/rg/rgmanual.pdf Wisconsin Natural Resources. 2003. “Rain gardens made one Maryland community famous.” www.wnrmag.com/supps/2003/feb03/run.htm#one Rain Gardens 10 University of Georgia Cooperative Extension Bulletin 1380
- 11. University of Georgia Cooperative Extension Bulletin 1380 11 Rain Gardens
- 12. Bulletin 1380 / February 2011 The University of Georgia and Ft. Valley State University, the U.S. Department of Agriculture and counties of the state cooperating. Cooperative Extension, the University of Georgia College of Agricultural and Environmental Sciences, offers educational programs, assistance and materials to all people without regard to race, color, national origin, age, gender or disability. An Equal Opportunity Employer/Affirmative Action Organization Committed to a Diverse Work Force