Architectural Letter Sculpture
•Transferir como PPTX, PDF•
9 gostaram•6,996 visualizações

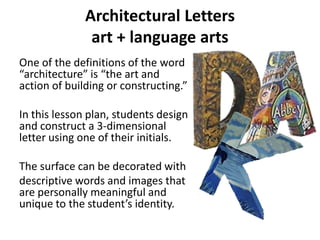
In this lesson plan, students design and construct a 3-dimensional letter using one of their initials.

Recomendados
Mais conteúdo relacionado
Mais procurados
Mais procurados (20)
Semelhante a Architectural Letter Sculpture
Semelhante a Architectural Letter Sculpture (20)
Último
Último (20)
Architectural Letter Sculpture
- 1. Architectural Letters art + language arts One of the definitions of the word “architecture” is “the art and action of building or constructing.” In this lesson plan, students design and construct a 3-dimensional letter using one of their initials. The surface can be decorated with descriptive words and images that are personally meaningful and unique to the student’s identity.
- 2. Letter Sculpture in the Manner of Robert Indiana
- 3. Look at the sculptures on the following slide. Consider their DESIGN (not construction or decoration) Which is more interesting? Unique? More wisely designed? Better? Which of the two artists would you commission to make a sculpture for you?
- 4. BOTH are by Robert Indiana “Ahava”, meaning “Love” in Hebrew.
- 5. POP ART • Pop art presented a challenge to traditions of fine art by including imagery from popular culture such as advertising, news, and mundane everyday objects. • LOVE is an iconic Pop Art image by American artist Robert Indiana. • Its original rendering in sculpture was made in 1970 and is displayed in Indiana at the Indianapolis Museum of Art.
- 6. Other examples of POP Art
- 7. Robert Indiana: Born American painter, sculptor, and Printmaker. Born September 13, 1928 at New Castle, Indiana, as Robert Clark. Soon after, he was adopted by Earl Clark and Carmen Watters. The family moves repeatedly; Indiana later says he lived in twenty-one houses before he was seventeen.
- 8. Robert Indiana: Childhood 10. He entered the first grade where recognition of his artistic talent by his teacher, Ruth Coffman, reinforces his decision to become an artist. Halfway through the school year, the family moves again. In September 1935, he skipped second grade and the family moves three times during the school year, causing Robert to relocate to three different schools
- 9. Robert Indiana: Adulthood 11. After attending a technical school for high school, he received a Scholastic Art and Writing Award to attend the John Herron Art Institute. 12. He chose instead to enlist in the U.S. Army Air Corps (which would become the U.S. Air Force the following year).
- 10. Robert Indiana: Artist 13. After the military, he attended 3 art schools, and settled in New York in 1954 with other famous artists. 14. His early works were inspired by traffic signs, automatic amusement machines, commercial stencils and old trade names.
- 11. Robert Indiana: Artist 15.In the early sixties he did sculpture assemblages and developed his style of vivid color surfaces, involving letters, words and numbers. 16. He became known for silkscreen prints, posters and sculptures which took the word LOVE as their theme. The brash directness of these works stemmed from their symmetrical arrangements of color and form.
- 12. 17. Indiana's LOVE design has since been reproduced in a variety of formats for rendering in displays around the world. Spain Japan Philadelphia Israel
- 14. PROCESS Steps 1&2 1. Design the shape of a letter on drawing paper using a pencil. 2. The letter should be a minimum of 2-1/2” thick in all areas, but may be up to 12” x 18” in overall size.
- 15. Drafting & Planning Then consider the colors and designs of your letter and include them in your draft. Remember, your letter sculpture will need to balance on its own, so take that into consideration for your design.
- 16. Drafting & Planning In the 2 draft spaces, design a letter from your initials. Your letter must touch at least 2 sides of the space, for example (this letter touches 3 sides):
- 17. BALANCE Your letter sculpture must be able to stand on its own (BALANCED). Penn & Teller Discuss Sculptural Balance Balance Activity: Wait for Ms. Drews’ Instructions 1. Stand up 2. You are a sculpture. Make yourself into the form of the letter ‘R.’ 3. What is necessary for your sculpture to be balanced?
- 18. Initial Sculpture You will design and create a large sculpture of one of your initials out of chipboard, cups, tag board, masking tape, and Papier Mache. Later, we’ll paint it with colors and images that represent your personality, identity, or theme.
- 19. CONGRUENT WARM UP 1/2/14: Put your name on your paper and please write down the definition below: con·gru·ent • In mathematics : having the same size and shape. • For two polygons to be congruent, they must have an equal number of sides. • Or matching or in agreement with something A. B. C. D. Which two shapes are CONGRUENT?
- 20. Warm UP 1/3: Write your name at the top of your paper. 1. In your own words, what does congruent mean? 2. Write down all the pairs of shapes below that are CONGRUENT.
- 21. Warm UP 12/6: Write your name at the top of your paper. Answer in COMPLETE SENTENCES. 1. Which letter is most balanced and likely to stand on its own? 2. Why? A. B. C.
- 22. Warm UP 12/16: Write your name at the top of your paper. Number your paper 1-8. Next to each number, put the steps for making your sculpture in the correct order. 1. g. Draw your initials on a piece of rough draft paper. 2. a. Cut out your initials from chipboard 3. 4. b. Use 2.25 inch strips of tag board and masking tape to build the edges of your sculpture. c. Trace your initial on TWO pieces of chipboard. 5. f. Glue a few cups on one façade. 6. e. Cut out your initials from PAPER. 7. d. Draw your initials on a piece of large paper.
- 23. OBJECTIVES • Day 1: Students will gain background knowledge of the artist, Robert Indiana. • Day 2: Students will – review background knowledge of Robert Indiana, – discuss balance in sculpture, and – create a design for their letter sculpture. • Day 3-4: Students will create a large stencil of their letter & will trace 2 CONGRUENT shapes onto chipboard. • Day 4-5: Students will trace their letter on to chipboard & cut it out. • Day 6: Students will cut out their letter and assemble using Dixie cups.
- 24. PROCESS Steps 3 & 4 3. Cut the letter out and use it as a pattern to trace onto both chipboard pieces, then cut out. 4. Take one chipboard letter, right side-up and glue paper cups onto it, staggering them up and down so the cups fit together. The more cups used, the stronger the letter will be. Allow glue to dry until tacky (or longer), then glue the top letter in place, being careful to align it with the bottom letter. Allow to dry completely.
- 25. PROCESS Step 4: One side at a time!
- 27. Your Letter Sculpture MUST: • Use one of your initials. • Feature a creatively designed letter that is BALANCED. • Have TWO congruent faces that are both cut from ONE piece of 12”x18” chipboard. (Your sculpture will be about 12”x18”in.). • Be 3-dimensional. (We will use dixie cups and tagboard for this). Today, we design our letters! You should make at least 2 designs.
- 33. The strips should make sturdy walls all the way around your letter.
- 34. Papier Mâché Papier Mâché, French for "chewed paper“, is a composite material consisting of paper pieces or pulp (paper), bound with an adhesive, such as glue, starch, or wallpaper paste.
- 35. Set Up & Clean up 1. Get out a sheet of newspaper to put on the table for each person. Throw away when finished. 2. Get a bowl of paper mache paste for each table. Return to the orange counter when finished. 3. Get a small stack of newspapers. Return unused pieces to the cabinet.
- 36. Papier Mâché IMPORTANT TIPS: • Tear small thin strips of newspaper. It is easier to apply them. Large pieces may have bubbles and be difficult to manipulate. • Start with the edges of your letter. • Get the paste on BOTH sides of the newspaper strips. • You will need at least two layers of Papier Mâché.
- 37. Objectives • Day 7: When students are SURE that their two letter shapes are CONGRUENTLY glued together, they will begin to assemble the edges with tag board & masking tape. • Day 8-10: Students will use Papier (PAH-PEE-YAY) Mâché (MA-SHAY)to cover their sculptures. • Day 11: Students will paint their sculpture with GESSO as a primer for their designs. • Day 12: Students will create a draft for the design of their sculpture. Your sculpture must have a theme! You must do a rough draft before you can begin your design.
- 38. What is the THEME?? YOUR sculpture must be decorated with a THEME
- 39. What is the THEME?? YOUR sculpture must be decorated with a THEME
- 40. What is the THEME?? YOUR sculpture must be decorated with a THEME