
Recomendados
Recomendados
Mais conteúdo relacionado
Último
Último (20)
Destaque
Destaque (20)
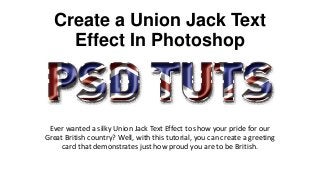
Create a union jack text effect in photoshop
- 1. Create a Union Jack Text Effect In Photoshop Ever wanted a silky Union Jack Text Effect to show your pride for our Great British country? Well, with this tutorial, you can create a greeting card that demonstrates just how proud you are to be British.
- 2. STEP 1 Open Photoshop and create a New Document (File — New) Create a custom document at 1000 x 600 px. Ensure you have a white background at 300 dpi, 16 Bit CMYK and click OK.
- 3. STEP 2 Create your Text using the Horizontal Text Tool. Using DIN-Black font and size 50 in black. Press Enter to apply and Save so as to not lose anything.
- 4. STEP 3 Next we are going to create a Union Jack pattern. You can use the image of the Union Jack flag from this slide. You can find any Union Jack, similar to this image, on Google Images.
- 5. STEP 4 Go to Edit — Define Pattern and label it “Union Jack”.
- 6. STEP 5 Select the Text layer and double click to open the Layer Styles. Select Pattern Overlay and choose the Union Jack pattern that we have just created. Ensure the following: Blend Mode = Normal Opacity = 100% Pattern = Union Jack flag Scale = 100% Link with Layer = Checked
- 7. STEP 6 Select Bevel & Emboss and use the following to create a 3D look. Style: Inner Bevel Technique: Smooth Depth: 100% Direction: Up Size: 21px Soften: 2px Angle: 120 Degrees Check Use Global Light Altitude: 30 Degrees Highlight Mode: Screen White Opacity: 55% Shadow Mode: Multiply Black Shadow Opacity: 73% Gloss Contour: Cone Assymmetrical Check Anti-Aliased
- 8. STEP 7 Select Stroke and make the size 4px, Outside position and blend mode as Luminosity. Make the fill type as Pattern and again choose the Union Jack pattern. Scale down to 65%.
- 9. STEP 8 Select Drop Shadow and set the following: Blend Mode: Multiple Black Opacity: 75% Angle: 120 Degrees Check Use Global Light Distance: 10px Spread: 0% Size: 10px Gloss Contour: Gaussian Check Anti-Aliased Noise: 52% Click OK and there you have it. A silky Union Jack Text Effect that you can really be proud of.