How to make a pearl necklace
•
2 likes•710 views

Detailed instructions tell you how to make a pearl necklace at home! Absolutely complete and free pearl necklace making tutorial!

Recommended
Recommended
More Related Content
Recently uploaded
Recently uploaded (6)
Featured
Featured (20)
How to make a pearl necklace
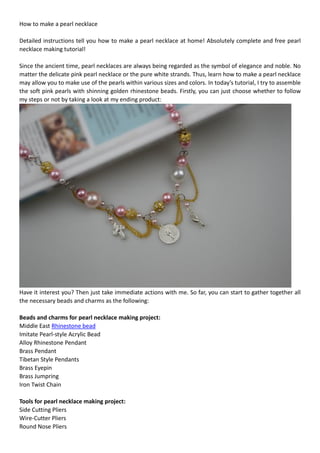
- 1. How to make a pearl necklace Detailed instructions tell you how to make a pearl necklace at home! Absolutely complete and free pearl necklace making tutorial! Since the ancient time, pearl necklaces are always being regarded as the symbol of elegance and noble. No matter the delicate pink pearl necklace or the pure white strands. Thus, learn how to make a pearl necklace may allow you to make use of the pearls within various sizes and colors. In today’s tutorial, I try to assemble the soft pink pearls with shinning golden rhinestone beads. Firstly, you can just choose whether to follow my steps or not by taking a look at my ending product: Have it interest you? Then just take immediate actions with me. So far, you can start to gather together all the necessary beads and charms as the following: Beads and charms for pearl necklace making project: Middle East Rhinestone bead Imitate Pearl-style Acrylic Bead Alloy Rhinestone Pendant Brass Pendant Tibetan Style Pendants Brass Eyepin Brass Jumpring Iron Twist Chain Tools for pearl necklace making project: Side Cutting Pliers Wire-Cutter Pliers Round Nose Pliers
- 2. How to make a pearl necklace? Step1: Make the small beads groups of your pearl necklace Group1: 4mm Pearl-style Acrylic Bead*1, Middle East Rhinestone bead*1, 12mm Pearl-style Acrylic Bead *1 String the three beads one by one on the Eyepin, then leave about 7~8mm for making the loops with the Round Nose Plier, so that they can be assembled together for a necklace. 2 groups like this are enough. Group2: 4mm Pearl-style Acrylic Bead*1, 16mm Pearl-style Acrylic Bead*1, 12mm Pearl-style Acrylic Bead *1
- 3. The making processes can be as same as that of the group1, that is, just string the three beads with the eyepins , and then leave a proper length for loops at end. For this group, 2 groups are OK for your pearl necklace. Group3: 4mm Pearl-style Acrylic Bead*1, Middle East Rhinestone bead*1, 12mm Pearl-style Acrylic Bead *1 The beads are absolutely as same as that in group one, then the only difference is you should change the position of the Middle East Rhinestone bead and 12mm Pearl-style Acrylic Bead . 2 groups will do! Group4: 4mm Pearl-style Acrylic Bead*2, 12mm Pearl-style Acrylic Bead *2
- 4. These are for the rest part of the whole pink pearl necklace. Just refer to the above detailed making progresses and pay attention to the orders of your pearl beads. For this part, you should make at least 6 groups. Step2: Prepare for the decorate branches for your pearl necklace Cut out three sections chains, the length should be: 65mm*1, 35mm*2; next, open the loop of the eyepins and apply the three pendants to them; then string one 4mm pearl-style Acrylic bead on each branch and at last makes a loop at end with the Round Nose Plier again. Step3: Combine the separate pieces for a simply pink pearl necklace In this step, the most vital part is the Jumprings and the groups you have prepared well in step1. According to the picture shows, first are two group1; secondly, each side one of the group 2; thirdly the groups 3; finally, the group4.
- 5. Step4: Apply the adornments In this pearl necklace making project, to make the pearl beads achieve more coordination to the golden rhinestone beads, I decide to apply the golden chains and pendants at the center of the pearl necklace. You can use the Side Cutting Plier to open the chains. After decorate the necklace well, a stunning pink pearl necklace have finished:
- 6. Tips: In this tutorial, for a pink pearl necklace, I choose the different size pink Imitate Pearl-style Acrylic Beads as the main materials, the sizes are 4mm, 12mm and 16mm, respectively. In addition, the length of the eyepins may depend on the beads you use to avoid materials waste. So much for this pearl necklace making tutorial, do you love my design? By the way, I haven’t got a name for it, so, any suggestions? Learn to Bead more stunning jewelry ornaments, please visit pandahallstock learning-center, the site address is: http://www.pandahallstock.com/learning-center.html