SlideShare uma empresa Scribd logo
1 de 39
SoW: Identity(Year 7)
During this project you will explore your identity and create
images that reflect ideas about yourself, working from observation,
memory and imagination.

You will improve your use of graphite and chalk
pastels and develop an understanding of proportion.
You will also discover the potential of clay and
produce a glazed, self portrait, ceramic tile.

You will learn about the ideas, methods and
approaches used by other artists who have created
portraits. You will also investigate artists who use
symbolism within their work to tell us more about
the people they are painting.
Part 1: Clay tile

Step1: Introduction to clay
Learning objectives. By the end of the lesson you will:
Develop an understanding of the properties and potential of clay.
Use the correct words to describe clay techniques and processes.
Learning outcomes. By the end of the lesson you will:
Have created a thumb pot showing your understanding of techniques.
Glossary:
Clay
Wedge
Leatherhard
Greenware
Firing
Bisque
Kiln
Glaze

moist earth of decomposed rock
technique to take the air out of clay.
unfired clay not quite dry but firm enough to carve.
dried out, unfired clay.
baking clay at a high temperature.
clay after first firing.
furnace that fires the clay.
finely ground mineral solution, turns to glass when fired
Preparing your clay for sculpting
Wedging removes air pockets
Modeling clay into a pinch pot.

Start with a ball.

Push thumb into centre.

Pinch from bottom upward.

Shape and smooth for finished pot.
Step 2: Create two slabs
Learning objectives.
By the end of the lesson you will be able to roll out a clay slab and explain the
process to a peer using the correct words.
Learning outcomes.
By the end of two lessons you will have created two clay slabs.
Glossary:
Clay
Wedge
Slab
Leatherhard
Greenware
Firing
Bisque
Kiln
Glaze

moist earth of decomposed rock
technique to take the air out of clay.
a piece of clay that has been rolled out to a specific
thickness.
unfired clay not quite dry but firm enough to carve.
dried out, unfired clay.
baking clay at a high temperature.
clay after first firing.
furnace that fires the clay.
finely ground mineral solution, turns to glass when fired
Creating a slab.

Flatten the clay a little to start you off.

Roll out a slab using the guides to
control the thickness of the clay.

Use the sharp knife to cut around the
template. Initial your tile discreetly.
Collecting homework
Due: next Art lesson
Bring objects to impress into the
clay slabs.
Objects should reflect something
about your hobbies and interests.
Choose objects with an interesting
texture.
Please do not bring anything too
valuable, inappropriate or too big.
Step 3: Creating a self portrait in clay
Learning objectives. By the end of the lesson you will:
Develop your control of manipulating and cutting clay accurately.
Be able to explain the process of transferring an image to clay using the correct
vocabulary.
Learning outcomes.
By the end of the two lessons you will have transferred an image of you to one of
your clay slabs. The face will be clear and recognisable as you.
Glossary:
Clay
Wedge
Slab
Leatherhard
Greenware
Firing
Bisque
Kiln
Glaze

moist earth of decomposed rock
technique to take the air out of clay.
a piece of clay that has been rolled out to a specific
thickness.
unfired clay not quite dry but firm enough to carve.
dried out, unfired clay.
baking clay at a high temperature.
clay after first firing.
furnace that fires the clay.
finely ground mineral solution, turns to glass when fired
Step 4: Decorating your clay tiles and create your
layered portrait.
Learning objectives. By the end of the lesson you will:
Be able to construct strong composition and understand how to use symmetry,
balance and pattern to your advantage.
Use your understanding of Lucinda Mudge’s work to influence the marks you use
in decorating your tile
Understand the potential of different tools and objects in creating an effective
impressions into the clay.
Learning outcomes. By the end of the lesson you will have:
Created a patterned clay slab using impressing, moulding and embossing
techniques.
Used the score and slip technique to join together the two decorated, slabs of clay.
Glossary:
Clay
Wedge
Slab
Leatherhard
Greenware
Glaze

moist earth of decomposed rock
technique to take the air out of clay.
a piece of clay that has been rolled out to a specific thickness.
unfired clay not quite dry but firm enough to carve.
dried out, unfired clay.
finely ground mineral solution, turns to glass when fired
Lucinda Mudge
Mudge’s work pays
homage to the
Staffordshire slipware
potters of the 17th
century, and refers to
the decorative arts.
Her surfaces are richly
textured with designs
marked into the clay,
which is then followed by
the process of honey
glazing that traditionally
accompanies slip work.
Option 1: Water colour and white ready mix.

Step 5: Painting your ceramic self portrait.
Learning objectives. By the end of the lesson you will:
Understand basic colour mixing and be able to mix your skin tone.
Choose the most appropriate colours in terms of reflecting your own interests and
creating a good balance.
Learning outcomes.
By the end of the lesson you will have painted your ceramic self portrait accurately
and with colours that reflect something about your personality.
Glossary:
Clay
Wedge
Slab
Leatherhard
Greenware
Firing
Bisque
Kiln
Glaze

moist earth of decomposed rock
technique to take the air out of clay.
a piece of clay that has been rolled out to a specific thickness.
unfired clay not quite dry but firm enough to carve.
dried out, unfired clay.
baking clay at a high temperature.
clay after first firing.
furnace that fires the clay.
finely ground mineral solution, turns to glass when fired
Option 2: With glaze.

Step 5: Painting your ceramic self portrait.
Learning objectives. By the end of the lesson you will:
Understand how and why the colours of the glaze are altered when they are fired.
Choose the most appropriate colours in terms of reflecting your own interests and
creating a good balance on the tile.
Learning outcomes.
By the end of the lesson you will have painted your ceramic self portrait accurately
and with colours that reflect something about your personality.
Glossary:
Clay
Wedge
Slab
Leatherhard
Greenware
Firing
Bisque
Kiln
Glaze

moist earth of decomposed rock
technique to take the air out of clay.
a piece of clay that has been rolled out to a specific thickness.
unfired clay not quite dry but firm enough to carve.
dried out, unfired clay.
baking clay at a high temperature.
clay after first firing.
furnace that fires the clay.
finely ground mineral solution, turns to glass when fired
Jasna Sokolovic left her native
Yugoslavia in 1994, venturing to
Granville Island, Vancouver. She is
inspired by as Gaudi and
Hundertwasser. Her long journey is
often portrayed symbolically with birds
representing “fragility and liberty,
taking off, falling down and covering
distances.”

Jasna
Sokolovic
Part 2: Developing skills in 2D

Step1: Introduction to drawing
Learning objectives. By the end of the lesson you will:
Develop an understanding of the purpose of drawing.
Know what the formal elements are in art.
Learning outcomes.
By the end of the lesson you will show your understanding of the formal elements
through a number of drawing exercises.
Glossary:
The formal elements:
Cross hatching:
Stippling:
Tone:
Burnishing:

Line, Tone, Colour, Pattern, Texture, Shape, Form
At least two layers of parallel lines. The line sin each
later travel in different directions.
Areas of tone created by dots or specks.
The degree of lightness or darkness of an area
Heavy layers of pencil creating a shiny surface
Why draw?
To Observe
To Investigate

Key Words:
Look & see.

To Contemplate
To Remember

Rami Efal “Tea” (2005) Pen on paper
www.flickr.com/photos/aburami/sets/1509705/

Paul Brady “Will Smith” (2008)
www.flickr.com/photos/pbradyartwork/

Elizabeth Kane “Diet Coke” (2008) Colouring Pencils
www.flickr.com/photos/elizabethkane/
To Observe
To Investigate

Key Words: To observe or inquire into in detail;
examine systematically.

To Contemplate
To Remember

Ernst Haeckel “Kunstformen
der Natur” (1899-1904)
To see more click here

Ben Lawson “Absence Makes the Heart…” (2007 )
www.trans-technical.com/images.html
To Observe
To Investigate

Key Words: An act of directing the eyes on an object:
look, regard, sight, view, believe.

To Contemplate
To Remember

Grayson Perry: Map to
Nowhere. 2008

Steve Bell: 10 Dec 2013
No matter how famous you are, it appears, few can resist
the appeal of the selfie
To Observe
To Investigate
To Contemplate
To Remember

“Thinking of Dad” (2007)
Pen and Watercolour
www.flickr.com/photos/sketchpot/

16

Cai Guo-Qiang
"Drawing for Transient Rainbow“ (2003)
Gunpowder on paper, 198 x 157 inches
Taking a line for a walk!
The artist Paul Klee spoke of drawing as “taking a line for a walk”—so start
off in one corner of your page, and take your pencil for a stroll across it.
Start off slow and meandering, then add some detours. Experiment with
the weight of the line, pressing heavily and lightly. Do some zigzag sprints,
flicking skips, and twirling spirals. See how many different marks you can
create with a single pencil.
Pencil Shading

Cross-hatching
Shading Support Task Sheet 1

NOTE: Trim the edges of this paper and stick this sheet in your sketchbook
Exercise 1
Copy the tones
into the boxes
using a HB or 2B
pencil. Try to keep
within the boxes

Exercise 2
Copy the crosshatching next to
the marks below
using a pen or biro

Exercise 3
Copy following
tones using a 4B
pencil

Exercise 4
Copy following 3D
shapes using
dark, mid-tone and
light shades
Step 2: Drawing an eye, nose, mouth and ear.
Learning objectives. By the end of the lesson you will:
Understand how to create a realistic depiction of the features of a face.
Apply the formal elements as appropriate in creating the features.
Learning outcomes.
By the end of the session you will have an accurate drawing of an eye, nose,
mouth showing good use of tone.
Glossary:
The formal elements:
Cross hatching:
Stippling:
Tone:
Burnishing:

Line, Tone, Colour, Pattern, Texture, Shape, Form
At least two layers of parallel lines. The line sin each
later travel in different directions.
Areas of tone created by dots or specks.
The degree of lightness or darkness of an area
Heavy layers of pencil creating a shiny surface
Drawing eyes

Structure of the eye clip (go to two thirds in).
Add tone to the iris
and pupil working
from the centre
outwards.

Create a shadow
beneath the upper
lid to show the eye
sits behind it.

The eyelashes are
added, take a look at
the angle that they
are drawn, they are
not drawn straight
down,except for the
ones in the centre.

Add the lower
lashes. Like the
top eyelashes, the
centre ones curve
down and you go
either left or right
so you start to see
the curve on the
hair
Drawing mouths

Clip of mouth drawing
1. Draw a straight line to indicate where the lips should be. Curve the line to
show an expression.
2. Draw a circle in the middle with a slight bit of the circle below the line.
3. Draw two circles / ovals on the side of and slightly above the first circle and
two below.
4. Follow the shape of the circles as you draw the shape of the lips. NB the lips
do not always go to the end of the line.
The purple highlighted areas in the
illustration above show a particular
shadowed area of the upper lip. As
a general rule, all of the upper lip is
darker (compared to the lower lip)
but the area highlighted in purple is
especially darker. If you look at the
original mouth drawing above, you'll
see the particular shadow of this
area—like the lips go "in" there
especially. This is where the lips
curve "in" to the inside of the mouth.

The highlighted area in orange
shows an area of the lower lip that
sometimes is a little darker, or gets
a little more shadow. This is where
the lower lip especially curves in.
The closer to the edges of the
mouth, the darker (or, in shadow)
the bottom lip gets. But, remember the bottom lip is usually lighter than
the top lip because it is facing
upwards, and gets more light cast
upon it.

The highlighted area in green
shows shows a shadowed area
around the mouth that should not
be forgotten. This shading indicates
the structure of the face around the
mouth. The mouth isn't just plopped
on the face, it is a threedimensional thing, with surrounding
muscles and structure. Usually,
there will be some shading (subtle,
but there) at under the lower lip,
and around the corners of the
mouth.
Drawing noses

Nose drawing clip
Draw the shape the
nostrils make at the
base of the nose. The
size will depend on your
‘model’

Complete the nostrils by
adding lines (like brackets)
around them. The curve in
the middle shows where
the tip of the nose is.
Drawing ears

7 minute drawing of ears.
Side view
Draw a
rectangle
that is twice
as high as it
is broad.
This will help
us to keep
the ear in the
right
proportions.

Some ears are very flat inside,
but the average ear is quite a
sculpture. The shape inside of
the ear looks like a curved
version of the letter Y.
Start to draw this with a line
that begins at the left top and
curves down to the bottom of
the tragus, curving around the
obstacle in its way.

Start at the left side, close to
the top, then curve upwards to
touch the rectangle's top in the
middle, and curve down again
afterwards, touching the
rectangles right side. In a long
curve it then moves towards
the bottom, where the small
earlobe is finally ending its
shape.

In some ears
you can still
see a bit of
the ear hole;
in other ears
it is entirely
hidden
behind the
tragus.

In case you want to shade your
ear, draw the darkest values
into the places where the least
light is falling on, and leave the
brightest places entirely white.
Shading will strengthen the
three-dimensional depth of your
picture.

Outline the ear's rim, by
drawing a parallel line along its
side.
Some ears have a small bump
in their upper corner here.
The rim's shape continues and
curves into the ear's inner part.
Front view

The basic ear shape is
almost the same as in the
side view; the difference is
just that the 1x2
proportions no longer
apply. Draw the ear much
narrower instead. It is
probably three times as
high as it is wide now. Also
take care to make all the
curves much flatter.

Here is another
special thing about
the front view.
The inner earstructure can be
seen bulging out of
the ear in some
cases. Here it is
overlapping the
ear's rim a little bit.

Draw in the beginning of
the ear's upper rim. Make
it fairly thick.
The rest of the ear's rim
lies in the back and
appears to be a bit thinner.
Note how its line starts
from behind the line for the
front rim.
Also add the tragus at the
side.

Outline the
inner edge
of this part.

Then add a
little dent at
its top, and
your ear is
finished
Step 3: Proportions of the face
Learning objectives. By the end of the lesson you will:
Understand how to plan a drawing of the face making sure that all the features are
in proportion.
Apply the formal elements as appropriate when creating the features and use tone
to give the illusion that the features are three dimensional.
Learning outcomes.
By the end of the session you will be have an accurate portrait drawing.
Glossary:
Proportion:
The formal elements:
Cross hatching:
Stippling:
Tone:
Burnishing:

Proportion is the relative size and scale of various
elements in a work of art. It describes the relationship
between objects or parts of a whole.
Line, Tone, Colour, Pattern, Texture, Shape, Form
At least two layers of parallel lines. The line sin each
later travel in different directions.
Areas of tone created by dots or specks.
The degree of lightness or darkness of an area
Heavy layers of pencil creating a shiny surface
Shading Support Task Sheet 2

NOTE: Trim the edges of this paper and stick this sheet in your sketchbook
Exercise 1
Practice drawing
the following
cross-hatchings
using a pen/biro

Exercise 2
Using the crosshatching
technique, try
drawing the face
below using the
outline to help

Extension
Exercise
Take a portrait
photograph from a
magazine or
newspaper and try
to draw using the
cross-hatching
technique with a
pen

Mais conteúdo relacionado

Mais procurados

Langkah sebelum, semasa, selepas kembara seni
Langkah sebelum, semasa, selepas kembara seniLangkah sebelum, semasa, selepas kembara seni
Langkah sebelum, semasa, selepas kembara seniArifahAzlanShah2
 
media dan teknik.docx
media dan teknik.docxmedia dan teknik.docx
media dan teknik.docxNajmieHunter
 
21963733 apresiasi-seni
21963733 apresiasi-seni21963733 apresiasi-seni
21963733 apresiasi-seniEvelyna Usun
 
Wayang kulit [recovered] (2)
Wayang kulit [recovered] (2)Wayang kulit [recovered] (2)
Wayang kulit [recovered] (2)Nadia Azmi
 
Intro to printmaking
Intro to printmakingIntro to printmaking
Intro to printmakingmrsbauerart
 
Rgd modul 5.1 identiti korporat
Rgd modul 5.1 identiti korporat Rgd modul 5.1 identiti korporat
Rgd modul 5.1 identiti korporat SMK Zainab 2
 
E-Portfolio Asas Seni Catan (Kuih Tradisional Negeri Pahang)
E-Portfolio Asas Seni Catan (Kuih Tradisional Negeri Pahang)E-Portfolio Asas Seni Catan (Kuih Tradisional Negeri Pahang)
E-Portfolio Asas Seni Catan (Kuih Tradisional Negeri Pahang)HanisahJabar
 
Batik TINGKATAN 5
Batik TINGKATAN 5Batik TINGKATAN 5
Batik TINGKATAN 5syakizah
 
Art Appreciation: Drawing & Painting UPDATED
Art Appreciation: Drawing & Painting UPDATEDArt Appreciation: Drawing & Painting UPDATED
Art Appreciation: Drawing & Painting UPDATEDPaige Prater
 
Ikat dan celup
Ikat dan celupIkat dan celup
Ikat dan celuprajiahMJ
 
Developing Citizenship, Civics and Government-Chapter 10 Social Studies for ...
Developing Citizenship, Civics and Government-Chapter 10 Social Studies for  ...Developing Citizenship, Civics and Government-Chapter 10 Social Studies for  ...
Developing Citizenship, Civics and Government-Chapter 10 Social Studies for ...Arianny Calcagno
 
Abstract art
Abstract artAbstract art
Abstract artcequinn1
 
Ctu 281 kuliah 8 seni tembikar, ukir dan tenunan
Ctu 281 kuliah 8 seni tembikar, ukir dan tenunanCtu 281 kuliah 8 seni tembikar, ukir dan tenunan
Ctu 281 kuliah 8 seni tembikar, ukir dan tenunanSyuk Bond
 

Mais procurados (20)

Penegasan
PenegasanPenegasan
Penegasan
 
Langkah sebelum, semasa, selepas kembara seni
Langkah sebelum, semasa, selepas kembara seniLangkah sebelum, semasa, selepas kembara seni
Langkah sebelum, semasa, selepas kembara seni
 
media dan teknik.docx
media dan teknik.docxmedia dan teknik.docx
media dan teknik.docx
 
21963733 apresiasi-seni
21963733 apresiasi-seni21963733 apresiasi-seni
21963733 apresiasi-seni
 
Wayang kulit [recovered] (2)
Wayang kulit [recovered] (2)Wayang kulit [recovered] (2)
Wayang kulit [recovered] (2)
 
Intro to printmaking
Intro to printmakingIntro to printmaking
Intro to printmaking
 
Rgd modul 5.1 identiti korporat
Rgd modul 5.1 identiti korporat Rgd modul 5.1 identiti korporat
Rgd modul 5.1 identiti korporat
 
E-Portfolio Asas Seni Catan (Kuih Tradisional Negeri Pahang)
E-Portfolio Asas Seni Catan (Kuih Tradisional Negeri Pahang)E-Portfolio Asas Seni Catan (Kuih Tradisional Negeri Pahang)
E-Portfolio Asas Seni Catan (Kuih Tradisional Negeri Pahang)
 
Cth rph psv tahun 4 batik
Cth rph psv tahun 4   batikCth rph psv tahun 4   batik
Cth rph psv tahun 4 batik
 
Psv
PsvPsv
Psv
 
Cetakan
CetakanCetakan
Cetakan
 
Batik TINGKATAN 5
Batik TINGKATAN 5Batik TINGKATAN 5
Batik TINGKATAN 5
 
Art Appreciation: Drawing & Painting UPDATED
Art Appreciation: Drawing & Painting UPDATEDArt Appreciation: Drawing & Painting UPDATED
Art Appreciation: Drawing & Painting UPDATED
 
Clay
ClayClay
Clay
 
Ikat dan celup
Ikat dan celupIkat dan celup
Ikat dan celup
 
Asas grafik
Asas grafikAsas grafik
Asas grafik
 
Developing Citizenship, Civics and Government-Chapter 10 Social Studies for ...
Developing Citizenship, Civics and Government-Chapter 10 Social Studies for  ...Developing Citizenship, Civics and Government-Chapter 10 Social Studies for  ...
Developing Citizenship, Civics and Government-Chapter 10 Social Studies for ...
 
Batik
BatikBatik
Batik
 
Abstract art
Abstract artAbstract art
Abstract art
 
Ctu 281 kuliah 8 seni tembikar, ukir dan tenunan
Ctu 281 kuliah 8 seni tembikar, ukir dan tenunanCtu 281 kuliah 8 seni tembikar, ukir dan tenunan
Ctu 281 kuliah 8 seni tembikar, ukir dan tenunan
 

Destaque

Portraiture year 7_compressed-1
Portraiture year 7_compressed-1Portraiture year 7_compressed-1
Portraiture year 7_compressed-1Melanie Powell
 
Zines & Alternative Press: A Guide to Historical Research
Zines & Alternative Press: A Guide to Historical ResearchZines & Alternative Press: A Guide to Historical Research
Zines & Alternative Press: A Guide to Historical Researchsgroz
 
Artefact indigenous education assessment task 4
Artefact indigenous education assessment task 4Artefact indigenous education assessment task 4
Artefact indigenous education assessment task 4danicajanemurphy
 
2nd Annual Pan African High Security Printing Summit 2013
2nd Annual Pan African High Security Printing Summit 20132nd Annual Pan African High Security Printing Summit 2013
2nd Annual Pan African High Security Printing Summit 2013Matshego Rawula
 
Zines – an informal presentation!
Zines – an informal presentation!Zines – an informal presentation!
Zines – an informal presentation!syratron
 
Artwork analysis worksheet
Artwork analysis worksheetArtwork analysis worksheet
Artwork analysis worksheetColin_Duff
 
Art Movements Throughout European History
Art Movements Throughout European HistoryArt Movements Throughout European History
Art Movements Throughout European Historyap.euro.outlines
 
Introduction to Art History
Introduction to Art HistoryIntroduction to Art History
Introduction to Art HistoryJohn Ricard
 
A Taste of: The Now Literacies, Documenting Learning & Digital Portfolios
A Taste of: The Now Literacies, Documenting Learning & Digital PortfoliosA Taste of: The Now Literacies, Documenting Learning & Digital Portfolios
A Taste of: The Now Literacies, Documenting Learning & Digital PortfoliosSilvia Rosenthal Tolisano
 
Periods of Art
Periods of ArtPeriods of Art
Periods of Artcoleseth88
 

Destaque (16)

Portraiture year 7_compressed-1
Portraiture year 7_compressed-1Portraiture year 7_compressed-1
Portraiture year 7_compressed-1
 
Zines & Alternative Press: A Guide to Historical Research
Zines & Alternative Press: A Guide to Historical ResearchZines & Alternative Press: A Guide to Historical Research
Zines & Alternative Press: A Guide to Historical Research
 
Artefact indigenous education assessment task 4
Artefact indigenous education assessment task 4Artefact indigenous education assessment task 4
Artefact indigenous education assessment task 4
 
2nd Annual Pan African High Security Printing Summit 2013
2nd Annual Pan African High Security Printing Summit 20132nd Annual Pan African High Security Printing Summit 2013
2nd Annual Pan African High Security Printing Summit 2013
 
Zines – an informal presentation!
Zines – an informal presentation!Zines – an informal presentation!
Zines – an informal presentation!
 
What are zines
What are zinesWhat are zines
What are zines
 
Portraiture
PortraiturePortraiture
Portraiture
 
Year 7 identity
Year 7 identityYear 7 identity
Year 7 identity
 
Portraiture
PortraiturePortraiture
Portraiture
 
Artwork analysis worksheet
Artwork analysis worksheetArtwork analysis worksheet
Artwork analysis worksheet
 
Art Movements Throughout European History
Art Movements Throughout European HistoryArt Movements Throughout European History
Art Movements Throughout European History
 
Art Criticism student example
Art Criticism student exampleArt Criticism student example
Art Criticism student example
 
Art Critique Words
Art Critique WordsArt Critique Words
Art Critique Words
 
Introduction to Art History
Introduction to Art HistoryIntroduction to Art History
Introduction to Art History
 
A Taste of: The Now Literacies, Documenting Learning & Digital Portfolios
A Taste of: The Now Literacies, Documenting Learning & Digital PortfoliosA Taste of: The Now Literacies, Documenting Learning & Digital Portfolios
A Taste of: The Now Literacies, Documenting Learning & Digital Portfolios
 
Periods of Art
Periods of ArtPeriods of Art
Periods of Art
 

Semelhante a Identity(Year 7) - Exploring Identity Through Art

Working with Clay
Working with ClayWorking with Clay
Working with Claykarafrank
 
Beyond the Clay Container
Beyond the Clay Container Beyond the Clay Container
Beyond the Clay Container ilaeadigital
 
KCC Art 141 Chapter 8 Art Production
KCC Art 141 Chapter 8 Art ProductionKCC Art 141 Chapter 8 Art Production
KCC Art 141 Chapter 8 Art ProductionKelly Parker
 
Chalk Mixed Media Drawing inspired by Jim Dine Lesson
Chalk Mixed Media Drawing inspired by Jim Dine LessonChalk Mixed Media Drawing inspired by Jim Dine Lesson
Chalk Mixed Media Drawing inspired by Jim Dine LessonGrace Moppett
 
Ceramic Lecture, clay, pottery, handbuilding, stages of clay, teaching
Ceramic Lecture, clay, pottery, handbuilding, stages of clay, teachingCeramic Lecture, clay, pottery, handbuilding, stages of clay, teaching
Ceramic Lecture, clay, pottery, handbuilding, stages of clay, teachingMaria Padgett
 
Yr 7 insect clay tiles4
Yr 7 insect clay tiles4Yr 7 insect clay tiles4
Yr 7 insect clay tiles4NeilOw87
 
KCC Art 211 Ch 12 Clay, Metal, Fiber, Wood
KCC Art 211 Ch 12 Clay, Metal, Fiber, WoodKCC Art 211 Ch 12 Clay, Metal, Fiber, Wood
KCC Art 211 Ch 12 Clay, Metal, Fiber, WoodKelly Parker
 
Ceramics terms
Ceramics termsCeramics terms
Ceramics termsmicahkraus
 
How to make a clay slab house facade
How to make a clay slab house facadeHow to make a clay slab house facade
How to make a clay slab house facadefshutterman
 
HAND-BUILT CERAMIC TECHNIQUES.pptx
HAND-BUILT CERAMIC TECHNIQUES.pptxHAND-BUILT CERAMIC TECHNIQUES.pptx
HAND-BUILT CERAMIC TECHNIQUES.pptxBernard Richardson
 
Year 12 3 d design
Year 12 3 d designYear 12 3 d design
Year 12 3 d designmissfcmay
 

Semelhante a Identity(Year 7) - Exploring Identity Through Art (20)

Year 7: Identity
Year 7: IdentityYear 7: Identity
Year 7: Identity
 
Year 8 canopic jar
Year 8 canopic jarYear 8 canopic jar
Year 8 canopic jar
 
Working with Clay
Working with ClayWorking with Clay
Working with Clay
 
Unit 2 Clay & Artifacts
Unit 2 Clay & ArtifactsUnit 2 Clay & Artifacts
Unit 2 Clay & Artifacts
 
Animal effigybowls
Animal effigybowlsAnimal effigybowls
Animal effigybowls
 
Beyond the Clay Container
Beyond the Clay Container Beyond the Clay Container
Beyond the Clay Container
 
KCC Art 141 Chapter 8 Art Production
KCC Art 141 Chapter 8 Art ProductionKCC Art 141 Chapter 8 Art Production
KCC Art 141 Chapter 8 Art Production
 
Chalk Mixed Media Drawing inspired by Jim Dine Lesson
Chalk Mixed Media Drawing inspired by Jim Dine LessonChalk Mixed Media Drawing inspired by Jim Dine Lesson
Chalk Mixed Media Drawing inspired by Jim Dine Lesson
 
Ceramic Lecture, clay, pottery, handbuilding, stages of clay, teaching
Ceramic Lecture, clay, pottery, handbuilding, stages of clay, teachingCeramic Lecture, clay, pottery, handbuilding, stages of clay, teaching
Ceramic Lecture, clay, pottery, handbuilding, stages of clay, teaching
 
Yr 7 insect clay tiles4
Yr 7 insect clay tiles4Yr 7 insect clay tiles4
Yr 7 insect clay tiles4
 
KCC Art 211 Ch 12 Clay, Metal, Fiber, Wood
KCC Art 211 Ch 12 Clay, Metal, Fiber, WoodKCC Art 211 Ch 12 Clay, Metal, Fiber, Wood
KCC Art 211 Ch 12 Clay, Metal, Fiber, Wood
 
Ceramics terms
Ceramics termsCeramics terms
Ceramics terms
 
Techniques in Ceramics
Techniques in CeramicsTechniques in Ceramics
Techniques in Ceramics
 
How to make a clay slab house facade
How to make a clay slab house facadeHow to make a clay slab house facade
How to make a clay slab house facade
 
HAND-BUILT CERAMIC TECHNIQUES.pptx
HAND-BUILT CERAMIC TECHNIQUES.pptxHAND-BUILT CERAMIC TECHNIQUES.pptx
HAND-BUILT CERAMIC TECHNIQUES.pptx
 
Ceramic dessertsproject
Ceramic dessertsprojectCeramic dessertsproject
Ceramic dessertsproject
 
Clay Sculpture
Clay SculptureClay Sculpture
Clay Sculpture
 
Gr. 9 Clay - Grotesque Art
Gr. 9 Clay - Grotesque ArtGr. 9 Clay - Grotesque Art
Gr. 9 Clay - Grotesque Art
 
Year 12 3 d design
Year 12 3 d designYear 12 3 d design
Year 12 3 d design
 
Ceramic dessertsproject
Ceramic dessertsprojectCeramic dessertsproject
Ceramic dessertsproject
 

Mais de Melanie Powell

Pictorialism- f64.pptx
Pictorialism- f64.pptxPictorialism- f64.pptx
Pictorialism- f64.pptxMelanie Powell
 
Aliens SoW 2022.pptx .pptx
Aliens SoW 2022.pptx .pptxAliens SoW 2022.pptx .pptx
Aliens SoW 2022.pptx .pptxMelanie Powell
 
Easter holiday challenge 3 loo roll
Easter holiday challenge 3  loo roll Easter holiday challenge 3  loo roll
Easter holiday challenge 3 loo roll Melanie Powell
 
Homework 1: Research an issue
Homework 1: Research an issueHomework 1: Research an issue
Homework 1: Research an issueMelanie Powell
 
Royal Academy W/Sheet 202
Royal Academy W/Sheet 202Royal Academy W/Sheet 202
Royal Academy W/Sheet 202Melanie Powell
 
Year 11 ESA lessons 2020
Year 11 ESA lessons 2020Year 11 ESA lessons 2020
Year 11 ESA lessons 2020Melanie Powell
 
Modernism and Photography
Modernism and PhotographyModernism and Photography
Modernism and PhotographyMelanie Powell
 
Past, Present & Future SoW
Past, Present & Future SoWPast, Present & Future SoW
Past, Present & Future SoWMelanie Powell
 
History of Photography, The Early Years
History of Photography, The Early YearsHistory of Photography, The Early Years
History of Photography, The Early YearsMelanie Powell
 
How do we read a photograph?
How do we read a photograph?How do we read a photograph?
How do we read a photograph?Melanie Powell
 
Year 12 abstraction 1
Year 12 abstraction 1 Year 12 abstraction 1
Year 12 abstraction 1 Melanie Powell
 
A level first lesson 2019
A level first lesson 2019A level first lesson 2019
A level first lesson 2019Melanie Powell
 

Mais de Melanie Powell (20)

Pictorialism- f64.pptx
Pictorialism- f64.pptxPictorialism- f64.pptx
Pictorialism- f64.pptx
 
Aliens SoW 2022.pptx .pptx
Aliens SoW 2022.pptx .pptxAliens SoW 2022.pptx .pptx
Aliens SoW 2022.pptx .pptx
 
Aliens so w.pptx (1)
Aliens so w.pptx (1)Aliens so w.pptx (1)
Aliens so w.pptx (1)
 
Easter holiday challenge 3 loo roll
Easter holiday challenge 3  loo roll Easter holiday challenge 3  loo roll
Easter holiday challenge 3 loo roll
 
Homework 1: Research an issue
Homework 1: Research an issueHomework 1: Research an issue
Homework 1: Research an issue
 
Royal Academy W/Sheet 202
Royal Academy W/Sheet 202Royal Academy W/Sheet 202
Royal Academy W/Sheet 202
 
Year 11 ESA lessons 2020
Year 11 ESA lessons 2020Year 11 ESA lessons 2020
Year 11 ESA lessons 2020
 
Selfie Cover Lesson
Selfie Cover LessonSelfie Cover Lesson
Selfie Cover Lesson
 
Modernism and Photography
Modernism and PhotographyModernism and Photography
Modernism and Photography
 
Lino step by step
Lino step by stepLino step by step
Lino step by step
 
Early Photography
Early PhotographyEarly Photography
Early Photography
 
Past, Present & Future SoW
Past, Present & Future SoWPast, Present & Future SoW
Past, Present & Future SoW
 
History of Photography, The Early Years
History of Photography, The Early YearsHistory of Photography, The Early Years
History of Photography, The Early Years
 
Drawing machine
Drawing machineDrawing machine
Drawing machine
 
Year 12 abstraction 2
Year 12 abstraction 2Year 12 abstraction 2
Year 12 abstraction 2
 
How do we read a photograph?
How do we read a photograph?How do we read a photograph?
How do we read a photograph?
 
KS3_First Lesson 2019
KS3_First Lesson 2019KS3_First Lesson 2019
KS3_First Lesson 2019
 
Year 12 abstraction 1
Year 12 abstraction 1 Year 12 abstraction 1
Year 12 abstraction 1
 
A level first lesson 2019
A level first lesson 2019A level first lesson 2019
A level first lesson 2019
 
Blind drawing
Blind drawingBlind drawing
Blind drawing
 

Último

Web & Social Media Analytics Previous Year Question Paper.pdf
Web & Social Media Analytics Previous Year Question Paper.pdfWeb & Social Media Analytics Previous Year Question Paper.pdf
Web & Social Media Analytics Previous Year Question Paper.pdfJayanti Pande
 
Nutritional Needs Presentation - HLTH 104
Nutritional Needs Presentation - HLTH 104Nutritional Needs Presentation - HLTH 104
Nutritional Needs Presentation - HLTH 104misteraugie
 
Hybridoma Technology ( Production , Purification , and Application )
Hybridoma Technology  ( Production , Purification , and Application  ) Hybridoma Technology  ( Production , Purification , and Application  )
Hybridoma Technology ( Production , Purification , and Application ) Sakshi Ghasle
 
Activity 01 - Artificial Culture (1).pdf
Activity 01 - Artificial Culture (1).pdfActivity 01 - Artificial Culture (1).pdf
Activity 01 - Artificial Culture (1).pdfciinovamais
 
URLs and Routing in the Odoo 17 Website App
URLs and Routing in the Odoo 17 Website AppURLs and Routing in the Odoo 17 Website App
URLs and Routing in the Odoo 17 Website AppCeline George
 
Contemporary philippine arts from the regions_PPT_Module_12 [Autosaved] (1).pptx
Contemporary philippine arts from the regions_PPT_Module_12 [Autosaved] (1).pptxContemporary philippine arts from the regions_PPT_Module_12 [Autosaved] (1).pptx
Contemporary philippine arts from the regions_PPT_Module_12 [Autosaved] (1).pptxRoyAbrique
 
Beyond the EU: DORA and NIS 2 Directive's Global Impact
Beyond the EU: DORA and NIS 2 Directive's Global ImpactBeyond the EU: DORA and NIS 2 Directive's Global Impact
Beyond the EU: DORA and NIS 2 Directive's Global ImpactPECB
 
18-04-UA_REPORT_MEDIALITERAСY_INDEX-DM_23-1-final-eng.pdf
18-04-UA_REPORT_MEDIALITERAСY_INDEX-DM_23-1-final-eng.pdf18-04-UA_REPORT_MEDIALITERAСY_INDEX-DM_23-1-final-eng.pdf
18-04-UA_REPORT_MEDIALITERAСY_INDEX-DM_23-1-final-eng.pdfssuser54595a
 
Accessible design: Minimum effort, maximum impact
Accessible design: Minimum effort, maximum impactAccessible design: Minimum effort, maximum impact
Accessible design: Minimum effort, maximum impactdawncurless
 
Organic Name Reactions for the students and aspirants of Chemistry12th.pptx
Organic Name Reactions  for the students and aspirants of Chemistry12th.pptxOrganic Name Reactions  for the students and aspirants of Chemistry12th.pptx
Organic Name Reactions for the students and aspirants of Chemistry12th.pptxVS Mahajan Coaching Centre
 
Mastering the Unannounced Regulatory Inspection
Mastering the Unannounced Regulatory InspectionMastering the Unannounced Regulatory Inspection
Mastering the Unannounced Regulatory InspectionSafetyChain Software
 
Q4-W6-Restating Informational Text Grade 3
Q4-W6-Restating Informational Text Grade 3Q4-W6-Restating Informational Text Grade 3
Q4-W6-Restating Informational Text Grade 3JemimahLaneBuaron
 
Presentation by Andreas Schleicher Tackling the School Absenteeism Crisis 30 ...
Presentation by Andreas Schleicher Tackling the School Absenteeism Crisis 30 ...Presentation by Andreas Schleicher Tackling the School Absenteeism Crisis 30 ...
Presentation by Andreas Schleicher Tackling the School Absenteeism Crisis 30 ...EduSkills OECD
 
mini mental status format.docx
mini    mental       status     format.docxmini    mental       status     format.docx
mini mental status format.docxPoojaSen20
 
Measures of Central Tendency: Mean, Median and Mode
Measures of Central Tendency: Mean, Median and ModeMeasures of Central Tendency: Mean, Median and Mode
Measures of Central Tendency: Mean, Median and ModeThiyagu K
 
Employee wellbeing at the workplace.pptx
Employee wellbeing at the workplace.pptxEmployee wellbeing at the workplace.pptx
Employee wellbeing at the workplace.pptxNirmalaLoungPoorunde1
 
Separation of Lanthanides/ Lanthanides and Actinides
Separation of Lanthanides/ Lanthanides and ActinidesSeparation of Lanthanides/ Lanthanides and Actinides
Separation of Lanthanides/ Lanthanides and ActinidesFatimaKhan178732
 
CARE OF CHILD IN INCUBATOR..........pptx
CARE OF CHILD IN INCUBATOR..........pptxCARE OF CHILD IN INCUBATOR..........pptx
CARE OF CHILD IN INCUBATOR..........pptxGaneshChakor2
 

Último (20)

Web & Social Media Analytics Previous Year Question Paper.pdf
Web & Social Media Analytics Previous Year Question Paper.pdfWeb & Social Media Analytics Previous Year Question Paper.pdf
Web & Social Media Analytics Previous Year Question Paper.pdf
 
Nutritional Needs Presentation - HLTH 104
Nutritional Needs Presentation - HLTH 104Nutritional Needs Presentation - HLTH 104
Nutritional Needs Presentation - HLTH 104
 
Hybridoma Technology ( Production , Purification , and Application )
Hybridoma Technology  ( Production , Purification , and Application  ) Hybridoma Technology  ( Production , Purification , and Application  )
Hybridoma Technology ( Production , Purification , and Application )
 
Activity 01 - Artificial Culture (1).pdf
Activity 01 - Artificial Culture (1).pdfActivity 01 - Artificial Culture (1).pdf
Activity 01 - Artificial Culture (1).pdf
 
URLs and Routing in the Odoo 17 Website App
URLs and Routing in the Odoo 17 Website AppURLs and Routing in the Odoo 17 Website App
URLs and Routing in the Odoo 17 Website App
 
Contemporary philippine arts from the regions_PPT_Module_12 [Autosaved] (1).pptx
Contemporary philippine arts from the regions_PPT_Module_12 [Autosaved] (1).pptxContemporary philippine arts from the regions_PPT_Module_12 [Autosaved] (1).pptx
Contemporary philippine arts from the regions_PPT_Module_12 [Autosaved] (1).pptx
 
Beyond the EU: DORA and NIS 2 Directive's Global Impact
Beyond the EU: DORA and NIS 2 Directive's Global ImpactBeyond the EU: DORA and NIS 2 Directive's Global Impact
Beyond the EU: DORA and NIS 2 Directive's Global Impact
 
18-04-UA_REPORT_MEDIALITERAСY_INDEX-DM_23-1-final-eng.pdf
18-04-UA_REPORT_MEDIALITERAСY_INDEX-DM_23-1-final-eng.pdf18-04-UA_REPORT_MEDIALITERAСY_INDEX-DM_23-1-final-eng.pdf
18-04-UA_REPORT_MEDIALITERAСY_INDEX-DM_23-1-final-eng.pdf
 
Accessible design: Minimum effort, maximum impact
Accessible design: Minimum effort, maximum impactAccessible design: Minimum effort, maximum impact
Accessible design: Minimum effort, maximum impact
 
TataKelola dan KamSiber Kecerdasan Buatan v022.pdf
TataKelola dan KamSiber Kecerdasan Buatan v022.pdfTataKelola dan KamSiber Kecerdasan Buatan v022.pdf
TataKelola dan KamSiber Kecerdasan Buatan v022.pdf
 
Organic Name Reactions for the students and aspirants of Chemistry12th.pptx
Organic Name Reactions  for the students and aspirants of Chemistry12th.pptxOrganic Name Reactions  for the students and aspirants of Chemistry12th.pptx
Organic Name Reactions for the students and aspirants of Chemistry12th.pptx
 
Mastering the Unannounced Regulatory Inspection
Mastering the Unannounced Regulatory InspectionMastering the Unannounced Regulatory Inspection
Mastering the Unannounced Regulatory Inspection
 
Q4-W6-Restating Informational Text Grade 3
Q4-W6-Restating Informational Text Grade 3Q4-W6-Restating Informational Text Grade 3
Q4-W6-Restating Informational Text Grade 3
 
Presentation by Andreas Schleicher Tackling the School Absenteeism Crisis 30 ...
Presentation by Andreas Schleicher Tackling the School Absenteeism Crisis 30 ...Presentation by Andreas Schleicher Tackling the School Absenteeism Crisis 30 ...
Presentation by Andreas Schleicher Tackling the School Absenteeism Crisis 30 ...
 
mini mental status format.docx
mini    mental       status     format.docxmini    mental       status     format.docx
mini mental status format.docx
 
Measures of Central Tendency: Mean, Median and Mode
Measures of Central Tendency: Mean, Median and ModeMeasures of Central Tendency: Mean, Median and Mode
Measures of Central Tendency: Mean, Median and Mode
 
INDIA QUIZ 2024 RLAC DELHI UNIVERSITY.pptx
INDIA QUIZ 2024 RLAC DELHI UNIVERSITY.pptxINDIA QUIZ 2024 RLAC DELHI UNIVERSITY.pptx
INDIA QUIZ 2024 RLAC DELHI UNIVERSITY.pptx
 
Employee wellbeing at the workplace.pptx
Employee wellbeing at the workplace.pptxEmployee wellbeing at the workplace.pptx
Employee wellbeing at the workplace.pptx
 
Separation of Lanthanides/ Lanthanides and Actinides
Separation of Lanthanides/ Lanthanides and ActinidesSeparation of Lanthanides/ Lanthanides and Actinides
Separation of Lanthanides/ Lanthanides and Actinides
 
CARE OF CHILD IN INCUBATOR..........pptx
CARE OF CHILD IN INCUBATOR..........pptxCARE OF CHILD IN INCUBATOR..........pptx
CARE OF CHILD IN INCUBATOR..........pptx
 

Identity(Year 7) - Exploring Identity Through Art

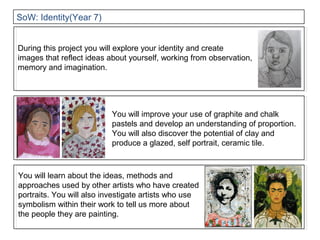
  • 1. SoW: Identity(Year 7) During this project you will explore your identity and create images that reflect ideas about yourself, working from observation, memory and imagination. You will improve your use of graphite and chalk pastels and develop an understanding of proportion. You will also discover the potential of clay and produce a glazed, self portrait, ceramic tile. You will learn about the ideas, methods and approaches used by other artists who have created portraits. You will also investigate artists who use symbolism within their work to tell us more about the people they are painting.
  • 2. Part 1: Clay tile Step1: Introduction to clay Learning objectives. By the end of the lesson you will: Develop an understanding of the properties and potential of clay. Use the correct words to describe clay techniques and processes. Learning outcomes. By the end of the lesson you will: Have created a thumb pot showing your understanding of techniques. Glossary: Clay Wedge Leatherhard Greenware Firing Bisque Kiln Glaze moist earth of decomposed rock technique to take the air out of clay. unfired clay not quite dry but firm enough to carve. dried out, unfired clay. baking clay at a high temperature. clay after first firing. furnace that fires the clay. finely ground mineral solution, turns to glass when fired
  • 3. Preparing your clay for sculpting Wedging removes air pockets
  • 4. Modeling clay into a pinch pot. Start with a ball. Push thumb into centre. Pinch from bottom upward. Shape and smooth for finished pot.
  • 5. Step 2: Create two slabs Learning objectives. By the end of the lesson you will be able to roll out a clay slab and explain the process to a peer using the correct words. Learning outcomes. By the end of two lessons you will have created two clay slabs. Glossary: Clay Wedge Slab Leatherhard Greenware Firing Bisque Kiln Glaze moist earth of decomposed rock technique to take the air out of clay. a piece of clay that has been rolled out to a specific thickness. unfired clay not quite dry but firm enough to carve. dried out, unfired clay. baking clay at a high temperature. clay after first firing. furnace that fires the clay. finely ground mineral solution, turns to glass when fired
  • 6. Creating a slab. Flatten the clay a little to start you off. Roll out a slab using the guides to control the thickness of the clay. Use the sharp knife to cut around the template. Initial your tile discreetly.
  • 7. Collecting homework Due: next Art lesson Bring objects to impress into the clay slabs. Objects should reflect something about your hobbies and interests. Choose objects with an interesting texture. Please do not bring anything too valuable, inappropriate or too big.
  • 8. Step 3: Creating a self portrait in clay Learning objectives. By the end of the lesson you will: Develop your control of manipulating and cutting clay accurately. Be able to explain the process of transferring an image to clay using the correct vocabulary. Learning outcomes. By the end of the two lessons you will have transferred an image of you to one of your clay slabs. The face will be clear and recognisable as you. Glossary: Clay Wedge Slab Leatherhard Greenware Firing Bisque Kiln Glaze moist earth of decomposed rock technique to take the air out of clay. a piece of clay that has been rolled out to a specific thickness. unfired clay not quite dry but firm enough to carve. dried out, unfired clay. baking clay at a high temperature. clay after first firing. furnace that fires the clay. finely ground mineral solution, turns to glass when fired
  • 9. Step 4: Decorating your clay tiles and create your layered portrait. Learning objectives. By the end of the lesson you will: Be able to construct strong composition and understand how to use symmetry, balance and pattern to your advantage. Use your understanding of Lucinda Mudge’s work to influence the marks you use in decorating your tile Understand the potential of different tools and objects in creating an effective impressions into the clay. Learning outcomes. By the end of the lesson you will have: Created a patterned clay slab using impressing, moulding and embossing techniques. Used the score and slip technique to join together the two decorated, slabs of clay. Glossary: Clay Wedge Slab Leatherhard Greenware Glaze moist earth of decomposed rock technique to take the air out of clay. a piece of clay that has been rolled out to a specific thickness. unfired clay not quite dry but firm enough to carve. dried out, unfired clay. finely ground mineral solution, turns to glass when fired
  • 10. Lucinda Mudge Mudge’s work pays homage to the Staffordshire slipware potters of the 17th century, and refers to the decorative arts. Her surfaces are richly textured with designs marked into the clay, which is then followed by the process of honey glazing that traditionally accompanies slip work.
  • 11.
  • 12. Option 1: Water colour and white ready mix. Step 5: Painting your ceramic self portrait. Learning objectives. By the end of the lesson you will: Understand basic colour mixing and be able to mix your skin tone. Choose the most appropriate colours in terms of reflecting your own interests and creating a good balance. Learning outcomes. By the end of the lesson you will have painted your ceramic self portrait accurately and with colours that reflect something about your personality. Glossary: Clay Wedge Slab Leatherhard Greenware Firing Bisque Kiln Glaze moist earth of decomposed rock technique to take the air out of clay. a piece of clay that has been rolled out to a specific thickness. unfired clay not quite dry but firm enough to carve. dried out, unfired clay. baking clay at a high temperature. clay after first firing. furnace that fires the clay. finely ground mineral solution, turns to glass when fired
  • 13. Option 2: With glaze. Step 5: Painting your ceramic self portrait. Learning objectives. By the end of the lesson you will: Understand how and why the colours of the glaze are altered when they are fired. Choose the most appropriate colours in terms of reflecting your own interests and creating a good balance on the tile. Learning outcomes. By the end of the lesson you will have painted your ceramic self portrait accurately and with colours that reflect something about your personality. Glossary: Clay Wedge Slab Leatherhard Greenware Firing Bisque Kiln Glaze moist earth of decomposed rock technique to take the air out of clay. a piece of clay that has been rolled out to a specific thickness. unfired clay not quite dry but firm enough to carve. dried out, unfired clay. baking clay at a high temperature. clay after first firing. furnace that fires the clay. finely ground mineral solution, turns to glass when fired
  • 14. Jasna Sokolovic left her native Yugoslavia in 1994, venturing to Granville Island, Vancouver. She is inspired by as Gaudi and Hundertwasser. Her long journey is often portrayed symbolically with birds representing “fragility and liberty, taking off, falling down and covering distances.” Jasna Sokolovic
  • 15. Part 2: Developing skills in 2D Step1: Introduction to drawing Learning objectives. By the end of the lesson you will: Develop an understanding of the purpose of drawing. Know what the formal elements are in art. Learning outcomes. By the end of the lesson you will show your understanding of the formal elements through a number of drawing exercises. Glossary: The formal elements: Cross hatching: Stippling: Tone: Burnishing: Line, Tone, Colour, Pattern, Texture, Shape, Form At least two layers of parallel lines. The line sin each later travel in different directions. Areas of tone created by dots or specks. The degree of lightness or darkness of an area Heavy layers of pencil creating a shiny surface
  • 17. To Observe To Investigate Key Words: Look & see. To Contemplate To Remember Rami Efal “Tea” (2005) Pen on paper www.flickr.com/photos/aburami/sets/1509705/ Paul Brady “Will Smith” (2008) www.flickr.com/photos/pbradyartwork/ Elizabeth Kane “Diet Coke” (2008) Colouring Pencils www.flickr.com/photos/elizabethkane/
  • 18. To Observe To Investigate Key Words: To observe or inquire into in detail; examine systematically. To Contemplate To Remember Ernst Haeckel “Kunstformen der Natur” (1899-1904) To see more click here Ben Lawson “Absence Makes the Heart…” (2007 ) www.trans-technical.com/images.html
  • 19. To Observe To Investigate Key Words: An act of directing the eyes on an object: look, regard, sight, view, believe. To Contemplate To Remember Grayson Perry: Map to Nowhere. 2008 Steve Bell: 10 Dec 2013 No matter how famous you are, it appears, few can resist the appeal of the selfie
  • 20. To Observe To Investigate To Contemplate To Remember “Thinking of Dad” (2007) Pen and Watercolour www.flickr.com/photos/sketchpot/ 16 Cai Guo-Qiang "Drawing for Transient Rainbow“ (2003) Gunpowder on paper, 198 x 157 inches
  • 21. Taking a line for a walk! The artist Paul Klee spoke of drawing as “taking a line for a walk”—so start off in one corner of your page, and take your pencil for a stroll across it. Start off slow and meandering, then add some detours. Experiment with the weight of the line, pressing heavily and lightly. Do some zigzag sprints, flicking skips, and twirling spirals. See how many different marks you can create with a single pencil.
  • 23. Shading Support Task Sheet 1 NOTE: Trim the edges of this paper and stick this sheet in your sketchbook Exercise 1 Copy the tones into the boxes using a HB or 2B pencil. Try to keep within the boxes Exercise 2 Copy the crosshatching next to the marks below using a pen or biro Exercise 3 Copy following tones using a 4B pencil Exercise 4 Copy following 3D shapes using dark, mid-tone and light shades
  • 24.
  • 25. Step 2: Drawing an eye, nose, mouth and ear. Learning objectives. By the end of the lesson you will: Understand how to create a realistic depiction of the features of a face. Apply the formal elements as appropriate in creating the features. Learning outcomes. By the end of the session you will have an accurate drawing of an eye, nose, mouth showing good use of tone. Glossary: The formal elements: Cross hatching: Stippling: Tone: Burnishing: Line, Tone, Colour, Pattern, Texture, Shape, Form At least two layers of parallel lines. The line sin each later travel in different directions. Areas of tone created by dots or specks. The degree of lightness or darkness of an area Heavy layers of pencil creating a shiny surface
  • 26. Drawing eyes Structure of the eye clip (go to two thirds in).
  • 27. Add tone to the iris and pupil working from the centre outwards. Create a shadow beneath the upper lid to show the eye sits behind it. The eyelashes are added, take a look at the angle that they are drawn, they are not drawn straight down,except for the ones in the centre. Add the lower lashes. Like the top eyelashes, the centre ones curve down and you go either left or right so you start to see the curve on the hair
  • 28. Drawing mouths Clip of mouth drawing
  • 29. 1. Draw a straight line to indicate where the lips should be. Curve the line to show an expression. 2. Draw a circle in the middle with a slight bit of the circle below the line. 3. Draw two circles / ovals on the side of and slightly above the first circle and two below. 4. Follow the shape of the circles as you draw the shape of the lips. NB the lips do not always go to the end of the line.
  • 30. The purple highlighted areas in the illustration above show a particular shadowed area of the upper lip. As a general rule, all of the upper lip is darker (compared to the lower lip) but the area highlighted in purple is especially darker. If you look at the original mouth drawing above, you'll see the particular shadow of this area—like the lips go "in" there especially. This is where the lips curve "in" to the inside of the mouth. The highlighted area in orange shows an area of the lower lip that sometimes is a little darker, or gets a little more shadow. This is where the lower lip especially curves in. The closer to the edges of the mouth, the darker (or, in shadow) the bottom lip gets. But, remember the bottom lip is usually lighter than the top lip because it is facing upwards, and gets more light cast upon it. The highlighted area in green shows shows a shadowed area around the mouth that should not be forgotten. This shading indicates the structure of the face around the mouth. The mouth isn't just plopped on the face, it is a threedimensional thing, with surrounding muscles and structure. Usually, there will be some shading (subtle, but there) at under the lower lip, and around the corners of the mouth.
  • 32. Draw the shape the nostrils make at the base of the nose. The size will depend on your ‘model’ Complete the nostrils by adding lines (like brackets) around them. The curve in the middle shows where the tip of the nose is.
  • 33. Drawing ears 7 minute drawing of ears.
  • 34. Side view Draw a rectangle that is twice as high as it is broad. This will help us to keep the ear in the right proportions. Some ears are very flat inside, but the average ear is quite a sculpture. The shape inside of the ear looks like a curved version of the letter Y. Start to draw this with a line that begins at the left top and curves down to the bottom of the tragus, curving around the obstacle in its way. Start at the left side, close to the top, then curve upwards to touch the rectangle's top in the middle, and curve down again afterwards, touching the rectangles right side. In a long curve it then moves towards the bottom, where the small earlobe is finally ending its shape. In some ears you can still see a bit of the ear hole; in other ears it is entirely hidden behind the tragus. In case you want to shade your ear, draw the darkest values into the places where the least light is falling on, and leave the brightest places entirely white. Shading will strengthen the three-dimensional depth of your picture. Outline the ear's rim, by drawing a parallel line along its side. Some ears have a small bump in their upper corner here. The rim's shape continues and curves into the ear's inner part.
  • 35. Front view The basic ear shape is almost the same as in the side view; the difference is just that the 1x2 proportions no longer apply. Draw the ear much narrower instead. It is probably three times as high as it is wide now. Also take care to make all the curves much flatter. Here is another special thing about the front view. The inner earstructure can be seen bulging out of the ear in some cases. Here it is overlapping the ear's rim a little bit. Draw in the beginning of the ear's upper rim. Make it fairly thick. The rest of the ear's rim lies in the back and appears to be a bit thinner. Note how its line starts from behind the line for the front rim. Also add the tragus at the side. Outline the inner edge of this part. Then add a little dent at its top, and your ear is finished
  • 36. Step 3: Proportions of the face Learning objectives. By the end of the lesson you will: Understand how to plan a drawing of the face making sure that all the features are in proportion. Apply the formal elements as appropriate when creating the features and use tone to give the illusion that the features are three dimensional. Learning outcomes. By the end of the session you will be have an accurate portrait drawing. Glossary: Proportion: The formal elements: Cross hatching: Stippling: Tone: Burnishing: Proportion is the relative size and scale of various elements in a work of art. It describes the relationship between objects or parts of a whole. Line, Tone, Colour, Pattern, Texture, Shape, Form At least two layers of parallel lines. The line sin each later travel in different directions. Areas of tone created by dots or specks. The degree of lightness or darkness of an area Heavy layers of pencil creating a shiny surface
  • 37.
  • 38.
  • 39. Shading Support Task Sheet 2 NOTE: Trim the edges of this paper and stick this sheet in your sketchbook Exercise 1 Practice drawing the following cross-hatchings using a pen/biro Exercise 2 Using the crosshatching technique, try drawing the face below using the outline to help Extension Exercise Take a portrait photograph from a magazine or newspaper and try to draw using the cross-hatching technique with a pen

Notas do Editor

  1. Use the ‘First ceramics lesson’ in the Autumn 2011 folder in the project folder in Art Resources (MLE). The aim is to allow students to interact with the clay and make a thumb pot. If these can be kept moist students can impress the objects they bring in later on to see how effecive they are. Understanding can be assessed using the clay jeopardy game. (same folder as the one mentionned above.)
  2. This may take two lessons to do it really well. You could start the second lesson by students demonstrating the technique to the rest of the class. Play the clay jeopardy for AfL. Or test them on the words in the glossary.
  3. This may take two lessons to do it really well. You could start the second lesson for this by students demonstrating the technique to the rest of the class. Play the clay jeopardy for AfL.
  4. This may take two lessons to do it really well. You could start the second lesson by students demonstrating the technique to the rest of the class. Play the clay jeopardy for AfL. If you feel you have too many groups to do two slabs just do one. You could try this idea from art attack. However, because of the nature of it it couldn’t then be part of the permanent wall display outside: http://teapot3.multiply.com/video/item/1/art_attack-_making_clay_faces
  5. Zek’s presentation in the Autumn folder: ‘Why draw’ is a really good discussion starting point.
  6. 2.1
  7. 2.4
  8. 2.5
  9. 2.7
  10. Zek’s presentation in the Autumn folder: ‘Why draw’ is a really good discussion starting point.
  11. Zek’s presentation in the Autumn folder: ‘Why draw’ is a really good discussion starting point.