

Recomendados
Mais conteúdo relacionado
Mais procurados
Mais procurados (20)
Destaque
Destaque (15)
Semelhante a Dental implants
Semelhante a Dental implants (20)
Último
Último (20)
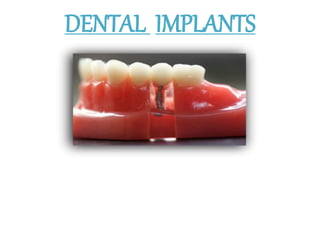
Dental implants
- 2. CONTENTS Introduction Terminology The science of Osseointegration Rationale for dental implants Merits over Fixed partial dentures Merits over removable prosthesis Uses Classification Clinical implant component Indications Contraindications Pre operative considerations Surgical procedure Various implant system
- 3. terminology DENTAL IMPLANT – A dental implant is a prosthetic device made of alloplastic material(s) implanted into the oral tissue beneath the mucosal or/and periosteal layer, and on/or within the bone to provide retention and support for a fixed or removable dental prosthesis.
- 4. OSSEOINTEGRATION – An apparent direct attachment or connection of osseous tissue to an inert, alloplastic material without intervening connective tissue. OSTEOCONDUCTION – The graft material act as a passive matrix like a trellis or scaffolding for new bone to cover
- 5. DENTAL IMPLANT SYSTEM:- dental implant components that are designed to mate together. • It consists of necessary parts and instrument to complete the implant placement and abutment components
- 6. The science of osseointegration In 1952 Dr. Per-Ingvar Branemark did extensive experimental studies on the microscopic circulation of bone marrow healing in rabbit. He found that hollow titanium screw was irretrievable and he termed it as “OSSEOINTEGRATED”. OSSEOINTEGRATION (earlier called as bone fusing/ankylosis) was defined by BRANEMARK as a direct contact of living bone with the surface of implant at the light microscopic level of magnification.
- 7. Rationale for dental implants • Aging population living longer. • Consequences of fixed prosthesis failures. • Anatomical consequences of edentulism. • Poor performance of removable prostheses. • Psychological aspects of tooth loss. • Predictable long term results of implant-supported prostheses. • Increased public awareness.
- 8. MERITS over fixed partial DENTURE Reasons for the failure of FPD Fracture of the endodontically treated abutment tooth. Periodontal health of abutment tooth is compromised leading to additional tooth loss. Caries & Endodontic failure. Bone loss. Single tooth implant advantages High success rates above 97% for 10 yrs. Decreased risk of caries & endodontic problems of adjacent teeth. Improved esthetics of adjacent teeth. Improved maintenance of bone in edentulous site.
- 9. Merits over removable prosthesis Removable dentures Accelerates bone loss. Poorly fitting prosthesis greater bone loss. Requires relining every 5 years. No proprioception. Abutment loss. Poor masticatory performance. Bulkier prosthesis. Implant supported dentures Less bone loss. Regain proprioception. No Abutment loss. Improves masticatory performance. Reduce the size of prosthesis. Improves retention & stability.
- 10. Uses of implants • Individual tooth replacement. • As abutment(s) for FPD with or without splinting to natural teeth abutments. • To construct either fixed(fully bone anchored) complete dentures or removable complete dentures. • Single complete denture. • As Anchor in orthodontics. • To retain maxillofacial prostheses.
- 11. indications • Poor retention of dentures due to anatomical factors. • Poor oral muscular coordination. • Low tolerance of mucosal tissues. • Para functional habits leading to constant soreness and instability. • Active or hyperactive gag reflex. • Psychological inability to wear conventional removable denture. • Unfavorable number and location of natural tooth abutments. • Single tooth loss ( to avoid preparation of sound teeth while constructing a fixed partial denture. • Long span fixed partial denture.
- 12. contraindications Absolute Drug abuse Pregnancy Bleeding disorder Psychiatric disorder Sever alcoholism Relative Cancer Controlled Hypertension Controlled diabetes Periodontal disease Smoking habits
- 13. classification • Depending on Anatomical site : 1. Subperiosteal 2. Transosteal 3.Endosteal- an endosteal implant is an alloplastic material surgically inserted into residual bony ridge primarily as a prosthodontic foundation. a. Plate/blade form b. Root form c. Pin form • Depending on the reactivity with bone : 1. Bioactive 2. Bioinert
- 17. • Depending on the implant abutment interface : 1. External hex implant – implant is connected to the abutment by coupling which is external about 2mm superior to the coronal surface of the implant. 2. Internal hex implant – the abutment is internal to the coronal surface of the implant body.
- 18. • Depending on the design : 1. Cylindrical shaped/ Press fit type- uses the friction between the implant surface and the bone. 2. Screw shaped/Threaded form- uses thread to establish primary stabilization of the implant allowing the process of osseo intergration to occur without mobilization. 3. Tappered screw shaped.
- 20. CLINICAL implant component • Implant body • Sealing screw / Cover Screw- this is placed in the implant during the healing phase following stage 1 surgery. It prevents the in growth of soft tissue within the implant body.
- 21. • Healing Screw- it is dome shaped screw that is placed after the stage 2 surgery done before prosthetic placement. It allows for the adaptation of the surrounding mucosa around the implant. • Abutment- it is that component of the implant system that screws directly into the implants and serves to support &/or retain any fixed or removable dental prosthesis.
- 22. • Impression Post- facilitates the transfer of intra oral location of the fixture or the abutment to a similar position in the lab cast. • Laboratory Analogue- it is the component machined to exactly represent either the implant or the abutment in lab cast.(Not intended for human implantation) • Presurgical Implant Guide- Guides for proper angulation and placement of implant.
- 23. PRE OPERATIVE CONSIDERATIONS • Patient’s selection • Treatment planning for success- a well prepared treatment plan is critical for the success of the implant. • General examination:- general health of the patient. Patient psychology and motivation. patients age. Etiology of edentulism.
- 24. • Extra Oral Examination – Smile line should be considered at the first appointment. • Intra Oral Examinations- 1. Jaw opening 2. Oral hygiene 3. Inter-arch relation 4. Presence of any pathology
- 25. • Radiographic Examination- Pre prosthetic imaging objectives 1. To identify disease 2. Determine bone quality 3. Determine bone quantity 4. Determine implant position 5. Determine implant orientation
- 26. Imaging modalities 1.Periapical radiography 2. panoramic radiography 3. Cephalometric radiography 4. Computed tomography (denta scan imaging) 5. CBCT 6. Interactive CT scan
- 29. Density of the available bone (MISCH in 1988) D1- Dense cortical bone (anterior mandible). D2- Thick dense to porous cortical bone on the crest and coarse trabecular bone within (anterior maxilla) D3- Thin porous cortical bone on the crest and fine trabecular bone within (anterior maxilla & posterior mandible) D4- Fine trabecular bone (posterior maxilla) *Bone density assist by radiographic technique by CT scan and also by tactile sensation by drilling through bone.
- 31. ANATOMICAL LIMITATION OF IMPLANT PLACEMENT Structure • Buccal plate • Lingual plate • Maxillary sinus • Inter implant distance • Inferior alveolar canal • Inter arch distance Minimum distance between implant and indicated structure • 1mm • 1mm • 1mm • 3mm between outer edge of the implants • 2mm from the superior aspect of the canal • 7mm
- 33. STEPS IN IMPLANT PLACEMENT • Step 1- Create a full thickness crestal incision & select the final implant location with a pre surgical prosthetic guide so the site can be marked with a round bur (1800-2000 rpm). • Step 2-Use the pilot drill to appropriate depth(700-1000 rpm)with copious irrigation. • Step 3-A parallel pin is used to determine the appropriate alignment with adjacent teeth opposing occlusion or other implant. A radiographic image is recommended.
- 34. • Step 4-When the final depth is reached with a pilot drill the site is expanded with appropriately sized implant bur at drill speed of 1000 rpm with irrigation. • Step 5-Irrigation is done to remove bone chip or residue. The site is checked with appropriate trial fit guage shoulder of the cone shaped position of the guage should be flushed or just below the crestal bone. • Step 6-Impalnt is aseptically delivered directly to the site using the delivery tooth. Implant is pressed into the prepared site with manual pressure & delivery tooth disconnected using gentle rocking motion. Wrench torque (10-45N- cm).
- 35. • Step 7- Cover screw is placed over the implant to prevent gingival growth into the implant. • Step 8-Flap margins are repositioned & sutured.
- 37. Branemark’s Protocol • Conventional loading:- 1st stage surgery patient is made to wait for 6 months for osseointegration. • Healing period:- 12-16 weeks. • Impression for loading:- 7-17 days are required for the formation of gingival cuff around the future abutment.
- 38. Immediate Implant Placement • Occurs at the time of extraction. ADVATAGES:- Reduction in healing time. Healing occurs similar as in case of extraction which enhance bone to implant contact. DISADVANTAGE:- Need for subsequent mucogingival surgery to correct tissues moved by repositioned flap. Used of bone graft material to fill the socket. Increase chance of infection and implant rejection.
- 39. Implant placed Primary stability achieved Corresponding restoration has full centric occlusion in max. intercuspation & placed with 48 hrs post surgery > immediate occlusal loading Corresponding restoration not in functional occlusion > immediate non occlusion loading Adequate primary stability achieved Corresponding restoration placed under occlusal load & prosthetic functions within 2 months > early loading.
- 40. Delayed Implant Placement • Is performed 2 months after extraction. ADVANTAGES:- Share same as immediate implant placement Allow soft tissue healing. More ossteogenesis adjacent to implant. No mucogingival flap advancement to correct mucogingival discrepancies. LIMITATIONS:- Lack of primary stability and limitation of bone support.
- 41. POST OPERATIVE FOLLOWUP Implant loading(minimum integration time) Region of implant placement • Anterior mandible • Posterior mandible • Anterior maxilla • Posterior maxilla • Implant into bone graft Minimum integration time • 3 months • 4months • 6 months • 6 months • 6-9 months
- 42. SECOND STAGE SURGERY: • Implant cover screw is exposed by the use of tissue punch by conservative incision & then removed. • Healing abutment is placed with a finger pressure on each implant & gingival surgery.
- 43. Implant success criteria • Immobile when tested clinically. • No evidence of peri-implantitis. • Mean vertical bone loss is < than 0.02mm annually after the 1st year. • No persistent pain, discomfort or infection is attributable to implant.
- 44. Various implant systems • Differ mainly in biomaterial, design and surgical procedure. • NOBLE BIOCARE ITI STRAUMANN INTEGRAL FRIDENT BIOMET ZIMMER ASTRA BIO HORIZON LIFE CORE BIOTEK ADIN Implant ENDOPORE Implant system
- 45. THANK YOU