SlideShare uma empresa Scribd logo
1 de 38
Baixar para ler offline
i
                                    TRAINING & REFERENCE


murach’s
Java
servlets and
  JSP
(Chapter 5)
                                                                 2ND EDITION

    Once you have your system set up with Java, Tomcat, and NetBeans, this chapter from
    Murach’s Java Servlets and JSP (2nd Edition) shows you how to develop JavaServerPages
    (JSPs). Then, chapter 6 shows you how to develop servlets. At that point, you’re ready for
    chapter 7, which shows you how to use the MVC pattern to structure a web application to take
    advantage of the best features of both servlets and JSPs.

    To see the expanded table of contents for this book, please go to the Murach web site. From
    there, you can read more about this book, you can find out about any additional downloads that
    are available, and you can review other Murach books for professional developers.


                                                    MIKE MURACH & ASSOCIATES, INC.
                                                    1-800-221-5528 • (559) 440-9071 • Fax: (559) 440-0963
                                                    murachbooks@murach.com • www.murach.com
                                                    Copyright © 2008 Mike Murach & Associates. All rights reserved.
i


Contents
Introduction                                                             xvii
Section 1 Introduction to servlet and JSP programming
  Chapter 1 An introduction to web programming with Java                   3
  Chapter 2 How to install and use Tomcat                                 29
  Chapter 3 How to use the NetBeans IDE                                   61
Section 2 Essential servlet and JSP skills
  Chapter 4    A crash course in HTML                                    105
  Chapter 5    How to develop JavaServer Pages                           137
  Chapter 6    How to develop servlets                                   173
  Chapter 7    How to structure a web application with the MVC pattern   201
  Chapter 8    How to work with sessions and cookies                     243
  Chapter 9    How to use standard JSP tags with JavaBeans               287
 Chapter 10    How to use the JSP Expression Language (EL)               311
 Chapter 11    How to use the JSP Standard Tag Library (JSTL)            337
 Chapter 12    How to use custom JSP tags                                375
Section 3 Essential database skills
 Chapter 13 How to use MySQL as the database management system           415
 Chapter 14 How to use JDBC to work with a database                      441
Section 4 Advanced servlet and JSP skills
 Chapter 15    How to use JavaMail to send email                         487
 Chapter 16    How to use SSL to work with a secure connection           513
 Chapter 17    How to restrict access to a web resource                  531
 Chapter 18    How to work with HTTP requests and responses              555
 Chapter 19    How to work with listeners                                583
 Chapter 20    How to work with filters                                  599
Section 5 The Music Store web site
 Chapter 21    An introduction to the Music Store web site               623
 Chapter 22    The Download application                                  649
 Chapter 23    The Cart application                                      661
 Chapter 24    The Admin application                                     683
Resources
Appendix A How to set up your computer for this book                     703
     Index                                                               719
Chapter 5            How to develop JavaServer Pages                         137


    5
How to develop
JavaServer Pages
In this chapter, you’ll learn how to develop a web application that consists of
HTML pages and JavaServer Pages (JSPs). As you will see, JSPs work fine as
long as the amount of processing that’s required for each page is limited. When
you complete this chapter, you should be able to use JSPs to develop simple
web applications of your own.

                The Email List application ................................................. 138
                The user interface for the application ......................................................... 138
                The code for the HTML page that calls the JSP ......................................... 140
                The code for the JSP ................................................................................... 142
                How to code a JSP ............................................................. 144
                How to code scriptlets and expressions ...................................................... 144
                How to use the methods of the request object ............................................ 146
                How to get the real path for a file ............................................................... 148
                How to request a JSP ......................................................... 150
                How to request a JSP with the HTTP Get method ..................................... 150
                How to request a JSP with the HTTP Post method .................................... 152
                When to use the HTTP Get and Post methods ........................................... 152
                How to use regular Java classes with JSPs .................... 154
                The code for the User and UserIO classes ................................................. 154
                A JSP that uses the User and UserIO classes ............................................. 158
                How to use three more types of JSP tags ........................ 160
                How to import classes ................................................................................ 160
                How to code comments in a JSP ................................................................ 162
                How to declare instance variables and methods ......................................... 164
                How to work with JSP errors ............................................. 166
                How to fix common JSP errors ................................................................... 166
                When and how to view the servlet that’s generated for a JSP .................... 168
                Perspective .......................................................................... 170
138   Section 2   Essential servlet and JSP skills


      The Email List application
                This topic introduces you to a simple web application that consists of one
             HTML page and one JavaServer Page (JSP). Once you get the general idea of
             how this application works, you’ll be ready to learn the specific skills that you
             need for developing JSPs.

      The user interface for the application
                  Figure 5-1 shows the two pages that make up the user interface for the
             Email List application. The first page is an HTML page that asks the user to
             enter a first name, last name, and email address. Then, when the user clicks on
             the Submit button, the HTML page calls the JSP and passes the three user
             entries to that page.
                  When the JSP receives the three entries, it can process them by checking
             them for validity, writing them to a file or database, and so on. In this simple
             application, though, the JSP just passes the three entries back to the browser so
             it can display the second page of this application. From this page, the user can
             return to the first page by clicking the Back button in the web browser or by
             clicking the Return button that’s displayed on this page.
                  As simple as this application is, you’re going to learn a lot from it. In this
             chapter, you’ll learn how enhance this application so it uses regular Java classes
             to save the user entries in a text file. Then, in later chapters, you’ll learn how to
             modify this application to illustrate other essential skills that apply to servlet
             and JSP programming.
Chapter 5   How to develop JavaServer Pages   139

The HTML page


The JSP


Figure 5-1   The user interface for the application
140   Section 2   Essential servlet and JSP skills


      The code for the HTML page that calls the JSP
                  Figure 5-2 presents the code for the HTML page that calls the JSP. If you’ve
             read chapter 4, you shouldn’t have any trouble following it. Here, the Action
             attribute of the Form tag calls a JSP named display_email_entry.jsp that’s stored
             in the same directory as the HTML page, and the Method attribute specifies that
             the HTTP Get method should be used with this action. Then, when the user
             clicks on the Submit button, the browser will send a request for the JSP.
                  You should also notice the Name attributes of the three text boxes that are
             used in the table within this HTML page. These are the names of the param-
             eters that are passed to the JSP when the user clicks on the Submit button. This
             figure shows that the parameter names are firstName, lastName, and
             emailAddress. In figure 5-1, the values for those parameters are John, Smith,
             and jsmith@gmail.com.
Chapter 5    How to develop JavaServer Pages   141

The code for the HTML page
<!DOCTYPE HTML PUBLIC "-//W3C//DTD HTML 4.01 Transitional//EN">

<html>

<head>
    <title>Murach's Java Servlets and JSP</title>
</head>

<body>
    <h1>Join our email list</h1>
    <p>To join our email list, enter your name and
     email address below. <br>
     Then, click on the Submit button.</p>

    <form action="display_email_entry.jsp" method="get">
    <table cellspacing="5" border="0">
        <tr>
             <td align="right">First name:</td>
             <td><input type="text" name="firstName"></td>
        </tr>
        <tr>
             <td align="right">Last name:</td>
             <td><input type="text" name="lastName"></td>
        </tr>
        <tr>
             <td align="right">Email address:</td>
             <td><input type="text" name="emailAddress"></td>
        </tr>
        <tr>
             <td></td>
             <td><br><input type="submit" value="Submit"></td>
        </tr>
    </table>
    </form>
</body>

</html>

Description
• The Action and Method attributes for the Form tag set up a request for a JSP that will be
  executed when the user clicks on the Submit button.
• The three text boxes represent parameters that will be passed to the JSP when the user
  clicks the Submit button.
• The parameter names are firstName, lastName, and emailAddress, and the parameter
  values are the strings that the user enters into the text boxes.


Figure 5-2     The code for the HTML page that calls the JSP
142   Section 2   Essential servlet and JSP skills


      The code for the JSP
                  Figure 5-3 presents the code for the JSP. As you can see, most of this code
             is HTML. In addition, some Java code is embedded within the HTML code in
             the form of JSP scriptlets and expressions. Typically, a scriptlet is used to
             execute one or more Java statements while a JSP expression is used to display
             text. To identify scriptlets and expressions, you use special tags. To distinguish
             these tags from HTML tags, you can refer to them as JSP tags.
                  When you code a JSP, you can use the methods of the request object in your
             scriptlets or expressions. Since you don’t have to explicitly create this object
             when you code JSPs, this object is sometimes referred to as the implicit request
             object. The scriptlet in this figure contains three statements that use the
             getParameter method of the request object. Each of these statements returns the
             value of the parameter that is passed to the JSP from the HTML page. Here, the
             argument for each getParameter method is the name of the textbox on the
             HTML page.
                  Once the scriptlet is executed, the values for the three parameters are
             available as variables to the rest of the page. Then, the three expressions can
             display these variables. Since these expressions are coded within the HTML
             tags for a table, the browser will display these expressions within a table.
                  After the table, the JSP contains some HTML that defines a form. This form
             contains only one control, a submit button named Return. When it is clicked, it
             takes the user back to the first page of the application. If you have any trouble
             visualizing how this button or the rest of the page will look when displayed by a
             browser, please refer back to figure 5-1.
                  As you read this book, remember that it assumes that you already know the
             basics of Java programming. If you have any trouble understanding the Java
             code in this chapter, you may need a refresher course on Java coding. To
             quickly review the basics of Java coding, we recommend that you use Murach’s
             Java SE 6 because it contains all the Java skills that you’ll need for working
             with this book.
Chapter 5   How to develop JavaServer Pages     143

The code for the JSP
<!DOCTYPE HTML PUBLIC "-//W3C//DTD HTML 4.01 Transitional//EN"
   "http://www.w3.org/TR/html4/loose.dtd">

<html>
<head>
    <title>Murach's Java Servlets and JSP</title>
</head>
<body>
    <%
        // get parameters from the request
        String firstName = request.getParameter("firstName");
                                                                                      JSP scriptlet
        String lastName = request.getParameter("lastName");
        String emailAddress = request.getParameter("emailAddress");
    %>

    <h1>Thanks for joining our email list</h1>

    <p>Here is the information that you entered:</p>

    <table cellspacing="5" cellpadding="5" border="1">
        <tr>
             <td align="right">First name:</td>
             <td><%= firstName %></td>
        </tr>
        <tr>
             <td align="right">Last name:</td>
             <td><%= lastName %></td>                                        JSP expressions
        </tr>
        <tr>
             <td align="right">Email address:</td>
             <td><%= emailAddress %></td>
        </tr>
    </table>

    <p>To enter another email address, click on the Back <br>
    button in your browser or the Return button shown <br>
    below.</p>

    <form action="join_email_list.html" method="post">
        <input type="submit" value="Return">
    </form>

</body>
</html>

Description
• A JSP contains HTML tags and embedded Java code.
• To code a scriptlet that contains one or more Java statements, you use the <% and %>
  tags.
• To code an expression that can be converted to a string, you use the <%= and %> tags.
• To get the values of the parameters that are passed to the JSP, you can use the
  getParameter method of implicit request object named request.

Figure 5-3    The code for the JSP
144   Section 2   Essential servlet and JSP skills


      How to code a JSP
                 Now that you have a general idea of how JSPs are coded, you’re ready to
             learn some specific skills for coding a JSP. To start, you need to know more
             about coding scriptlets and expressions.

      How to code scriptlets and expressions
                  Figure 5-4 summarizes the information you need for coding scriptlets and
             expressions within a JSP. To code a scriptlet, for example, you code Java
             statements that end with semicolons within the JSP scriptlet tags. To code an
             expression, you code any Java expression that evaluates to a primitive data type
             such as an int value or an object such as a String object.
                  If an expression evaluates to a primitive type like an int value or a double
             value, the JSP will automatically convert the primitive type to a string that
             represents the value. If, on the other hand, the expression evaluates to an object,
             the JSP will call the object’s toString method to get a string that represents the
             object. As a result, if you code an expression that evaluates to an object, you
             need to make sure that the object has a toString method that returns a string that
             represents the object. Otherwise, the object will use the toString method of the
             Object class, which includes the class name and hash code for the object.
                  When you’re coding a scriptlet or an expression, you can use any of the
             methods of the implicit request object. In this figure, only the getParameter
             method is used, but you’ll learn about two more methods of the request object
             in the next figure.
                  In this figure, the first two examples show different ways that you can
             display the value of a parameter. The first example uses a scriptlet to return the
             value of the firstName parameter and store it in a String object. Then, this
             example uses an expression to display the value. In contrast, the second ex-
             ample uses an expression to display the value of the firstName parameter
             without creating the firstName object.
                  The last example in this figure shows how two scriptlets and an expression
             can be used to display an HTML line five times while a Java variable within the
             HTML line counts from 1 to 5. Here, the first JSP scriptlet contains the code
             that begins a while loop. Then, a line of HTML code uses a JSP expression to
             display the current value of the counter for the loop. And finally, the second
             scriptlet contains the code that ends the loop.
Chapter 5   How to develop JavaServer Pages   145

The syntax for a JSP scriptlet
   <% Java statements %>

The syntax for a JSP expression
   <%= any Java expression that can be converted to a string %>

The syntax for getting a parameter from the implicit request object
   request.getParameter(parameterName);

Examples that use scriptlets and expressions
   A scriptlet and expression that display the value of the firstName parameter
   <%
       String firstName = request.getParameter("firstName");
   %>
   The first name is <%= firstName %>.

   An expression that displays the value of the firstName parameter
   The first name is <%= request.getParameter("firstName") %>.

   Two scriptlets and an expression that display an HTML line 5 times
   <%
        int numOfTimes = 1;
        while (numOfTimes <= 5)
        {
   %>
        <h1>This line is shown <%= numOfTimes %> of 5 times in a JSP.</h1>
   <%
             numOfTimes++;
        }
   %>

Description
• Within a scriptlet, you can code one or more Java statements. You must end each Java
  statement with a semicolon.
• Within a JSP expression, you can code any Java expression that evaluates to a Java
  object or to a primitive type. Since an expression isn’t a statement, you don’t end it with
  a semicolon.


Figure 5-4     How to code scriptlets and expressions
146   Section 2   Essential servlet and JSP skills


      How to use the methods of the request object
                  In the last figure, you learned how to use the getParameter method to return
             the value that the user entered into a textbox. Now, figure 5-5 summarizes that
             method and illustrates it in a new context. This figure also summarizes and
             illustrates two more methods of the implicit request object.
                  In most cases, the getParameter method returns the value of the parameter.
             For a textbox, that’s usually the value entered by the user. But for a group of
             radio buttons or a combo box, that’s the value of the button or item selected by
             the user.
                  For checkboxes or independent radio buttons that have a Value attribute, the
             getParameter method returns that value if the checkbox or button is selected and
             a null value if it isn’t. For checkboxes or independent radio buttons that don’t
             have a Value attribute, though, the getParameter method returns an “on” value if
             the checkbox or button is selected and a null value if it isn’t. This is illustrated
             by the first example in this figure.
                  To retrieve multiple values for one parameter name, you can use the
             getParameterValues method as illustrated by the second example. This method
             is useful for controls like list boxes that allow multiple selections. After you use
             the getParameterValues method to return an array of String objects, you can use
             a loop to get the values from the array.
                  To get the names of all the parameters sent with a request, you can use the
             getParameterNames method to return an Enumeration object that contains the
             names. Then, you can search through the Enumeration object to get the param-
             eter names, and you can use the getParameter method to return the value for
             each parameter name. This is illustrated by the third example.
                  If you’re not familiar with the Enumeration class, you can learn more about
             it by looking it up in the documentation for the Java SE 6 API specification. For
             most purposes, though, you only need to know that an Enumeration object is a
             collection that can be searched element by element. To determine if more
             elements exist in the collection, you can use the hasMoreElements method,
             which returns a Boolean value. And to get the next element in the collection,
             you can use the nextElement method.
Chapter 5        How to develop JavaServer Pages          147

Three methods available from the request object
 Method                                     Description
 getParameter(String param)                 Returns the value of the specified parameter as a string if it
                                            exists or null if it doesn’t. Often, this is the value defined in
                                            the Value attribute of the control in the HTML page or JSP.
 getParameterValues(String param)           Returns an array of String objects containing all of the
                                            values that the given request parameter has or null if the
                                            parameter doesn’t have any values.
 getParameterNames()                        Returns an Enumeration object that contains the names of
                                            all the parameters contained in the request. If the request
                                            has no parameters, the method returns an empty Enumera-
                                            tion object.


A scriptlet that determines if a checkbox is checked
   <%
        // returns the value or "on" if checked, null otherwise.
        String rockCheckBox = request.getParameter("Rock");
        if (rockCheckBox != null)
        {
   %>
                You checked Rock music!
   <%
        }
   %>

A scriptlet that reads and displays multiple values from a list box
   <%
        // returns the values of the items selected in a list box.
        String[] selectedCountries = request.getParameterValues("country");
        for (int i = 0; i < selectedCountries.length; i++)
        {
   %>
                <%= selectedCountries[i] %> <br>
   <%
        }
   %>

A scriptlet that reads and displays all request parameters and values
   <%
        Enumeration parameterNames = request.getParameterNames();
        while (parameterNames.hasMoreElements())
        {
            String parameterName = (String) parameterNames.nextElement();
            String parameterValue = request.getParameter(parameterName);
   %>
                <%= parameterName %> has value <%= parameterValue %>. <br>
   <%
            }
   %>


Figure 5-5       How to use the methods of the request object
148   Section 2   Essential servlet and JSP skills


      How to get the real path for a file
                  When you work with JSPs and servlets, you typically use relative paths to
             refer to files that are available within the web application. Sometimes, though,
             you need to get the real path for one of these files.
                  To do that, you can use the technique shown in figure 5-6. First, you call the
             getServletContext method from the JSP or servlet to get a ServletContext
             object. Then, you call the getRealPath method of the ServletContext object to
             return the real path for the specified file. When you use the getRealPath method,
             a front slash navigates to the root directory for the current application, so
                  getRealPath("/EmailList.txt")
             specifies the EmailList.txt file in the current application’s root directory.
                 In this figure, the first example gets the real path for a file named
             EmailList.txt that’s stored in the WEB-INF subdirectory of the application.
             Here, the getRealPath method returns a string for an absolute path to this file. If,
             for example, this method is used in the ch05email application that’s in the
             NetBeans directory that’s used for our downloadable applications, the
             getRealPath method will return the path shown in this figure.
                 If you store a file in a directory that’s web accessible, such as the root
             directory for a web application, the file can be accessed by any user who enters
             the correct URL. Keep in mind, though, that the WEB-INF directory isn’t web-
             accessible. As a result, if you want to keep a file private, you can store it in the
             WEB-INF directory or one of its subdirectories. Or, you can restrict access to
             the file or directory as described in chapter 17.
Chapter 5       How to develop JavaServer Pages       149

A method of the GenericServlet class
 Method                            Description
 getServletContext()               Returns a ServletContext object that contains information about the
                                   application’s context.


A method of the ServletContext class for working with paths
 Method                            Description
 getRealPath(String path)          Returns a String object for the real path of the specified relative path.


Code that gets the real path for a file
   ServletContext sc = this.getServletContext();
   String path = sc.getRealPath("/WEB-INF/EmailList.txt");

The value for the real path variable if the application is ch05email
in the netbeans directory
   C:murachservlet_jspnetbeansbook_appsch05emailbuildweb
   WEB-INFEmailList.txt

Description
• All servlets and JSPs inherit the GenericServlet class. As a result, the getServletContext
  method is available to all servlets and JSPs.
• In addition to working with relative paths as described here, you can use the
  ServletContext object to read global initialization parameters, to work with global
  variables, and to write data to log files. You’ll learn more about these skills as you
  progress through this book.


Figure 5-6     How to get the real path for a file
150   Section 2   Essential servlet and JSP skills


      How to request a JSP
                 After you code a JSP, you need to be able to request it. That way, you can
             view it in a browser and test it to make sure it’s working properly.

      How to request a JSP with the HTTP Get method
                  Figure 5-7 shows several ways to request a JSP. The first example shows
             how to use a Form tag to request a JSP. When you use this technique, you code
             the Action attribute of the form to provide a path and filename that point to the
             JSP. In this figure, for example, the first Form tag requests a JSP that’s stored in
             the same directory as the calling form. However, if the JSP is stored in a differ-
             ent directory, you can specify a relative or absolute path for the Action attribute.
                  When you use a Form tag to request a JSP, you can use the Method attribute
             to specify the HTTP method that’s used for the request. By default, the Get
             method is used for a Form tag, but you can also explicitly specify the Get
             method. In the first set of examples in this figure, both of the Form tags use the
             Get method. In the next figure, you’ll learn when and how to use the Method
             attribute to specify the Post method.
                  When you use the Get method to request a JSP from another page, any
             parameters that are passed to the JSP will be displayed in the browser’s URL
             address. In the bitmap in this figure, for example, you can see the two param-
             eters that have been appended to the URL. In the next figure, you’ll learn that
             the Post method doesn’t display the parameters in the URL.
                  When you test a JSP, you will often want to pass parameters to it. To do
             that, you can append the parameters to the end of the URL as shown by the
             second set of examples in this figure. Here, the question mark after the jsp
             extension indicates that one or more parameters will follow. Then, you code the
             parameter name, the equals sign, and the parameter value for each parameter
             that is passed, and you separate multiple parameters with ampersands (&). If
             you omit a parameter that’s required by the JSP, the getParameter method will
             return a null value for that parameter.
                  The third example shows how you can use an A tag to call a JSP. When you
             use an A tag, it always uses the HTTP Get method, and you can append param-
             eters to the end of the URL. In this example, the A tag appends two parameters
             to the URL that requests the JSP.
                  Finally, you can request a JSP by entering its URL into a browser as shown
             by the last set of examples in this figure. Here, the first example shows the URL
             for the JSP when it’s mapped to the ch05email directory on a local web server
             using port 8080. Then, the second example shows the URL for the JSP if it was
             deployed in the email directory of the web server for www.murach.com.
Chapter 5   How to develop JavaServer Pages   151

A JSP that’s requested with the HTTP Get method


Two Form tags that use the Get method
   <form action="display_email_entry.jsp">
   <form action="display_email_entry.jsp" method="get">

How to append parameters to a request
   display_email_entry.jsp?firstName=John
   display_email_entry.jsp?firstName=John&lastName=Smith

An Anchor tag that requests a JSP with the Get method
   <a href="display_email_entry.jsp?firstName=John&lastName=Smith">
       Display Email Entry Test
   </a>

Two URLs that request a JSP with the Get method
   http://localhost:8080/ch05email/display_email_entry.jsp?firstName=John
   http://www.murach.com/email/display_email_entry.jsp?firstName=John

Description
• When you use the HTTP Get method to request a JSP from an HTML form, the param-
  eters are automatically appended to the URL.
• When you code or enter a URL that requests a JSP, you can add a parameter list to it
  starting with a question mark and with no intervening spaces. Then, each parameter
  consists of its name, an equals sign, and its value. To code multiple parameters, use
  ampersands (&) to separate the parameters.
• The A tag always uses the HTTP Get method.


Figure 5-7    How to request a JSP with the HTTP Get method
152   Section 2   Essential servlet and JSP skills


      How to request a JSP with the HTTP Post method
                 When you use a Form tag to request a JSP, there are times when you will
             want to use the HTTP Post method for the request. To do that, you use the
             Method attribute to specify the Post method as shown in figure 5-8. Then, the
             parameters that are passed to the JSP aren’t shown in the URL.

      When to use the HTTP Get and Post methods
                 So, when should you use the HTTP Get method and when should you use
             the Post method? In general, you should use the Get method when you want to
             get (read) data from the server. Similarly, you should use the Post method when
             you want to post (write) data to the server.
                 When you use the Get method, you need to make sure that the page can be
             executed multiple times without causing any problems. In this figure, for
             example, the JSP just displays the data to the user, so there’s no harm in execut-
             ing this page multiple times. If, for example, the user clicks the Refresh button,
             the browser requests the page again, and this doesn’t cause any problems.
                 However, if the JSP in this figure wrote the data to a database, you wouldn’t
             want the user to write the same data to the database twice. As a result, it would
             make more sense to use the Post method. Then, if the user clicks the Refresh
             button, the browser will display a dialog like the one shown in this figure that
             warns the user that the data will be submitted again. At that point, the user can
             click on the Cancel button to cancel the request.
                 There are also a few other reasons to use the Post method. First, since the
             Post method doesn’t append parameters to the end of the URL, it is more
             appropriate for working with sensitive data. Second, since the Post method
             prevents the web browser from including parameters in a bookmark for a page,
             you’ll want to use it if you don’t want the parameters to be included in the
             bookmark. Third, if your parameters contain more than 4 KB of data, the Get
             method won’t work so you’ll need to use the Post method.
                 For all other uses, the Get method is preferred. It runs slightly faster than
             the Post method, and it lets the user bookmark the page along with the param-
             eters that were sent to the page.
Chapter 5   How to develop JavaServer Pages   153

A JSP that’s requested with the HTTP Post method


A Form tag that uses the Post method
    <form action="display_email_entry.jsp" method="post">

When to use the Get method
• When the request reads data from the server.
• When the request can be executed multiple times without causing any problems.

When to use the Post method
• When the request writes data to the server.
• When executing the request multiple times may cause problems.
• When you don’t want to include the parameters in the URL for security reasons.
• When you don’t want users to be able to include parameters when they bookmark a
  page.
• When you need to transfer more than 4 KB of data.

A typical browser dialog that’s displayed if the user tries to refresh a post


Figure 5-8    How to request a JSP with the HTTP Post method
154   Section 2   Essential servlet and JSP skills


      How to use regular Java classes with
      JSPs
                 In this topic, you’ll learn how to use regular Java classes to do the processing
             that a JSP requires. In particular, you’ll learn how to use two classes named User
             and UserIO to do the data processing for the JSP of the Email List application.

      The code for the User and UserIO classes
                  Figures 5-9 presents the code for a business class named User and figure 5-10
             presents the code for an I/O class named UserIO. The package statement at the
             start of each class indicates where each class is stored. Here, the User class is
             stored in the business directory because it defines a business object while the
             UserIO class is stored in the data directory because it provides the data access for
             the application.
                  The User class defines a user of the application. This class contains three
             instance variables: firstName, lastName, and emailAddress. It includes a con-
             structor that accepts three values for these instance variables. And it includes get
             and set methods for each instance variable.
Chapter 5   How to develop JavaServer Pages   155

The code for the User class
package business;

public class User
{
    private String firstName;
    private String lastName;
    private String emailAddress;

    public User()
    {
        firstName = "";
        lastName = "";
        emailAddress = "";
    }

    public User(String firstName, String lastName, String emailAddress)
    {
        this.firstName = firstName;
        this.lastName = lastName;
        this.emailAddress = emailAddress;
    }

    public void setFirstName(String firstName)
    {
        this.firstName = firstName;
    }

    public String getFirstName()
    {
        return firstName;
    }

    public void setLastName(String lastName)
    {
        this.lastName = lastName;
    }

    public String getLastName()
    {
        return lastName;
    }

    public void setEmailAddress(String emailAddress)
    {
        this.emailAddress = emailAddress;
    }

    public String getEmailAddress()
    {
        return emailAddress;
    }
}


Figure 5-9   The code for the User class
156   Section 2   Essential servlet and JSP skills


                  In contrast, the UserIO class contains one static method named add that
             writes the values stored in a User object to a text file. This method accepts two
             parameters: a User object and a string that provides the path for the file. If this
             file exists, the method will add the user data to the end of it. If the file doesn’t
             exist, the method will create it and add the data at the beginning of the file.
                  If you’ve read chapter 6 of Murach’s Java SE 6, you should understand the
             code for the User class. And if you’ve read chapter 19, you should understand
             the code in the UserIO class.
Chapter 5   How to develop JavaServer Pages   157

The code for the UserIO class
package data;

import java.io.*;
import business.User;

public class UserIO
{
    public static void add(User user, String filepath) throws IOException
    {
        File file = new File(filepath);
        PrintWriter out = new PrintWriter(
                new FileWriter(file, true));
        out.println(user.getEmailAddress()+ "|"
                + user.getFirstName() + "|"
                + user.getLastName());
        out.close();
    }
}


Figure 5-10   The code for the UserIO class
158   Section 2   Essential servlet and JSP skills


      A JSP that uses the User and UserIO classes
                  Figure 5-11 shows the code for the JSP in the Email List application after it
             has been enhanced so it uses the User and UserIO classes to process the param-
             eters that have been passed to it. In the first statement of the body, a special type
             of JSP tag is used to import the business and data packages that contain the User
             and UserIO classes. You’ll learn the details of coding this type of tag in the next
             figure.
                  In the scriptlet of the JSP, the getParameter method is used to get the values
             of the three parameters that are passed to it, and these values are stored in String
             objects. Then, the next two statements use the getRealPath method of the
             ServletContext object to get the real path for the EmailList.txt file that’s stored
             in the application’s WEB-INF directory. Since the WEB-INF directory isn’t
             web-accessible, the users of this application won’t be able to access this file.
                  The last two statements in this scriptlet create the User object from the three
             parameters and call the add method of the UserIO class to write this object to
             the EmailList.txt file. Note, here, that the real path of the EmailList.txt file is
             passed to the add method of the UserIO class, because that’s what this method
             requires.
                  After the scriptlet, the code in the JSP defines the layout of the page. Within
             the HTML table definitions, the JSP expressions use the get methods of the
             User object to display the first name, last name, and email address values.
             Although these JSP expressions could use the String objects instead, the code in
             this figure is intended to show how the get methods can be used. In addition,
             this makes sure that the data that’s displayed by the JSP is the same as the data
             that was written to the EmailList.txt file.
Chapter 5   How to develop JavaServer Pages   159

The code for a JSP that uses the User and UserIO classes
<!DOCTYPE HTML PUBLIC "-//W3C//DTD HTML 4.01 Transitional//EN"
   "http://www.w3.org/TR/html4/loose.dtd">

<html>
<head>
    <title>Murach's Java Servlets and JSP</title>
</head>
<body>
    <!-- import packages and classes needed by the scripts -->
    <%@ page import="business.*, data.*" %>

    <%
          // get   parameters from the request
          String   firstName = request.getParameter("firstName");
          String   lastName = request.getParameter("lastName");
          String   emailAddress = request.getParameter("emailAddress");

          // get the real path for the EmailList.txt file
          ServletContext sc = this.getServletContext();
          String path = sc.getRealPath("/WEB-INF/EmailList.txt");

          // use regular Java objects
          User user = new User(firstName, lastName, emailAddress);
          UserIO.add(user, path);
    %>

    <h1>Thanks for joining our email list</h1>

    <p>Here is the information that you entered:</p>

    <table cellspacing="5" cellpadding="5" border="1">
        <tr>
             <td align="right">First name:</td>
             <td><%= user.getFirstName() %></td>
        </tr>
        <tr>
             <td align="right">Last name:</td>
             <td><%= user.getLastName() %></td>
        </tr>
        <tr>
             <td align="right">Email address:</td>
             <td><%= user.getEmailAddress() %></td>
        </tr>
    </table>

    <p>To enter another email address, click on the Back <br>
    button in your browser or the Return button shown <br>
    below.</p>

    <form action="join_email_list.html" method="post">
        <input type="submit" value="Return">
    </form>

</body>
</html>


Figure 5-11   A JSP that uses the User and UserIO classes
160   Section 2   Essential servlet and JSP skills


      How to use three more types of JSP
      tags
                  So far, you’ve learned how to use the two most common types of JSP tags:
             the tags for scriptlets and expressions. Now, you’ll learn how to use three more
             types of JSP tags. All five types of JSP tags are summarized at the top of figure
             5-12.

      How to import classes
                  After the summary of JSP tags, figure 5-12 shows how to use a JSP direc-
             tive to import classes in a JSP. The type of directive that you use for doing that
             is called a page directive, and the shaded statement at the start of the JSP shows
             how to code one.
                  To code a page directive for importing classes, you code the starting tag and
             the word page followed by the Import attribute. Within the quotation marks
             after the equals sign for this attribute, you code the names of the Java classes
             that you want to import just as you do in a Java import statement. In the ex-
             ample in this figure, all the classes of the business and data packages are
             imported, plus the Date class in the java.util package.
                  Once the page directive imports the packages, the JSP can access the User
             and UserIO classes and the Date class without needing to fully qualify the
             name. The scriptlet that follows creates a User object from the User class and
             uses the add method of the UserIO class to write the data for the User object to
             a text file. The last line in this example uses the default constructor of the Date
             class as an expression in an HTML line. This works because the JSP will
             automatically call the toString method of the Date class to convert the Date
             object that’s created into a string.
Chapter 5         How to develop JavaServer Pages   161

The five types of JSP tags
 Tag            Name              Purpose
 <% %>          JSP scriptlet     To insert a block of Java statements.
 <%= %>         JSP expression    To display the string value of an expression.
 <%@ %>         JSP directive     To set conditions that apply to the entire JSP.
 <%-- --%>      JSP comment       To tell the JSP engine to ignore code.
 <%! %>         JSP declaration   To declare instance variables and methods for a JSP.


JSP code that imports Java classes
   <%@ page import="business.*, data.*, java.util.Date" %>
   <%
       // get parameters from the request
       String firstName = request.getParameter("firstName");
       String lastName = request.getParameter("lastName");
       String emailAddress = request.getParameter("emailAddress");

          // get a relative file name
          ServletContext sc = this.getServletContext();
          String path = sc.getRealPath("/WEB-INF/EmailList.txt");

          // use regular Java objects
          User user = new User(firstName, lastName, emailAddress);
          UserIO.add(user, path);
   %>

   <p>This email address was added to our list on <%= new Date() %></p>

Description
• To define the conditions that the JSP engine should follow when converting a JSP into a
  servlet, you can use a JSP directive.
• To import classes in a JSP, you use the import attribute of the page directive. This makes
  the imported classes available to the entire page.
• You can also use the page directive to define other conditions like error handling and
  content type conditions. You’ll learn more about this directive throughout this book.


Figure 5-12    How to import classes
162   Section 2   Essential servlet and JSP skills


      How to code comments in a JSP
                  Figure 5-13 shows how to code comments in a JSP. To start, the first ex-
             ample shows how you can use HTML comments within a JSP page. In this
             example, an HTML comment has been used to comment out a line that includes
             a JSP expression that displays a date.
                  Then, the second example shows how to use a JSP comment in a JSP page.
             In this example, a JSP comment has been used to comment out a line that
             includes a JSP expression that displays a date.
                  When you code HTML and JSP comments, you need to understand how
             they work to be able to use them properly. In particular, any Java code within an
             HTML comment is compiled and executed, but the browser doesn’t display it.
             For instance, the first example creates a new Date object even though it doesn’t
             display the date in the browser. In fact, the value for the date object is returned
             to the browser as an HTML comment. To check this, you can view the HTML
             for the page that’s returned to the browser by selecting the Source or Page
             Source command from your browser’s View menu.
                  In contrast, any Java code within a JSP comment isn’t compiled or executed
             or returned to the browser in any way. For instance, the second example doesn’t
             create a Date object and it doesn’t return it to the browser as a comment. As a
             result, if you want to comment out code that contains HTML and JSP tags, you
             typically use a JSP comment. This is critical if the code you’re commenting out
             performs tasks that you no longer want to perform. If, for example, the code
             updates a variable that you no longer want to update, you need to make sure to
             use a JSP comment.
                  Finally, the third example shows how you can code Java comments within a
             scriptlet. Here, a single-line comment is coded before the three statements that
             get the request parameters. Then, a multi-line comment is used to comment out
             the two statements that create the User object and write it to a text file. Since
             these types of comments work the same as they do with normal Java code, you
             shouldn’t have any trouble using them.
Chapter 5   How to develop JavaServer Pages   163

An HTML comment in a JSP
   <!--
   <p>This email address was added to our list on <%= new Date() %></p>
   -->

A JSP comment
   <%--
   <p>This email address was added to our list on <%= new Date() %></p>
   --%>

Java comments in a JSP scriptlet
   <%
        // get   parameters from the request
        String   firstName = request.getParameter("firstName");
        String   lastName = request.getParameter("lastName");
        String   emailAddress = request.getParameter("emailAddress");

        /*
        User user = new User(firstName, lastName, emailAddress);
        UserIO.add(user, path);
        */
   %>

Description
• When you code HTML comments, the comments are compiled and executed, but the
  browser doesn’t display them.
• When you code JSP comments, the comments aren’t compiled or executed.
• When you code Java comments within a scriptlet, the comments aren’t compiled or
  executed.


Figure 5-13   How to code comments in a JSP
164   Section 2   Essential servlet and JSP skills


      How to declare instance variables and methods
                  When a JSP is requested for the first time, one instance of the JSP is created
             and loaded into memory, and a thread is started that executes the Java code in
             the JSP. For each subsequent request for the JSP, another thread is started that
             can access the one instance of the JSP. When you code variables in scriptlets,
             they are known as local variables, and each thread gets its own copy of each
             local variable, which is usually what you want.
                  However, you can also declare instance variables that can be shared be-
             tween all of the threads that are accessing a JSP. To do that, you can code JSP
             declarations as shown in figure 5-14. Then, any instance variables are initialized
             when the JSP is first requested. After that, each thread can access these instance
             variables. This is illustrated by the globalCount variable that’s declared in this
             figure. This variable is incremented by one each time the JSP is requested.
             Later, when the variable is displayed, it represents the total number of times that
             the page has been accessed.
                  Unfortunately, using an instance variable in a JSP can lead to inaccurate
             results and is generally considered a bad practice. The problem occurs because
             Java uses a series of operations to increment the globalCount variable. In
             particular, it reads the value of the variable, modifies the value, and writes a new
             value back to the variable. Since multiple threads all have access to this vari-
             able, two threads may try to read the variable at the same time, which can result
             in a lost update. In other words, an instance variable in a JSP is not thread-safe.
                  In some cases, it’s okay to include instance variables that are not thread-
             safe. In this figure, for example, it might be acceptable to lose an update to the
             globalCount variable every now and then. However, in other cases, you need to
             make sure that your JSP is thread-safe. If, for example, you were using an
             instance variable to generate a unique identifier for an object, you would need to
             make sure that all access to the instance variable was thread-safe.
                  Although there are several techniques for making instance variables thread-
             safe, none of these techniques are easy to implement. As a result, when you
             need to make sure all of your operations are thread-safe, you should use local
             variables instead of instance variables whenever that’s possible. If that isn’t
             possible, you can use one of the thread-safe techniques for working with global
             variables that are described in chapter 8.
                  Besides declaring instance variables in a JSP, you can declare methods. In
             this figure, for example, the code for the JSP declares and calls an add method
             that writes a User object to a file. Here again, though, this is generally consid-
             ered a bad practice.
                  So, instead of declaring methods in a JSP, you should consider restructuring
             your application. In some cases, you may want to use regular Java classes like
             the UserIO class. In other cases, you may want to use a servlet as described in
             the next chapter. But most of the time, the best alternative is to use a combina-
             tion of servlets, JSPs, and regular Java classes as described in chapter 7.
Chapter 5    How to develop JavaServer Pages   165

JSP code that declares an instance variable and a method
   <%-- import any packages needed by the page --%>
   <%@ page import="business.*, data.*, java.util.Date, java.io.*" %>

   <%!
         // declare an instance variable for the page
         int globalCount = 0; // this is not thread-safe
   %>
   <%!
         // declare a method for the page
         public void add(User user, String filename)
                 throws IOException
         {
             PrintWriter out = new PrintWriter(
                     new FileWriter(filename, true));
             out.println(user.getEmailAddress()+ "|"
                     + user.getFirstName() + "|"
                     + user.getLastName());
             out.close();
         }
   %>
   <%
         String firstName = request.getParameter("firstName");
         String lastName = request.getParameter("lastName");
         String emailAddress = request.getParameter("emailAddress");

         ServletContext sc = getServletContext();
         String path = sc.getRealPath("/WEB-INF/EmailList.txt");

         User user = new User(firstName, lastName, emailAddress);

         // use the declared method
         this.add(user, path);

         // update the instance variable
         globalCount++; // this is not thread-safe
   %>
   .
   .
   .
   <p>
       This email address was added to our list on <%= new Date() %><br>
       This page has been accessed <%= globalCount %> times.
   </p>

Description
• You can use JSP declarations to declare instance variables and methods.
• Since instance variables aren’t thread-safe, two threads may conflict when they try to
  read, modify, and update the same instance variable at the same time.
• In general, you should avoid coding instance variables for JSPs and servlets. Instead, you
  should use other thread-safe techniques for working with global variables (see chapter 8).
• In general, you should avoid coding methods within JSPs. Instead, you should use some
  combination of JSPs, servlets, and regular Java classes (see chapter 7).

Figure 5-14    How to declare instance variables and methods
166   Section 2   Essential servlet and JSP skills


      How to work with JSP errors
                 As you develop JSPs, you will encounter errors. That’s why the last two
             figures in this chapter show you how to work with JSP errors.

      How to fix common JSP errors
                  Figure 5-15 presents the two most common errors that you will encounter
             when working with JSPs. HTTP Status 404 means that Tomcat received the
             HTTP request but couldn’t find the requested resource. You’ve already seen this
             in chapter 2. To fix this type of problem, make sure that the web server is
             running, that you have entered the correct path and filename for the request, and
             that the requested file is in the correct location.
                  In contrast, HTTP Status 500 means that the server received the request and
             found the resource but couldn’t fill the request. This usually means that the JSP
             engine wasn’t able to compile the JSP due to a coding error in the JSP. To fix
             this type of error, you can review the information provided by the error page. In
             this figure, for example, the message displayed by the error page shows that a
             semicolon is missing at the end of one of the statements in the JSP scriptlet.
                  To correct this type of error, you should fix the JSP so it will compile
             correctly. To do this, you can open the JSP, add the semicolon, save it, and
             request the page again. Then, the JSP engine will recognize that the JSP has
             been modified and it will automatically attempt to compile, load, and display
             the JSP.
Chapter 5   How to develop JavaServer Pages   167

An error page for a common JSP error


Common JSP errors
• HTTP Status 404 – File Not Found Error
• HTTP Status 500 – Internal Server Error

Tips for fixing JSP errors
• Make sure the Tomcat server is running.
• Make sure that the URL is valid and that it points to the right location for the requested
  page.
• Make sure all of the HTML, JSP, and Java class files are in the correct locations.
• Read the error page carefully to get all available information about the error.


Figure 5-15    How to fix common JSP errors
168   Section 2   Essential servlet and JSP skills


      When and how to view the servlet that’s
      generated for a JSP
                  From a practical point of view, you can almost always use the skills de-
             scribed in figure 5-15 to solve the errors that you encounter when working with
             JSPs. However, it’s sometimes helpful to understand what’s going on behind the
             scenes when you work with JSPs. In particular, you should understand the
             lifecycle of a JSP.
                  To start, when a user requests a JSP for the first time, the JSP engine
             generates a servlet for the JSP, compiles the JSP, and creates one instance of the
             servlet class. After that, a thread is created for each user, and each thread gets its
             own copy of the local variables of the servlet methods.
                  Although you may never need to view the code for the servlet that’s gener-
             ated for a JSP, you can view this code if you’re trying to debug a JSP or if
             you’re curious about how the JSP engine works. To view the generated servlet,
             you can look through the web server’s files until you find the appropriate
             directory. For example, the top of this figure shows the path to the directory that
             Tomcat uses to store the servlets that are generated for the ch05email applica-
             tion. As a result, to view the source code for any of the JSP pages of the
             ch05email application, you can navigate to this directory. Then, you can open
             the .java file that corresponds with the JSP that you want to view.
                  To give you an idea of what a generated servlet looks like, figure 5-16
             shows some key parts of the servlet that’s generated for the JSP in figure 5-11.
             As you read through this code, you may find it to be overwhelming at first.
             However, if you take a moment to compare the code for the JSP in figure 5-11
             with the partial servlet code shown in this figure, you should get a good idea of
             what’s going on. Also, after you read the next chapter, which shows you how to
             develop servlets, the code for this servlet should make even more sense. For
             now, you can just note how the JSP directive, scriptlet, and expression tags are
             translated into plain old Java code.
Chapter 5   How to develop JavaServer Pages   169

The JSP work directory for ch05email application
C:tomcatworkCatalinalocalhostch05emailorgapachejsp

Part of the servlet class that’s generated from the JSP in figure 5-11
package org.apache.jsp;

import    javax.servlet.*;
import    javax.servlet.http.*;
import    javax.servlet.jsp.*;
import    business.*;
import    data.*;
import    java.util.Date;

public final class display_005femail_005fentry_jsp extends
org.apache.jasper.runtime.HttpJspBase
implements org.apache.jasper.runtime.JspSourceDependent {
      ...
  public void _jspService(HttpServletRequest request,
  HttpServletResponse response)
  throws java.io.IOException, ServletException {
      ...
      response.setContentType("text/html");
      ...
      out.write("<html>n");
      out.write("<head>n");
      out.write("    <title>Murach's Java Servlets and JSP</title>n");
      out.write("</head>n");
      out.write("<body>n");
      ...
        // get parameters from the request
        String firstName = request.getParameter("firstName");
        String lastName = request.getParameter("lastName");
        String emailAddress = request.getParameter("emailAddress");

           // get the real path for the emaillist file
           ServletContext sc = this.getServletContext();
           String path = sc.getRealPath("/WEB-INF/EmailList.txt");

           // use regular Java objects
           User user = new User(firstName, lastName, emailAddress);
           UserIO.add(user, path);
         ...
         out.write("    <table cellspacing="5" cellpadding="5"
                        border="1">n");
         out.write("        <tr>n");
         out.write("             <td align="right">First name:</td>n");
         out.write("             <td>");
         out.print( user.getFirstName() );
         out.write("</td>n");
         out.write("        </tr>n");
         ...
         out.write("</body>n");
         out.write("</html>");
         ...
    }
}

Figure 5-16    When and how to view the servlet that’s generated for a JSP
170   Section 2   Essential servlet and JSP skills


      Perspective
               The goal of this chapter has been to provide you with the basic skills for
          coding a JSP. At this point, you should be able to code simple, but practical, JSPs
          of your own. In addition, you should understand how HTML pages communicate
          with JSPs, how JSPs communicate with regular Java classes, and how to fix some
          of the common JSP errors.
               In the next chapter, you’ll learn how to use the same types of skills with
          servlets. In fact, the next chapter uses the same application that’s presented in this
          chapter, but it uses a servlet instead of a JSP.

      Summary
      •   A JavaServer Page (JSP) consists of HTML code plus Java code that’s embedded
          in scriptlets and expressions. Within the scriptlets and expressions, you can use the
          methods of the implicit request object to get the parameters that are passed to the
          JSP.
      •   You can use the getRealPath method of the ServletContext object to get a relative
          path to refer to a file that’s used by your web application.
      •   When you use the HTTP Get method to pass parameters to a JSP, the parameters
          are displayed in the URL. When you use the HTTP Post method, they aren’t. If
          executing a request multiple times may cause problems, you should use the Post
          method.
      •   You can use regular Java classes from within scriptlets and expressions just as you
          use them from other Java classes.
      •   You use a JSP directive known as a page directive to import classes for use in a
          JSP.
      •   When you use JSP comments, the comments aren’t compiled or executed or
          returned to the browser. In contrast, HTML comments are compiled and executed
          and returned to the browser, but the browser doesn’t display them.
      •   You use JSP declarations to declare instance variables and methods for a JSP.
          However, instance variables are not thread-safe and may result in lost updates.
      •   When working with JSPs, an HTTP Status 500 error usually indicates that the JSP
          engine wasn’t able to compile the servlet class for the JSP.
      •   When a JSP is requested for the first time, the JSP engine generates a servlet class
          for the page, compiles it, and creates one instance of the servlet. For each subse-
          quent request, a new thread is created from this single instance of the servlet class.
          As a result, each thread gets its own copy of the local variables, but all threads
          share the same instance variables.
Chapter 5      How to develop JavaServer Pages   171


Exercise 5-1               Enhance the Email List
                           application
In this exercise, you’ll modify the HTML document for the Email List
application, and you’ll create a new JSP that responds to the HTML document.
Review and test the code for the email application
1.   Open the ch05email project in the ex_starts directory.
2.   Review the code for the HTML and JSP file for the application.
3.   Review the code for the User and UserIO classes that are in the business and
     data packages.
4.   Run the application, enter the name and email address for one user, and click on
     the Submit button. Then, note how the parameters are used in the URL for
     calling the JSP. Also, use the Back button and Refresh button to see how they
     work.
5.   Use the Windows Explorer or your IDE to find the text file that the users have
     been saved in (EmailList.txt), open the file, and review the data that has been
     stored in it.
6.   Change the method used for the form in the HTML file from get to post. Then,
     test the application again by entering another user. Note that the parameters
     aren’t shown in the URL, and note how the Refresh button works for the JSP.
7.   Create a JSP error by deleting the semicolon at the end of the first Java statement
     in the JSP. Then, run the application to see how Tomcat handles this error.
8.   Fix the error by restoring the semicolon in the JSP.
Enhance the application
9.   Modify the HTML document so it has this line of text after the Email Address
     text box: “I’m interested in these types of music.” Then, follow this text with a
     list box that has options for Rock, Country, Bluegrass, and Folk music. This list
     box should be followed by the Submit button, and the Submit button should
     submit the form to a new JSP named display_music_choices.jsp.
10. Create a new JSP named display_music_choices.jsp that responds to the
    changed HTML document. This JSP should start with an H1 line that reads like
    this:
     Thanks for joining our email list, John Smith.
     And this line should be followed by text that looks like this:
     We’ll use email to notify you whenever we have new releases for
     these types of music:

     Country
     Bluegrass
     In other words, you list the types of music that correspond to the items that are
     selected in the list box. And the entire web page consists of just the heading and
     text lines that I’ve just described.
172   Section 2   Essential servlet and JSP skills


              Please note that you don’t have to provide code that saves the data that the user
              enters to the EmailList.txt file because that would mean changes to both the
              User and UserIO classes.
         11. Change the method for the form in the HTML document back to the Get
             method so you can see the parameters in the URL. Then, test the HTML
             document and the new JSP by running the application. Note how the parameter
             list stores your music choices when you select more than one item from the list
             box. (To select more than one item, you can hold down the Ctrl or Shift key as
             you click on items.)
         12. Test the new JSP by entering a URL that includes a parameter list in the
             browser’s address box. To keep this simple, you only need to include
             parameters for first name and last name.
         13. When you’re through experimenting, close the project.

Mais conteúdo relacionado

Mais procurados

Mais procurados (7)

JAVA SERVER PAGES
JAVA SERVER PAGESJAVA SERVER PAGES
JAVA SERVER PAGES
 
Jsp chapter 1
Jsp chapter 1Jsp chapter 1
Jsp chapter 1
 
Java Server Pages
Java Server PagesJava Server Pages
Java Server Pages
 
Jsp elements
Jsp elementsJsp elements
Jsp elements
 
Servlet and jsp interview questions
Servlet and jsp interview questionsServlet and jsp interview questions
Servlet and jsp interview questions
 
JSP
JSPJSP
JSP
 
Jsp Introduction Tutorial
Jsp Introduction TutorialJsp Introduction Tutorial
Jsp Introduction Tutorial
 

Semelhante a Jsp2 ch5 (20)

Mvc15 (1)
Mvc15 (1)Mvc15 (1)
Mvc15 (1)
 
Introduction to the Servlet / JSP course
Introduction to the Servlet / JSP course Introduction to the Servlet / JSP course
Introduction to the Servlet / JSP course
 
WEB TECHNOLOGIES JSP
WEB TECHNOLOGIES  JSPWEB TECHNOLOGIES  JSP
WEB TECHNOLOGIES JSP
 
Jsp and Servlets
Jsp and ServletsJsp and Servlets
Jsp and Servlets
 
Servlets and jsp pages best practices
Servlets and jsp pages best practicesServlets and jsp pages best practices
Servlets and jsp pages best practices
 
Unit 4 web technology uptu
Unit 4 web technology uptuUnit 4 web technology uptu
Unit 4 web technology uptu
 
Unit 4 1 web technology uptu
Unit 4 1 web technology uptuUnit 4 1 web technology uptu
Unit 4 1 web technology uptu
 
Java JSP.pptx
Java JSP.pptxJava JSP.pptx
Java JSP.pptx
 
Jsp
JspJsp
Jsp
 
Jsp
JspJsp
Jsp
 
JSP overview
JSP overviewJSP overview
JSP overview
 
Jsp abes new
Jsp abes newJsp abes new
Jsp abes new
 
Online grocery store
Online grocery storeOnline grocery store
Online grocery store
 
Jsp tutorial
Jsp tutorialJsp tutorial
Jsp tutorial
 
Jsp tutorial (1)
Jsp tutorial (1)Jsp tutorial (1)
Jsp tutorial (1)
 
Java jsp tutorial
Java jsp tutorialJava jsp tutorial
Java jsp tutorial
 
servlet 2.5 & JSP 2.0
servlet 2.5 & JSP 2.0servlet 2.5 & JSP 2.0
servlet 2.5 & JSP 2.0
 
Jsp tutorial
Jsp tutorialJsp tutorial
Jsp tutorial
 
Servelts Jsp By Sai Butchi
Servelts Jsp By Sai ButchiServelts Jsp By Sai Butchi
Servelts Jsp By Sai Butchi
 
Web container and Apache Tomcat
Web container and Apache TomcatWeb container and Apache Tomcat
Web container and Apache Tomcat
 

Último

Tech-Forward - Achieving Business Readiness For Copilot in Microsoft 365
Tech-Forward - Achieving Business Readiness For Copilot in Microsoft 365Tech-Forward - Achieving Business Readiness For Copilot in Microsoft 365
Tech-Forward - Achieving Business Readiness For Copilot in Microsoft 3652toLead Limited
 
My Hashitalk Indonesia April 2024 Presentation
My Hashitalk Indonesia April 2024 PresentationMy Hashitalk Indonesia April 2024 Presentation
My Hashitalk Indonesia April 2024 PresentationRidwan Fadjar
 
Factors to Consider When Choosing Accounts Payable Services Providers.pptx
Factors to Consider When Choosing Accounts Payable Services Providers.pptxFactors to Consider When Choosing Accounts Payable Services Providers.pptx
Factors to Consider When Choosing Accounts Payable Services Providers.pptxKatpro Technologies
 
From Event to Action: Accelerate Your Decision Making with Real-Time Automation
From Event to Action: Accelerate Your Decision Making with Real-Time AutomationFrom Event to Action: Accelerate Your Decision Making with Real-Time Automation
From Event to Action: Accelerate Your Decision Making with Real-Time AutomationSafe Software
 
Transforming Data Streams with Kafka Connect: An Introduction to Single Messa...
Transforming Data Streams with Kafka Connect: An Introduction to Single Messa...Transforming Data Streams with Kafka Connect: An Introduction to Single Messa...
Transforming Data Streams with Kafka Connect: An Introduction to Single Messa...HostedbyConfluent
 
IAC 2024 - IA Fast Track to Search Focused AI Solutions
IAC 2024 - IA Fast Track to Search Focused AI SolutionsIAC 2024 - IA Fast Track to Search Focused AI Solutions
IAC 2024 - IA Fast Track to Search Focused AI SolutionsEnterprise Knowledge
 
Unblocking The Main Thread Solving ANRs and Frozen Frames
Unblocking The Main Thread Solving ANRs and Frozen FramesUnblocking The Main Thread Solving ANRs and Frozen Frames
Unblocking The Main Thread Solving ANRs and Frozen FramesSinan KOZAK
 
Beyond Boundaries: Leveraging No-Code Solutions for Industry Innovation
Beyond Boundaries: Leveraging No-Code Solutions for Industry InnovationBeyond Boundaries: Leveraging No-Code Solutions for Industry Innovation
Beyond Boundaries: Leveraging No-Code Solutions for Industry InnovationSafe Software
 
Install Stable Diffusion in windows machine
Install Stable Diffusion in windows machineInstall Stable Diffusion in windows machine
Install Stable Diffusion in windows machinePadma Pradeep
 
Slack Application Development 101 Slides
Slack Application Development 101 SlidesSlack Application Development 101 Slides
Slack Application Development 101 Slidespraypatel2
 
How to Remove Document Management Hurdles with X-Docs?
How to Remove Document Management Hurdles with X-Docs?How to Remove Document Management Hurdles with X-Docs?
How to Remove Document Management Hurdles with X-Docs?XfilesPro
 
Kotlin Multiplatform & Compose Multiplatform - Starter kit for pragmatics
Kotlin Multiplatform & Compose Multiplatform - Starter kit for pragmaticsKotlin Multiplatform & Compose Multiplatform - Starter kit for pragmatics
Kotlin Multiplatform & Compose Multiplatform - Starter kit for pragmaticscarlostorres15106
 
Neo4j - How KGs are shaping the future of Generative AI at AWS Summit London ...
Neo4j - How KGs are shaping the future of Generative AI at AWS Summit London ...Neo4j - How KGs are shaping the future of Generative AI at AWS Summit London ...
Neo4j - How KGs are shaping the future of Generative AI at AWS Summit London ...Neo4j
 
How to convert PDF to text with Nanonets
How to convert PDF to text with NanonetsHow to convert PDF to text with Nanonets
How to convert PDF to text with Nanonetsnaman860154
 
Key Features Of Token Development (1).pptx
Key  Features Of Token  Development (1).pptxKey  Features Of Token  Development (1).pptx
Key Features Of Token Development (1).pptxLBM Solutions
 
Azure Monitor & Application Insight to monitor Infrastructure & Application
Azure Monitor & Application Insight to monitor Infrastructure & ApplicationAzure Monitor & Application Insight to monitor Infrastructure & Application
Azure Monitor & Application Insight to monitor Infrastructure & ApplicationAndikSusilo4
 
04-2024-HHUG-Sales-and-Marketing-Alignment.pptx
04-2024-HHUG-Sales-and-Marketing-Alignment.pptx04-2024-HHUG-Sales-and-Marketing-Alignment.pptx
04-2024-HHUG-Sales-and-Marketing-Alignment.pptxHampshireHUG
 
Breaking the Kubernetes Kill Chain: Host Path Mount
Breaking the Kubernetes Kill Chain: Host Path MountBreaking the Kubernetes Kill Chain: Host Path Mount
Breaking the Kubernetes Kill Chain: Host Path MountPuma Security, LLC
 
08448380779 Call Girls In Diplomatic Enclave Women Seeking Men
08448380779 Call Girls In Diplomatic Enclave Women Seeking Men08448380779 Call Girls In Diplomatic Enclave Women Seeking Men
08448380779 Call Girls In Diplomatic Enclave Women Seeking MenDelhi Call girls
 
Enhancing Worker Digital Experience: A Hands-on Workshop for Partners
Enhancing Worker Digital Experience: A Hands-on Workshop for PartnersEnhancing Worker Digital Experience: A Hands-on Workshop for Partners
Enhancing Worker Digital Experience: A Hands-on Workshop for PartnersThousandEyes
 

Último (20)

Tech-Forward - Achieving Business Readiness For Copilot in Microsoft 365
Tech-Forward - Achieving Business Readiness For Copilot in Microsoft 365Tech-Forward - Achieving Business Readiness For Copilot in Microsoft 365
Tech-Forward - Achieving Business Readiness For Copilot in Microsoft 365
 
My Hashitalk Indonesia April 2024 Presentation
My Hashitalk Indonesia April 2024 PresentationMy Hashitalk Indonesia April 2024 Presentation
My Hashitalk Indonesia April 2024 Presentation
 
Factors to Consider When Choosing Accounts Payable Services Providers.pptx
Factors to Consider When Choosing Accounts Payable Services Providers.pptxFactors to Consider When Choosing Accounts Payable Services Providers.pptx
Factors to Consider When Choosing Accounts Payable Services Providers.pptx
 
From Event to Action: Accelerate Your Decision Making with Real-Time Automation
From Event to Action: Accelerate Your Decision Making with Real-Time AutomationFrom Event to Action: Accelerate Your Decision Making with Real-Time Automation
From Event to Action: Accelerate Your Decision Making with Real-Time Automation
 
Transforming Data Streams with Kafka Connect: An Introduction to Single Messa...
Transforming Data Streams with Kafka Connect: An Introduction to Single Messa...Transforming Data Streams with Kafka Connect: An Introduction to Single Messa...
Transforming Data Streams with Kafka Connect: An Introduction to Single Messa...
 
IAC 2024 - IA Fast Track to Search Focused AI Solutions
IAC 2024 - IA Fast Track to Search Focused AI SolutionsIAC 2024 - IA Fast Track to Search Focused AI Solutions
IAC 2024 - IA Fast Track to Search Focused AI Solutions
 
Unblocking The Main Thread Solving ANRs and Frozen Frames
Unblocking The Main Thread Solving ANRs and Frozen FramesUnblocking The Main Thread Solving ANRs and Frozen Frames
Unblocking The Main Thread Solving ANRs and Frozen Frames
 
Beyond Boundaries: Leveraging No-Code Solutions for Industry Innovation
Beyond Boundaries: Leveraging No-Code Solutions for Industry InnovationBeyond Boundaries: Leveraging No-Code Solutions for Industry Innovation
Beyond Boundaries: Leveraging No-Code Solutions for Industry Innovation
 
Install Stable Diffusion in windows machine
Install Stable Diffusion in windows machineInstall Stable Diffusion in windows machine
Install Stable Diffusion in windows machine
 
Slack Application Development 101 Slides
Slack Application Development 101 SlidesSlack Application Development 101 Slides
Slack Application Development 101 Slides
 
How to Remove Document Management Hurdles with X-Docs?
How to Remove Document Management Hurdles with X-Docs?How to Remove Document Management Hurdles with X-Docs?
How to Remove Document Management Hurdles with X-Docs?
 
Kotlin Multiplatform & Compose Multiplatform - Starter kit for pragmatics
Kotlin Multiplatform & Compose Multiplatform - Starter kit for pragmaticsKotlin Multiplatform & Compose Multiplatform - Starter kit for pragmatics
Kotlin Multiplatform & Compose Multiplatform - Starter kit for pragmatics
 
Neo4j - How KGs are shaping the future of Generative AI at AWS Summit London ...
Neo4j - How KGs are shaping the future of Generative AI at AWS Summit London ...Neo4j - How KGs are shaping the future of Generative AI at AWS Summit London ...
Neo4j - How KGs are shaping the future of Generative AI at AWS Summit London ...
 
How to convert PDF to text with Nanonets
How to convert PDF to text with NanonetsHow to convert PDF to text with Nanonets
How to convert PDF to text with Nanonets
 
Key Features Of Token Development (1).pptx
Key  Features Of Token  Development (1).pptxKey  Features Of Token  Development (1).pptx
Key Features Of Token Development (1).pptx
 
Azure Monitor & Application Insight to monitor Infrastructure & Application
Azure Monitor & Application Insight to monitor Infrastructure & ApplicationAzure Monitor & Application Insight to monitor Infrastructure & Application
Azure Monitor & Application Insight to monitor Infrastructure & Application
 
04-2024-HHUG-Sales-and-Marketing-Alignment.pptx
04-2024-HHUG-Sales-and-Marketing-Alignment.pptx04-2024-HHUG-Sales-and-Marketing-Alignment.pptx
04-2024-HHUG-Sales-and-Marketing-Alignment.pptx
 
Breaking the Kubernetes Kill Chain: Host Path Mount
Breaking the Kubernetes Kill Chain: Host Path MountBreaking the Kubernetes Kill Chain: Host Path Mount
Breaking the Kubernetes Kill Chain: Host Path Mount
 
08448380779 Call Girls In Diplomatic Enclave Women Seeking Men
08448380779 Call Girls In Diplomatic Enclave Women Seeking Men08448380779 Call Girls In Diplomatic Enclave Women Seeking Men
08448380779 Call Girls In Diplomatic Enclave Women Seeking Men
 
Enhancing Worker Digital Experience: A Hands-on Workshop for Partners
Enhancing Worker Digital Experience: A Hands-on Workshop for PartnersEnhancing Worker Digital Experience: A Hands-on Workshop for Partners
Enhancing Worker Digital Experience: A Hands-on Workshop for Partners
 

Jsp2 ch5

  • 1. i TRAINING & REFERENCE murach’s Java servlets and JSP (Chapter 5) 2ND EDITION Once you have your system set up with Java, Tomcat, and NetBeans, this chapter from Murach’s Java Servlets and JSP (2nd Edition) shows you how to develop JavaServerPages (JSPs). Then, chapter 6 shows you how to develop servlets. At that point, you’re ready for chapter 7, which shows you how to use the MVC pattern to structure a web application to take advantage of the best features of both servlets and JSPs. To see the expanded table of contents for this book, please go to the Murach web site. From there, you can read more about this book, you can find out about any additional downloads that are available, and you can review other Murach books for professional developers. MIKE MURACH & ASSOCIATES, INC. 1-800-221-5528 • (559) 440-9071 • Fax: (559) 440-0963 murachbooks@murach.com • www.murach.com Copyright © 2008 Mike Murach & Associates. All rights reserved.
  • 2. i Contents Introduction xvii Section 1 Introduction to servlet and JSP programming Chapter 1 An introduction to web programming with Java 3 Chapter 2 How to install and use Tomcat 29 Chapter 3 How to use the NetBeans IDE 61 Section 2 Essential servlet and JSP skills Chapter 4 A crash course in HTML 105 Chapter 5 How to develop JavaServer Pages 137 Chapter 6 How to develop servlets 173 Chapter 7 How to structure a web application with the MVC pattern 201 Chapter 8 How to work with sessions and cookies 243 Chapter 9 How to use standard JSP tags with JavaBeans 287 Chapter 10 How to use the JSP Expression Language (EL) 311 Chapter 11 How to use the JSP Standard Tag Library (JSTL) 337 Chapter 12 How to use custom JSP tags 375 Section 3 Essential database skills Chapter 13 How to use MySQL as the database management system 415 Chapter 14 How to use JDBC to work with a database 441 Section 4 Advanced servlet and JSP skills Chapter 15 How to use JavaMail to send email 487 Chapter 16 How to use SSL to work with a secure connection 513 Chapter 17 How to restrict access to a web resource 531 Chapter 18 How to work with HTTP requests and responses 555 Chapter 19 How to work with listeners 583 Chapter 20 How to work with filters 599 Section 5 The Music Store web site Chapter 21 An introduction to the Music Store web site 623 Chapter 22 The Download application 649 Chapter 23 The Cart application 661 Chapter 24 The Admin application 683 Resources Appendix A How to set up your computer for this book 703 Index 719
  • 3. Chapter 5 How to develop JavaServer Pages 137 5 How to develop JavaServer Pages In this chapter, you’ll learn how to develop a web application that consists of HTML pages and JavaServer Pages (JSPs). As you will see, JSPs work fine as long as the amount of processing that’s required for each page is limited. When you complete this chapter, you should be able to use JSPs to develop simple web applications of your own. The Email List application ................................................. 138 The user interface for the application ......................................................... 138 The code for the HTML page that calls the JSP ......................................... 140 The code for the JSP ................................................................................... 142 How to code a JSP ............................................................. 144 How to code scriptlets and expressions ...................................................... 144 How to use the methods of the request object ............................................ 146 How to get the real path for a file ............................................................... 148 How to request a JSP ......................................................... 150 How to request a JSP with the HTTP Get method ..................................... 150 How to request a JSP with the HTTP Post method .................................... 152 When to use the HTTP Get and Post methods ........................................... 152 How to use regular Java classes with JSPs .................... 154 The code for the User and UserIO classes ................................................. 154 A JSP that uses the User and UserIO classes ............................................. 158 How to use three more types of JSP tags ........................ 160 How to import classes ................................................................................ 160 How to code comments in a JSP ................................................................ 162 How to declare instance variables and methods ......................................... 164 How to work with JSP errors ............................................. 166 How to fix common JSP errors ................................................................... 166 When and how to view the servlet that’s generated for a JSP .................... 168 Perspective .......................................................................... 170
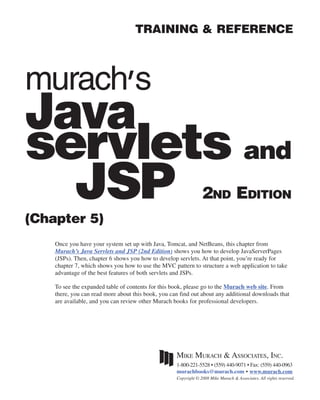
  • 4. 138 Section 2 Essential servlet and JSP skills The Email List application This topic introduces you to a simple web application that consists of one HTML page and one JavaServer Page (JSP). Once you get the general idea of how this application works, you’ll be ready to learn the specific skills that you need for developing JSPs. The user interface for the application Figure 5-1 shows the two pages that make up the user interface for the Email List application. The first page is an HTML page that asks the user to enter a first name, last name, and email address. Then, when the user clicks on the Submit button, the HTML page calls the JSP and passes the three user entries to that page. When the JSP receives the three entries, it can process them by checking them for validity, writing them to a file or database, and so on. In this simple application, though, the JSP just passes the three entries back to the browser so it can display the second page of this application. From this page, the user can return to the first page by clicking the Back button in the web browser or by clicking the Return button that’s displayed on this page. As simple as this application is, you’re going to learn a lot from it. In this chapter, you’ll learn how enhance this application so it uses regular Java classes to save the user entries in a text file. Then, in later chapters, you’ll learn how to modify this application to illustrate other essential skills that apply to servlet and JSP programming.
  • 5. Chapter 5 How to develop JavaServer Pages 139 The HTML page The JSP Figure 5-1 The user interface for the application
  • 6. 140 Section 2 Essential servlet and JSP skills The code for the HTML page that calls the JSP Figure 5-2 presents the code for the HTML page that calls the JSP. If you’ve read chapter 4, you shouldn’t have any trouble following it. Here, the Action attribute of the Form tag calls a JSP named display_email_entry.jsp that’s stored in the same directory as the HTML page, and the Method attribute specifies that the HTTP Get method should be used with this action. Then, when the user clicks on the Submit button, the browser will send a request for the JSP. You should also notice the Name attributes of the three text boxes that are used in the table within this HTML page. These are the names of the param- eters that are passed to the JSP when the user clicks on the Submit button. This figure shows that the parameter names are firstName, lastName, and emailAddress. In figure 5-1, the values for those parameters are John, Smith, and jsmith@gmail.com.
  • 7. Chapter 5 How to develop JavaServer Pages 141 The code for the HTML page <!DOCTYPE HTML PUBLIC "-//W3C//DTD HTML 4.01 Transitional//EN"> <html> <head> <title>Murach's Java Servlets and JSP</title> </head> <body> <h1>Join our email list</h1> <p>To join our email list, enter your name and email address below. <br> Then, click on the Submit button.</p> <form action="display_email_entry.jsp" method="get"> <table cellspacing="5" border="0"> <tr> <td align="right">First name:</td> <td><input type="text" name="firstName"></td> </tr> <tr> <td align="right">Last name:</td> <td><input type="text" name="lastName"></td> </tr> <tr> <td align="right">Email address:</td> <td><input type="text" name="emailAddress"></td> </tr> <tr> <td></td> <td><br><input type="submit" value="Submit"></td> </tr> </table> </form> </body> </html> Description • The Action and Method attributes for the Form tag set up a request for a JSP that will be executed when the user clicks on the Submit button. • The three text boxes represent parameters that will be passed to the JSP when the user clicks the Submit button. • The parameter names are firstName, lastName, and emailAddress, and the parameter values are the strings that the user enters into the text boxes. Figure 5-2 The code for the HTML page that calls the JSP
  • 8. 142 Section 2 Essential servlet and JSP skills The code for the JSP Figure 5-3 presents the code for the JSP. As you can see, most of this code is HTML. In addition, some Java code is embedded within the HTML code in the form of JSP scriptlets and expressions. Typically, a scriptlet is used to execute one or more Java statements while a JSP expression is used to display text. To identify scriptlets and expressions, you use special tags. To distinguish these tags from HTML tags, you can refer to them as JSP tags. When you code a JSP, you can use the methods of the request object in your scriptlets or expressions. Since you don’t have to explicitly create this object when you code JSPs, this object is sometimes referred to as the implicit request object. The scriptlet in this figure contains three statements that use the getParameter method of the request object. Each of these statements returns the value of the parameter that is passed to the JSP from the HTML page. Here, the argument for each getParameter method is the name of the textbox on the HTML page. Once the scriptlet is executed, the values for the three parameters are available as variables to the rest of the page. Then, the three expressions can display these variables. Since these expressions are coded within the HTML tags for a table, the browser will display these expressions within a table. After the table, the JSP contains some HTML that defines a form. This form contains only one control, a submit button named Return. When it is clicked, it takes the user back to the first page of the application. If you have any trouble visualizing how this button or the rest of the page will look when displayed by a browser, please refer back to figure 5-1. As you read this book, remember that it assumes that you already know the basics of Java programming. If you have any trouble understanding the Java code in this chapter, you may need a refresher course on Java coding. To quickly review the basics of Java coding, we recommend that you use Murach’s Java SE 6 because it contains all the Java skills that you’ll need for working with this book.
  • 9. Chapter 5 How to develop JavaServer Pages 143 The code for the JSP <!DOCTYPE HTML PUBLIC "-//W3C//DTD HTML 4.01 Transitional//EN" "http://www.w3.org/TR/html4/loose.dtd"> <html> <head> <title>Murach's Java Servlets and JSP</title> </head> <body> <% // get parameters from the request String firstName = request.getParameter("firstName"); JSP scriptlet String lastName = request.getParameter("lastName"); String emailAddress = request.getParameter("emailAddress"); %> <h1>Thanks for joining our email list</h1> <p>Here is the information that you entered:</p> <table cellspacing="5" cellpadding="5" border="1"> <tr> <td align="right">First name:</td> <td><%= firstName %></td> </tr> <tr> <td align="right">Last name:</td> <td><%= lastName %></td> JSP expressions </tr> <tr> <td align="right">Email address:</td> <td><%= emailAddress %></td> </tr> </table> <p>To enter another email address, click on the Back <br> button in your browser or the Return button shown <br> below.</p> <form action="join_email_list.html" method="post"> <input type="submit" value="Return"> </form> </body> </html> Description • A JSP contains HTML tags and embedded Java code. • To code a scriptlet that contains one or more Java statements, you use the <% and %> tags. • To code an expression that can be converted to a string, you use the <%= and %> tags. • To get the values of the parameters that are passed to the JSP, you can use the getParameter method of implicit request object named request. Figure 5-3 The code for the JSP
  • 10. 144 Section 2 Essential servlet and JSP skills How to code a JSP Now that you have a general idea of how JSPs are coded, you’re ready to learn some specific skills for coding a JSP. To start, you need to know more about coding scriptlets and expressions. How to code scriptlets and expressions Figure 5-4 summarizes the information you need for coding scriptlets and expressions within a JSP. To code a scriptlet, for example, you code Java statements that end with semicolons within the JSP scriptlet tags. To code an expression, you code any Java expression that evaluates to a primitive data type such as an int value or an object such as a String object. If an expression evaluates to a primitive type like an int value or a double value, the JSP will automatically convert the primitive type to a string that represents the value. If, on the other hand, the expression evaluates to an object, the JSP will call the object’s toString method to get a string that represents the object. As a result, if you code an expression that evaluates to an object, you need to make sure that the object has a toString method that returns a string that represents the object. Otherwise, the object will use the toString method of the Object class, which includes the class name and hash code for the object. When you’re coding a scriptlet or an expression, you can use any of the methods of the implicit request object. In this figure, only the getParameter method is used, but you’ll learn about two more methods of the request object in the next figure. In this figure, the first two examples show different ways that you can display the value of a parameter. The first example uses a scriptlet to return the value of the firstName parameter and store it in a String object. Then, this example uses an expression to display the value. In contrast, the second ex- ample uses an expression to display the value of the firstName parameter without creating the firstName object. The last example in this figure shows how two scriptlets and an expression can be used to display an HTML line five times while a Java variable within the HTML line counts from 1 to 5. Here, the first JSP scriptlet contains the code that begins a while loop. Then, a line of HTML code uses a JSP expression to display the current value of the counter for the loop. And finally, the second scriptlet contains the code that ends the loop.
  • 11. Chapter 5 How to develop JavaServer Pages 145 The syntax for a JSP scriptlet <% Java statements %> The syntax for a JSP expression <%= any Java expression that can be converted to a string %> The syntax for getting a parameter from the implicit request object request.getParameter(parameterName); Examples that use scriptlets and expressions A scriptlet and expression that display the value of the firstName parameter <% String firstName = request.getParameter("firstName"); %> The first name is <%= firstName %>. An expression that displays the value of the firstName parameter The first name is <%= request.getParameter("firstName") %>. Two scriptlets and an expression that display an HTML line 5 times <% int numOfTimes = 1; while (numOfTimes <= 5) { %> <h1>This line is shown <%= numOfTimes %> of 5 times in a JSP.</h1> <% numOfTimes++; } %> Description • Within a scriptlet, you can code one or more Java statements. You must end each Java statement with a semicolon. • Within a JSP expression, you can code any Java expression that evaluates to a Java object or to a primitive type. Since an expression isn’t a statement, you don’t end it with a semicolon. Figure 5-4 How to code scriptlets and expressions
  • 12. 146 Section 2 Essential servlet and JSP skills How to use the methods of the request object In the last figure, you learned how to use the getParameter method to return the value that the user entered into a textbox. Now, figure 5-5 summarizes that method and illustrates it in a new context. This figure also summarizes and illustrates two more methods of the implicit request object. In most cases, the getParameter method returns the value of the parameter. For a textbox, that’s usually the value entered by the user. But for a group of radio buttons or a combo box, that’s the value of the button or item selected by the user. For checkboxes or independent radio buttons that have a Value attribute, the getParameter method returns that value if the checkbox or button is selected and a null value if it isn’t. For checkboxes or independent radio buttons that don’t have a Value attribute, though, the getParameter method returns an “on” value if the checkbox or button is selected and a null value if it isn’t. This is illustrated by the first example in this figure. To retrieve multiple values for one parameter name, you can use the getParameterValues method as illustrated by the second example. This method is useful for controls like list boxes that allow multiple selections. After you use the getParameterValues method to return an array of String objects, you can use a loop to get the values from the array. To get the names of all the parameters sent with a request, you can use the getParameterNames method to return an Enumeration object that contains the names. Then, you can search through the Enumeration object to get the param- eter names, and you can use the getParameter method to return the value for each parameter name. This is illustrated by the third example. If you’re not familiar with the Enumeration class, you can learn more about it by looking it up in the documentation for the Java SE 6 API specification. For most purposes, though, you only need to know that an Enumeration object is a collection that can be searched element by element. To determine if more elements exist in the collection, you can use the hasMoreElements method, which returns a Boolean value. And to get the next element in the collection, you can use the nextElement method.
  • 13. Chapter 5 How to develop JavaServer Pages 147 Three methods available from the request object Method Description getParameter(String param) Returns the value of the specified parameter as a string if it exists or null if it doesn’t. Often, this is the value defined in the Value attribute of the control in the HTML page or JSP. getParameterValues(String param) Returns an array of String objects containing all of the values that the given request parameter has or null if the parameter doesn’t have any values. getParameterNames() Returns an Enumeration object that contains the names of all the parameters contained in the request. If the request has no parameters, the method returns an empty Enumera- tion object. A scriptlet that determines if a checkbox is checked <% // returns the value or "on" if checked, null otherwise. String rockCheckBox = request.getParameter("Rock"); if (rockCheckBox != null) { %> You checked Rock music! <% } %> A scriptlet that reads and displays multiple values from a list box <% // returns the values of the items selected in a list box. String[] selectedCountries = request.getParameterValues("country"); for (int i = 0; i < selectedCountries.length; i++) { %> <%= selectedCountries[i] %> <br> <% } %> A scriptlet that reads and displays all request parameters and values <% Enumeration parameterNames = request.getParameterNames(); while (parameterNames.hasMoreElements()) { String parameterName = (String) parameterNames.nextElement(); String parameterValue = request.getParameter(parameterName); %> <%= parameterName %> has value <%= parameterValue %>. <br> <% } %> Figure 5-5 How to use the methods of the request object
  • 14. 148 Section 2 Essential servlet and JSP skills How to get the real path for a file When you work with JSPs and servlets, you typically use relative paths to refer to files that are available within the web application. Sometimes, though, you need to get the real path for one of these files. To do that, you can use the technique shown in figure 5-6. First, you call the getServletContext method from the JSP or servlet to get a ServletContext object. Then, you call the getRealPath method of the ServletContext object to return the real path for the specified file. When you use the getRealPath method, a front slash navigates to the root directory for the current application, so getRealPath("/EmailList.txt") specifies the EmailList.txt file in the current application’s root directory. In this figure, the first example gets the real path for a file named EmailList.txt that’s stored in the WEB-INF subdirectory of the application. Here, the getRealPath method returns a string for an absolute path to this file. If, for example, this method is used in the ch05email application that’s in the NetBeans directory that’s used for our downloadable applications, the getRealPath method will return the path shown in this figure. If you store a file in a directory that’s web accessible, such as the root directory for a web application, the file can be accessed by any user who enters the correct URL. Keep in mind, though, that the WEB-INF directory isn’t web- accessible. As a result, if you want to keep a file private, you can store it in the WEB-INF directory or one of its subdirectories. Or, you can restrict access to the file or directory as described in chapter 17.
  • 15. Chapter 5 How to develop JavaServer Pages 149 A method of the GenericServlet class Method Description getServletContext() Returns a ServletContext object that contains information about the application’s context. A method of the ServletContext class for working with paths Method Description getRealPath(String path) Returns a String object for the real path of the specified relative path. Code that gets the real path for a file ServletContext sc = this.getServletContext(); String path = sc.getRealPath("/WEB-INF/EmailList.txt"); The value for the real path variable if the application is ch05email in the netbeans directory C:murachservlet_jspnetbeansbook_appsch05emailbuildweb WEB-INFEmailList.txt Description • All servlets and JSPs inherit the GenericServlet class. As a result, the getServletContext method is available to all servlets and JSPs. • In addition to working with relative paths as described here, you can use the ServletContext object to read global initialization parameters, to work with global variables, and to write data to log files. You’ll learn more about these skills as you progress through this book. Figure 5-6 How to get the real path for a file
  • 16. 150 Section 2 Essential servlet and JSP skills How to request a JSP After you code a JSP, you need to be able to request it. That way, you can view it in a browser and test it to make sure it’s working properly. How to request a JSP with the HTTP Get method Figure 5-7 shows several ways to request a JSP. The first example shows how to use a Form tag to request a JSP. When you use this technique, you code the Action attribute of the form to provide a path and filename that point to the JSP. In this figure, for example, the first Form tag requests a JSP that’s stored in the same directory as the calling form. However, if the JSP is stored in a differ- ent directory, you can specify a relative or absolute path for the Action attribute. When you use a Form tag to request a JSP, you can use the Method attribute to specify the HTTP method that’s used for the request. By default, the Get method is used for a Form tag, but you can also explicitly specify the Get method. In the first set of examples in this figure, both of the Form tags use the Get method. In the next figure, you’ll learn when and how to use the Method attribute to specify the Post method. When you use the Get method to request a JSP from another page, any parameters that are passed to the JSP will be displayed in the browser’s URL address. In the bitmap in this figure, for example, you can see the two param- eters that have been appended to the URL. In the next figure, you’ll learn that the Post method doesn’t display the parameters in the URL. When you test a JSP, you will often want to pass parameters to it. To do that, you can append the parameters to the end of the URL as shown by the second set of examples in this figure. Here, the question mark after the jsp extension indicates that one or more parameters will follow. Then, you code the parameter name, the equals sign, and the parameter value for each parameter that is passed, and you separate multiple parameters with ampersands (&). If you omit a parameter that’s required by the JSP, the getParameter method will return a null value for that parameter. The third example shows how you can use an A tag to call a JSP. When you use an A tag, it always uses the HTTP Get method, and you can append param- eters to the end of the URL. In this example, the A tag appends two parameters to the URL that requests the JSP. Finally, you can request a JSP by entering its URL into a browser as shown by the last set of examples in this figure. Here, the first example shows the URL for the JSP when it’s mapped to the ch05email directory on a local web server using port 8080. Then, the second example shows the URL for the JSP if it was deployed in the email directory of the web server for www.murach.com.
  • 17. Chapter 5 How to develop JavaServer Pages 151 A JSP that’s requested with the HTTP Get method Two Form tags that use the Get method <form action="display_email_entry.jsp"> <form action="display_email_entry.jsp" method="get"> How to append parameters to a request display_email_entry.jsp?firstName=John display_email_entry.jsp?firstName=John&lastName=Smith An Anchor tag that requests a JSP with the Get method <a href="display_email_entry.jsp?firstName=John&lastName=Smith"> Display Email Entry Test </a> Two URLs that request a JSP with the Get method http://localhost:8080/ch05email/display_email_entry.jsp?firstName=John http://www.murach.com/email/display_email_entry.jsp?firstName=John Description • When you use the HTTP Get method to request a JSP from an HTML form, the param- eters are automatically appended to the URL. • When you code or enter a URL that requests a JSP, you can add a parameter list to it starting with a question mark and with no intervening spaces. Then, each parameter consists of its name, an equals sign, and its value. To code multiple parameters, use ampersands (&) to separate the parameters. • The A tag always uses the HTTP Get method. Figure 5-7 How to request a JSP with the HTTP Get method
  • 18. 152 Section 2 Essential servlet and JSP skills How to request a JSP with the HTTP Post method When you use a Form tag to request a JSP, there are times when you will want to use the HTTP Post method for the request. To do that, you use the Method attribute to specify the Post method as shown in figure 5-8. Then, the parameters that are passed to the JSP aren’t shown in the URL. When to use the HTTP Get and Post methods So, when should you use the HTTP Get method and when should you use the Post method? In general, you should use the Get method when you want to get (read) data from the server. Similarly, you should use the Post method when you want to post (write) data to the server. When you use the Get method, you need to make sure that the page can be executed multiple times without causing any problems. In this figure, for example, the JSP just displays the data to the user, so there’s no harm in execut- ing this page multiple times. If, for example, the user clicks the Refresh button, the browser requests the page again, and this doesn’t cause any problems. However, if the JSP in this figure wrote the data to a database, you wouldn’t want the user to write the same data to the database twice. As a result, it would make more sense to use the Post method. Then, if the user clicks the Refresh button, the browser will display a dialog like the one shown in this figure that warns the user that the data will be submitted again. At that point, the user can click on the Cancel button to cancel the request. There are also a few other reasons to use the Post method. First, since the Post method doesn’t append parameters to the end of the URL, it is more appropriate for working with sensitive data. Second, since the Post method prevents the web browser from including parameters in a bookmark for a page, you’ll want to use it if you don’t want the parameters to be included in the bookmark. Third, if your parameters contain more than 4 KB of data, the Get method won’t work so you’ll need to use the Post method. For all other uses, the Get method is preferred. It runs slightly faster than the Post method, and it lets the user bookmark the page along with the param- eters that were sent to the page.
  • 19. Chapter 5 How to develop JavaServer Pages 153 A JSP that’s requested with the HTTP Post method A Form tag that uses the Post method <form action="display_email_entry.jsp" method="post"> When to use the Get method • When the request reads data from the server. • When the request can be executed multiple times without causing any problems. When to use the Post method • When the request writes data to the server. • When executing the request multiple times may cause problems. • When you don’t want to include the parameters in the URL for security reasons. • When you don’t want users to be able to include parameters when they bookmark a page. • When you need to transfer more than 4 KB of data. A typical browser dialog that’s displayed if the user tries to refresh a post Figure 5-8 How to request a JSP with the HTTP Post method
  • 20. 154 Section 2 Essential servlet and JSP skills How to use regular Java classes with JSPs In this topic, you’ll learn how to use regular Java classes to do the processing that a JSP requires. In particular, you’ll learn how to use two classes named User and UserIO to do the data processing for the JSP of the Email List application. The code for the User and UserIO classes Figures 5-9 presents the code for a business class named User and figure 5-10 presents the code for an I/O class named UserIO. The package statement at the start of each class indicates where each class is stored. Here, the User class is stored in the business directory because it defines a business object while the UserIO class is stored in the data directory because it provides the data access for the application. The User class defines a user of the application. This class contains three instance variables: firstName, lastName, and emailAddress. It includes a con- structor that accepts three values for these instance variables. And it includes get and set methods for each instance variable.
  • 21. Chapter 5 How to develop JavaServer Pages 155 The code for the User class package business; public class User { private String firstName; private String lastName; private String emailAddress; public User() { firstName = ""; lastName = ""; emailAddress = ""; } public User(String firstName, String lastName, String emailAddress) { this.firstName = firstName; this.lastName = lastName; this.emailAddress = emailAddress; } public void setFirstName(String firstName) { this.firstName = firstName; } public String getFirstName() { return firstName; } public void setLastName(String lastName) { this.lastName = lastName; } public String getLastName() { return lastName; } public void setEmailAddress(String emailAddress) { this.emailAddress = emailAddress; } public String getEmailAddress() { return emailAddress; } } Figure 5-9 The code for the User class
  • 22. 156 Section 2 Essential servlet and JSP skills In contrast, the UserIO class contains one static method named add that writes the values stored in a User object to a text file. This method accepts two parameters: a User object and a string that provides the path for the file. If this file exists, the method will add the user data to the end of it. If the file doesn’t exist, the method will create it and add the data at the beginning of the file. If you’ve read chapter 6 of Murach’s Java SE 6, you should understand the code for the User class. And if you’ve read chapter 19, you should understand the code in the UserIO class.
  • 23. Chapter 5 How to develop JavaServer Pages 157 The code for the UserIO class package data; import java.io.*; import business.User; public class UserIO { public static void add(User user, String filepath) throws IOException { File file = new File(filepath); PrintWriter out = new PrintWriter( new FileWriter(file, true)); out.println(user.getEmailAddress()+ "|" + user.getFirstName() + "|" + user.getLastName()); out.close(); } } Figure 5-10 The code for the UserIO class
  • 24. 158 Section 2 Essential servlet and JSP skills A JSP that uses the User and UserIO classes Figure 5-11 shows the code for the JSP in the Email List application after it has been enhanced so it uses the User and UserIO classes to process the param- eters that have been passed to it. In the first statement of the body, a special type of JSP tag is used to import the business and data packages that contain the User and UserIO classes. You’ll learn the details of coding this type of tag in the next figure. In the scriptlet of the JSP, the getParameter method is used to get the values of the three parameters that are passed to it, and these values are stored in String objects. Then, the next two statements use the getRealPath method of the ServletContext object to get the real path for the EmailList.txt file that’s stored in the application’s WEB-INF directory. Since the WEB-INF directory isn’t web-accessible, the users of this application won’t be able to access this file. The last two statements in this scriptlet create the User object from the three parameters and call the add method of the UserIO class to write this object to the EmailList.txt file. Note, here, that the real path of the EmailList.txt file is passed to the add method of the UserIO class, because that’s what this method requires. After the scriptlet, the code in the JSP defines the layout of the page. Within the HTML table definitions, the JSP expressions use the get methods of the User object to display the first name, last name, and email address values. Although these JSP expressions could use the String objects instead, the code in this figure is intended to show how the get methods can be used. In addition, this makes sure that the data that’s displayed by the JSP is the same as the data that was written to the EmailList.txt file.
  • 25. Chapter 5 How to develop JavaServer Pages 159 The code for a JSP that uses the User and UserIO classes <!DOCTYPE HTML PUBLIC "-//W3C//DTD HTML 4.01 Transitional//EN" "http://www.w3.org/TR/html4/loose.dtd"> <html> <head> <title>Murach's Java Servlets and JSP</title> </head> <body> <!-- import packages and classes needed by the scripts --> <%@ page import="business.*, data.*" %> <% // get parameters from the request String firstName = request.getParameter("firstName"); String lastName = request.getParameter("lastName"); String emailAddress = request.getParameter("emailAddress"); // get the real path for the EmailList.txt file ServletContext sc = this.getServletContext(); String path = sc.getRealPath("/WEB-INF/EmailList.txt"); // use regular Java objects User user = new User(firstName, lastName, emailAddress); UserIO.add(user, path); %> <h1>Thanks for joining our email list</h1> <p>Here is the information that you entered:</p> <table cellspacing="5" cellpadding="5" border="1"> <tr> <td align="right">First name:</td> <td><%= user.getFirstName() %></td> </tr> <tr> <td align="right">Last name:</td> <td><%= user.getLastName() %></td> </tr> <tr> <td align="right">Email address:</td> <td><%= user.getEmailAddress() %></td> </tr> </table> <p>To enter another email address, click on the Back <br> button in your browser or the Return button shown <br> below.</p> <form action="join_email_list.html" method="post"> <input type="submit" value="Return"> </form> </body> </html> Figure 5-11 A JSP that uses the User and UserIO classes
  • 26. 160 Section 2 Essential servlet and JSP skills How to use three more types of JSP tags So far, you’ve learned how to use the two most common types of JSP tags: the tags for scriptlets and expressions. Now, you’ll learn how to use three more types of JSP tags. All five types of JSP tags are summarized at the top of figure 5-12. How to import classes After the summary of JSP tags, figure 5-12 shows how to use a JSP direc- tive to import classes in a JSP. The type of directive that you use for doing that is called a page directive, and the shaded statement at the start of the JSP shows how to code one. To code a page directive for importing classes, you code the starting tag and the word page followed by the Import attribute. Within the quotation marks after the equals sign for this attribute, you code the names of the Java classes that you want to import just as you do in a Java import statement. In the ex- ample in this figure, all the classes of the business and data packages are imported, plus the Date class in the java.util package. Once the page directive imports the packages, the JSP can access the User and UserIO classes and the Date class without needing to fully qualify the name. The scriptlet that follows creates a User object from the User class and uses the add method of the UserIO class to write the data for the User object to a text file. The last line in this example uses the default constructor of the Date class as an expression in an HTML line. This works because the JSP will automatically call the toString method of the Date class to convert the Date object that’s created into a string.
  • 27. Chapter 5 How to develop JavaServer Pages 161 The five types of JSP tags Tag Name Purpose <% %> JSP scriptlet To insert a block of Java statements. <%= %> JSP expression To display the string value of an expression. <%@ %> JSP directive To set conditions that apply to the entire JSP. <%-- --%> JSP comment To tell the JSP engine to ignore code. <%! %> JSP declaration To declare instance variables and methods for a JSP. JSP code that imports Java classes <%@ page import="business.*, data.*, java.util.Date" %> <% // get parameters from the request String firstName = request.getParameter("firstName"); String lastName = request.getParameter("lastName"); String emailAddress = request.getParameter("emailAddress"); // get a relative file name ServletContext sc = this.getServletContext(); String path = sc.getRealPath("/WEB-INF/EmailList.txt"); // use regular Java objects User user = new User(firstName, lastName, emailAddress); UserIO.add(user, path); %> <p>This email address was added to our list on <%= new Date() %></p> Description • To define the conditions that the JSP engine should follow when converting a JSP into a servlet, you can use a JSP directive. • To import classes in a JSP, you use the import attribute of the page directive. This makes the imported classes available to the entire page. • You can also use the page directive to define other conditions like error handling and content type conditions. You’ll learn more about this directive throughout this book. Figure 5-12 How to import classes
  • 28. 162 Section 2 Essential servlet and JSP skills How to code comments in a JSP Figure 5-13 shows how to code comments in a JSP. To start, the first ex- ample shows how you can use HTML comments within a JSP page. In this example, an HTML comment has been used to comment out a line that includes a JSP expression that displays a date. Then, the second example shows how to use a JSP comment in a JSP page. In this example, a JSP comment has been used to comment out a line that includes a JSP expression that displays a date. When you code HTML and JSP comments, you need to understand how they work to be able to use them properly. In particular, any Java code within an HTML comment is compiled and executed, but the browser doesn’t display it. For instance, the first example creates a new Date object even though it doesn’t display the date in the browser. In fact, the value for the date object is returned to the browser as an HTML comment. To check this, you can view the HTML for the page that’s returned to the browser by selecting the Source or Page Source command from your browser’s View menu. In contrast, any Java code within a JSP comment isn’t compiled or executed or returned to the browser in any way. For instance, the second example doesn’t create a Date object and it doesn’t return it to the browser as a comment. As a result, if you want to comment out code that contains HTML and JSP tags, you typically use a JSP comment. This is critical if the code you’re commenting out performs tasks that you no longer want to perform. If, for example, the code updates a variable that you no longer want to update, you need to make sure to use a JSP comment. Finally, the third example shows how you can code Java comments within a scriptlet. Here, a single-line comment is coded before the three statements that get the request parameters. Then, a multi-line comment is used to comment out the two statements that create the User object and write it to a text file. Since these types of comments work the same as they do with normal Java code, you shouldn’t have any trouble using them.
  • 29. Chapter 5 How to develop JavaServer Pages 163 An HTML comment in a JSP <!-- <p>This email address was added to our list on <%= new Date() %></p> --> A JSP comment <%-- <p>This email address was added to our list on <%= new Date() %></p> --%> Java comments in a JSP scriptlet <% // get parameters from the request String firstName = request.getParameter("firstName"); String lastName = request.getParameter("lastName"); String emailAddress = request.getParameter("emailAddress"); /* User user = new User(firstName, lastName, emailAddress); UserIO.add(user, path); */ %> Description • When you code HTML comments, the comments are compiled and executed, but the browser doesn’t display them. • When you code JSP comments, the comments aren’t compiled or executed. • When you code Java comments within a scriptlet, the comments aren’t compiled or executed. Figure 5-13 How to code comments in a JSP
  • 30. 164 Section 2 Essential servlet and JSP skills How to declare instance variables and methods When a JSP is requested for the first time, one instance of the JSP is created and loaded into memory, and a thread is started that executes the Java code in the JSP. For each subsequent request for the JSP, another thread is started that can access the one instance of the JSP. When you code variables in scriptlets, they are known as local variables, and each thread gets its own copy of each local variable, which is usually what you want. However, you can also declare instance variables that can be shared be- tween all of the threads that are accessing a JSP. To do that, you can code JSP declarations as shown in figure 5-14. Then, any instance variables are initialized when the JSP is first requested. After that, each thread can access these instance variables. This is illustrated by the globalCount variable that’s declared in this figure. This variable is incremented by one each time the JSP is requested. Later, when the variable is displayed, it represents the total number of times that the page has been accessed. Unfortunately, using an instance variable in a JSP can lead to inaccurate results and is generally considered a bad practice. The problem occurs because Java uses a series of operations to increment the globalCount variable. In particular, it reads the value of the variable, modifies the value, and writes a new value back to the variable. Since multiple threads all have access to this vari- able, two threads may try to read the variable at the same time, which can result in a lost update. In other words, an instance variable in a JSP is not thread-safe. In some cases, it’s okay to include instance variables that are not thread- safe. In this figure, for example, it might be acceptable to lose an update to the globalCount variable every now and then. However, in other cases, you need to make sure that your JSP is thread-safe. If, for example, you were using an instance variable to generate a unique identifier for an object, you would need to make sure that all access to the instance variable was thread-safe. Although there are several techniques for making instance variables thread- safe, none of these techniques are easy to implement. As a result, when you need to make sure all of your operations are thread-safe, you should use local variables instead of instance variables whenever that’s possible. If that isn’t possible, you can use one of the thread-safe techniques for working with global variables that are described in chapter 8. Besides declaring instance variables in a JSP, you can declare methods. In this figure, for example, the code for the JSP declares and calls an add method that writes a User object to a file. Here again, though, this is generally consid- ered a bad practice. So, instead of declaring methods in a JSP, you should consider restructuring your application. In some cases, you may want to use regular Java classes like the UserIO class. In other cases, you may want to use a servlet as described in the next chapter. But most of the time, the best alternative is to use a combina- tion of servlets, JSPs, and regular Java classes as described in chapter 7.
  • 31. Chapter 5 How to develop JavaServer Pages 165 JSP code that declares an instance variable and a method <%-- import any packages needed by the page --%> <%@ page import="business.*, data.*, java.util.Date, java.io.*" %> <%! // declare an instance variable for the page int globalCount = 0; // this is not thread-safe %> <%! // declare a method for the page public void add(User user, String filename) throws IOException { PrintWriter out = new PrintWriter( new FileWriter(filename, true)); out.println(user.getEmailAddress()+ "|" + user.getFirstName() + "|" + user.getLastName()); out.close(); } %> <% String firstName = request.getParameter("firstName"); String lastName = request.getParameter("lastName"); String emailAddress = request.getParameter("emailAddress"); ServletContext sc = getServletContext(); String path = sc.getRealPath("/WEB-INF/EmailList.txt"); User user = new User(firstName, lastName, emailAddress); // use the declared method this.add(user, path); // update the instance variable globalCount++; // this is not thread-safe %> . . . <p> This email address was added to our list on <%= new Date() %><br> This page has been accessed <%= globalCount %> times. </p> Description • You can use JSP declarations to declare instance variables and methods. • Since instance variables aren’t thread-safe, two threads may conflict when they try to read, modify, and update the same instance variable at the same time. • In general, you should avoid coding instance variables for JSPs and servlets. Instead, you should use other thread-safe techniques for working with global variables (see chapter 8). • In general, you should avoid coding methods within JSPs. Instead, you should use some combination of JSPs, servlets, and regular Java classes (see chapter 7). Figure 5-14 How to declare instance variables and methods
  • 32. 166 Section 2 Essential servlet and JSP skills How to work with JSP errors As you develop JSPs, you will encounter errors. That’s why the last two figures in this chapter show you how to work with JSP errors. How to fix common JSP errors Figure 5-15 presents the two most common errors that you will encounter when working with JSPs. HTTP Status 404 means that Tomcat received the HTTP request but couldn’t find the requested resource. You’ve already seen this in chapter 2. To fix this type of problem, make sure that the web server is running, that you have entered the correct path and filename for the request, and that the requested file is in the correct location. In contrast, HTTP Status 500 means that the server received the request and found the resource but couldn’t fill the request. This usually means that the JSP engine wasn’t able to compile the JSP due to a coding error in the JSP. To fix this type of error, you can review the information provided by the error page. In this figure, for example, the message displayed by the error page shows that a semicolon is missing at the end of one of the statements in the JSP scriptlet. To correct this type of error, you should fix the JSP so it will compile correctly. To do this, you can open the JSP, add the semicolon, save it, and request the page again. Then, the JSP engine will recognize that the JSP has been modified and it will automatically attempt to compile, load, and display the JSP.
  • 33. Chapter 5 How to develop JavaServer Pages 167 An error page for a common JSP error Common JSP errors • HTTP Status 404 – File Not Found Error • HTTP Status 500 – Internal Server Error Tips for fixing JSP errors • Make sure the Tomcat server is running. • Make sure that the URL is valid and that it points to the right location for the requested page. • Make sure all of the HTML, JSP, and Java class files are in the correct locations. • Read the error page carefully to get all available information about the error. Figure 5-15 How to fix common JSP errors
  • 34. 168 Section 2 Essential servlet and JSP skills When and how to view the servlet that’s generated for a JSP From a practical point of view, you can almost always use the skills de- scribed in figure 5-15 to solve the errors that you encounter when working with JSPs. However, it’s sometimes helpful to understand what’s going on behind the scenes when you work with JSPs. In particular, you should understand the lifecycle of a JSP. To start, when a user requests a JSP for the first time, the JSP engine generates a servlet for the JSP, compiles the JSP, and creates one instance of the servlet class. After that, a thread is created for each user, and each thread gets its own copy of the local variables of the servlet methods. Although you may never need to view the code for the servlet that’s gener- ated for a JSP, you can view this code if you’re trying to debug a JSP or if you’re curious about how the JSP engine works. To view the generated servlet, you can look through the web server’s files until you find the appropriate directory. For example, the top of this figure shows the path to the directory that Tomcat uses to store the servlets that are generated for the ch05email applica- tion. As a result, to view the source code for any of the JSP pages of the ch05email application, you can navigate to this directory. Then, you can open the .java file that corresponds with the JSP that you want to view. To give you an idea of what a generated servlet looks like, figure 5-16 shows some key parts of the servlet that’s generated for the JSP in figure 5-11. As you read through this code, you may find it to be overwhelming at first. However, if you take a moment to compare the code for the JSP in figure 5-11 with the partial servlet code shown in this figure, you should get a good idea of what’s going on. Also, after you read the next chapter, which shows you how to develop servlets, the code for this servlet should make even more sense. For now, you can just note how the JSP directive, scriptlet, and expression tags are translated into plain old Java code.
  • 35. Chapter 5 How to develop JavaServer Pages 169 The JSP work directory for ch05email application C:tomcatworkCatalinalocalhostch05emailorgapachejsp Part of the servlet class that’s generated from the JSP in figure 5-11 package org.apache.jsp; import javax.servlet.*; import javax.servlet.http.*; import javax.servlet.jsp.*; import business.*; import data.*; import java.util.Date; public final class display_005femail_005fentry_jsp extends org.apache.jasper.runtime.HttpJspBase implements org.apache.jasper.runtime.JspSourceDependent { ... public void _jspService(HttpServletRequest request, HttpServletResponse response) throws java.io.IOException, ServletException { ... response.setContentType("text/html"); ... out.write("<html>n"); out.write("<head>n"); out.write(" <title>Murach's Java Servlets and JSP</title>n"); out.write("</head>n"); out.write("<body>n"); ... // get parameters from the request String firstName = request.getParameter("firstName"); String lastName = request.getParameter("lastName"); String emailAddress = request.getParameter("emailAddress"); // get the real path for the emaillist file ServletContext sc = this.getServletContext(); String path = sc.getRealPath("/WEB-INF/EmailList.txt"); // use regular Java objects User user = new User(firstName, lastName, emailAddress); UserIO.add(user, path); ... out.write(" <table cellspacing="5" cellpadding="5" border="1">n"); out.write(" <tr>n"); out.write(" <td align="right">First name:</td>n"); out.write(" <td>"); out.print( user.getFirstName() ); out.write("</td>n"); out.write(" </tr>n"); ... out.write("</body>n"); out.write("</html>"); ... } } Figure 5-16 When and how to view the servlet that’s generated for a JSP
  • 36. 170 Section 2 Essential servlet and JSP skills Perspective The goal of this chapter has been to provide you with the basic skills for coding a JSP. At this point, you should be able to code simple, but practical, JSPs of your own. In addition, you should understand how HTML pages communicate with JSPs, how JSPs communicate with regular Java classes, and how to fix some of the common JSP errors. In the next chapter, you’ll learn how to use the same types of skills with servlets. In fact, the next chapter uses the same application that’s presented in this chapter, but it uses a servlet instead of a JSP. Summary • A JavaServer Page (JSP) consists of HTML code plus Java code that’s embedded in scriptlets and expressions. Within the scriptlets and expressions, you can use the methods of the implicit request object to get the parameters that are passed to the JSP. • You can use the getRealPath method of the ServletContext object to get a relative path to refer to a file that’s used by your web application. • When you use the HTTP Get method to pass parameters to a JSP, the parameters are displayed in the URL. When you use the HTTP Post method, they aren’t. If executing a request multiple times may cause problems, you should use the Post method. • You can use regular Java classes from within scriptlets and expressions just as you use them from other Java classes. • You use a JSP directive known as a page directive to import classes for use in a JSP. • When you use JSP comments, the comments aren’t compiled or executed or returned to the browser. In contrast, HTML comments are compiled and executed and returned to the browser, but the browser doesn’t display them. • You use JSP declarations to declare instance variables and methods for a JSP. However, instance variables are not thread-safe and may result in lost updates. • When working with JSPs, an HTTP Status 500 error usually indicates that the JSP engine wasn’t able to compile the servlet class for the JSP. • When a JSP is requested for the first time, the JSP engine generates a servlet class for the page, compiles it, and creates one instance of the servlet. For each subse- quent request, a new thread is created from this single instance of the servlet class. As a result, each thread gets its own copy of the local variables, but all threads share the same instance variables.
  • 37. Chapter 5 How to develop JavaServer Pages 171 Exercise 5-1 Enhance the Email List application In this exercise, you’ll modify the HTML document for the Email List application, and you’ll create a new JSP that responds to the HTML document. Review and test the code for the email application 1. Open the ch05email project in the ex_starts directory. 2. Review the code for the HTML and JSP file for the application. 3. Review the code for the User and UserIO classes that are in the business and data packages. 4. Run the application, enter the name and email address for one user, and click on the Submit button. Then, note how the parameters are used in the URL for calling the JSP. Also, use the Back button and Refresh button to see how they work. 5. Use the Windows Explorer or your IDE to find the text file that the users have been saved in (EmailList.txt), open the file, and review the data that has been stored in it. 6. Change the method used for the form in the HTML file from get to post. Then, test the application again by entering another user. Note that the parameters aren’t shown in the URL, and note how the Refresh button works for the JSP. 7. Create a JSP error by deleting the semicolon at the end of the first Java statement in the JSP. Then, run the application to see how Tomcat handles this error. 8. Fix the error by restoring the semicolon in the JSP. Enhance the application 9. Modify the HTML document so it has this line of text after the Email Address text box: “I’m interested in these types of music.” Then, follow this text with a list box that has options for Rock, Country, Bluegrass, and Folk music. This list box should be followed by the Submit button, and the Submit button should submit the form to a new JSP named display_music_choices.jsp. 10. Create a new JSP named display_music_choices.jsp that responds to the changed HTML document. This JSP should start with an H1 line that reads like this: Thanks for joining our email list, John Smith. And this line should be followed by text that looks like this: We’ll use email to notify you whenever we have new releases for these types of music: Country Bluegrass In other words, you list the types of music that correspond to the items that are selected in the list box. And the entire web page consists of just the heading and text lines that I’ve just described.
  • 38. 172 Section 2 Essential servlet and JSP skills Please note that you don’t have to provide code that saves the data that the user enters to the EmailList.txt file because that would mean changes to both the User and UserIO classes. 11. Change the method for the form in the HTML document back to the Get method so you can see the parameters in the URL. Then, test the HTML document and the new JSP by running the application. Note how the parameter list stores your music choices when you select more than one item from the list box. (To select more than one item, you can hold down the Ctrl or Shift key as you click on items.) 12. Test the new JSP by entering a URL that includes a parameter list in the browser’s address box. To keep this simple, you only need to include parameters for first name and last name. 13. When you’re through experimenting, close the project.