Libguides at UCT Libraries 2014 add images to boxes
•Transferir como PPTX, PDF•
1 gostou•447 visualizações

How to add an image in a content box in LibGuides at UCT Libraries

Recomendados
Recomendados
Mais conteúdo relacionado
Semelhante a Libguides at UCT Libraries 2014 add images to boxes
Semelhante a Libguides at UCT Libraries 2014 add images to boxes (20)
Mais de UCT
Mais de UCT (20)
Último
Último (20)
Libguides at UCT Libraries 2014 add images to boxes
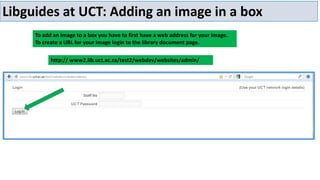
- 1. Libguides at UCT: Adding an image in a box To add an image to a box you have to first have a web address for your image. To create a URL for your image login to the library document page. http:// www2.lib.uct.ac.za/test2/webdev/websites/admin/
- 2. Libguides at UCT: Adding an image in a box Click on FILES Click on ADD
- 3. Libguides at UCT: Adding an image in a box Browse for the file you wish to upload, then click Upload File
- 4. Libguides at UCT: Adding an image in a box This is the URL of your image Copy and paste the URL into the relevant field in your text box in LibGuides (see next slides)
- 5. Libguides at UCT: Adding an image in a box Click on ‘Add New Box’.
- 6. Libguides at UCT: Adding content to Boxes In the ‘Add New Box’ screen, use the ‘Create New Box’ tab.
- 7. Libguides at UCT: Adding content to Boxes Select the type of box you want to use from the drop down menu. Choose ‘Rich text/dynamic content/scripts’
- 8. Libguides at UCT: Adding content to Boxes Choose the position of the box on the page
- 9. Libguides at UCT: Adding content to Boxes Add content in the ‘Rich Text Editor’ Click on the Picture Icon in the toolbar to add an image.
- 10. Libguides at UCT: Adding an image in a box • Paste the URL of the image in the ‘Image URL’ field……… • You can give the image a description in the ‘Alt Tag’ field • Change the size of the image in the ‘Dimensions’ field etc. • Click ‘INSERT’
- 11. Libguides at UCT: Adding an image in a box You can align the box (centre, right, left) by using the editor tools Click on ‘Save and Close’ Your image has been inserted – you can also change the size of your image by clicking on the image and then dragging the handles to the size that you want.
- 12. Libguides at UCT: Adding an image in a box Your image has been inserted in the Box