
Recomendados
Recomendados
Mais conteúdo relacionado
Mais procurados
Mais procurados (20)
Semelhante a Set Alarm Groups and Properties
Semelhante a Set Alarm Groups and Properties (20)
Mais de Iamtubalcain
Mais de Iamtubalcain (8)
Último
Último (20)
Set Alarm Groups and Properties
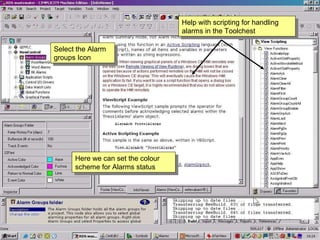
- 1. Select the Alarm groups Icon Here we can set the colour scheme for Alarms status Help with scripting for handling alarms in the Toolchest
- 2. There is one indelible mother group The Root Logging group
- 3. We can create new groups that can contain different types of alarms or alarms from one machine or area
- 5. Create more groups and sub groups as required
- 6. We can assign our points to the appropriate group
- 7. Keep History means this alarm will be logged to disk
- 9. This alarm as it is digital, alerts when on or off as selected
- 10. If we select an analog point our options are slightly different
- 11. We can select Limit alarms, and deviation alarms, percent and fixed value, or rate of change alarms
- 13. Select property columns view
- 14. Click on the Dock/undock tab
- 18. To view our alarms on our HMI we place an alarm object on the screen in one of two ways by selecting the icon here, or by right clicking and selecting from the menu
- 19. Click where you want anchor the top left corner drag to the size you want and click again to place
- 38. Help. Toolchest Companion window
- 39. Set the programming language View scripting or VB scripting
Notas do Editor
- Setting up Alarm configuration in Machine Edition is an intuitive process with the usual excellent help information. Basically select the Alarm group Icon configure the Alarm groups settings. Assign variables to our groups. Place an alarm object on the screen and download the project.
- Here we have our “Mother” group we can add our own groups to group alarms for a particular view
- As with the whole Machine Edition environment “Right-Clicking” is the easiest way to negotiate yourway around. So right click on the Root Alarm Group and select “New”
- Add as many groups as you like
- Go to the variable table and assign variables to the appropriate group
- Input1 is attached to th group MC1
- Obviously with more than a few points this could take a while if we proceed in this way. So let’s select The property columns view
- This enables the variuables tabel to be seen in it’s entirity in the main screen
- Here we can see all of our variables. We have the ability to set the group, Keep history etc as before even limits.
- Click the group name
- But for faster configuration we can set up multiple variables at one time. Simply highlight the variables as a group by click and drag. Press any letter key and use arrow keys to scroll through groups available
- Add an Alarm Object. The name of this object is how we will identify it for scripting purposes so keep it short and recognisable.
- Anchor the alarm object drag across and click again to place on the panel
- Configure the panel settings. To demonstrate the difference between Keep history True and False we will place two objects
- Highlight the object Right-click and select duplicate
- Keep history False
- For the group MC1 we will also select Email notification, now where is that smtp server name again?!!
- Go to contacts in your email I am using outlook it may be different for you. For instance eircom is mail1.eircom.net
- Click on your properties. You may need to send yorself an email to get you and add as yourself a contact or you may know the way to find this info more quickly!
- In properties I can see my smtp address I have two I will use the first just the bit after the “@”
- I am adding “Input1” an internal tag (variable) to my screen. Any variable that is connected to the MC1 group will cause an email to be sent to the preconfigured addressee
- Download
- Here is our Runtime screen. As we can see the Top Alarm object has old alarms visible the lower object does not as it was set to KeepHistory = False only active alarms are visible
- If we activate Input1 we will see that an email is sent to our addressee ME!
- Input1 has just been set NO message
- Message comes in , it is in a very basic form INPUT1 = True type Hi. An analog variable would show a value. I have turned INPUT1 off at this point
- And here we have another message INPUT1 is False and type normal
- So we have Alarm objects that show us alarms activating messages and we can even get email notification. But what if we want to reset alarms , acknowledge alarms etc..Well we add buttons to the screen that enable this.
- We add a button, we configure the animation property of the button by double-clicking, using the TOUCH property. Check enable touch animation.
- On the drop down selection we will use “run script when down”. This script will run once when the button is activated
- What is the script we need? Remember the help files or go to View Scripting in the Toolchest. Let’s start with a button that clears all alarms that are not currently active. Remember you need to have the Companion window open to see the help in the Toolchest
- Enter the script. My alarm object is called AL1 (simple!!! and recognisable) So my script is simply “alarmclearall AL1” ignore the quotation marks when using Viewscripting as opposed to Vbscripting. This means when I touch/select the Button “ClrAll” on my screen this script will run ONCE!
- After downloading Click ClrAll
- All alarms Not active are cleared
- We need other buttons Acknowledge or buttons to navigate up or down etc… I have some from before in a Toolchest drawer
- I can add these quickly without the need to redraw them
- The shortcut arrows show that they are linked to the toolchest and cannot be changed on our panel as they are.
- Select the button and right click select Break Link
- The links are broken but things look a bit messy. Place you mouse pointer so that you can drag a box around all of the buttons
- Now that they are selected certain greyed-out buttons on the screen editor toolbar become active such as Aign to middle , left, right or space vertically horizontally. Select align to middle
- Space horizontally. Download and start you can accept “download in runtime mode?”. Sometimes this will develop an error No RTS permitted which just means you must stop the controller to download
- Click on alarm last
- Activate any of the buttons. If your buttons don’t work check the animation property of the button touch is enabled. Does your script refer to the correct alarm object. Some functions will not work with objects that are Keep history check the help file for the command.
- And finally where did that Keep History data go to? Open Internet explorer enter your local machine IP address or type www.localhost. You can of course read data from another machine on the network but for now we will examine data on the local machine. These files are stored as *.alm files with the datetime as their prefix so you can search and open by another method these are in .xml format
- Cimplicity machine Edition’s web server has a number of web accessible features including control of the application. For now Select Alarm History
- Each day whilst alarm logging is active a new file is created
- Here is the data from the day selected