1. Salford City College
Eccles Sixth Form
Centre
BTec Level 3
Extended Diploma in Creative
Media Production
Games Design
Unit 66 – 3D Modelling
HA5 – Sidekick Task 6 – Production
Name Hayden Parkes
Date:28/04/14
Date: 22/04/14
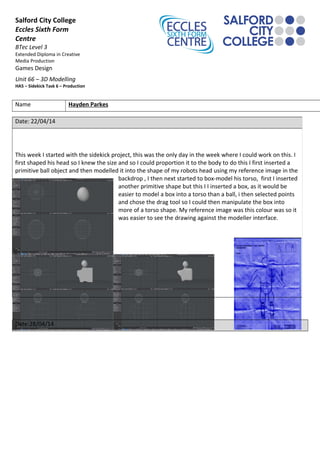
This week I started with the sidekick project, this was the only day in the week where I could work on this. I
first shaped his head so I knew the size and so I could proportion it to the body to do this I first inserted a
primitive ball object and then modelled it into the shape of my robots head using my reference image in the
backdrop , I then next started to box-model his torso, first I inserted
another primitive shape but this I I inserted a box, as it would be
easier to model a box into a torso than a ball, i then selected points
and chose the drag tool so I could then manipulate the box into
more of a torso shape. My reference image was this colour was so it
was easier to see the drawing against the modeller interface.
2. On this day I made a lot of progress with finishing my sidekick to
create his I arm I used the multi-shift tool to create an offshoot off his
torso I then used the tools drag, move and stretch to form his arm
again using the reference image to aid in my modelling. After his arm I
then worked on his waist and lower torso, the part that is connecting
his waist and torso was made using the pen toll as I wasn’t able to
model it using any of the primitives. I then used the multi-shift tool
again to make an off shooting to form his leg. When his thigh was
created I then added three capsules to make pipes to link his thigh to
his knee and lower leg, and then box modelled his foot.
Date:29/04/14
This time working with my sidekick I created an ankle joint to add
more of a robotic effect to my sidekick. I then went on to creating his
using a different reference as I found many difficulties trying to form
the hand from his arm, I used an image o found on Google to help
me with this modelling, this hand was also created using the pen
tool.
Date:06/05/14
3. This day I
created an
indent into
the side of
his head as
to further the robotic effect, I did this using polygon mode to
select the polygons I wanted and then used the bevel tool to
create the indent. After that I mirrored my sidekick to create
the other side of him as his symmetrical, I then started to
surface him and add colour.
Date:12/05/14
This was the last day I worked on my sidekick, adding the surfaces to him in Modeler, to add the surfaces in
Modeler I selected the polygons I wanted to surface and then pressed the Q button on the keyboard and
selecting the colour of them surfaces using sliders. Then when loading in my scene and object from Modeler
to Layout I had 3 lights and a camera but before taking shots of my robot I textured the surfaces I added to
him to make him look more metallic and robot than before, after texturing the surfaces I took various shots of
my robot and rendered them out then saved them as JPEG’s to use later on in my presentation. Below are just
a few shots of my robot sidekick