Azure Monitor & Application Insight to monitor Infrastructure & Application
Lab apparatus
1. LAB APPARATUS
NO Apparatus Function/Description How to use
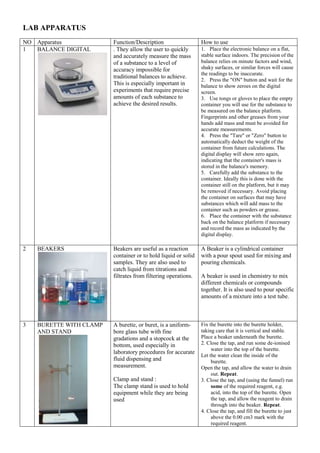
1 BALANCE DIGITAL . They allow the user to quickly
and accurately measure the mass
of a substance to a level of
accuracy impossible for
traditional balances to achieve.
This is especially important in
experiments that require precise
amounts of each substance to
achieve the desired results.
1. Place the electronic balance on a flat,
stable surface indoors. The precision of the
balance relies on minute factors and wind,
shaky surfaces, or similar forces will cause
the readings to be inaccurate.
2. Press the "ON" button and wait for the
balance to show zeroes on the digital
screen.
3. Use tongs or gloves to place the empty
container you will use for the substance to
be measured on the balance platform.
Fingerprints and other greases from your
hands add mass and must be avoided for
accurate measurements.
4. Press the "Tare" or "Zero" button to
automatically deduct the weight of the
container from future calculations. The
digital display will show zero again,
indicating that the container's mass is
stored in the balance's memory.
5. Carefully add the substance to the
container. Ideally this is done with the
container still on the platform, but it may
be removed if necessary. Avoid placing
the container on surfaces that may have
substances which will add mass to the
container such as powders or grease.
6. Place the container with the substance
back on the balance platform if necessary
and record the mass as indicated by the
digital display.
2 BEAKERS Beakers are useful as a reaction
container or to hold liquid or solid
samples. They are also used to
catch liquid from titrations and
filtrates from filtering operations.
A Beaker is a cylindrical container
with a pour spout used for mixing and
pouring chemicals.
A beaker is used in chemistry to mix
different chemicals or compounds
together. It is also used to pour specific
amounts of a mixture into a test tube.
3 BURETTE WITH CLAMP
AND STAND
A burette, or buret, is a uniform-
bore glass tube with fine
gradations and a stopcock at the
bottom, used especially in
laboratory procedures for accurate
fluid dispensing and
measurement.
Clamp and stand :
The clamp stand is used to hold
equipment while they are being
used
Fix the burette into the burette holder,
taking care that it is vertical and stable.
Place a beaker underneath the burette.
2. Close the tap, and run some de-ionised
water into the top of the burette.
Let the water clean the inside of the
burette.
Open the tap, and allow the water to drain
out. Repeat.
3. Close the tap, and (using the funnel) run
some of the required reagent, e.g.
acid, into the top of the burette. Open
the tap, and allow the reagent to drain
through into the beaker. Repeat.
4. Close the tap, and fill the burette to just
above the 0.00 cm3 mark with the
required reagent.
2. Remove the funnel. Make sure that there
are no air bubbles inside the burette.
Slowly open the tap, and allow the reagent
to run down to (or just past) the 0.00
cm3 mark.
Close the tap.
5. Remove the beaker, and place a white
tile under the burette. Put a conical
flask under the burette, and adjust the
height of the burette so that the tip is
just above the lip of the conical flask.
The burette is now ready for use.
4 FLASK, ERLENMEYER Are useful to contain reaction or
to hold liquid samples. They are
also useful to catch filtrates.
Commonly, we can use it by hold the
flask on the neck of it.
5 FLASK, FILTERING
FLASK WITH COLLAR
AND VACUUM TUBING
Vacuum flask can keep heat,
because there is a gap between the
inner and outer walls of the flask.
During the manufacturing process
the air in the gap is extracted and
the opening is sealed - creating a
vacuum between the walls.
Heat transmits rapidly through air
- but a lot less rapidly, in fact only
very, very slowly, through a
vacuum.
A vacuum flask not only keeps
heat in, it also keeps it out. If you
put iced water into a vacuum flask
it will stay cold for a very long
time.
A filter flask is a flask fitted with a
side arm for connecting to a vacuum
source. The flask is used with a
Buchner funnel (a funnel with a flat,
porous bottom). By drawing a vacuum
on the flask, the filtration can be
caused to be faster. The filter flask
looks like a thick glass version of an
Erlenmeyer flask with a side arm for
attaching the vacuum source.
6 FLASK, VOLUMETRIC A volumetric flask is a container that
is used to measure the volume of a
liquid with extremely high accuracy.
It is the best way to measure a
specific quantity of a liquid.
It cannot be used to measure just any
volume (unlike a graduate cylinder) -
- each volumetric flask is designed to
measure one specific volume.
Because of that they come in a
variety of sizes, such as 1 mL, 5 mL,
10 mL, 25 mL, 50 mL, 100 mL, 250
mL, 500 mL, 1000 mL, 2 L, and 5 L.
A volumetric flask is tear-drop
shaped, with a very long neck and a
round section at the bottom (and a
flat bottom so that it stands upright
on a flat surface)
In a volumetric flask, you should also
fill the flask until the bottom of the
meniscus is at the level of the marked
Example on an experiment :
Multiply the molarity by the volume of
the solution and the molar mass of the
compound to calculate the mass of the
substance needed. In our example, the
molar mass of sodium hydroxide is 40
g/mole and the solution volume is 0.5 L
(500 ml). The mass of sodium hydroxide
is 2 mole/L x 0.5 L x 40 g/mole = 40 g.
Weigh the calculated amount of the
compound (step 1) on the analytical
scale. Carefully transfer sodium
hydroxide into the "500 ml" volumetric
flask.
Add about 400 ml of the distilled water
into the volumetric flask. Gently swirl
the flask until the sodium hydroxide gets
completely dissolved.
Add the distilled water slowly to the
volumetric flask until the level of the
liquid almost reaches the volume mark
on the flask neck.
Fill in the plastic pipette with the
distilled water.Lift the volumetric flask
3. ring around the neck of the flask.
Hold the flask at eye level and
carefully add liquid (drop by drop if
necessary) until the bottom of the
meniscus is exactly at the level of the
marking on the neck of the flask.
to bring the volume mark to the eye
level. You will see the curved solution
meniscus.Add the distilled water from
the pipette drop by drop until the bottom
of the solution meniscus lines up exactly
with the volume mark.
7 FUNNEL, BUCHNER are for funneling liquids from one
container
to another or for filtering when
equipped with filter paper.
Buchner funnels are used to
conduct filtrations very quickly
Essentially, the Buchner funnel
simply speeds up the separation of
solid/liquid mixtures by drawing
off the liquid under vacuum and
catching the solid component on a
piece of filter paper. This basic
concept can save significant
amounts of time compared to the
much slower process of gravity
filtration.
8 1. PIPETTE,
DISPOSABLE
are used to dispense small
quantities of liquids.
Squeeze the bulb before inserting
the tip of the pipette into the
liquids of choice.
Insert the pipette into the liquid to
be moved.
Release your grip on the bulb.
The liquid will be sucked into the
pipette.
Move your pipette to the next
container and squeeze the bulb.
Its contents will be pushed into
the container.
9 PIPETTE, MOHR Mohr pipettes are measuring
devices that have multiple
graduation lines, so you can
use them to measure and
dispense volumes of liquid that
you cannot do with a standard
volumetric pipette.
Insert the non-tapered end of the Mohr
pipette into your pipette aid, so that it fits
snugly and is able to remain inserted
without you having to hold the pipette
itself.
Draw up the fluid you want to transfer
vertically into the Mohr pipette using the
pipette aid, so that the the bottom of the
curve created by the top of the fluid (also
known as the meniscus) is precisely at the
top graduation mark. No matter what size
Mohr pipette you are using, the top
graduation mark on it will be 0 milliliter
(ml).
Determine, based on the amount of fluid
you want to transfer, at which graduation
mark on the Mohr pipette you should stop
the meniscus of the fluid while you are
dispensing. For example, if you want to
transfer 6 ml of fluid from a full 10 ml
Mohr pipette, you will want the meniscus
to stop at the 6 ml graduation mark.
Dispense the fluid in your Mohr pipette
using the pipette aid, stopping when the
meniscus reaches the graduation mark that
4. corresponds to the volume of fluid you
want to transfer.
10 PIPETTE PUMPS are used to dispense small
quantities of liquids.
Insert the cotton-filled end of a sterile
pipette into the end of a plastic pipette
pump.
o Both pipettes and pumps come in
different sizes. Be sure to use a pump that
can "suck" the quantity of liquid you want
(e.g. 10 ml pump with a 5 ml or 10 ml
sterile pipette).
Using the wheel at the top of the
pump, raise the white top of the pump
approximately 1 cm BEFORE inserting
the pipette into the liquid.
o This step is necessary in order to create
additional air pressure in the pipette as
you expel the liquid.
Next, place the tapered tip of the
pipette into the liquid. The tip should be
within the liquid during the pipetting.
Hold the pipette pump with one hand--
your thumb should be placed on the
wheel.
Use your thumb to rotate the wheel
downward. This will cause the liquid to
rise into the pipette. Do this carefully and
watch the meniscus of the liquid rise to
your desired level.
o Remember: Measure the level of the
liquid at the BOTTOM of the meniscus.
Next, take the tip of the pipette out of
the liquid and move the entire apparatus to
the place where you desire to put the
measured liquid.
Use your thumb to rotate the wheel
upward. This will cause the liquid to be
dispensed from the pipette. Lower the
white top of the pump all the way to the
pump shaft. Because you created the extra
space before pipetting, the entire contents
of the pipette should be now be dispensed!
11 RING STAND WITH RING
CLAMPS
are for holding pieces of
glassware in place.
In chemistry, a ring stand places a
heated sample above the direct
flame of a Bunsen burner.
Clamps and ring stands are used to
hold glassware and apparatuses in
place. For example, clamps are
frequently used to hold round-bottom
flasks, condensers, thermometers,
addition funnels, etc. Ring stands may
be used for larger diameter items,
including separatory funnels, filter
funnels, wire gauze etc.
12 STIRRER/HOT PLATE
AND STIR BARS
The function of hot plate with
stirrer :
a) Stirring a solution with the
magnetic stirrer
b) Simultaneously heating the
same solution
Magnetic Stirrer :
Place the magnetic stir bar into the flask or
beaker by gently sliding it along the wall
of the vessel. Make sure that the plate is
relatively cool initially, and that the stirrer
5. Stirring a solution with the
magnetic stirrer
b) Simultaneously heating the
same solution
Stir bars :
A magnetic stir bar is used to stir
a mixture on a stir plate. The stir
plate contains a magnet that spins,
causing the magnetic stir bar to
spin and stir the mixture. Many
hot plates also have this feature
built in.
is off before placing the vessel onto the
plate.
Place the flask onto the plate and turn on
the stirrer. Use a low setting at first, and
increase the rate of stirring if necessary.
Do not stir the solution too rapidly.
thermometer, clamp it in place so that the
thermometer's tip does not come into
contact with the stir bar or the sides of the
vessel.
Hot Plate :
Place the vessel containing the liquid to be
heated on the plate. If the liquid should be
stirred while it is being heated, the vessel
should contain a magnetic stir bar. Turn on
the hotplate using the heating control
knob. The red light to the left of the knob
flashes to indicate the heat setting.
13 TEST TUBE RACK A test tube holder is used in a
laboratory and it is used to
hold/support test tubes containing
chemicals waiting for further
operations. Although it is called a
test tube holder, it is also used to
hold/ support pipettes, etc.
Since a test tube has a rounded
bottom, it cannot stand by itself;
the rack is a convenient and
necessary piece of laboratory
equipment for the storage of test
tubes.
Test tube racks are used to support the
test tubes but unlike the test tube
holder, it can store the test tubes
without anyone who will hold the rack.
14 TONGS are similar in function to forceps but
are useful for
larger items.
Laboratory tongs are large pincers
for grasping and lifting vessels of
heat-resistant material used in high
temperature chemical reactions. They
can be used to hold or pick up many
items, but work best as tongs for
picking up a hot evaporating dish.
Crucible tongs are welded steel tools
used to lift a hot crucible from a
furnace or for other items you may
not want to handle with your hands.
Crucible tongs may also be used to
prevent any inaccuracies regarding
mass measurements as any moisture
or oil will affect the readings and
accuracy.
Beaker tongs are best used to hold a
hot beaker.
Pick up hot glassware without heat
protection and your skin will be
injured. This is as true in the
laboratory as it is in your kitchen.
Lab tongs, part of a range of
laboratory safety equipment, help
you move hot ceramics and
glassware safely. Lab tongs are a
type of forceps designed to grip
laboratory items used during a
heating process. Opening and
closing lab tongs is an intuitive
action. You will avoid accidents by
always using the tongs during
heating experiments. You can
handle lab tongs safely by
complying with some basic safety
procedures.
15 WIRE GAUZE WITH
CERAMIC CENTER
Wire gauze can be used to support a
container (such as a beaker or flask)
during heating. When the bunsen
burner flame is beneath it, with a
On a bunsen burner tripod.
It is for the beaker or other container.
6. tripod, the wire gauze helps to spread
the flame (and heat) out evenly over
the container.
It is frequently used in combination
with an iron ring and ring stand with
a bunsen burner underneath it (see the
Related Questions for more
information about an iron ring, ring
stand, and bunsen burner & tripod).
A clay triangle serves a similar
purpose, except that a clay triangle is
used for a crucible instead.
16 CENTRIFUGE TUBE A centrifuge is used for separating
components in a liquid that have
different weights.
Make a counterbalance for the
centrifuge tube you want to put in the
centrifuge. The masses, not volumes,
of the tubes should be as close as
possible! Unbalanced tubes may
permanently damage the centrifuge.
Put the tubes opposite each other in the
centrifuge. If you have more than two
tubes, only the ones opposite each
other have to be equal in mass.
Enter your settings such as rotations
per minute.
Remove the tubes carefully after the
centrifuge has completely stopped
spinning. This is so that the different
suspensions do not mix again.
17 CRUCIBLE WITH LID A crucible is a container that is
used to hold things whilst they are
heated to very high temperatures
and typically melted.
In the school chemistry lab they
are usually small ceramic pots. A
substance is placed in the
crucible. A lid may be used to
cover it. The crucible is heated,
typically with a Bunsen burner. A
support system is usually used
(such as a triangle of pipe clay on
wire placed on a tripod) to
minimize the risk of burns.
A crucible is used to hold small
amounts of chemicals during heating at
high temperatures. The lid covers the
bowl so nothing escapes, or to keep
oxygen out of the reaction.
18 LIEBIG CONDENSER it is used to separate two liquids
and find out what both of them
are
The liebig condenser is used in
distillation. It allows cold water to run
in the condenser so that the vapour
passing through it can condense.
7. 19 DESICATOR GLASS The dessicator is a very usual
laboratory instrument used to dry
substances or to store dry substances.
Desiccators are sealable
enclosures containing desiccants
used for preserving moisture-
sensitive items. A common use
for desiccators is to protect
chemicals which are hygroscopic
or which react with water from
humidity.
The contents of desiccators are
exposed to atmospheric moisture
whenever the desiccators are
opened. It also requires some time
to achieve a low humidity. Hence
they are not appropriate for
storing chemicals which react
quickly or violently with
atmospheric moisture such as the
alkali metals. Aglovebox or
Schlenk-type apparatus may be
more suitable for these purposes.
Desiccators are sometimes used to remove
traces of water from an almost-dry sample.
Where a desiccator alone is unsatisfactory,
the sample may be dried at elevated
temperature using Abderhalden's drying
pistol.
in laboratory use, the most common
desiccators are circular, and made of heavy
glass. There is usually a removable
platform on which the items to be stored
are placed. The desiccant, usually an
otherwise-inert solid such as silica gel, fills
the space under the platform.
A stopcock may be included to permit the
desiccator to be evacuated. Such models
are usually known as vacuum desiccators.
When a vacuum is to be applied, it is a
common practice to criss-cross the vacuum
desiccator with tape, or to place it behind a
screen to minimize damage or injury
caused by an implosion.
To maintain a good seal, vacuum grease is
usually applied to the flanges.
20 DRYING TUBE A drying tube or guard tube is a
tube-like piece of apparatus used
to house a disposable solid
desiccant, wherein at one end the
tube-like structure terminates in a
ground glass joint for use in
connecting the drying tube to a
reaction vessel, for the purpose of
keeping the vessel free of
moisture from the air from
entering a reaction flask..
The tube-like structure is often
bent and can also widen to form a
bulb/desiccant reservoir. If the
drying tube is bent the bend is
oriented so that solid desiccant
does not fall into the reaction
vessel.
useful as a molecular sieve for running
anhydrous reactions.
11. 40 BEND PIPE
41 PLASTIC WASH BOTTLE for dispensing small quantities
of distilled water.
Press the bottle and then the water
will be go out
42 PNEUMATIC TROUGH To hold water, gas collecting
bottles and delivery tube from
gas generator.
43 FUNNEL SUPPORT To support funnel Put the funnel on the funnel support
44 FORCEPS To pick up or hold small object
45 BINOCULAR
MICROSCOPE
To observe the microscopic
object like plant cell, animal
cell etc
Put the object which you want to
observe, covered it by glass plate.
You can set the objective lens, and
observe the object.
46 WATCH GLASS for holding small samples or
for covering beakers or
evaporating dishes.
12. 47 GLASS PLATE To hold the specimen You put a specimen on a glass plate
and then view the specimen under a
microscope. It acts sort of like a
slide.
48 EVAPORATING DISH As a container for small
amounts of liquid being
evaporated.
Put the liquid/subtances in the
evaporating dish
49 TEST TUBE BRUSH made with nylon bristles
attached to a twisted-wire
shaft, used to knock the
bottoms out of test tubes.
It is a brush that is long and
narrow to clean the inside of
glassware, in particular test
tubes.
make test tube brush get in and get
out from test tube to clean the test
tube.
50 DROP PLATE a place to test the chemistry
reaction inlarge quantities.
Put the small substances in drop
plate by dropper/pipette
51 CLAY TRIANGLES A clay triangle is a piece of
laboratory equipment used in
the process of heating
substances. It is used in
conjunction with other lab
equipment to create a stable
framework in which to place a
substance -- usually a solid
chemical -- while it is heated to
a high temperature.
The Clay triangle is placed into the
open triangle gives stability to the
set up to prevent tipping and
spilling the molten contents.
52 DROPPERS A dropper is used to dispense
small amounts of a liquid. It is
especially useful when the
Squeeze the rubber part, put in
liquid, let go of rubber part- you
have liquid in dropper
13. amount to be added is very
small and needs to be
measured accurately.
slowly squeeze out drops
53 HOT PLATES A hot plate is an adjustable
heating source which is ideal
for heating beakers, erlenmeyer
flasks, hot water baths, and
other flat-bottomed containers.
It is essentially an electric
stove top that is used in the
laboratory.
A hot plate or heating mantle
should always be used in place of a
Bunsen burner or other open-flame
source to heat a flammable liquid
54 SPECTROPHOTOMETERS measure the absorbance or
tran smittance of a liquid
sample.
55 FUME HOODS ventilate noxious or harmful
gases.
56 BUNSEN BURNER Its source of heat Lighting the Bunsen burner - Make
sure the
rubber tubing is connec ted to the
Bunsen
burner and the gas jet. Turn the gas
valve
until it is parallel to the gas jet.
You should be
able to hear the gas flow. Use a
flint striker to
cause a spark and ignite the gas.
Adjusting the Bunsen burner - First,
adjust
the height of the flame using the
gas valve at
the bottom of the burner. For a
14. clean burning
flame, more air is required than is
available
from the gas exhaust. The air
vents can be
adjusted to produce an inner blue
cone in the
flame with no yellow tip. Too little
air produces
a sooty, orange-yellow tipped
flame that is
quite noisy. Too much air supply
may cause
the flame to separate from the
burner and
even blow itself out. The ideal
working flame
is bluish-green with a light blue
cone and it
burns quietly.
57 POWER SUPPLY a device that supplies electric
power to an electrical load
Connect the power supply with the
electricity source and then turn on
the power supply.
THIS IS STILL NEED TO BE EDITED, SORRY ^_^