How to Make a KODAK Photo Book in 10 Steps
•
0 gostou•715 visualizações

The document provides steps for making a photo book using a Kodak kiosk: 1) Select photo book and size/style, 2) Choose a background, 3) Add photos from media and select title page photo, 4) Rearrange photos and edit pages, 5) Select quantity and checkout. The 10 step process walks users through selecting options, adding their photos, customizing pages, and placing an order for their photo book.

Recomendados
Mais conteúdo relacionado
Semelhante a How to Make a KODAK Photo Book in 10 Steps
Semelhante a How to Make a KODAK Photo Book in 10 Steps (13)
Último
Último (7)
How to Make a KODAK Photo Book in 10 Steps
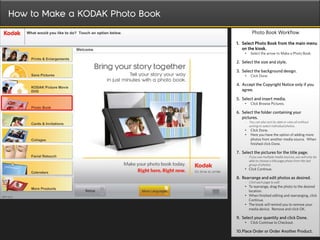
- 1. How to Make a KODAK Photo Book Photo Book Workflow 1. Select Photo Book from the main menu on the kiosk. • Select the arrow to Make a Photo Book. 2. Select the size and style. 3. Select the background design. • Click Done. 4. Accept the Copyright Notice only if you agree. 5. Select and insert media. • Click Browse Pictures. 6. Select the folder containing your pictures. - You can also sort by date or view all without sorting to select individual photos. • Click Done. • Here you have the option of adding more photos from another media source. When finished click Done. 7. Select the pictures for the title page. - If you use multiple media sources, you will only be able to choose a title page photo from the last group of photos. • Click Continue. 8. Rearrange and edit photos as desired. - Click each page to edit. • To rearrange, drag the photo to the desired location. • When finished editing and rearranging, click Continue. • The kiosk will remind you to remove your media device. Remove and click OK. 9. Select your quantity and click Done. • Click Continue to Checkout. 10.Place Order or Order Another Product.
- 2. How to Make a KODAK Photo Book Photo Book Workflow 1. Select Photo Book from the main menu on the kiosk. • Select the arrow to Make a Photo Book. 2. Select the size and style. 3. Select the background design. • Click Done. 4. Accept the Copyright Notice only if you agree. 5. Select and insert media. • Click Browse Pictures. 6. Select the folder containing your pictures. - You can also sort by date or view all without sorting to select individual photos. • Click Done. • Here you have the option of adding more photos from another media source. When finished click Done. 7. Select the pictures for the title page. - If you use multiple media sources, you will only be able to choose a title page photo from the last group of photos. • Click Continue. 8. Rearrange and edit photos as desired. - Click each page to edit. • To rearrange, drag the photo to the desired location. • When finished editing and rearranging, click Continue. • The kiosk will remind you to remove your media device. Remove and click OK. 9. Select your quantity and click Done. • Click Continue to Checkout. 10.Place Order or Order Another Product.
- 3. How to Make a KODAK Photo Book Photo Book Workflow 1. Select Photo Book from the main menu on the kiosk. • Select the arrow to Make a Photo Book. 2. Select the size and style. 3. Select the background design. • Click Done. 4. Accept the Copyright Notice only if you agree. 5. Select and insert media. • Click Browse Pictures. 6. Select the folder containing your pictures. - You can also sort by date or view all without sorting to select individual photos. • Click Done. • Here you have the option of adding more photos from another media source. When finished click Done. 7. Select the pictures for the title page. - If you use multiple media sources, you will only be able to choose a title page photo from the last group of photos. • Click Continue. 8. Rearrange and edit photos as desired. - Click each page to edit. • To rearrange, drag the photo to the desired location. • When finished editing and rearranging, click Continue. • The kiosk will remind you to remove your media device. Remove and click OK. 9. Select your quantity and click Done. • Click Continue to Checkout. 10.Place Order or Order Another Product.
- 4. How to Make a KODAK Photo Book Photo Book Workflow 1. Select Photo Book from the main menu on the kiosk. • Select the arrow to Make a Photo Book. 2. Select the size and style. 3. Select the background design. • Click Done. 4. Accept the Copyright Notice only if you agree. 5. Select and insert media. • Click Browse Pictures. 6. Select the folder containing your pictures. - You can also sort by date or view all without sorting to select individual photos. • Click Done. • Here you have the option of adding more photos from another media source. When finished click Done. 7. Select the pictures for the title page. - If you use multiple media sources, you will only be able to choose a title page photo from the last group of photos. • Click Continue. 8. Rearrange and edit photos as desired. - Click each page to edit. • To rearrange, drag the photo to the desired location. • When finished editing and rearranging, click Continue. • The kiosk will remind you to remove your media device. Remove and click OK. 9. Select your quantity and click Done. • Click Continue to Checkout. 10.Place Order or Order Another Product.
- 5. How to Make a KODAK Photo Book Photo Book Workflow 1. Select Photo Book from the main menu on the kiosk. • Select the arrow to Make a Photo Book. 2. Select the size and style. 3. Select the background design. • Click Done. 4. Accept the Copyright Notice only if you agree. 5. Select and insert media. • Click Browse Pictures. 6. Select the folder containing your pictures. - You can also sort by date or view all without sorting to select individual photos. • Click Done. • Here you have the option of adding more photos from another media source. When finished click Done. 7. Select the pictures for the title page. - If you use multiple media sources, you will only be able to choose a title page photo from the last group of photos. • Click Continue. 8. Rearrange and edit photos as desired. - Click each page to edit. • To rearrange, drag the photo to the desired location. • When finished editing and rearranging, click Continue. • The kiosk will remind you to remove your media device. Remove and click OK. 9. Select your quantity and click Done. • Click Continue to Checkout. 10.Place Order or Order Another Product.
- 6. How to Make a KODAK Photo Book Photo Book Workflow 1. Select Photo Book from the main menu on the kiosk. • Select the arrow to Make a Photo Book. 2. Select the size and style. 3. Select the background design. • Click Done. 4. Accept the Copyright Notice only if you agree. 5. Select and insert media. • Click Browse Pictures. 6. Select the folder containing your pictures. - You can also sort by date or view all without sorting to select individual photos. • Click Done. • Here you have the option of adding more photos from another media source. When finished click Done. 7. Select the pictures for the title page. - If you use multiple media sources, you will only be able to choose a title page photo from the last group of photos. • Click Continue. 8. Rearrange and edit photos as desired. - Click each page to edit. • To rearrange, drag the photo to the desired location. • When finished editing and rearranging, click Continue. • The kiosk will remind you to remove your media device. Remove and click OK. 9. Select your quantity and click Done. • Click Continue to Checkout. 10.Place Order or Order Another Product.
- 7. How to Make a KODAK Photo Book Photo Book Workflow 1. Select Photo Book from the main menu on the kiosk. • Select the arrow to Make a Photo Book. 2. Select the size and style. 3. Select the background design. • Click Done. 4. Accept the Copyright Notice only if you agree. 5. Select and insert media. • Click Browse Pictures. 6. Select the folder containing your pictures. - You can also sort by date or view all without sorting to select individual photos. • Click Done. • Here you have the option of adding more photos from another media source. When finished click Done. 7. Select the pictures for the title page. - If you use multiple media sources, you will only be able to choose a title page photo from the last group of photos. • Click Continue. 8. Rearrange and edit photos as desired. - Click each page to edit. • To rearrange, drag the photo to the desired location. • When finished editing and rearranging, click Continue. • The kiosk will remind you to remove your media device. Remove and click OK. 9. Select your quantity and click Done. • Click Continue to Checkout. 10.Place Order or Order Another Product.
- 8. How to Make a KODAK Photo Book Photo Book Workflow 1. Select Photo Book from the main menu on the kiosk. • Select the arrow to Make a Photo Book. 2. Select the size and style. 3. Select the background design. • Click Done. 4. Accept the Copyright Notice only if you agree. 5. Select and insert media. • Click Browse Pictures. 6. Select the folder containing your pictures. - You can also sort by date or view all without sorting to select individual photos. • Click Done. • Here you have the option of adding more photos from another media source. When finished click Done. 7. Select the pictures for the title page. - If you use multiple media sources, you will only be able to choose a title page photo from the last group of photos. • Click Continue. 8. Rearrange and edit photos as desired. - Click each page to edit. • To rearrange, drag the photo to the desired location. • When finished editing and rearranging, click Continue. • The kiosk will remind you to remove your media device. Remove and click OK. 9. Select your quantity and click Done. • Click Continue to Checkout. 10.Place Order or Order Another Product.
- 9. How to Make a KODAK Photo Book Photo Book Workflow 1. Select Photo Book from the main menu on the kiosk. • Select the arrow to Make a Photo Book. 2. Select the size and style. 3. Select the background design. • Click Done. 4. Accept the Copyright Notice only if you agree. 5. Select and insert media. • Click Browse Pictures. 6. Select the folder containing your pictures. - You can also sort by date or view all without sorting to select individual photos. • Click Done. • Here you have the option of adding more photos from another media source. When finished click Done. 7. Select the pictures for the title page. - If you use multiple media sources, you will only be able to choose a title page photo from the last group of photos. • Click Continue. 8. Rearrange and edit photos as desired. - Click each page to edit. • To rearrange, drag the photo to the desired location. • When finished editing and rearranging, click Continue. • The kiosk will remind you to remove your media device. Remove and click OK. 9. Select your quantity and click Done. • Click Continue to Checkout. 10.Place Order or Order Another Product.
- 10. How to Make a KODAK Photo Book Photo Book Workflow 1. Select Photo Book from the main menu on the kiosk. • Select the arrow to Make a Photo Book. 2. Select the size and style. 3. Select the background design. • Click Done. 4. Accept the Copyright Notice only if you agree. 5. Select and insert media. • Click Browse Pictures. 6. Select the folder containing your pictures. - You can also sort by date or view all without sorting to select individual photos. • Click Done. • Here you have the option of adding more photos from another media source. When finished click Done. 7. Select the pictures for the title page. - If you use multiple media sources, you will only be able to choose a title page photo from the last group of photos. • Click Continue. 8. Rearrange and edit photos as desired. - Click each page to edit. • To rearrange, drag the photo to the desired location. • When finished editing and rearranging, click Continue. • The kiosk will remind you to remove your media device. Remove and click OK. 9. Select your quantity and click Done. • Click Continue to Checkout. 10.Place Order or Order Another Product.
- 11. How to Make a KODAK Photo Book Photo Book Workflow 1. Select Photo Book from the main menu on the kiosk. • Select the arrow to Make a Photo Book. 2. Select the size and style. 3. Select the background design. • Click Done. 4. Accept the Copyright Notice only if you agree. 5. Select and insert media. • Click Browse Pictures. 6. Select the folder containing your pictures. - You can also sort by date or view all without sorting to select individual photos. • Click Done. • Here you have the option of adding more photos from another media source. When finished click Done. 7. Select the pictures for the title page. - If you use multiple media sources, you will only be able to choose a title page photo from the last group of photos. • Click Continue. 8. Rearrange and edit photos as desired. - Click each page to edit. • To rearrange, drag the photo to the desired location. • When finished editing and rearranging, click Continue. • The kiosk will remind you to remove your media device. Remove and click OK. 9. Select your quantity and click Done. • Click Continue to Checkout. 10.Place Order or Order Another Product.
- 12. How to Make a KODAK Photo Book Photo Book Workflow 1. Select Photo Book from the main menu on the kiosk. • Select the arrow to Make a Photo Book. 2. Select the size and style. 3. Select the background design. • Click Done. 4. Accept the Copyright Notice only if you agree. 5. Select and insert media. • Click Browse Pictures. 6. Select the folder containing your pictures. - You can also sort by date or view all without sorting to select individual photos. • Click Done. • Here you have the option of adding more photos from another media source. When finished click Done. 7. Select the pictures for the title page. - If you use multiple media sources, you will only be able to choose a title page photo from the last group of photos. • Click Continue. 8. Rearrange and edit photos as desired. - Click each page to edit. • To rearrange, drag the photo to the desired location. • When finished editing and rearranging, click Continue. • The kiosk will remind you to remove your media device. Remove and click OK. 9. Select your quantity and click Done. • Click Continue to Checkout. 10.Place Order or Order Another Product.
- 13. How to Make a KODAK Photo Book Photo Book Workflow 1. Select Photo Book from the main menu on the kiosk. • Select the arrow to Make a Photo Book. 2. Select the size and style. 3. Select the background design. • Click Done. 4. Accept the Copyright Notice only if you agree. 5. Select and insert media. • Click Browse Pictures. 6. Select the folder containing your pictures. - You can also sort by date or view all without sorting to select individual photos. • Click Done. • Here you have the option of adding more photos from another media source. When finished click Done. 7. Select the pictures for the title page. - If you use multiple media sources, you will only be able to choose a title page photo from the last group of photos. • Click Continue. 8. Rearrange and edit photos as desired. - Click each page to edit. • To rearrange, drag the photo to the desired location. • When finished editing and rearranging, click Continue. • The kiosk will remind you to remove your media device. Remove and click OK. 9. Select your quantity and click Done. • Click Continue to Checkout. 10.Place Order or Order Another Product.
- 14. How to Make a KODAK Photo Book Photo Book Workflow 1. Select Photo Book from the main menu on the kiosk. • Select the arrow to Make a Photo Book. 2. Select the size and style. 3. Select the background design. • Click Done. 4. Accept the Copyright Notice only if you agree. 5. Select and insert media. • Click Browse Pictures. 6. Select the folder containing your pictures. - You can also sort by date or view all without sorting to select individual photos. • Click Done. • Here you have the option of adding more photos from another media source. When finished click Done. 7. Select the pictures for the title page. - If you use multiple media sources, you will only be able to choose a title page photo from the last group of photos. • Click Continue. 8. Rearrange and edit photos as desired. - Click each page to edit. • To rearrange, drag the photo to the desired location. • When finished editing and rearranging, click Continue. • The kiosk will remind you to remove your media device. Remove and click OK. 9. Select your quantity and click Done. • Click Continue to Checkout. 10.Place Order or Order Another Product.
- 15. How to Make a KODAK Photo Book Photo Book Workflow 1. Select Photo Book from the main menu on the kiosk. • Select the arrow to Make a Photo Book. 2. Select the size and style. 3. Select the background design. • Click Done. 4. Accept the Copyright Notice only if you agree. 5. Select and insert media. • Click Browse Pictures. 6. Select the folder containing your pictures. - You can also sort by date or view all without sorting to select individual photos. • Click Done. • Here you have the option of adding more photos from another media source. When finished click Done. 7. Select the pictures for the title page. - If you use multiple media sources, you will only be able to choose a title page photo from the last group of photos. • Click Continue. 8. Rearrange and edit photos as desired. - Click each page to edit. • To rearrange, drag the photo to the desired location. • When finished editing and rearranging, click Continue. • The kiosk will remind you to remove your media device. Remove and click OK. 9. Select your quantity and click Done. • Click Continue to Checkout. 10.Place Order or Order Another Product.
- 16. How to Make a KODAK Photo Book Photo Book Workflow 1. Select Photo Book from the main menu on the kiosk. • Select the arrow to Make a Photo Book. 2. Select the size and style. 3. Select the background design. • Click Done. 4. Accept the Copyright Notice only if you agree. 5. Select and insert media. • Click Browse Pictures. 6. Select the folder containing your pictures. - You can also sort by date or view all without sorting to select individual photos. • Click Done. • Here you have the option of adding more photos from another media source. When finished click Done. 7. Select the pictures for the title page. - If you use multiple media sources, you will only be able to choose a title page photo from the last group of photos. • Click Continue. 8. Rearrange and edit photos as desired. - Click each page to edit. • To rearrange, drag the photo to the desired location. • When finished editing and rearranging, click Continue. • The kiosk will remind you to remove your media device. Remove and click OK. 9. Select your quantity and click Done. • Click Continue to Checkout. 10.Place Order or Order Another Product.
- 17. How to Make a KODAK Photo Book Photo Book Workflow 1. Select Photo Book from the main menu on the kiosk. • Select the arrow to Make a Photo Book. 2. Select the size and style. 3. Select the background design. • Click Done. 4. Accept the Copyright Notice only if you agree. 5. Select and insert media. • Click Browse Pictures. 6. Select the folder containing your pictures. - You can also sort by date or view all without sorting to select individual photos. • Click Done. • Here you have the option of adding more photos from another media source. When finished click Done. 7. Select the pictures for the title page. - If you use multiple media sources, you will only be able to choose a title page photo from the last group of photos. • Click Continue. 8. Rearrange and edit photos as desired. - Click each page to edit. • To rearrange, drag the photo to the desired location. • When finished editing and rearranging, click Continue. • The kiosk will remind you to remove your media device. Remove and click OK. 9. Select your quantity and click Done. • Click Continue to Checkout. 10.Place Order or Order Another Product.
- 18. How to Make a KODAK Photo Book Photo Book Workflow 1. Select Photo Book from the main menu on the kiosk. • Select the arrow to Make a Photo Book. 2. Select the size and style. 3. Select the background design. • Click Done. 4. Accept the Copyright Notice only if you agree. 5. Select and insert media. • Click Browse Pictures. 6. Select the folder containing your pictures. - You can also sort by date or view all without sorting to select individual photos. • Click Done. • Here you have the option of adding more photos from another media source. When finished click Done. 7. Select the pictures for the title page. - If you use multiple media sources, you will only be able to choose a title page photo from the last group of photos. • Click Continue. 8. Rearrange and edit photos as desired. - Click each page to edit. • To rearrange, drag the photo to the desired location. • When finished editing and rearranging, click Continue. • The kiosk will remind you to remove your media device. Remove and click OK. 9. Select your quantity and click Done. • Click Continue to Checkout. 10.Place Order or Order Another Product.
- 19. How to Make a KODAK Photo Book Photo Book Workflow 1. Select Photo Book from the main menu on the kiosk. • Select the arrow to Make a Photo Book. 2. Select the size and style. 3. Select the background design. • Click Done. 4. Accept the Copyright Notice only if you agree. 5. Select and insert media. • Click Browse Pictures. 6. Select the folder containing your pictures. - You can also sort by date or view all without sorting to select individual photos. • Click Done. • Here you have the option of adding more photos from another media source. When finished click Done. 7. Select the pictures for the title page. - If you use multiple media sources, you will only be able to choose a title page photo from the last group of photos. • Click Continue. 8. Rearrange and edit photos as desired. - Click each page to edit. • To rearrange, drag the photo to the desired location. • When finished editing and rearranging, click Continue. • The kiosk will remind you to remove your media device. Remove and click OK. 9. Select your quantity and click Done. • Click Continue to Checkout. 10.Place Order or Order Another Product.
- 20. How to Make a KODAK Photo Book Photo Book Workflow 1. Select Photo Book from the main menu on the kiosk. • Select the arrow to Make a Photo Book. 2. Select the size and style. 3. Select the background design. • Click Done. 4. Accept the Copyright Notice only if you agree. 5. Select and insert media. • Click Browse Pictures. 6. Select the folder containing your pictures. - You can also sort by date or view all without sorting to select individual photos. • Click Done. • Here you have the option of adding more photos from another media source. When finished click Done. 7. Select the pictures for the title page. - If you use multiple media sources, you will only be able to choose a title page photo from the last group of photos. • Click Continue. 8. Rearrange and edit photos as desired. - Click each page to edit. • To rearrange, drag the photo to the desired location. • When finished editing and rearranging, click Continue. • The kiosk will remind you to remove your media device. Remove and click OK. 9. Select your quantity and click Done. • Click Continue to Checkout. 10.Place Order or Order Another Product.
- 21. How to Make a KODAK Photo Book Depending on the Photo Book size and style ordered, your Photo Book will print at the kiosk or behind the counter.