SlideShare uma empresa Scribd logo
1 de 72
Startup Engineering Class: class.coursera.org/startup-001
Balaji S. Srinivasan Signup: coursera.org/course/startup
Stanford University Forums: bit.ly/startup-eng-forum
Interactive Start
Your First Webapp
Let’s get started. Our first goal is to get you set up with a basic development environment
and then get a simple page online by following these steps:
1. Set up Google Chrome and your terminal, and sign up for Amazon Web Services (AWS),
Github, Heroku, and Gravatar.
2. Initialize and connect to an AWS cloud instance.
3. Clone code from github.com/heroku/node-js-sample, create a new Heroku app and get
your page live on the web (Figure 1).
Figure 1: Here is what your final goal is: a simple web page up and live on Heroku.
The general concept of how all these services fit together is illustrated in Figure 2. Even
if you don’t know what all the terms mean, just follow along with the screens in this lecture.
We’ll review things more formally once you get your simple site online.
1
Figure 2: Here’s how the pieces we set up today will fit together. During the class, you will remotely
control an AWS virtual machine from your laptop and use it to edit code, periodically storing the
intermediate results on Github. Once you are ready, you will deploy your code to Heroku for viewing
by the world. The reason we recommend AWS rather than your local computer for development is that
using a virtual machine means you can easily replicate the development environment. By contrast, it
is much more time consuming to get another engineer set up with all the programs and libraries on
your local computer. For this lecture, you won’t be pushing code to github, but you will be pulling it
from github.com/heroku/node-js-sample.
2
Setup and Signup
Install Google Chrome
Begin by installing the Google Chrome web browser and the User Agent Switcher extension,
which you will use to make your browser mimic a smartphone or tablet. Chrome has a number
of advanced tools for debugging websites which we will use later on in the class.
Figure 3: Install Google Chrome.
Figure 4: Install the Chrome User Agent Switcher, to mimic smartphones/tablets.
3
Set up your terminal
A command line interface (CLI) is a way to control your computer by typing in commands
rather than clicking on buttons in a graphical user interface (GUI). Most computer users are
only doing basic things like clicking on links, watching movies, and playing video games, and
GUIs are fine for such purposes.
Figure 5: Closing an application via the GUI requires a click.
Figure 6: Achieving the same task with the CLI by running kill.
4
But to do industrial strength programming - to analyze large datasets, ship a webapp, or
build a software startup - you will need an intimate familiarity with the CLI. Not only can
many daily tasks be done more quickly at the command line, many others can only be done at
the command line, especially in non-Windows environments. You can understand this from
an information transmission perspective: while a standard keyboard has 50+ keys that can
be hit very precisely in quick succession, achieving the same speed in a GUI is impossible as
it would require rapidly moving a mouse cursor over a profusion of 50 buttons. It is for this
reason that expert computer users prefer command-line and keyboard-driven interfaces.
Much of the class will be spent connecting to a remote cloud computer and executing
commands there, rather than executing commands on your local computer. However, to
accomplish this you will still want to set up a basic command line on your local computer.
• Mac OS X: Terminal.app
Apple laptops are preferred by many Silicon Valley engineers because they run BSD
Unix under the hood. We recommend getting a Mac with an SSD drive if you wish
to join a startup in the Valley; it is standard issue at this point. You can gain access
to the Unix command line by on a Mac by opening up Terminal.app, located under
/Applications/Utilities/Terminal.app
Figure 7: Double click /Applications/Utilities/Terminal.app.
5
Figure 8: You should see a window like this pop up.
Figure 9: Go to Terminal -> Preferences in the top left.
6
Figure 10: Here’s your preference window. There are only a few preferences we need to tweak.
7
Figure 11: Click Settings (in the top row of buttons) and then “Keyboard”. Click “Use option as meta
key”. You’ll need this for emacs.
8
Figure 12: Now click Advanced and set the “Delete sends Ctrl-H” setting. This is useful for Ubuntu.
9
• Windows: Cygwin
Relatively few startups use Windows computers for their primary development ma-
chines, in part because command line support has historically been something of an
afterthought. For the many students who still run Windows, for the purposes of this
course we are recommending that you use Cygwin to get a Unix-like environment on
your Windows computer. Install Cygwin from cygwin.com/setup.exe as shown:
10
Figure 13: Cygwin provides a Linux-like command line environment on Windows.
11
Figure 14: Download cygwin.com/setup.exe and double-click it.
Figure 15: Set up access for all users in the default directory C:cygwin
12
Figure 16: Select “Direct Connection”.
Figure 17: Use http://mirrors.kernel.org for fast downloading. This is the Linux Kernel site.
13
Figure 18: Click OK here.
Figure 19: You now need to select some packages to install.
14
Figure 20: Type in ssh and select OpenSSH (what’s shown is overkill but doesn’t hurt).
Figure 21: Go ahead to the next screen.
15
Figure 22: Wait for setup to complete.
Figure 23: You now have a command-line interface on Windows. Double click the Desktop Cygwin
icon to boot up a terminal.
16
Figure 24: Upon first boot, your Cygwin terminal should show a message like this.
Figure 25: You can confirm it works by typing in ping google.com and seeing a Reply.
17
Besides Cygwin, it is also possible to use a pure SSH client like Putty, a browser-based
client like the Chrome Secure Shell, or the native Windows Powershell. The reason we
prefer Cygwin is threefold. First, some commands are best done locally. Second, of these
alternatives, the environment that Cygwin provides is closest to the environment on a
real Unix box, so we don’t need to change the instructions around too much for each
platform. Third, the local Cygwin environment can be configured to be very similar to
the remote environment on your AWS machine (though a Mac will get even closer).
• Linux: Terminal
If you are using Linux, you probably already know how to open up the Terminal. But
just in case, here are instructions for Ubuntu.
Sign up for AWS, Gravatar, Github, and Heroku
Now that you have your browser (Chrome) and your terminal (Terminal.app or Cygwin), you
will begin by signing up for four webservices:
• Github: github.com
• Gravatar: gravatar.com
• Amazon Web Services: aws.amazon.com
• Heroku: heroku.com
Over the course of this class, you will use Github to store code, Gravatar to identify
yourself in public git commits and pull requests, AWS as a development environment for
writing code, and Heroku for deploying your code on the web.
• AWS Signup
Let’s begin by getting you set up with Amazon Webservices. You will need an email
account, your cellphone, and your credit card with you to begin. Please use the same
email account/phone/credit card for all services used in this course; this will save you
headaches related to service synchronization. Note also that the credit card will only
be billed if you exceed the free usage tier. We’ll talk about this later, and Amazon has
some checks in place to prevent you from using too much, but right now you won’t be
billed. Begin by going to http://aws.amazon.com and then following the sequence of
screens as shown below:
18
Figure 26: The AWS homepage. Click “Sign Up” at the top.
Figure 27: The signup form.
19
Figure 28: Register as a new user.
Figure 29: Set up your login.
20
Figure 30: Enter address and complete CAPTCHA.
21
Figure 31: Set up your credit card.
22
Figure 32: Begin phone verification.
23
Figure 33: When called, enter in your PIN followed by an asterisk (‘*’).
24
Figure 34: Identity verification complete.
25
Figure 35: Account activation is now beginning. This may take a while.
26
Figure 36: You should receive an account confirmation email.
27
Figure 37: Go to aws.amazon.com/products and click ‘My Account Console’ to log in.
28
Figure 38: Now you have an active AWS dashboard. EC2 (boxed) will be of particular interest to us
soon.
29
Fantastic. You now have access to a variety of AWS services. Let’s keep going and we’ll
come back to this dashboard as the class progresses.
• Gravatar Signup
The next step is to get your Gravatar account set up, so that you have a globally
recognizable avatar that will be used to identify your git commits. A Gravatar is
very similar to the small image that appears next to your comments on Facebook,
except that it is used by sites outside of Facebook, such as Github. Begin by going to
http://www.gravatar.com and then work through the following steps:
Figure 39: Go to the gravatar homepage to get started.
30
Figure 40: Once everything is set up, your page should look like this.
31
The Gravatar site has been buggy in the past and you may need to repeat some of the
steps (particularly the cropping step and the “add a new image” step at the very end) a
few times. Do this by logging out of Gravatar, clearing cookies in Chrome, logging back
in and resuming where you left off.
• Github Signup
Github is one of the most important developments in software over the past five years.
The site began in 2008 as a simple frontend for the open-source git distributed version
control tool, which we will cover in much more detail later in the course. In this sense
it was similar to code repositories like SourceForge, Google Code, or Bitbucket. But
Github has transcended the category to become an institution in its own right. Features
that it pioneered (like web-based pull requests and README.md files) are now crucial tools
for any group software engineering work. Moreover, github.com is now the world’s
largest and most dynamic repository of open-source code, and a strong Github account
has become more important than your CV or formal education for the most cutting-edge
technology companies. Let’s get started by navigating to http://www.github.com.
32
Figure 41: Sign up in the top right and confirm your account via email.
33
Figure 42: After signing in, you will see this page.
34
Figure 43: Navigate to github.com/settings/profile to enter your Gravatar email
35
You now have a Github account, which you will use for hosting your sourcecode for this
class and likely for future projects. Take a look at your profile page in particular.
Importantly, if you fork a repository, you can optionally submit a so-called pull request
to the owner of the upstream repository to merge in your contributions. As an analogy,
this is like making a copy of a book (forking), writing up a new chapter (editing), and
then sending that chapter back to the original author to integrate into the main book
should he deem it worthy (issuing a pull request, i.e. a request to pull your code back
into the main book). We’ll cover these concepts in more depth later in the class.
• Heroku Signup
The last account we want to get configured is on Heroku, which began as a layer on top of
Amazon Web Services. While AWS focuses more on low-level hardware manipulations,
Heroku makes it easy to deploy a web/mobile application (see here for more). Begin by
going to http://www.heroku.com.
Figure 44: The Heroku homepage. Click “Sign Up” in the bottom right.
36
Figure 45: Enter your email.
37
Figure 46: You should see a confirm page.
Figure 47: Check your email and click the confirm link.
38
Figure 48: Now set up your password.
39
Figure 49: You now have a Heroku account. Ignore the instructions for now, we’ll return to them
later.
40
All right. At this point you should have your AWS, Gravatar, Github, and Heroku
accounts all set up. Our next step will be to get an AWS instance running in the cloud
as a development environment.
Connect to a Cloud Computer
Launch your EC2 Instance
You are now going to launch and connect to an AWS cloud computer; you may find Amazon’s
own instructions useful as as a supplement. We are going to initalize Amazon’s smallest
kind of cloud computer (a t1.micro instance) running Ubuntu 12.04.2 LTS (a popular Linux
distribution) in its us-east-1 region. Begin by returning to http://aws.amazon.com and log
into the dashboard as shown.
Figure 50: Log into your Management Console.
Figure 51: Click “EC2” on the AWS Dashboard.
41
Figure 52: Click “Launch Instances”. Also note the “Instances” link (boxed) on the left hand side;
you will need this in a bit.
42
Figure 53: You should see the Create a New Instance Wizard.
43
Figure 54: Select the Quick Launch Wizard, click the “Create New” ratio button, enter a memo-
rable keyname (e.g. cs184-john-stanford-edu), and select Ubuntu Server 12.04.2 LTS for the “Launch
Configuration”. Note that the remaining screenshots depict 12.04.1 LTS, while your screen will show
12.04.2 LTS; this won’t change anything that you do, however.
44
Figure 55: Click Download and notice the .pem file which you just created. Then click Continue.
45
Figure 56: Launch the new instance.
46
Figure 57: Your instance (in this case i-4b4cf83a) is now launching. Now go to the Instances
Dashboard.
47
Figure 58: At the Instances Dashboard, your instance (shown is i-4b4cf83a again) should be ini-
tializing. (Ignore the older terminated instance in this screenshot).
48
You should now have a local .pem file downloaded and the instance (in the above exam-
ple i-4b4cf83a) should be in the process of initializing. You can monitor the status at this
dashboard link (Figure 59). Now you want to connect to the instance, which in this case has
hostname
ec2-50-19-140-229.compute-1.amazonaws.com (yours will be different). For didactic pur-
poses let’s take a look at Amazon’s instructions; we are going to modify these instructions
slightly.
49
Figure 59: The Instances Dashboard will have a green check under “Status Checks” when the instance
is live. Note that it is at this point that the hostname ec2-50-19-140-229.compute-1.amazonaws.com
is assigned.
50
Figure 60: Right clicking on your instance and select ‘Connect’ from the dropdown.
51
Figure 61: Click ‘Connect with a standalone SSH client’ and read the instructions. In the next
section, we are going to have to use slightly different commands.
52
Mac: Connect to EC2 instance via Terminal.app
To connect to your EC2 instance via a Mac, type a modified version of the following commands
into Terminal.app (see also Figure 62):
1 # Commands for Terminal.app on Mac OS X
2 $ cd ~/downloads
3 $ chmod 400 cs184-john-stanford-edu.pem
4 $ ssh -i cs184-john-stanford-edu.pem 
5 ubuntu@ec2-50-19-140-229.compute-1.amazonaws.com
Here, we use the standard convention that lines prefixed with # are comments and with $
are meant to be typed in literally. When a backslash  appears at the end of a line, that is a
command which extends over multiple lines. Note also that you will need to change the .pem
file (cs184-john-stanford-edu.pem) and
hostname (ec2-50-19-140-229.compute-1.amazonaws.com) to match your own, and that we
are logging in as ubuntu rather than root. Note in particular the use of the chmod command
to change the permissions of your file. In the event you are using a multiuser system, like a
shared computer in an academic environment, this would keep other users from logging in as
you.
Figure 62: Connecting to your EC2 instance via Terminal.app on a Mac.
53
Windows: Connect to EC2 instance via Cygwin
To connect to EC2 via Cygwin on Windows, you need to handle two key idiosyncra-
cies. First, the Windows directory structure sits off the to the side from where Cyg-
win lives, so you need to address files in /cygdrive/c or /cygdrive/d to access files on
the C: and D: drives, such as the .pem file you just downloaded. Second, Cygwin has
a permissions bug which requires an extra command to fix. You will thus need to ex-
ecute the following commands, replacing JohnSmith, cs184-john-stanford-edu.pem and
ec2-50-19-140-229.compute-1.amazonaws.com with your own variables.
1 # Commands for Cygwin on Windows
2 $ cd ~
3 $ cp /cygdrive/c/Users/JohnSmith/Downloads/cs184-john-stanford-edu.pem .
4 $ chgrp Users cs184-john-stanford-edu
5 $ chmod 400 cs184-john-stanford-edu.pem
6 $ ssh -i cs184-john-stanford-edu.pem 
7 ubuntu@ec2-50-19-140-229.compute-1.amazonaws.com
Here is how all this looks when you launch Cygwin:
Figure 63: Connecting to your EC2 instance via Cygwin for Windows.
54
Figure 64: The chgrp command changed the group membership of the cs184-john-stanford-edu.pem
file from None to Users, as shown. (More on Unix permissions.)
55
Figure 65: The chmod command changed the read/write permissions of the cs184-john-stanford-
edu.pem file such that only you can read it. (More on Unix permissions.)
Figure 66: Here’s what happens if your permissions are wrong: a public key error caused by incorrect
permissions on the .pem file. Make sure you executed chmod and chgrp.
56
Unix permissions are a bit of a deep topic, so you can just think of the above as an
incantation for now that makes the files private to you. Note that if your permissions are
incorrect (i.e. if you have not executed the chmod 0400 and chgrp Users commands) you
will get an error about public keys as shown above.
Security Groups
If you still have problems with the above commands, you might need to change your security
groups to permit traffic on the SSH port.
Figure 67: Select your instance and look at the pane on the lower right to see which security group
you’re running.
57
Figure 68: This is what things should look like if you click Security Groups (left hand side), your
own security group at the top (which may or may not be titled quicklaunch-1), and then look in the
bottom right corner.
58
Figure 69: If necessary, use the form to open up SSH on port 22 with allowed IPs 0.0.0.0/0 (i.e.
any IP), just as shown. You wouldn’t do this in production, but it’s fine for now.
59
Standard Operating System: Ubuntu 12.04.2 LTS on a t1.micro AWS instance
From this point forward, for the duration of the class unless otherwise specified, we assume
that all commands are executed on your remote AWS cloud instance, specifically on Ubuntu
12.04.2 LTS on a t1.micro AWS instance (Figure 70). The idea here is to even out the
dissimilarities between different computer setups and get an even (and reproducible) playing
field for all students.
Figure 70: Note that AWS smooths out OS and configuration inhomogeneity. All assignments and
commands from this point forward will be assumed to be run on a EC2 t1.micro instance running
Ubuntu 12.04.2 LTS unless otherwise specified.
Going forward, note that conventionally the @ symbol is used to indicate where a command
is being executed, to distinguish between remote vs. local machines. If you ever get confused,
you can issue the command hostname to learn which machine you’re on, as shown:
OK. You know that cloud thing everyone is talking about? You just did it. You rented a
computer in the cloud and executed a few commands!
60
Figure 71: Red are commands executed locally by your laptop. Blue are commands which are executed
remotely by the AWS instance.
61
Deploy your code
Test out your Heroku account
We’re now going to execute a series of commands that will deploy your first node.js app to
heroku.
• First, you will SSH into your EC2 instance.
• Next, you’ll install git and the heroku toolbelt.
• Next, login to heroku at the command line and set up SSH keys.
• Then, pull down a sample app, configure it as a heroku app, and push it live.
• Finally, view the app’s URL in your browser.
That was in English. Here are the command lines to accomplish this:
1 # Execute these commands on your EC2 instance.
2 # Note that -qO- is not -q0-. O is the English letter, 0 is the number zero.
3
4 # 1) Install heroku and git
5 $ sudo apt-get install -y git-core
6 $ wget -qO- https://toolbelt.heroku.com/install-ubuntu.sh | sh
7 $ which git
8 $ which heroku
9 # 2) Login and set up your SSH keys
10 $ heroku login
11 $ ssh-keygen -t rsa
12 $ heroku keys:add
13 # 3) Clone a sample repo and push to heroku
14 $ git clone https://github.com/heroku/node-js-sample.git
15 $ cd node-js-sample
16 $ heroku create
17 $ git push heroku master
Now let’s go through the screenshots of how it looks when executing those commands.
Again, begin by connecting to your EC2 instance.
62
Figure 72: SSH into your EC2 instance and install git-core as shown. If you do sudo apt-get
install -y git-core you won’t have to type the Y.
63
Figure 73: Once the installation of git-core completes, paste in the command from tool-
belt.heroku.com/debian to install the heroku command line tools.
64
Figure 74: Now confirm that git and heroku are installed and on your path. If they were not,
then which would not print anything. If they are both installed, which will print the location of the
programs, as shown they are both in /usr/bin.
Figure 75: Log in to heroku from the command line, using the same user/pass you set up at
heroku.com.
Figure 76: Here we are setting up your SSH keys for connecting to Heroku. Just hit enter twice
when prompted for the passphrase.
65
Figure 77: Now add the SSH keys you just generated to heroku (specifically you are sending the public
key to heroku).
Figure 78: Type in the commands shown to pull down the sample nodejs codebase and create a
corresponding heroku app for that codebase.
66
Figure 79: Last step: type in git push heroku master and then confirm that a URL is printed at
the end (something like http://guarded-lake-3837.herokuapp.com, but yours will be different.)
67
Figure 80: Your first heroku nodejs app is now online! Your URL will be similar to http://guarded-
lake-3837.herokuapp.com, but you will have your own custom version.
68
Congratulations! You just launched a cloud computer via AWS’ EC2, cloned code from
Github, and deployed a very simple website on Heroku. The last thing you want to do is
terminate your EC2 instance so that it doesn’t keep running.
Figure 81: After you’ve gotten your Heroku app live, go to the Instances Dashboard, right-click your
instance, and select Terminate.
Note: it is also possible to stop an instance. Stopping is different from terminating; while
terminating completely kills and frees up all resources, stopping an EBS-backed instances
pauses billing for the computing portion but still charges for the storage. We’ll get into this
later, but read here and here for more.
Post-mortem
Now that you have your site up, take a look again at Figure 82. We did most of the things in
there, except we only pulled code from github.com and didn’t push any code. It’s very impor-
tant to keep in mind which computer you are currently controlling and executing commands
on, whether that be your own laptop, an AWS machine, or a remote machine in the Heroku
or Github clouds. Over time this will become second nature, and we’ll show how to configure
69
your command line environment to give some hints.
Figure 82: Recall this figure again. You were controlling the t1.micro instance as you typed in those
commands to pull down code from github and push it to heroku.
In the interests of speed, we did a number of things in this interactive start that we would
not normally do. For example, we worked with .pem files in the directory where they landed,
rather than moving them into ~/.ssh. And in practice you would want to put code through
three stages: a dev, staging, and production branch before pushing to the web. You probably
also want to read the Heroku documentation on node.js and SSH keys to understand some of
the steps at the end. We’ll cover things like this in more detail as the course progresses.
70
Terminology
Whew! We flew through quite a bit there. Here are a few terms which we introduced that
you should become familiar with:
• git: A tool for storing and manipulating the history of a program edited by many
different users. Also known as a distributed version control system (DVCS).
• Github.com: A social network for programmers built around git. There are other sites
like this, such as BitBucket.com and Sourceforge.com
• AWS: Amazon Web Services, a set of cloud services for programmers.
• Heroku: A layer on top of AWS that greatly simplifies the process of developing and
deploying a web application.
• Gravatar: A simple site which provides a globally recognizable image that you can use
in various social contexts. For example, click here and look at the little images to the
left of each git commit; those are being pulled from gravatar.com.
• EC2: Elastic Compute Cloud, a fleet of virtual machines that you can rent by the hour
from Amazon.
• Virtual machine: In practice, you are usually not renting a single physical computer,
but rather a virtualized piece of a multiprocessor computer. Breakthroughs in operating
systems research have allowed us to take a single computer with (say) eight processors
and make it seem like eight independent computers, capable of being completely wiped
and rebooted without affecting the others.
A good analogy for virtualization is sort of like taking a house with eight rooms and
converting it into eight independent apartments, each of which has its own key and
climate control, and can be restored to default settings without affecting the others.
While these “virtual computers” have reasonable performance, they are less than that of
the native hardware. In practice, virtualization is not magic; extremely high workloads
on one of the other “tenants” in the VM system can affect your room, in the same way
that a very loud next door neighbor can overwhelm the soundproofing. Still, most of
the time you don’t need an eight room home or an eight processor computer; you need
just one room for the night.
• AMI : Amazon Machine Image, an operating system + default software package which
you can use to initialize any instance.
• Availability Zone: the physical location of the instance.
• EC2 instance: a particular instance, e.g. i-2938408.
• IP address: a dotted address representing a machine on the internet, e.g. 171.65.1.2.
• Hostname: The name of a server, e.g. ec2-1234.amazon.com.
• DNS: The system which maps a hostname like ec2-1234.amazon.com to an IP address
like 171.65.1.2.
71
• SSH : Secure Shell, a means of connecting to a remote computer and execute commands.
• Public Key: When you hand out your public key, it is like handing out a set of special
envelopes. Any who has your public key can put their message in one of these envelopes,
seal it, and send it to you. But only you can open that message with your private key.
Both of the “keys” in this case can be thought of as long hexadecimal numbers. Github
asks for your public key to confirm your identity in future interactions; essentially for
all future communications they send you a message that only you can open (with your
private key). By decrypting this message and sending it back to them, they know that
you must have the private key and so they authorize the operation.
• RSA: A kind of encryption algorithm that generates both public and private keys. Al-
ways run this locally on your machine; anyone who knows your private key can decrypt
messages encrypted with the corresponding public key and thereby pose as you.
72

Mais conteúdo relacionado

Mais procurados

Adding flash animation to a website
Adding flash animation to a websiteAdding flash animation to a website
Adding flash animation to a websiteBubblefruit.com
 
Embedding a Video to your Netvibes Dashboard
Embedding a Video to your Netvibes DashboardEmbedding a Video to your Netvibes Dashboard
Embedding a Video to your Netvibes DashboardCatherine Hainstock
 
WiZiQ Virtual Classroom Embed for Wordpress
WiZiQ Virtual Classroom Embed for WordpressWiZiQ Virtual Classroom Embed for Wordpress
WiZiQ Virtual Classroom Embed for Wordpresssarvinder
 
Rich Internet Applications (RIA) Web Testing
Rich Internet Applications (RIA) Web TestingRich Internet Applications (RIA) Web Testing
Rich Internet Applications (RIA) Web TestingMathias Roth
 
Using Edge Animate to Create a Reusable Component Set
Using Edge Animate to Create a Reusable Component SetUsing Edge Animate to Create a Reusable Component Set
Using Edge Animate to Create a Reusable Component SetJoseph Labrecque
 
Joomla Website Development Company
Joomla Website Development CompanyJoomla Website Development Company
Joomla Website Development CompanySanjay Kumar
 
305 startup wordpress free hosting
305 startup wordpress free hosting305 startup wordpress free hosting
305 startup wordpress free hostingSatoru Hoshiba
 
Creating a Membership Site in WordPress with WP-Members: A Step-by-Step Guide
Creating a Membership Site in WordPress with WP-Members: A Step-by-Step GuideCreating a Membership Site in WordPress with WP-Members: A Step-by-Step Guide
Creating a Membership Site in WordPress with WP-Members: A Step-by-Step GuideMarshall Reyher
 
Conquering Code with hjc
Conquering Code with hjcConquering Code with hjc
Conquering Code with hjchjc
 
Create an Animated Navigation Bar - Edge Animate Tutorial
Create an Animated Navigation Bar - Edge Animate TutorialCreate an Animated Navigation Bar - Edge Animate Tutorial
Create an Animated Navigation Bar - Edge Animate TutorialJason Hill
 
Angular 11 google social login or sign in tutorial using angularx social-login
Angular 11 google social login or sign in tutorial using angularx social-loginAngular 11 google social login or sign in tutorial using angularx social-login
Angular 11 google social login or sign in tutorial using angularx social-loginKaty Slemon
 
bbPress vs. vBulletin: The Migration Way to The Successful Forum Board
bbPress vs. vBulletin: The Migration Way to The Successful Forum BoardbbPress vs. vBulletin: The Migration Way to The Successful Forum Board
bbPress vs. vBulletin: The Migration Way to The Successful Forum BoardCMS2CMS
 
User guide to power point
User guide to power pointUser guide to power point
User guide to power pointmvandamme3
 
Fancy Facebook Fan Pages - A Step By Step Guide
Fancy Facebook Fan Pages  - A Step By Step GuideFancy Facebook Fan Pages  - A Step By Step Guide
Fancy Facebook Fan Pages - A Step By Step GuideOlaf Nitz
 
Installing WooCommerce Plugin
Installing WooCommerce PluginInstalling WooCommerce Plugin
Installing WooCommerce PluginReema
 
How to connect raspberry pi to laptop display: 4 steps
How to connect raspberry pi to laptop display: 4 stepsHow to connect raspberry pi to laptop display: 4 steps
How to connect raspberry pi to laptop display: 4 stepsArvind Arasu
 

Mais procurados (18)

Adding flash animation to a website
Adding flash animation to a websiteAdding flash animation to a website
Adding flash animation to a website
 
Embedding a Video to your Netvibes Dashboard
Embedding a Video to your Netvibes DashboardEmbedding a Video to your Netvibes Dashboard
Embedding a Video to your Netvibes Dashboard
 
WiZiQ Virtual Classroom Embed for Wordpress
WiZiQ Virtual Classroom Embed for WordpressWiZiQ Virtual Classroom Embed for Wordpress
WiZiQ Virtual Classroom Embed for Wordpress
 
Rich Internet Applications (RIA) Web Testing
Rich Internet Applications (RIA) Web TestingRich Internet Applications (RIA) Web Testing
Rich Internet Applications (RIA) Web Testing
 
Using Edge Animate to Create a Reusable Component Set
Using Edge Animate to Create a Reusable Component SetUsing Edge Animate to Create a Reusable Component Set
Using Edge Animate to Create a Reusable Component Set
 
Joomla Website Development Company
Joomla Website Development CompanyJoomla Website Development Company
Joomla Website Development Company
 
Wordpress as a framework
Wordpress as a frameworkWordpress as a framework
Wordpress as a framework
 
305 startup wordpress free hosting
305 startup wordpress free hosting305 startup wordpress free hosting
305 startup wordpress free hosting
 
Creating a Membership Site in WordPress with WP-Members: A Step-by-Step Guide
Creating a Membership Site in WordPress with WP-Members: A Step-by-Step GuideCreating a Membership Site in WordPress with WP-Members: A Step-by-Step Guide
Creating a Membership Site in WordPress with WP-Members: A Step-by-Step Guide
 
Conquering Code with hjc
Conquering Code with hjcConquering Code with hjc
Conquering Code with hjc
 
Create an Animated Navigation Bar - Edge Animate Tutorial
Create an Animated Navigation Bar - Edge Animate TutorialCreate an Animated Navigation Bar - Edge Animate Tutorial
Create an Animated Navigation Bar - Edge Animate Tutorial
 
Angular 11 google social login or sign in tutorial using angularx social-login
Angular 11 google social login or sign in tutorial using angularx social-loginAngular 11 google social login or sign in tutorial using angularx social-login
Angular 11 google social login or sign in tutorial using angularx social-login
 
Ohioe Tech Handout
Ohioe Tech HandoutOhioe Tech Handout
Ohioe Tech Handout
 
bbPress vs. vBulletin: The Migration Way to The Successful Forum Board
bbPress vs. vBulletin: The Migration Way to The Successful Forum BoardbbPress vs. vBulletin: The Migration Way to The Successful Forum Board
bbPress vs. vBulletin: The Migration Way to The Successful Forum Board
 
User guide to power point
User guide to power pointUser guide to power point
User guide to power point
 
Fancy Facebook Fan Pages - A Step By Step Guide
Fancy Facebook Fan Pages  - A Step By Step GuideFancy Facebook Fan Pages  - A Step By Step Guide
Fancy Facebook Fan Pages - A Step By Step Guide
 
Installing WooCommerce Plugin
Installing WooCommerce PluginInstalling WooCommerce Plugin
Installing WooCommerce Plugin
 
How to connect raspberry pi to laptop display: 4 steps
How to connect raspberry pi to laptop display: 4 stepsHow to connect raspberry pi to laptop display: 4 steps
How to connect raspberry pi to laptop display: 4 steps
 

Semelhante a Lecture2 interactive-start

Web services in asp.net
Web services in asp.netWeb services in asp.net
Web services in asp.netDharma Raju
 
Accelerating your application development with IBM BlueMix (Your dream devel...
Accelerating your application development with IBM BlueMix (Your dream devel...Accelerating your application development with IBM BlueMix (Your dream devel...
Accelerating your application development with IBM BlueMix (Your dream devel...Supal Chowdhury
 
Build, Deploy and Run Node Js Application on Azure using Docker
Build, Deploy and Run Node Js Application on Azure using DockerBuild, Deploy and Run Node Js Application on Azure using Docker
Build, Deploy and Run Node Js Application on Azure using DockerOsama Mustafa
 
Build your first rpa bot using IBM RPA automation
Build your first rpa bot using IBM RPA automationBuild your first rpa bot using IBM RPA automation
Build your first rpa bot using IBM RPA automationWinton Winton
 
Serverless and Kubernetes Workshop on IBM Cloud
Serverless and Kubernetes Workshop on IBM CloudServerless and Kubernetes Workshop on IBM Cloud
Serverless and Kubernetes Workshop on IBM CloudAnsgar Schmidt
 
Intro to IBM Bluemix DevOps Services, a Workshop with a Cloudant twist
Intro to IBM Bluemix DevOps Services, a Workshop with a Cloudant twistIntro to IBM Bluemix DevOps Services, a Workshop with a Cloudant twist
Intro to IBM Bluemix DevOps Services, a Workshop with a Cloudant twistLauren Hayward Schaefer
 
Details Description of Load Runner Recording option
Details Description of  Load Runner Recording optionDetails Description of  Load Runner Recording option
Details Description of Load Runner Recording optionSanchita Singha
 
Easy Cross Browser Testing with LambdaTest Screenshots Chrome Extension
Easy Cross Browser Testing with LambdaTest Screenshots Chrome ExtensionEasy Cross Browser Testing with LambdaTest Screenshots Chrome Extension
Easy Cross Browser Testing with LambdaTest Screenshots Chrome ExtensionSarah Elson
 
CIS 170 Life of the Mind/newtonhelp.com   
CIS 170 Life of the Mind/newtonhelp.com   CIS 170 Life of the Mind/newtonhelp.com   
CIS 170 Life of the Mind/newtonhelp.com   llflowe
 
CIS 170 Imagine Your Future/newtonhelp.com   
CIS 170 Imagine Your Future/newtonhelp.com   CIS 170 Imagine Your Future/newtonhelp.com   
CIS 170 Imagine Your Future/newtonhelp.com   bellflower42
 
windows azure cloud services - Lab Manual
windows azure cloud services - Lab Manualwindows azure cloud services - Lab Manual
windows azure cloud services - Lab ManualArun Kumar
 
Cis 170 Extraordinary Success/newtonhelp.com
Cis 170 Extraordinary Success/newtonhelp.com  Cis 170 Extraordinary Success/newtonhelp.com
Cis 170 Extraordinary Success/newtonhelp.com amaranthbeg143
 
How to work with code blocks
How to work with code blocksHow to work with code blocks
How to work with code blocksTech Bikram
 
CIS 170 Focus Dreams/newtonhelp.com
CIS 170 Focus Dreams/newtonhelp.comCIS 170 Focus Dreams/newtonhelp.com
CIS 170 Focus Dreams/newtonhelp.combellflower82
 
BUILDING WEBSITES ON WORDPRESS
BUILDING WEBSITES ON WORDPRESSBUILDING WEBSITES ON WORDPRESS
BUILDING WEBSITES ON WORDPRESSPRINCE KUMAR
 
M365 global developer bootcamp 2019 PA
M365 global developer bootcamp 2019  PAM365 global developer bootcamp 2019  PA
M365 global developer bootcamp 2019 PAThomas Daly
 
]project-open[ on Amazon AWS
]project-open[ on Amazon AWS]project-open[ on Amazon AWS
]project-open[ on Amazon AWSKlaus Hofeditz
 

Semelhante a Lecture2 interactive-start (20)

Homestead demo
Homestead demoHomestead demo
Homestead demo
 
Web services in asp.net
Web services in asp.netWeb services in asp.net
Web services in asp.net
 
Accelerating your application development with IBM BlueMix (Your dream devel...
Accelerating your application development with IBM BlueMix (Your dream devel...Accelerating your application development with IBM BlueMix (Your dream devel...
Accelerating your application development with IBM BlueMix (Your dream devel...
 
Build, Deploy and Run Node Js Application on Azure using Docker
Build, Deploy and Run Node Js Application on Azure using DockerBuild, Deploy and Run Node Js Application on Azure using Docker
Build, Deploy and Run Node Js Application on Azure using Docker
 
Build your first rpa bot using IBM RPA automation
Build your first rpa bot using IBM RPA automationBuild your first rpa bot using IBM RPA automation
Build your first rpa bot using IBM RPA automation
 
Serverless and Kubernetes Workshop on IBM Cloud
Serverless and Kubernetes Workshop on IBM CloudServerless and Kubernetes Workshop on IBM Cloud
Serverless and Kubernetes Workshop on IBM Cloud
 
Intro to IBM Bluemix DevOps Services, a Workshop with a Cloudant twist
Intro to IBM Bluemix DevOps Services, a Workshop with a Cloudant twistIntro to IBM Bluemix DevOps Services, a Workshop with a Cloudant twist
Intro to IBM Bluemix DevOps Services, a Workshop with a Cloudant twist
 
Details Description of Load Runner Recording option
Details Description of  Load Runner Recording optionDetails Description of  Load Runner Recording option
Details Description of Load Runner Recording option
 
Easy Cross Browser Testing with LambdaTest Screenshots Chrome Extension
Easy Cross Browser Testing with LambdaTest Screenshots Chrome ExtensionEasy Cross Browser Testing with LambdaTest Screenshots Chrome Extension
Easy Cross Browser Testing with LambdaTest Screenshots Chrome Extension
 
Client Server Live Hosting Documentation
Client Server Live Hosting Documentation Client Server Live Hosting Documentation
Client Server Live Hosting Documentation
 
CIS 170 Life of the Mind/newtonhelp.com   
CIS 170 Life of the Mind/newtonhelp.com   CIS 170 Life of the Mind/newtonhelp.com   
CIS 170 Life of the Mind/newtonhelp.com   
 
CIS 170 Imagine Your Future/newtonhelp.com   
CIS 170 Imagine Your Future/newtonhelp.com   CIS 170 Imagine Your Future/newtonhelp.com   
CIS 170 Imagine Your Future/newtonhelp.com   
 
windows azure cloud services - Lab Manual
windows azure cloud services - Lab Manualwindows azure cloud services - Lab Manual
windows azure cloud services - Lab Manual
 
Cis 170 Extraordinary Success/newtonhelp.com
Cis 170 Extraordinary Success/newtonhelp.com  Cis 170 Extraordinary Success/newtonhelp.com
Cis 170 Extraordinary Success/newtonhelp.com
 
Azure Devops
Azure DevopsAzure Devops
Azure Devops
 
How to work with code blocks
How to work with code blocksHow to work with code blocks
How to work with code blocks
 
CIS 170 Focus Dreams/newtonhelp.com
CIS 170 Focus Dreams/newtonhelp.comCIS 170 Focus Dreams/newtonhelp.com
CIS 170 Focus Dreams/newtonhelp.com
 
BUILDING WEBSITES ON WORDPRESS
BUILDING WEBSITES ON WORDPRESSBUILDING WEBSITES ON WORDPRESS
BUILDING WEBSITES ON WORDPRESS
 
M365 global developer bootcamp 2019 PA
M365 global developer bootcamp 2019  PAM365 global developer bootcamp 2019  PA
M365 global developer bootcamp 2019 PA
 
]project-open[ on Amazon AWS
]project-open[ on Amazon AWS]project-open[ on Amazon AWS
]project-open[ on Amazon AWS
 

Último

Apidays Singapore 2024 - Building Digital Trust in a Digital Economy by Veron...
Apidays Singapore 2024 - Building Digital Trust in a Digital Economy by Veron...Apidays Singapore 2024 - Building Digital Trust in a Digital Economy by Veron...
Apidays Singapore 2024 - Building Digital Trust in a Digital Economy by Veron...apidays
 
Handwritten Text Recognition for manuscripts and early printed texts
Handwritten Text Recognition for manuscripts and early printed textsHandwritten Text Recognition for manuscripts and early printed texts
Handwritten Text Recognition for manuscripts and early printed textsMaria Levchenko
 
What Are The Drone Anti-jamming Systems Technology?
What Are The Drone Anti-jamming Systems Technology?What Are The Drone Anti-jamming Systems Technology?
What Are The Drone Anti-jamming Systems Technology?Antenna Manufacturer Coco
 
IAC 2024 - IA Fast Track to Search Focused AI Solutions
IAC 2024 - IA Fast Track to Search Focused AI SolutionsIAC 2024 - IA Fast Track to Search Focused AI Solutions
IAC 2024 - IA Fast Track to Search Focused AI SolutionsEnterprise Knowledge
 
TrustArc Webinar - Stay Ahead of US State Data Privacy Law Developments
TrustArc Webinar - Stay Ahead of US State Data Privacy Law DevelopmentsTrustArc Webinar - Stay Ahead of US State Data Privacy Law Developments
TrustArc Webinar - Stay Ahead of US State Data Privacy Law DevelopmentsTrustArc
 
Powerful Google developer tools for immediate impact! (2023-24 C)
Powerful Google developer tools for immediate impact! (2023-24 C)Powerful Google developer tools for immediate impact! (2023-24 C)
Powerful Google developer tools for immediate impact! (2023-24 C)wesley chun
 
Artificial Intelligence: Facts and Myths
Artificial Intelligence: Facts and MythsArtificial Intelligence: Facts and Myths
Artificial Intelligence: Facts and MythsJoaquim Jorge
 
08448380779 Call Girls In Greater Kailash - I Women Seeking Men
08448380779 Call Girls In Greater Kailash - I Women Seeking Men08448380779 Call Girls In Greater Kailash - I Women Seeking Men
08448380779 Call Girls In Greater Kailash - I Women Seeking MenDelhi Call girls
 
The Role of Taxonomy and Ontology in Semantic Layers - Heather Hedden.pdf
The Role of Taxonomy and Ontology in Semantic Layers - Heather Hedden.pdfThe Role of Taxonomy and Ontology in Semantic Layers - Heather Hedden.pdf
The Role of Taxonomy and Ontology in Semantic Layers - Heather Hedden.pdfEnterprise Knowledge
 
Exploring the Future Potential of AI-Enabled Smartphone Processors
Exploring the Future Potential of AI-Enabled Smartphone ProcessorsExploring the Future Potential of AI-Enabled Smartphone Processors
Exploring the Future Potential of AI-Enabled Smartphone Processorsdebabhi2
 
Understanding Discord NSFW Servers A Guide for Responsible Users.pdf
Understanding Discord NSFW Servers A Guide for Responsible Users.pdfUnderstanding Discord NSFW Servers A Guide for Responsible Users.pdf
Understanding Discord NSFW Servers A Guide for Responsible Users.pdfUK Journal
 
How to Troubleshoot Apps for the Modern Connected Worker
How to Troubleshoot Apps for the Modern Connected WorkerHow to Troubleshoot Apps for the Modern Connected Worker
How to Troubleshoot Apps for the Modern Connected WorkerThousandEyes
 
Real Time Object Detection Using Open CV
Real Time Object Detection Using Open CVReal Time Object Detection Using Open CV
Real Time Object Detection Using Open CVKhem
 
Raspberry Pi 5: Challenges and Solutions in Bringing up an OpenGL/Vulkan Driv...
Raspberry Pi 5: Challenges and Solutions in Bringing up an OpenGL/Vulkan Driv...Raspberry Pi 5: Challenges and Solutions in Bringing up an OpenGL/Vulkan Driv...
Raspberry Pi 5: Challenges and Solutions in Bringing up an OpenGL/Vulkan Driv...Igalia
 
Factors to Consider When Choosing Accounts Payable Services Providers.pptx
Factors to Consider When Choosing Accounts Payable Services Providers.pptxFactors to Consider When Choosing Accounts Payable Services Providers.pptx
Factors to Consider When Choosing Accounts Payable Services Providers.pptxKatpro Technologies
 
Finology Group – Insurtech Innovation Award 2024
Finology Group – Insurtech Innovation Award 2024Finology Group – Insurtech Innovation Award 2024
Finology Group – Insurtech Innovation Award 2024The Digital Insurer
 
EIS-Webinar-Prompt-Knowledge-Eng-2024-04-08.pptx
EIS-Webinar-Prompt-Knowledge-Eng-2024-04-08.pptxEIS-Webinar-Prompt-Knowledge-Eng-2024-04-08.pptx
EIS-Webinar-Prompt-Knowledge-Eng-2024-04-08.pptxEarley Information Science
 
Axa Assurance Maroc - Insurer Innovation Award 2024
Axa Assurance Maroc - Insurer Innovation Award 2024Axa Assurance Maroc - Insurer Innovation Award 2024
Axa Assurance Maroc - Insurer Innovation Award 2024The Digital Insurer
 
From Event to Action: Accelerate Your Decision Making with Real-Time Automation
From Event to Action: Accelerate Your Decision Making with Real-Time AutomationFrom Event to Action: Accelerate Your Decision Making with Real-Time Automation
From Event to Action: Accelerate Your Decision Making with Real-Time AutomationSafe Software
 
A Call to Action for Generative AI in 2024
A Call to Action for Generative AI in 2024A Call to Action for Generative AI in 2024
A Call to Action for Generative AI in 2024Results
 

Último (20)

Apidays Singapore 2024 - Building Digital Trust in a Digital Economy by Veron...
Apidays Singapore 2024 - Building Digital Trust in a Digital Economy by Veron...Apidays Singapore 2024 - Building Digital Trust in a Digital Economy by Veron...
Apidays Singapore 2024 - Building Digital Trust in a Digital Economy by Veron...
 
Handwritten Text Recognition for manuscripts and early printed texts
Handwritten Text Recognition for manuscripts and early printed textsHandwritten Text Recognition for manuscripts and early printed texts
Handwritten Text Recognition for manuscripts and early printed texts
 
What Are The Drone Anti-jamming Systems Technology?
What Are The Drone Anti-jamming Systems Technology?What Are The Drone Anti-jamming Systems Technology?
What Are The Drone Anti-jamming Systems Technology?
 
IAC 2024 - IA Fast Track to Search Focused AI Solutions
IAC 2024 - IA Fast Track to Search Focused AI SolutionsIAC 2024 - IA Fast Track to Search Focused AI Solutions
IAC 2024 - IA Fast Track to Search Focused AI Solutions
 
TrustArc Webinar - Stay Ahead of US State Data Privacy Law Developments
TrustArc Webinar - Stay Ahead of US State Data Privacy Law DevelopmentsTrustArc Webinar - Stay Ahead of US State Data Privacy Law Developments
TrustArc Webinar - Stay Ahead of US State Data Privacy Law Developments
 
Powerful Google developer tools for immediate impact! (2023-24 C)
Powerful Google developer tools for immediate impact! (2023-24 C)Powerful Google developer tools for immediate impact! (2023-24 C)
Powerful Google developer tools for immediate impact! (2023-24 C)
 
Artificial Intelligence: Facts and Myths
Artificial Intelligence: Facts and MythsArtificial Intelligence: Facts and Myths
Artificial Intelligence: Facts and Myths
 
08448380779 Call Girls In Greater Kailash - I Women Seeking Men
08448380779 Call Girls In Greater Kailash - I Women Seeking Men08448380779 Call Girls In Greater Kailash - I Women Seeking Men
08448380779 Call Girls In Greater Kailash - I Women Seeking Men
 
The Role of Taxonomy and Ontology in Semantic Layers - Heather Hedden.pdf
The Role of Taxonomy and Ontology in Semantic Layers - Heather Hedden.pdfThe Role of Taxonomy and Ontology in Semantic Layers - Heather Hedden.pdf
The Role of Taxonomy and Ontology in Semantic Layers - Heather Hedden.pdf
 
Exploring the Future Potential of AI-Enabled Smartphone Processors
Exploring the Future Potential of AI-Enabled Smartphone ProcessorsExploring the Future Potential of AI-Enabled Smartphone Processors
Exploring the Future Potential of AI-Enabled Smartphone Processors
 
Understanding Discord NSFW Servers A Guide for Responsible Users.pdf
Understanding Discord NSFW Servers A Guide for Responsible Users.pdfUnderstanding Discord NSFW Servers A Guide for Responsible Users.pdf
Understanding Discord NSFW Servers A Guide for Responsible Users.pdf
 
How to Troubleshoot Apps for the Modern Connected Worker
How to Troubleshoot Apps for the Modern Connected WorkerHow to Troubleshoot Apps for the Modern Connected Worker
How to Troubleshoot Apps for the Modern Connected Worker
 
Real Time Object Detection Using Open CV
Real Time Object Detection Using Open CVReal Time Object Detection Using Open CV
Real Time Object Detection Using Open CV
 
Raspberry Pi 5: Challenges and Solutions in Bringing up an OpenGL/Vulkan Driv...
Raspberry Pi 5: Challenges and Solutions in Bringing up an OpenGL/Vulkan Driv...Raspberry Pi 5: Challenges and Solutions in Bringing up an OpenGL/Vulkan Driv...
Raspberry Pi 5: Challenges and Solutions in Bringing up an OpenGL/Vulkan Driv...
 
Factors to Consider When Choosing Accounts Payable Services Providers.pptx
Factors to Consider When Choosing Accounts Payable Services Providers.pptxFactors to Consider When Choosing Accounts Payable Services Providers.pptx
Factors to Consider When Choosing Accounts Payable Services Providers.pptx
 
Finology Group – Insurtech Innovation Award 2024
Finology Group – Insurtech Innovation Award 2024Finology Group – Insurtech Innovation Award 2024
Finology Group – Insurtech Innovation Award 2024
 
EIS-Webinar-Prompt-Knowledge-Eng-2024-04-08.pptx
EIS-Webinar-Prompt-Knowledge-Eng-2024-04-08.pptxEIS-Webinar-Prompt-Knowledge-Eng-2024-04-08.pptx
EIS-Webinar-Prompt-Knowledge-Eng-2024-04-08.pptx
 
Axa Assurance Maroc - Insurer Innovation Award 2024
Axa Assurance Maroc - Insurer Innovation Award 2024Axa Assurance Maroc - Insurer Innovation Award 2024
Axa Assurance Maroc - Insurer Innovation Award 2024
 
From Event to Action: Accelerate Your Decision Making with Real-Time Automation
From Event to Action: Accelerate Your Decision Making with Real-Time AutomationFrom Event to Action: Accelerate Your Decision Making with Real-Time Automation
From Event to Action: Accelerate Your Decision Making with Real-Time Automation
 
A Call to Action for Generative AI in 2024
A Call to Action for Generative AI in 2024A Call to Action for Generative AI in 2024
A Call to Action for Generative AI in 2024
 

Lecture2 interactive-start

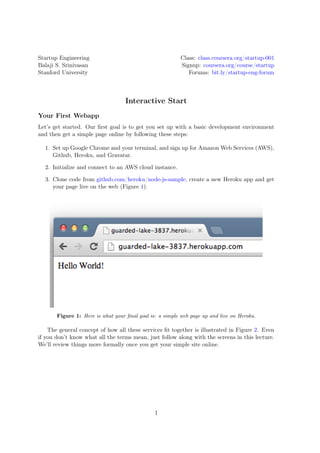
  • 1. Startup Engineering Class: class.coursera.org/startup-001 Balaji S. Srinivasan Signup: coursera.org/course/startup Stanford University Forums: bit.ly/startup-eng-forum Interactive Start Your First Webapp Let’s get started. Our first goal is to get you set up with a basic development environment and then get a simple page online by following these steps: 1. Set up Google Chrome and your terminal, and sign up for Amazon Web Services (AWS), Github, Heroku, and Gravatar. 2. Initialize and connect to an AWS cloud instance. 3. Clone code from github.com/heroku/node-js-sample, create a new Heroku app and get your page live on the web (Figure 1). Figure 1: Here is what your final goal is: a simple web page up and live on Heroku. The general concept of how all these services fit together is illustrated in Figure 2. Even if you don’t know what all the terms mean, just follow along with the screens in this lecture. We’ll review things more formally once you get your simple site online. 1
  • 2. Figure 2: Here’s how the pieces we set up today will fit together. During the class, you will remotely control an AWS virtual machine from your laptop and use it to edit code, periodically storing the intermediate results on Github. Once you are ready, you will deploy your code to Heroku for viewing by the world. The reason we recommend AWS rather than your local computer for development is that using a virtual machine means you can easily replicate the development environment. By contrast, it is much more time consuming to get another engineer set up with all the programs and libraries on your local computer. For this lecture, you won’t be pushing code to github, but you will be pulling it from github.com/heroku/node-js-sample. 2
  • 3. Setup and Signup Install Google Chrome Begin by installing the Google Chrome web browser and the User Agent Switcher extension, which you will use to make your browser mimic a smartphone or tablet. Chrome has a number of advanced tools for debugging websites which we will use later on in the class. Figure 3: Install Google Chrome. Figure 4: Install the Chrome User Agent Switcher, to mimic smartphones/tablets. 3
  • 4. Set up your terminal A command line interface (CLI) is a way to control your computer by typing in commands rather than clicking on buttons in a graphical user interface (GUI). Most computer users are only doing basic things like clicking on links, watching movies, and playing video games, and GUIs are fine for such purposes. Figure 5: Closing an application via the GUI requires a click. Figure 6: Achieving the same task with the CLI by running kill. 4
  • 5. But to do industrial strength programming - to analyze large datasets, ship a webapp, or build a software startup - you will need an intimate familiarity with the CLI. Not only can many daily tasks be done more quickly at the command line, many others can only be done at the command line, especially in non-Windows environments. You can understand this from an information transmission perspective: while a standard keyboard has 50+ keys that can be hit very precisely in quick succession, achieving the same speed in a GUI is impossible as it would require rapidly moving a mouse cursor over a profusion of 50 buttons. It is for this reason that expert computer users prefer command-line and keyboard-driven interfaces. Much of the class will be spent connecting to a remote cloud computer and executing commands there, rather than executing commands on your local computer. However, to accomplish this you will still want to set up a basic command line on your local computer. • Mac OS X: Terminal.app Apple laptops are preferred by many Silicon Valley engineers because they run BSD Unix under the hood. We recommend getting a Mac with an SSD drive if you wish to join a startup in the Valley; it is standard issue at this point. You can gain access to the Unix command line by on a Mac by opening up Terminal.app, located under /Applications/Utilities/Terminal.app Figure 7: Double click /Applications/Utilities/Terminal.app. 5
  • 6. Figure 8: You should see a window like this pop up. Figure 9: Go to Terminal -> Preferences in the top left. 6
  • 7. Figure 10: Here’s your preference window. There are only a few preferences we need to tweak. 7
  • 8. Figure 11: Click Settings (in the top row of buttons) and then “Keyboard”. Click “Use option as meta key”. You’ll need this for emacs. 8
  • 9. Figure 12: Now click Advanced and set the “Delete sends Ctrl-H” setting. This is useful for Ubuntu. 9
  • 10. • Windows: Cygwin Relatively few startups use Windows computers for their primary development ma- chines, in part because command line support has historically been something of an afterthought. For the many students who still run Windows, for the purposes of this course we are recommending that you use Cygwin to get a Unix-like environment on your Windows computer. Install Cygwin from cygwin.com/setup.exe as shown: 10
  • 11. Figure 13: Cygwin provides a Linux-like command line environment on Windows. 11
  • 12. Figure 14: Download cygwin.com/setup.exe and double-click it. Figure 15: Set up access for all users in the default directory C:cygwin 12
  • 13. Figure 16: Select “Direct Connection”. Figure 17: Use http://mirrors.kernel.org for fast downloading. This is the Linux Kernel site. 13
  • 14. Figure 18: Click OK here. Figure 19: You now need to select some packages to install. 14
  • 15. Figure 20: Type in ssh and select OpenSSH (what’s shown is overkill but doesn’t hurt). Figure 21: Go ahead to the next screen. 15
  • 16. Figure 22: Wait for setup to complete. Figure 23: You now have a command-line interface on Windows. Double click the Desktop Cygwin icon to boot up a terminal. 16
  • 17. Figure 24: Upon first boot, your Cygwin terminal should show a message like this. Figure 25: You can confirm it works by typing in ping google.com and seeing a Reply. 17
  • 18. Besides Cygwin, it is also possible to use a pure SSH client like Putty, a browser-based client like the Chrome Secure Shell, or the native Windows Powershell. The reason we prefer Cygwin is threefold. First, some commands are best done locally. Second, of these alternatives, the environment that Cygwin provides is closest to the environment on a real Unix box, so we don’t need to change the instructions around too much for each platform. Third, the local Cygwin environment can be configured to be very similar to the remote environment on your AWS machine (though a Mac will get even closer). • Linux: Terminal If you are using Linux, you probably already know how to open up the Terminal. But just in case, here are instructions for Ubuntu. Sign up for AWS, Gravatar, Github, and Heroku Now that you have your browser (Chrome) and your terminal (Terminal.app or Cygwin), you will begin by signing up for four webservices: • Github: github.com • Gravatar: gravatar.com • Amazon Web Services: aws.amazon.com • Heroku: heroku.com Over the course of this class, you will use Github to store code, Gravatar to identify yourself in public git commits and pull requests, AWS as a development environment for writing code, and Heroku for deploying your code on the web. • AWS Signup Let’s begin by getting you set up with Amazon Webservices. You will need an email account, your cellphone, and your credit card with you to begin. Please use the same email account/phone/credit card for all services used in this course; this will save you headaches related to service synchronization. Note also that the credit card will only be billed if you exceed the free usage tier. We’ll talk about this later, and Amazon has some checks in place to prevent you from using too much, but right now you won’t be billed. Begin by going to http://aws.amazon.com and then following the sequence of screens as shown below: 18
  • 19. Figure 26: The AWS homepage. Click “Sign Up” at the top. Figure 27: The signup form. 19
  • 20. Figure 28: Register as a new user. Figure 29: Set up your login. 20
  • 21. Figure 30: Enter address and complete CAPTCHA. 21
  • 22. Figure 31: Set up your credit card. 22
  • 23. Figure 32: Begin phone verification. 23
  • 24. Figure 33: When called, enter in your PIN followed by an asterisk (‘*’). 24
  • 25. Figure 34: Identity verification complete. 25
  • 26. Figure 35: Account activation is now beginning. This may take a while. 26
  • 27. Figure 36: You should receive an account confirmation email. 27
  • 28. Figure 37: Go to aws.amazon.com/products and click ‘My Account Console’ to log in. 28
  • 29. Figure 38: Now you have an active AWS dashboard. EC2 (boxed) will be of particular interest to us soon. 29
  • 30. Fantastic. You now have access to a variety of AWS services. Let’s keep going and we’ll come back to this dashboard as the class progresses. • Gravatar Signup The next step is to get your Gravatar account set up, so that you have a globally recognizable avatar that will be used to identify your git commits. A Gravatar is very similar to the small image that appears next to your comments on Facebook, except that it is used by sites outside of Facebook, such as Github. Begin by going to http://www.gravatar.com and then work through the following steps: Figure 39: Go to the gravatar homepage to get started. 30
  • 31. Figure 40: Once everything is set up, your page should look like this. 31
  • 32. The Gravatar site has been buggy in the past and you may need to repeat some of the steps (particularly the cropping step and the “add a new image” step at the very end) a few times. Do this by logging out of Gravatar, clearing cookies in Chrome, logging back in and resuming where you left off. • Github Signup Github is one of the most important developments in software over the past five years. The site began in 2008 as a simple frontend for the open-source git distributed version control tool, which we will cover in much more detail later in the course. In this sense it was similar to code repositories like SourceForge, Google Code, or Bitbucket. But Github has transcended the category to become an institution in its own right. Features that it pioneered (like web-based pull requests and README.md files) are now crucial tools for any group software engineering work. Moreover, github.com is now the world’s largest and most dynamic repository of open-source code, and a strong Github account has become more important than your CV or formal education for the most cutting-edge technology companies. Let’s get started by navigating to http://www.github.com. 32
  • 33. Figure 41: Sign up in the top right and confirm your account via email. 33
  • 34. Figure 42: After signing in, you will see this page. 34
  • 35. Figure 43: Navigate to github.com/settings/profile to enter your Gravatar email 35
  • 36. You now have a Github account, which you will use for hosting your sourcecode for this class and likely for future projects. Take a look at your profile page in particular. Importantly, if you fork a repository, you can optionally submit a so-called pull request to the owner of the upstream repository to merge in your contributions. As an analogy, this is like making a copy of a book (forking), writing up a new chapter (editing), and then sending that chapter back to the original author to integrate into the main book should he deem it worthy (issuing a pull request, i.e. a request to pull your code back into the main book). We’ll cover these concepts in more depth later in the class. • Heroku Signup The last account we want to get configured is on Heroku, which began as a layer on top of Amazon Web Services. While AWS focuses more on low-level hardware manipulations, Heroku makes it easy to deploy a web/mobile application (see here for more). Begin by going to http://www.heroku.com. Figure 44: The Heroku homepage. Click “Sign Up” in the bottom right. 36
  • 37. Figure 45: Enter your email. 37
  • 38. Figure 46: You should see a confirm page. Figure 47: Check your email and click the confirm link. 38
  • 39. Figure 48: Now set up your password. 39
  • 40. Figure 49: You now have a Heroku account. Ignore the instructions for now, we’ll return to them later. 40
  • 41. All right. At this point you should have your AWS, Gravatar, Github, and Heroku accounts all set up. Our next step will be to get an AWS instance running in the cloud as a development environment. Connect to a Cloud Computer Launch your EC2 Instance You are now going to launch and connect to an AWS cloud computer; you may find Amazon’s own instructions useful as as a supplement. We are going to initalize Amazon’s smallest kind of cloud computer (a t1.micro instance) running Ubuntu 12.04.2 LTS (a popular Linux distribution) in its us-east-1 region. Begin by returning to http://aws.amazon.com and log into the dashboard as shown. Figure 50: Log into your Management Console. Figure 51: Click “EC2” on the AWS Dashboard. 41
  • 42. Figure 52: Click “Launch Instances”. Also note the “Instances” link (boxed) on the left hand side; you will need this in a bit. 42
  • 43. Figure 53: You should see the Create a New Instance Wizard. 43
  • 44. Figure 54: Select the Quick Launch Wizard, click the “Create New” ratio button, enter a memo- rable keyname (e.g. cs184-john-stanford-edu), and select Ubuntu Server 12.04.2 LTS for the “Launch Configuration”. Note that the remaining screenshots depict 12.04.1 LTS, while your screen will show 12.04.2 LTS; this won’t change anything that you do, however. 44
  • 45. Figure 55: Click Download and notice the .pem file which you just created. Then click Continue. 45
  • 46. Figure 56: Launch the new instance. 46
  • 47. Figure 57: Your instance (in this case i-4b4cf83a) is now launching. Now go to the Instances Dashboard. 47
  • 48. Figure 58: At the Instances Dashboard, your instance (shown is i-4b4cf83a again) should be ini- tializing. (Ignore the older terminated instance in this screenshot). 48
  • 49. You should now have a local .pem file downloaded and the instance (in the above exam- ple i-4b4cf83a) should be in the process of initializing. You can monitor the status at this dashboard link (Figure 59). Now you want to connect to the instance, which in this case has hostname ec2-50-19-140-229.compute-1.amazonaws.com (yours will be different). For didactic pur- poses let’s take a look at Amazon’s instructions; we are going to modify these instructions slightly. 49
  • 50. Figure 59: The Instances Dashboard will have a green check under “Status Checks” when the instance is live. Note that it is at this point that the hostname ec2-50-19-140-229.compute-1.amazonaws.com is assigned. 50
  • 51. Figure 60: Right clicking on your instance and select ‘Connect’ from the dropdown. 51
  • 52. Figure 61: Click ‘Connect with a standalone SSH client’ and read the instructions. In the next section, we are going to have to use slightly different commands. 52
  • 53. Mac: Connect to EC2 instance via Terminal.app To connect to your EC2 instance via a Mac, type a modified version of the following commands into Terminal.app (see also Figure 62): 1 # Commands for Terminal.app on Mac OS X 2 $ cd ~/downloads 3 $ chmod 400 cs184-john-stanford-edu.pem 4 $ ssh -i cs184-john-stanford-edu.pem 5 ubuntu@ec2-50-19-140-229.compute-1.amazonaws.com Here, we use the standard convention that lines prefixed with # are comments and with $ are meant to be typed in literally. When a backslash appears at the end of a line, that is a command which extends over multiple lines. Note also that you will need to change the .pem file (cs184-john-stanford-edu.pem) and hostname (ec2-50-19-140-229.compute-1.amazonaws.com) to match your own, and that we are logging in as ubuntu rather than root. Note in particular the use of the chmod command to change the permissions of your file. In the event you are using a multiuser system, like a shared computer in an academic environment, this would keep other users from logging in as you. Figure 62: Connecting to your EC2 instance via Terminal.app on a Mac. 53
  • 54. Windows: Connect to EC2 instance via Cygwin To connect to EC2 via Cygwin on Windows, you need to handle two key idiosyncra- cies. First, the Windows directory structure sits off the to the side from where Cyg- win lives, so you need to address files in /cygdrive/c or /cygdrive/d to access files on the C: and D: drives, such as the .pem file you just downloaded. Second, Cygwin has a permissions bug which requires an extra command to fix. You will thus need to ex- ecute the following commands, replacing JohnSmith, cs184-john-stanford-edu.pem and ec2-50-19-140-229.compute-1.amazonaws.com with your own variables. 1 # Commands for Cygwin on Windows 2 $ cd ~ 3 $ cp /cygdrive/c/Users/JohnSmith/Downloads/cs184-john-stanford-edu.pem . 4 $ chgrp Users cs184-john-stanford-edu 5 $ chmod 400 cs184-john-stanford-edu.pem 6 $ ssh -i cs184-john-stanford-edu.pem 7 ubuntu@ec2-50-19-140-229.compute-1.amazonaws.com Here is how all this looks when you launch Cygwin: Figure 63: Connecting to your EC2 instance via Cygwin for Windows. 54
  • 55. Figure 64: The chgrp command changed the group membership of the cs184-john-stanford-edu.pem file from None to Users, as shown. (More on Unix permissions.) 55
  • 56. Figure 65: The chmod command changed the read/write permissions of the cs184-john-stanford- edu.pem file such that only you can read it. (More on Unix permissions.) Figure 66: Here’s what happens if your permissions are wrong: a public key error caused by incorrect permissions on the .pem file. Make sure you executed chmod and chgrp. 56
  • 57. Unix permissions are a bit of a deep topic, so you can just think of the above as an incantation for now that makes the files private to you. Note that if your permissions are incorrect (i.e. if you have not executed the chmod 0400 and chgrp Users commands) you will get an error about public keys as shown above. Security Groups If you still have problems with the above commands, you might need to change your security groups to permit traffic on the SSH port. Figure 67: Select your instance and look at the pane on the lower right to see which security group you’re running. 57
  • 58. Figure 68: This is what things should look like if you click Security Groups (left hand side), your own security group at the top (which may or may not be titled quicklaunch-1), and then look in the bottom right corner. 58
  • 59. Figure 69: If necessary, use the form to open up SSH on port 22 with allowed IPs 0.0.0.0/0 (i.e. any IP), just as shown. You wouldn’t do this in production, but it’s fine for now. 59
  • 60. Standard Operating System: Ubuntu 12.04.2 LTS on a t1.micro AWS instance From this point forward, for the duration of the class unless otherwise specified, we assume that all commands are executed on your remote AWS cloud instance, specifically on Ubuntu 12.04.2 LTS on a t1.micro AWS instance (Figure 70). The idea here is to even out the dissimilarities between different computer setups and get an even (and reproducible) playing field for all students. Figure 70: Note that AWS smooths out OS and configuration inhomogeneity. All assignments and commands from this point forward will be assumed to be run on a EC2 t1.micro instance running Ubuntu 12.04.2 LTS unless otherwise specified. Going forward, note that conventionally the @ symbol is used to indicate where a command is being executed, to distinguish between remote vs. local machines. If you ever get confused, you can issue the command hostname to learn which machine you’re on, as shown: OK. You know that cloud thing everyone is talking about? You just did it. You rented a computer in the cloud and executed a few commands! 60
  • 61. Figure 71: Red are commands executed locally by your laptop. Blue are commands which are executed remotely by the AWS instance. 61
  • 62. Deploy your code Test out your Heroku account We’re now going to execute a series of commands that will deploy your first node.js app to heroku. • First, you will SSH into your EC2 instance. • Next, you’ll install git and the heroku toolbelt. • Next, login to heroku at the command line and set up SSH keys. • Then, pull down a sample app, configure it as a heroku app, and push it live. • Finally, view the app’s URL in your browser. That was in English. Here are the command lines to accomplish this: 1 # Execute these commands on your EC2 instance. 2 # Note that -qO- is not -q0-. O is the English letter, 0 is the number zero. 3 4 # 1) Install heroku and git 5 $ sudo apt-get install -y git-core 6 $ wget -qO- https://toolbelt.heroku.com/install-ubuntu.sh | sh 7 $ which git 8 $ which heroku 9 # 2) Login and set up your SSH keys 10 $ heroku login 11 $ ssh-keygen -t rsa 12 $ heroku keys:add 13 # 3) Clone a sample repo and push to heroku 14 $ git clone https://github.com/heroku/node-js-sample.git 15 $ cd node-js-sample 16 $ heroku create 17 $ git push heroku master Now let’s go through the screenshots of how it looks when executing those commands. Again, begin by connecting to your EC2 instance. 62
  • 63. Figure 72: SSH into your EC2 instance and install git-core as shown. If you do sudo apt-get install -y git-core you won’t have to type the Y. 63
  • 64. Figure 73: Once the installation of git-core completes, paste in the command from tool- belt.heroku.com/debian to install the heroku command line tools. 64
  • 65. Figure 74: Now confirm that git and heroku are installed and on your path. If they were not, then which would not print anything. If they are both installed, which will print the location of the programs, as shown they are both in /usr/bin. Figure 75: Log in to heroku from the command line, using the same user/pass you set up at heroku.com. Figure 76: Here we are setting up your SSH keys for connecting to Heroku. Just hit enter twice when prompted for the passphrase. 65
  • 66. Figure 77: Now add the SSH keys you just generated to heroku (specifically you are sending the public key to heroku). Figure 78: Type in the commands shown to pull down the sample nodejs codebase and create a corresponding heroku app for that codebase. 66
  • 67. Figure 79: Last step: type in git push heroku master and then confirm that a URL is printed at the end (something like http://guarded-lake-3837.herokuapp.com, but yours will be different.) 67
  • 68. Figure 80: Your first heroku nodejs app is now online! Your URL will be similar to http://guarded- lake-3837.herokuapp.com, but you will have your own custom version. 68
  • 69. Congratulations! You just launched a cloud computer via AWS’ EC2, cloned code from Github, and deployed a very simple website on Heroku. The last thing you want to do is terminate your EC2 instance so that it doesn’t keep running. Figure 81: After you’ve gotten your Heroku app live, go to the Instances Dashboard, right-click your instance, and select Terminate. Note: it is also possible to stop an instance. Stopping is different from terminating; while terminating completely kills and frees up all resources, stopping an EBS-backed instances pauses billing for the computing portion but still charges for the storage. We’ll get into this later, but read here and here for more. Post-mortem Now that you have your site up, take a look again at Figure 82. We did most of the things in there, except we only pulled code from github.com and didn’t push any code. It’s very impor- tant to keep in mind which computer you are currently controlling and executing commands on, whether that be your own laptop, an AWS machine, or a remote machine in the Heroku or Github clouds. Over time this will become second nature, and we’ll show how to configure 69
  • 70. your command line environment to give some hints. Figure 82: Recall this figure again. You were controlling the t1.micro instance as you typed in those commands to pull down code from github and push it to heroku. In the interests of speed, we did a number of things in this interactive start that we would not normally do. For example, we worked with .pem files in the directory where they landed, rather than moving them into ~/.ssh. And in practice you would want to put code through three stages: a dev, staging, and production branch before pushing to the web. You probably also want to read the Heroku documentation on node.js and SSH keys to understand some of the steps at the end. We’ll cover things like this in more detail as the course progresses. 70
  • 71. Terminology Whew! We flew through quite a bit there. Here are a few terms which we introduced that you should become familiar with: • git: A tool for storing and manipulating the history of a program edited by many different users. Also known as a distributed version control system (DVCS). • Github.com: A social network for programmers built around git. There are other sites like this, such as BitBucket.com and Sourceforge.com • AWS: Amazon Web Services, a set of cloud services for programmers. • Heroku: A layer on top of AWS that greatly simplifies the process of developing and deploying a web application. • Gravatar: A simple site which provides a globally recognizable image that you can use in various social contexts. For example, click here and look at the little images to the left of each git commit; those are being pulled from gravatar.com. • EC2: Elastic Compute Cloud, a fleet of virtual machines that you can rent by the hour from Amazon. • Virtual machine: In practice, you are usually not renting a single physical computer, but rather a virtualized piece of a multiprocessor computer. Breakthroughs in operating systems research have allowed us to take a single computer with (say) eight processors and make it seem like eight independent computers, capable of being completely wiped and rebooted without affecting the others. A good analogy for virtualization is sort of like taking a house with eight rooms and converting it into eight independent apartments, each of which has its own key and climate control, and can be restored to default settings without affecting the others. While these “virtual computers” have reasonable performance, they are less than that of the native hardware. In practice, virtualization is not magic; extremely high workloads on one of the other “tenants” in the VM system can affect your room, in the same way that a very loud next door neighbor can overwhelm the soundproofing. Still, most of the time you don’t need an eight room home or an eight processor computer; you need just one room for the night. • AMI : Amazon Machine Image, an operating system + default software package which you can use to initialize any instance. • Availability Zone: the physical location of the instance. • EC2 instance: a particular instance, e.g. i-2938408. • IP address: a dotted address representing a machine on the internet, e.g. 171.65.1.2. • Hostname: The name of a server, e.g. ec2-1234.amazon.com. • DNS: The system which maps a hostname like ec2-1234.amazon.com to an IP address like 171.65.1.2. 71
  • 72. • SSH : Secure Shell, a means of connecting to a remote computer and execute commands. • Public Key: When you hand out your public key, it is like handing out a set of special envelopes. Any who has your public key can put their message in one of these envelopes, seal it, and send it to you. But only you can open that message with your private key. Both of the “keys” in this case can be thought of as long hexadecimal numbers. Github asks for your public key to confirm your identity in future interactions; essentially for all future communications they send you a message that only you can open (with your private key). By decrypting this message and sending it back to them, they know that you must have the private key and so they authorize the operation. • RSA: A kind of encryption algorithm that generates both public and private keys. Al- ways run this locally on your machine; anyone who knows your private key can decrypt messages encrypted with the corresponding public key and thereby pose as you. 72