6 ict tutorial create a family tree chart in power point 2007
•
2 gostaram•2,408 visualizações


Recomendados
Mais conteúdo relacionado
Semelhante a 6 ict tutorial create a family tree chart in power point 2007
Semelhante a 6 ict tutorial create a family tree chart in power point 2007 (20)
Último
Último (20)
6 ict tutorial create a family tree chart in power point 2007
- 1. Create a Family Tree Chart in PowerPoint 2007, TUTORIAL
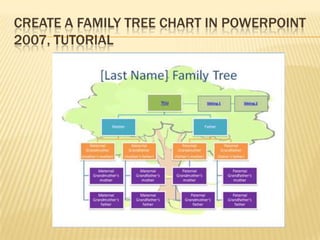
- 2. 1- Choose the Slide Layout for the Family Tree Chart Click the Home tab of the ribbon if it is not already selected. In the Slides section of the ribbon, click the drop down button next to Layout. Select the Title and Content type of slide layout. Click the icon to Insert SmartArt Graphic.
- 3. 2- Choose the Correct Hierarchy SmartArt Graphic In the list of SmartArt graphic objects, click on Hierarchy in the list on the left. This is one of the many organization chart types of SmartArt graphics. Select the first hierarchy option for your family tree chart.
- 4. 3- LocatetheSmartArt Tools If the SmartArt Tools option is not visible (just above the ribbon), click anywhere in your family tree chart and you will see the SmartArt Tools button appear. Click the SmartArt Tools button to see all the options available for the family tree chart.
- 5. 4- Select a Shape Type the information for each member of your family tree into the text boxes formed in the hierarchy chart. You will notice that as you add more text, the font resizes to fit the box. Adding a new member to the family tree chart is simply a matter of adding a new shape and filling in the information. Click on the border of the shape to which you need to make an addition. Click the drop down arrow on the Add Shape button to see the options. Select the correct type of shape from the list. Continue to add new shapes as necessary to complete the family tree. Make sure that the correct "parent" shape, (in relation to the new addition), is selected before you add a new member to the family tree chart. Type the information for this new member(s) of the family tree into the new object shape(s). Delete a Shape in the Family Tree To delete a shape in the family tree chart, simply click on the border of the shape and then press the Delete key on the keyboard.
- 7. 5- Example - New MemberAdded This example shows how a step-child was added as a new member to the family tree chart. The step-child is a child of the spouse, so was added using Add Shape Below when the Spouse text box was selected.
- 8. 6- Branching Out in the Family Tree Chart From the main family tree page, you may wish to branch out to other relatives in your family tree, or take a closer look at your immediate family tree. This can be done by adding new slides with that information.
- 9. Steps to Add New Shapes for Hyperlinking Select the slide where you want to create a hyperlink from. Click on the Insert tab of the ribbon. Click the Shapes icon. Select a shape that closely matches the existing shape on the slide. Draw the shape over top of the existing shape on the slide. Right click on the new shape and choose Format Shape... Edit the color of the shape to match the original shape.
- 10. 7- Draw a Text Box Click on the Insert tab of the ribbon, if it is not already selected. Click the Text Box icon. Draw a text box on top of the new shape you added in the previous step. Type the appropriate text
- 11. 8- Hyperlink to a Different Branch Select the text in the newly added text box. On the Insert tab of the ribbon, click on the Hyperlink button. On the left side of the Edit Hyperlink dialog box, choose Place in This Document and select the appropriate slide to link to. Click OK to complete the hyperlink. Test the hyperlink by pressing the F5 key on the keyboard to start the slide show. Navigate to the slide containing the hyperlink. When you click on the hyperlinked text, the appropriate slide will open.
- 12. 9- Jazz Up Your Family Tree Chart You may consider adding a background picture to your family tree chart. If so, then be sure to fade the background picture significantly so that it does not detract from your family tree chart.