SlideShare uma empresa Scribd logo
1 de 5
Open up a picture
then go to Select ->
colour range. Then
on the drop down
menu select
shadows. Then
press (CTRL+C)
followed by
(CTRL+J) to copy
the shadows and
place them on a
new layer. Then
repeat this step but
instead of clicking on shadows click on midtones.
Then turn off
the background
layer by
clicking the eye
next to the
layer.
On the midtones layer click on edit -> fill and
under contents make sure its set to 50% grey
and check the box that says preserve
transparency. Do the same with the shadows
layer but select black instead of 50% shadows.
Then you merge the shadows layer and the midtones
layer so that they are one, you do this by left clicking
on the top layer and click on merge down.
Next open up a blank workspace on
photoshop and use the text tool to
write some text into it, use black as
the colour and any font that you
want. Your text has to fill up the
whole document.
Then press (CTRL+A) to select the whole document and go to edit -> define
brush preset. A box should pop up click ok.
Go back to the image you were working on, and add two new layers. And on layer
3 get a brush and colour the whole layer white. Then hide it again.
Then go to layer 4 and get your
brush tool again and click on the
brush you have just created,
change the size if need and make
sure the colour is black. Next
paint over the face.
Now go back to layer 2 and click
(CTRL+A) then (CTRL+C) to copy the
whole layer. Then turn off layer number
2. Next on layer 4 open up a layer mask.
When you have click on layer mask a
white square would appear next to layer
4. Press and hold ALT and click on the
white layer.
Now press (CTRL+V) to paste the image, (CTRL+D) to deselect the image and
(CTRL+I) to invert the image. The select the normal layer 4 after turn on layer 3.
Next on the layer with text, right click onto it and right click onto it, then select
blending options and check on gradient. Then click on the bar with colours and
select your colours that you would like to use.
After grab a black brush and colour on layer 4 the details of the models face, such
as eyes, nose and hair; when you do this make sure the opacity of the brush is
around 50% to fade in with the text. If you want to remove the background grab
the rubber tool and rub out the background out.

Mais conteúdo relacionado

Mais de Anne

Perspective PowerPoint-Secondary Education
Perspective PowerPoint-Secondary EducationPerspective PowerPoint-Secondary Education
Perspective PowerPoint-Secondary EducationAnne
 
Perspective Lesson Plan-Secondary Education
Perspective Lesson Plan-Secondary EducationPerspective Lesson Plan-Secondary Education
Perspective Lesson Plan-Secondary EducationAnne
 
Kirsty Mitchell PowerPoint-Secondary Education
Kirsty Mitchell PowerPoint-Secondary EducationKirsty Mitchell PowerPoint-Secondary Education
Kirsty Mitchell PowerPoint-Secondary EducationAnne
 
Kirsty Mitchell Photography Lesson Plan-Secondary Education
Kirsty Mitchell Photography Lesson Plan-Secondary EducationKirsty Mitchell Photography Lesson Plan-Secondary Education
Kirsty Mitchell Photography Lesson Plan-Secondary EducationAnne
 
African Art-Secondary Education
African Art-Secondary EducationAfrican Art-Secondary Education
African Art-Secondary EducationAnne
 
Aboriginal Art PowerPoint-Secondary Education
Aboriginal Art PowerPoint-Secondary EducationAboriginal Art PowerPoint-Secondary Education
Aboriginal Art PowerPoint-Secondary EducationAnne
 
Kirsty Mitchell Photography
Kirsty Mitchell PhotographyKirsty Mitchell Photography
Kirsty Mitchell PhotographyAnne
 
Different Artists Distinct Painting Styles And Techniques
Different Artists Distinct Painting Styles And TechniquesDifferent Artists Distinct Painting Styles And Techniques
Different Artists Distinct Painting Styles And TechniquesAnne
 
Image & Text PowerPoint
Image & Text PowerPointImage & Text PowerPoint
Image & Text PowerPointAnne
 
What Is Performance Scheme Of Work-Year 5/Year 6
What Is Performance Scheme Of Work-Year 5/Year 6What Is Performance Scheme Of Work-Year 5/Year 6
What Is Performance Scheme Of Work-Year 5/Year 6Anne
 
Self Portrait Scheme Of Work-Year 1/Year 2
Self Portrait Scheme Of Work-Year 1/Year 2Self Portrait Scheme Of Work-Year 1/Year 2
Self Portrait Scheme Of Work-Year 1/Year 2Anne
 
Portraying Relationships-Year 3/Year 4
Portraying Relationships-Year 3/Year 4Portraying Relationships-Year 3/Year 4
Portraying Relationships-Year 3/Year 4Anne
 
Picture This Scheme Of Work-Year 1/Year 2
Picture This Scheme Of Work-Year 1/Year 2 Picture This Scheme Of Work-Year 1/Year 2
Picture This Scheme Of Work-Year 1/Year 2 Anne
 
Mother Nature Designer Scheme Of Work-Year 1 And Year 2
Mother Nature Designer Scheme Of Work-Year 1 And Year 2Mother Nature Designer Scheme Of Work-Year 1 And Year 2
Mother Nature Designer Scheme Of Work-Year 1 And Year 2Anne
 
Journey's Scheme Of Work Year 3 And Year 4
Journey's Scheme Of Work Year 3 And Year 4Journey's Scheme Of Work Year 3 And Year 4
Journey's Scheme Of Work Year 3 And Year 4Anne
 
Investigating Pattern Scheme Of Work Year 3 And Year 4
Investigating Pattern Scheme Of Work Year 3 And Year 4Investigating Pattern Scheme Of Work Year 3 And Year 4
Investigating Pattern Scheme Of Work Year 3 And Year 4Anne
 
Indiana Love Worksheet-Secondary Education Resource
Indiana Love Worksheet-Secondary Education ResourceIndiana Love Worksheet-Secondary Education Resource
Indiana Love Worksheet-Secondary Education ResourceAnne
 
Dreams Scheme Of Work Year 3 And Year 4
Dreams Scheme Of Work Year 3 And Year 4Dreams Scheme Of Work Year 3 And Year 4
Dreams Scheme Of Work Year 3 And Year 4Anne
 
Compositional Techniques Keywords-Photography-Secondary Education Resource
Compositional Techniques Keywords-Photography-Secondary Education ResourceCompositional Techniques Keywords-Photography-Secondary Education Resource
Compositional Techniques Keywords-Photography-Secondary Education ResourceAnne
 
Front Cover Concertina Book Design-Children's Illustration-Secondary School R...
Front Cover Concertina Book Design-Children's Illustration-Secondary School R...Front Cover Concertina Book Design-Children's Illustration-Secondary School R...
Front Cover Concertina Book Design-Children's Illustration-Secondary School R...Anne
 

Mais de Anne (20)

Perspective PowerPoint-Secondary Education
Perspective PowerPoint-Secondary EducationPerspective PowerPoint-Secondary Education
Perspective PowerPoint-Secondary Education
 
Perspective Lesson Plan-Secondary Education
Perspective Lesson Plan-Secondary EducationPerspective Lesson Plan-Secondary Education
Perspective Lesson Plan-Secondary Education
 
Kirsty Mitchell PowerPoint-Secondary Education
Kirsty Mitchell PowerPoint-Secondary EducationKirsty Mitchell PowerPoint-Secondary Education
Kirsty Mitchell PowerPoint-Secondary Education
 
Kirsty Mitchell Photography Lesson Plan-Secondary Education
Kirsty Mitchell Photography Lesson Plan-Secondary EducationKirsty Mitchell Photography Lesson Plan-Secondary Education
Kirsty Mitchell Photography Lesson Plan-Secondary Education
 
African Art-Secondary Education
African Art-Secondary EducationAfrican Art-Secondary Education
African Art-Secondary Education
 
Aboriginal Art PowerPoint-Secondary Education
Aboriginal Art PowerPoint-Secondary EducationAboriginal Art PowerPoint-Secondary Education
Aboriginal Art PowerPoint-Secondary Education
 
Kirsty Mitchell Photography
Kirsty Mitchell PhotographyKirsty Mitchell Photography
Kirsty Mitchell Photography
 
Different Artists Distinct Painting Styles And Techniques
Different Artists Distinct Painting Styles And TechniquesDifferent Artists Distinct Painting Styles And Techniques
Different Artists Distinct Painting Styles And Techniques
 
Image & Text PowerPoint
Image & Text PowerPointImage & Text PowerPoint
Image & Text PowerPoint
 
What Is Performance Scheme Of Work-Year 5/Year 6
What Is Performance Scheme Of Work-Year 5/Year 6What Is Performance Scheme Of Work-Year 5/Year 6
What Is Performance Scheme Of Work-Year 5/Year 6
 
Self Portrait Scheme Of Work-Year 1/Year 2
Self Portrait Scheme Of Work-Year 1/Year 2Self Portrait Scheme Of Work-Year 1/Year 2
Self Portrait Scheme Of Work-Year 1/Year 2
 
Portraying Relationships-Year 3/Year 4
Portraying Relationships-Year 3/Year 4Portraying Relationships-Year 3/Year 4
Portraying Relationships-Year 3/Year 4
 
Picture This Scheme Of Work-Year 1/Year 2
Picture This Scheme Of Work-Year 1/Year 2 Picture This Scheme Of Work-Year 1/Year 2
Picture This Scheme Of Work-Year 1/Year 2
 
Mother Nature Designer Scheme Of Work-Year 1 And Year 2
Mother Nature Designer Scheme Of Work-Year 1 And Year 2Mother Nature Designer Scheme Of Work-Year 1 And Year 2
Mother Nature Designer Scheme Of Work-Year 1 And Year 2
 
Journey's Scheme Of Work Year 3 And Year 4
Journey's Scheme Of Work Year 3 And Year 4Journey's Scheme Of Work Year 3 And Year 4
Journey's Scheme Of Work Year 3 And Year 4
 
Investigating Pattern Scheme Of Work Year 3 And Year 4
Investigating Pattern Scheme Of Work Year 3 And Year 4Investigating Pattern Scheme Of Work Year 3 And Year 4
Investigating Pattern Scheme Of Work Year 3 And Year 4
 
Indiana Love Worksheet-Secondary Education Resource
Indiana Love Worksheet-Secondary Education ResourceIndiana Love Worksheet-Secondary Education Resource
Indiana Love Worksheet-Secondary Education Resource
 
Dreams Scheme Of Work Year 3 And Year 4
Dreams Scheme Of Work Year 3 And Year 4Dreams Scheme Of Work Year 3 And Year 4
Dreams Scheme Of Work Year 3 And Year 4
 
Compositional Techniques Keywords-Photography-Secondary Education Resource
Compositional Techniques Keywords-Photography-Secondary Education ResourceCompositional Techniques Keywords-Photography-Secondary Education Resource
Compositional Techniques Keywords-Photography-Secondary Education Resource
 
Front Cover Concertina Book Design-Children's Illustration-Secondary School R...
Front Cover Concertina Book Design-Children's Illustration-Secondary School R...Front Cover Concertina Book Design-Children's Illustration-Secondary School R...
Front Cover Concertina Book Design-Children's Illustration-Secondary School R...
 

Photoshop Process To Add Text To A Portrait-Secondary Education Resource

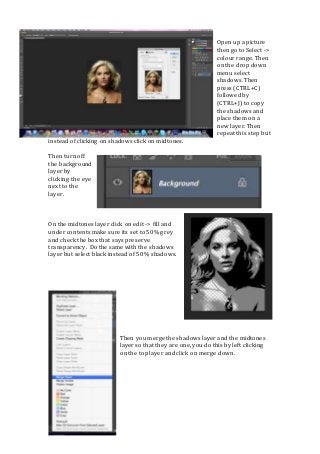
  • 1. Open up a picture then go to Select -> colour range. Then on the drop down menu select shadows. Then press (CTRL+C) followed by (CTRL+J) to copy the shadows and place them on a new layer. Then repeat this step but instead of clicking on shadows click on midtones. Then turn off the background layer by clicking the eye next to the layer. On the midtones layer click on edit -> fill and under contents make sure its set to 50% grey and check the box that says preserve transparency. Do the same with the shadows layer but select black instead of 50% shadows. Then you merge the shadows layer and the midtones layer so that they are one, you do this by left clicking on the top layer and click on merge down.
  • 2. Next open up a blank workspace on photoshop and use the text tool to write some text into it, use black as the colour and any font that you want. Your text has to fill up the whole document. Then press (CTRL+A) to select the whole document and go to edit -> define brush preset. A box should pop up click ok.
  • 3. Go back to the image you were working on, and add two new layers. And on layer 3 get a brush and colour the whole layer white. Then hide it again. Then go to layer 4 and get your brush tool again and click on the brush you have just created, change the size if need and make sure the colour is black. Next paint over the face.
  • 4. Now go back to layer 2 and click (CTRL+A) then (CTRL+C) to copy the whole layer. Then turn off layer number 2. Next on layer 4 open up a layer mask. When you have click on layer mask a white square would appear next to layer 4. Press and hold ALT and click on the white layer. Now press (CTRL+V) to paste the image, (CTRL+D) to deselect the image and (CTRL+I) to invert the image. The select the normal layer 4 after turn on layer 3.
  • 5. Next on the layer with text, right click onto it and right click onto it, then select blending options and check on gradient. Then click on the bar with colours and select your colours that you would like to use. After grab a black brush and colour on layer 4 the details of the models face, such as eyes, nose and hair; when you do this make sure the opacity of the brush is around 50% to fade in with the text. If you want to remove the background grab the rubber tool and rub out the background out.